In for a penny, in for a pound. I’ve decided to enter a second quilt in the Fall 2014 Blogger’s Quilt Festival, hosted by Amy Ellis at Amy’s Creative Side. (You can read about my first entry in yesterday’s post.)
Billed as “the biggest quilt show online,” the festival accepts entries Oct. 24-31 in 11 categories. Viewers can nominate a quilt in any category for the Viewer’s Choice award and, beginning Nov. 1, vote for their favorites in all the other categories. This is my first experience entering the festival, and already I’ve seen dozens of fabulous quilts and discovered some new blogs I absolutely must follow.
I’m entering Square Dance in the Small Quilts category:
Square Dance (2014)
It’s an original design based on the classic Twist block dating back to 1870. Square Dance measures 55½” x 64½” and was quilted by Melissa Hoffman. I wrote about it in this post.
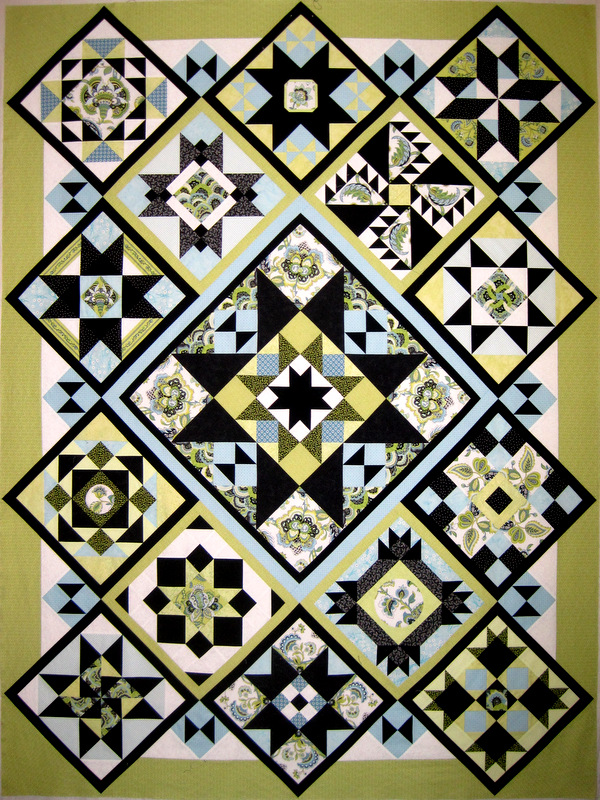
The fall 2014 Blogger’s Quilt Festival is now underway, and I am entering Good Day Sunshine, finished earlier this year, in the Modern category:
Many of you have seen pictures of this quilt already. I hope you don’t mind revisiting it!
Good Day Sunshine was the product of a summertime Sew-Along organized by Thelma of Cupcakes ‘n’ Daisies. The pattern, Dancing Churndash, was designed for Cut Loose Press by sisters Jenny Pedigo and Helen Robinson of Sew Kind of Wonderful. Here’s a look at the entire quilt:
I used quite a few prints from the Gray Matters line by Camelot Cottons and filled in with fabrics from my stash. I’ve loved the combination of gray/yellow/white ever since my mother made me a wool plaid skirt in those colors when I was in high school.
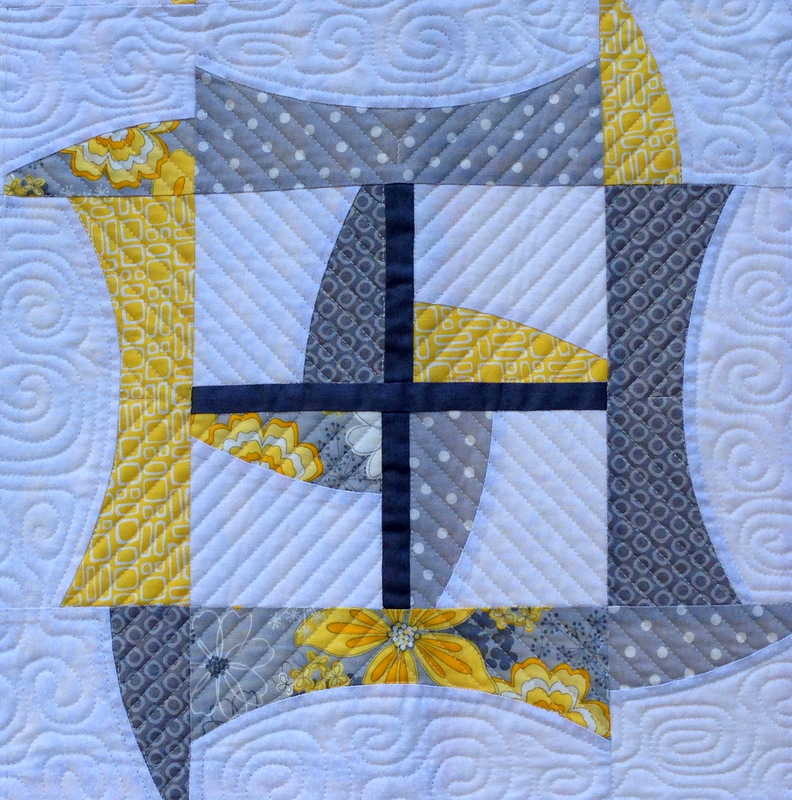
Although there’s a lot of gray in this quilt, it’s offset by the bright and cheerful yellow prints. Each block makes me feel like I’m looking out a window on a sunny day:
That’s what led me to name this quilt Good Day Sunshine, after the Beatles song. It measures 43″ x 57½” and was quilted by Jolene Knight of Good Knight Quilts. A close-up of the quilting:
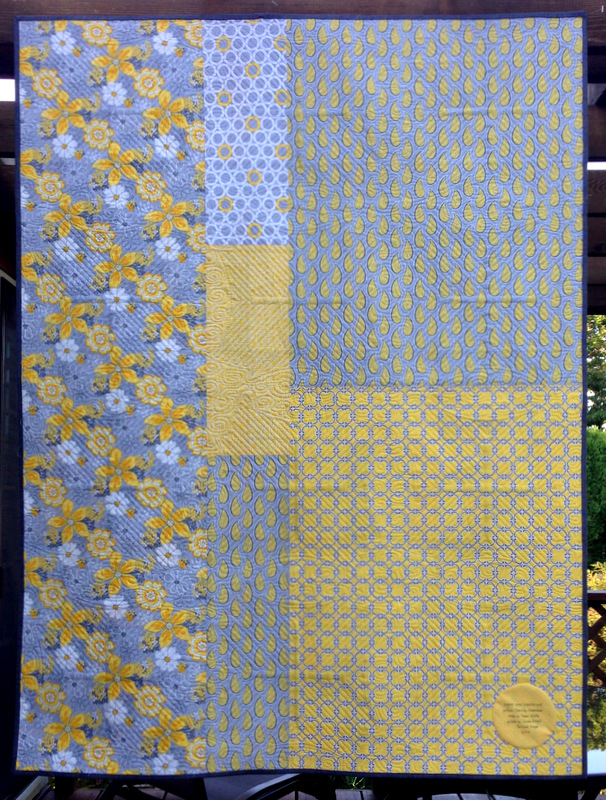
The back was pieced from leftover fabrics used on the front:
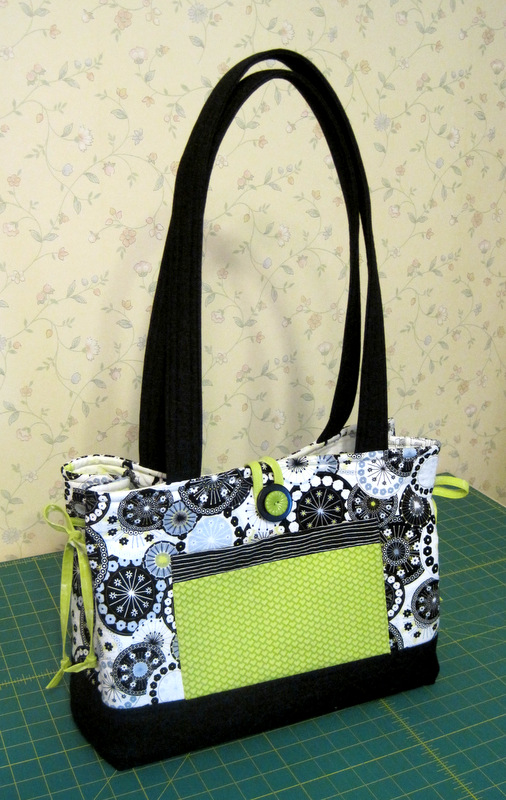
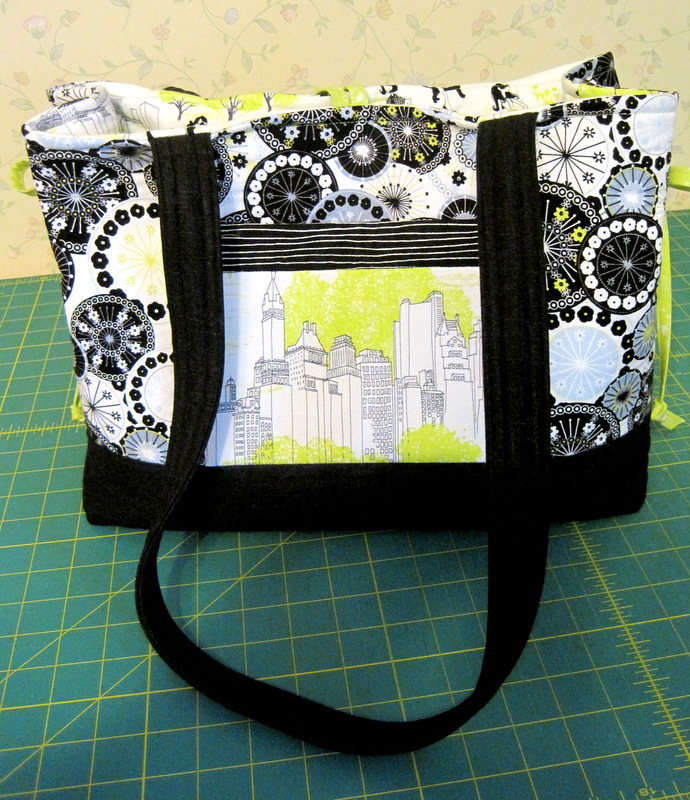
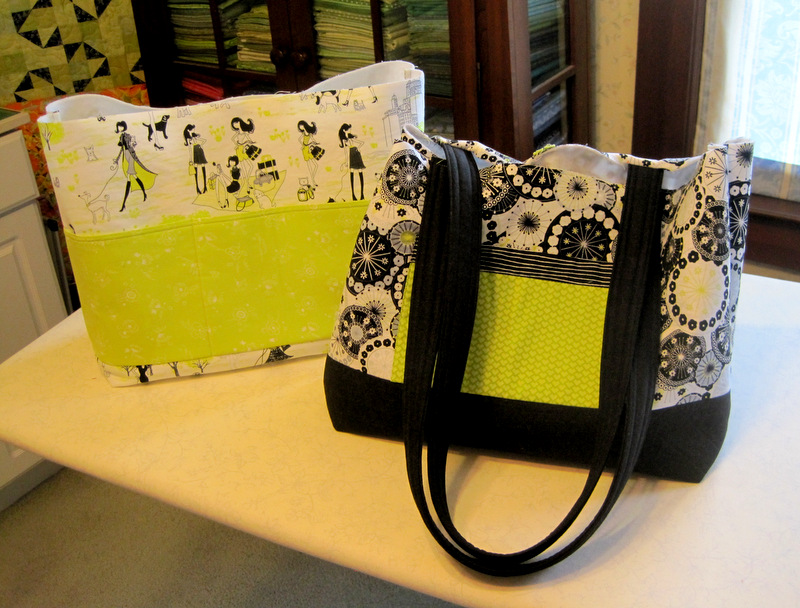
Someone’s got a brand new bag. And it’s not Papa. Take a look:
Dawn’s Central Park Tote
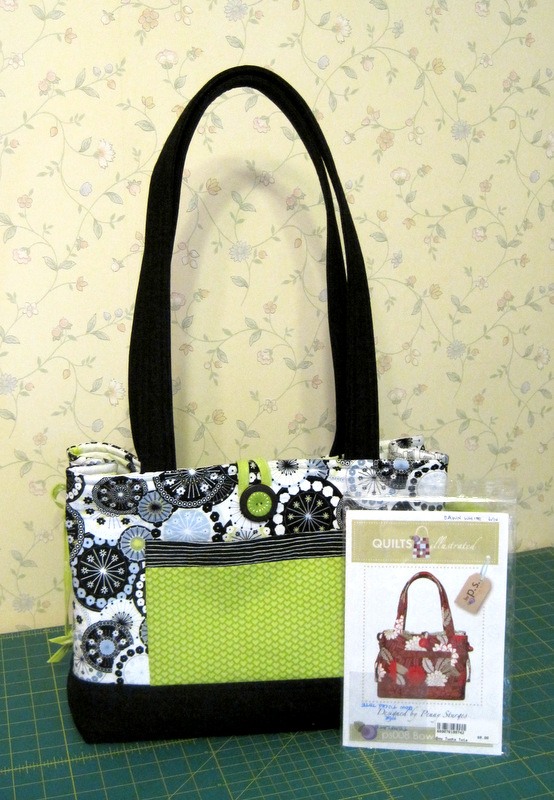
The pattern is Bow Tucks Tote by Penny Sturges of quiltsillustrated.com. It’s 13″ wide, 11″ high, and 5″ deep. As you can see from the picture below, I made the handles on my tote several inches longer:
The Tote and the Pattern
It’s easy to see how the pattern got its name:
Bows and Tucks on the Sides
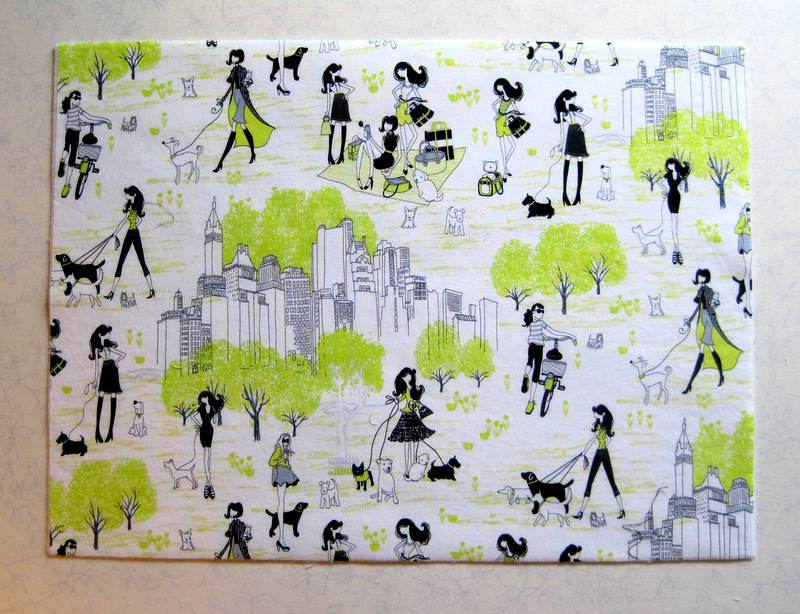
Are you wondering why I am calling it my Central Park tote? It’s all about the fabric! This is what I used for the lining:
City Girls in Central Park
I love New York, and when I saw this print last year from the Central Park line by Timeless Treasures Fabrics, I promptly bought some. It features slightly retro and very chic young women walking their dogs, bicycling, and picnicking in Central Park. When I chose the fabric for the outside of the bag (from the Doodle line by Alice Kennedy, also for Timeless Treasures), it occurred to me that this fabric would go well with it. And it would make me smile every time I looked inside.
Did you notice the New York skyline in the fabric above? I fussy-cut that scene and added a pocket on the back side of the tote:
A Pocket on the Other Side
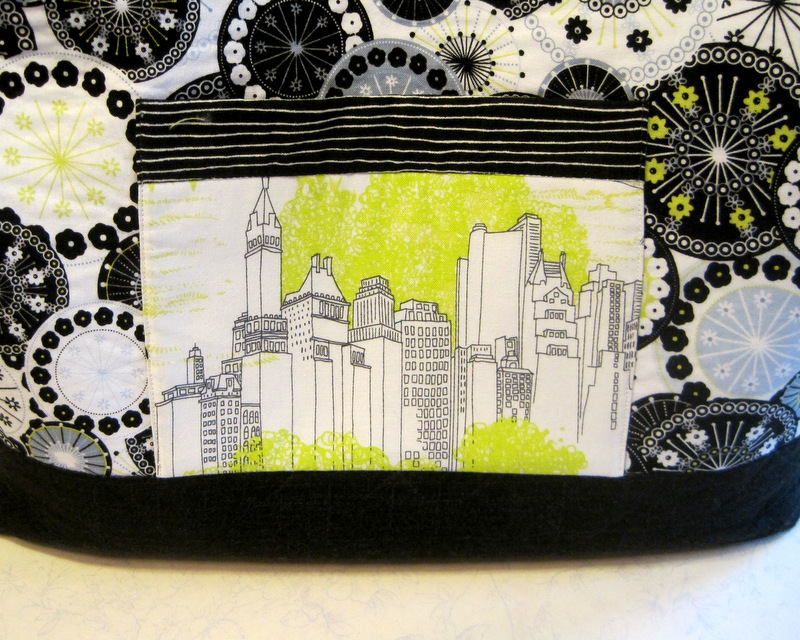
A close-up of said pocket:
The View from Central Park
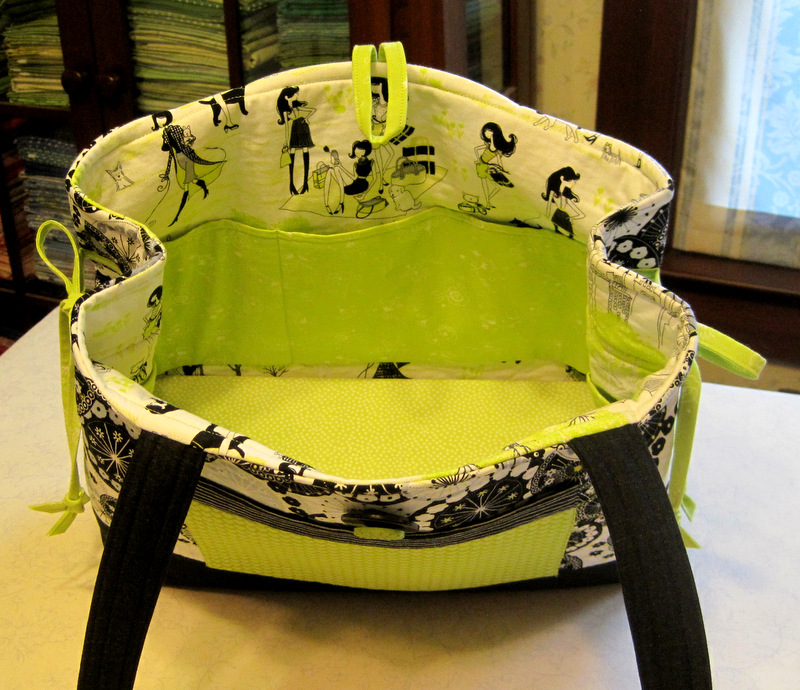
The inside of the bag has divided pockets that go around all four sides:
Pockets All Around
What a great feature! A tote with lots of pockets is a very good thing. On the bottom of the bag is a rectangle of 1/4″-wide foam core covered with a fabric sleeve. The foam core provides stability and helps the boxed corners keep their shape.
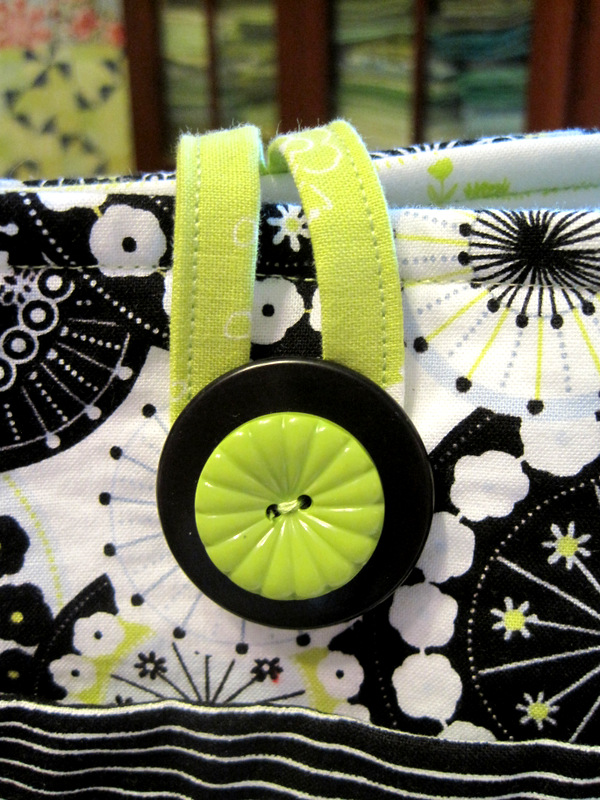
The pattern calls for a button-and-loop closing. I dug around in my vintage button collection and found a button just the right shade of green but too small. I paired it with a larger plain black button, aligned the holes, and sewed both of them onto the bag together:
Vintage Buttons
This is the first tote bag I have ever made for myself. I think I will enjoy using it!
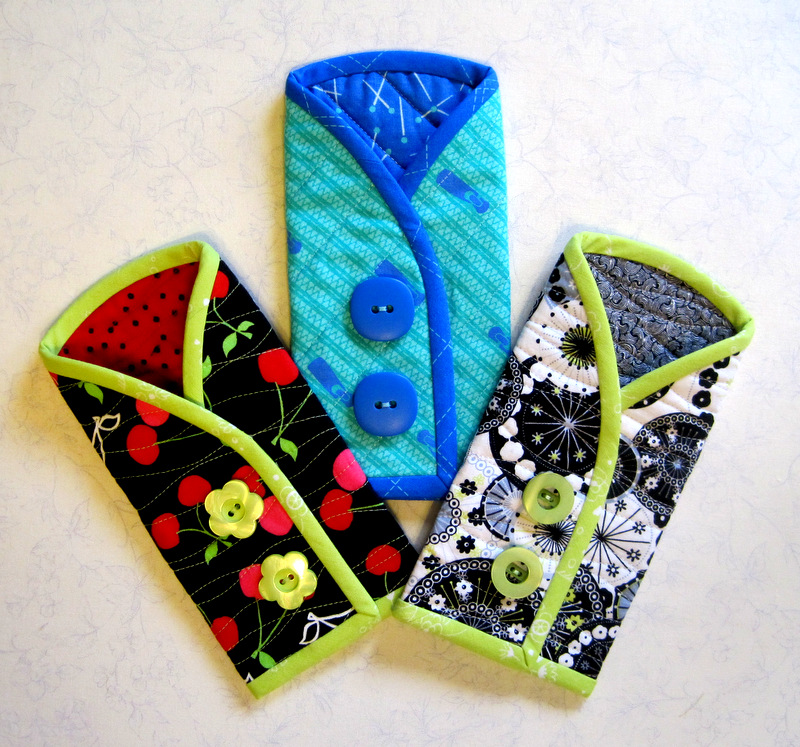
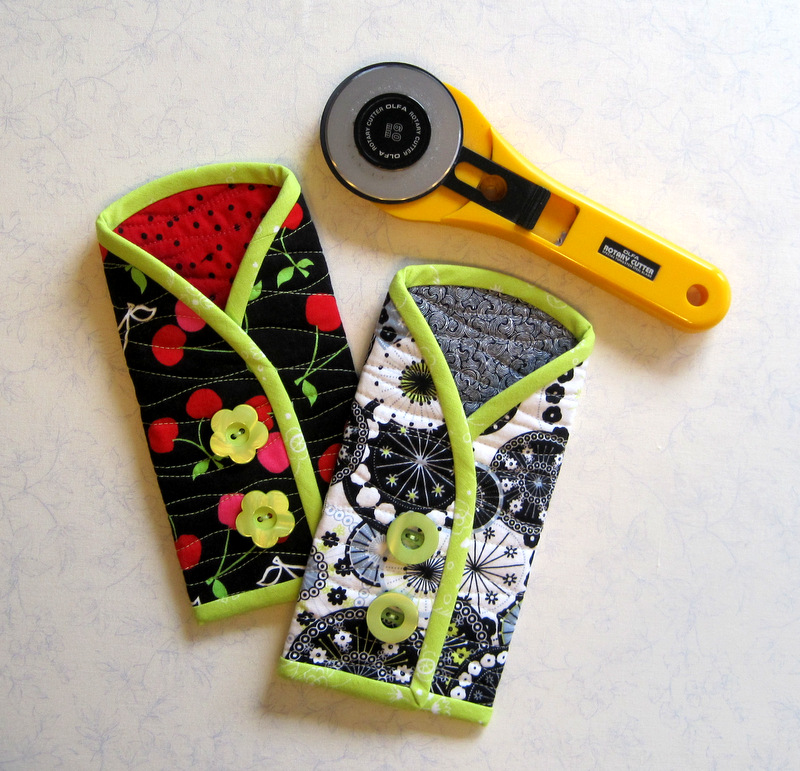
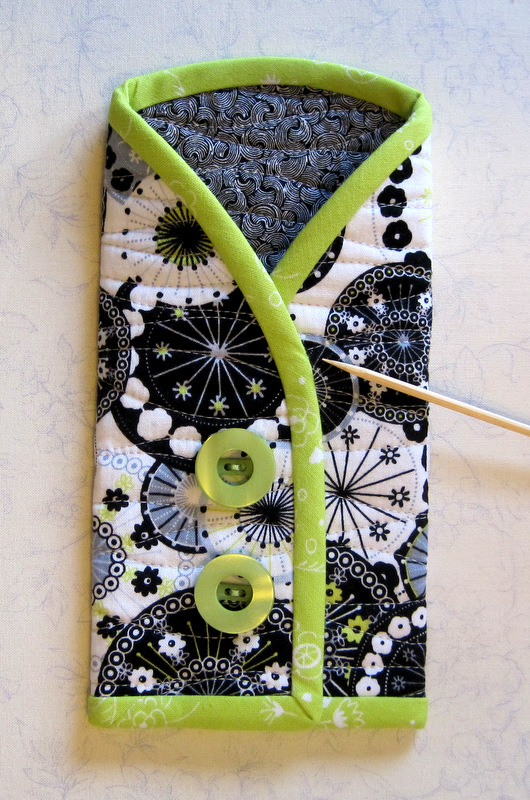
Time to announce the winners of my Rotary Cutter Case giveaway. First, here’s a look at what’s up for grabs:
Rotary Cutter Coats: Free to Good Homes!
I used a Random Number Generator to draw three names. And the winners are:
Bill Volckening
Janet Boundy
Jayne Emsdem
Congratulations, folks!
In their comments, Bill said he liked the rotary cutter coat in the middle best, Janet liked the one on the left, and Jayne said she would be happy with any one of them, so she will get the one on the right. How perfectly providential! Winners, please email me your mailing addresses and I will get them in the mail to you this week.
Didn’t win? Sorry! But you can make a rotary cutter coat for yourself or perhaps one for a friend. Directions are available as a one-page handout or as a full step-by-step tutorial with lots of pictures.
Thanks to everyone who checked out my Giveaway post and to those who left comments. Have a great week!
Would you like to win one of these rotary cutter coats? I’m hosting a Giveaway and will send one of these cases to three lucky winners. To enter all you need to do is add a comment at the bottom of this post answering one of two questions:
1) which case do you like the best and why (fabric? buttons? color combo? something else)?
or
2) how did you find out about my website/blog?
The Giveaway will remain open through this week. I’ll draw three names using a random number generator and announce the winners early next week. I will mail anywhere in the world so international readers are welcome to enter.
A tutorial for making one of these rotary cutter coats can be found here.
Good luck, everyone, and thank you so much for visiting First Light Designs!
Today’s my day to post in the “Around the World Blog Hop.” It’s like a chain letter passed from one blogger to another. What a fun way to meet new quilters and discover new quilting blogs! My assignment is to respond to four questions and then tag another quilter who will post on the same questions a week later.
I was tagged by Debbie Scroggy of All Quilted, LLC. Debbie is a local award-winning professional longarm quilter whose clients keep coming back because she does beautiful work. She takes care to bring out the best in every quilter’s project. I know this because she has quilted two quilts for me — and they will certainly not be the last. I’ve seen examples of quilting Debbie has done for other people as well as quilts she has made herself. You’ll see for yourself when you click on the link above. And when you do, you’ll find a link to the blogger who tagged her. This blog hop takes you backward as well as forward.
Moving forward, you will hop from Oregon halfway across the North American continent to visit Jennifer Gwyn of Seams Crazy. Jennifer lives in Houston, Texas with her husband and two young children. Despite the demands of working and raising a family, she still manages to get a lot of quilting done. Jennifer’s fabric choices are always pleasing to the eye. I especially admire her ability to go scrappy when the quilt calls for it. I have Jennifer to thank for the project you see below. She wrote about it on her blog late last year and got me hooked.
On to the assignment at hand.
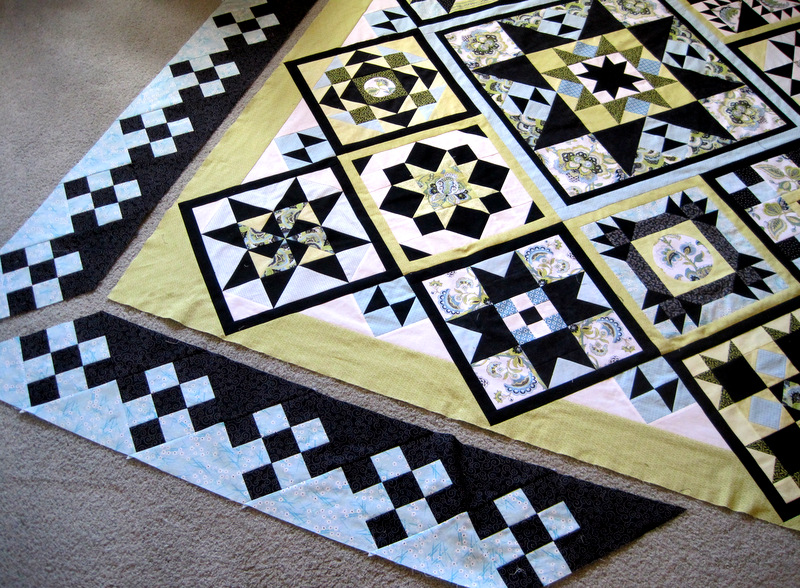
1. What am I working on? Ah, the easy question first. I always have several projects underway. One is my series sampler quilt, Reach for the Stars:
Reach for the Stars Border Puzzle
I’ve been working on this quilt since the beginning of the year, and the end is tantalizingly in sight. At the moment I’m trying to solve the puzzle of how to make the borders match in all four corners, something the original design does not do. The math doesn’t work out, and I’m trying to figure out a creative way to make it work.
Another work-in-progress is this Bow Tucks Tote, designed by Penny Sturges of quiltsillustrated.com:
Tote Bag in Progress
I’m currently teaching a class on this bag at the Pine Needle and need to make a tote along with my students to demonstrate the steps. In the photo above, that’s the lining you see on the left. The green strip turns into pockets that go around the entire inside of the bag. Clever!
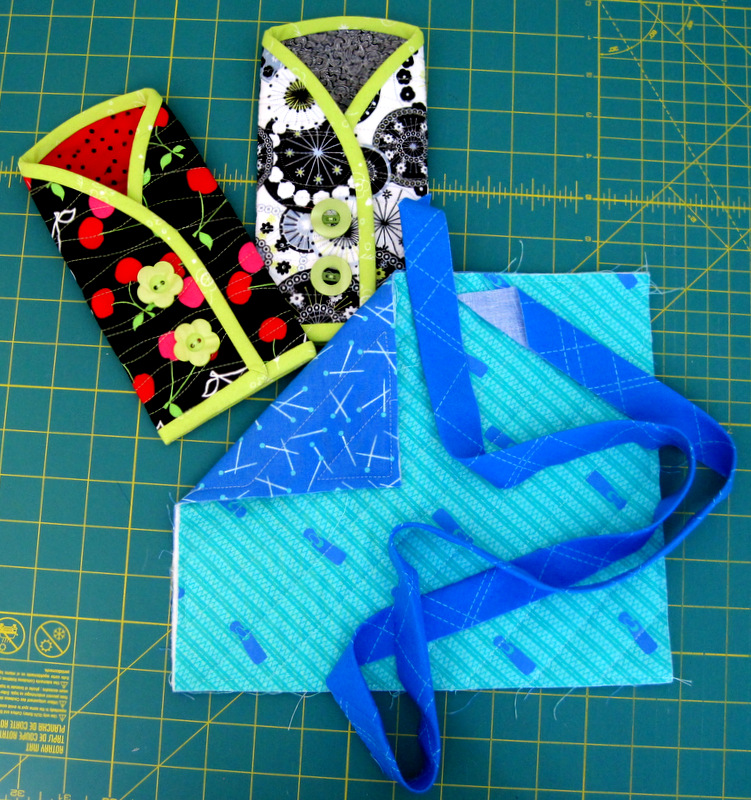
Yet another project is this Rotary Cutter Coat, one of my own designs:
Rotary Cutter Coat in the Works
Look closely at the fabrics in the unfinished project above: those are zipper pulls and zipper teeth on the front and straight pins on the back. So cute! (I posted a tutorial a few days ago that includes a link to the free pattern; perhaps you’d like to make a rotary cutter coat yourself.) As soon as the zipper pull coat above is finished, I’m going to give all three away. I hope you’ll come back later this week for my Giveaway.
2. How does my work differ from others of its genre? I would be hard pressed even to identify what genre my work fits in. I’m all over the map in terms of the kinds of quilts I like — and the kinds of quilts I like to make. Am I a traditional quilter? Absolutely. Non-traditional quilter? Yes. Modern quilter? Yes. Art quilter? That too. I tend to make what pleases me, and most of the time my work pleases others. That’s satisfying on both fronts.
3. Why do I create what I do? It’s all about the fabric. I love fabric! I love to make things with it. My mother taught me to sew when I was 12 years old, and I honestly can’t remember a time I didn’t have some kind of sewing project underway. I made all of my own clothes well into the 1980s (past the time when it was cheaper to make clothing than to buy it), along with pillows and curtains and other “soft furnishings.” By then I had also discovered quilting, which became a creative outlet and antidote to an intense work schedule. When I retired six years ago, quilting — and then teaching quilting — took over my life. Oh, and sewing for my sisters, who think I’m the Home Dec Queen.
4. How does my creative process work? Often an element in a quilt — a block, perhaps, or a border — will catch my eye, and I will think about how I might incorporate it into a quilt of my own. Or I will look at a traditional block and ponder how it might be jazzed up a bit. I will look at a design element and think, “What if I did this or that to it?” Some of my best ideas have come from asking myself, “What if . . .?”
Some of my work is frankly derivative. Case in point: the rotary cutter coats pictured above. A couple of years ago I saw a pattern in a magazine for a quilted eyeglasses case. I was instantly transported back to the age of four, when I got my first pair of glasses. I came home from the optician with glasses on my nose and a faux-leather case to store them in when I wasn’t wearing them. The case was cut along the same lines as the one in the magazine. I examined the eyeglasses case in the photo and said to myself, “What if . . .?” The result was a case (or coat, as I like to call it) designed specifically for a rotary cutter, though it could certainly double as a case for a pair of large eyeglasses.
I find inspiration everywhere: not just in books and magazines but also in nature, the work of other quilters and crafters, designs in fabric, a sidewalk, a coffee cup. I study quilts I like — and quilts I don’t much care for — to understand what appeals to me and why. Straying from the familiar path and trying something new are parts of the creative process, so I take classes whenever I can.
***
Jennifer’s “Blog Hop Around the World” post is due Oct. 20, one week from today. But you don’t have to wait till then to visit her blog. Go there now and see what she’s working on. Not only will you get a glimpse of her Reach for the Stars fabrics, you’ll be able to check out the size of her stash. Oh my!
What quilter wouldn’t love one of these quilted cases to hold her rotary cutter? The buttons and contrast trim make the cases look like little coats — so that is what I am calling them. A finished coat measures about 3¾” x 8″.
This tutorial guides you step by step. You can also download a one-page handout.
Fabric and notions One piece of fabric 9″ x 10½” for outside of coat
One piece of fabric 9″ x 10½” for inside (lining)
One piece of fabric 18″ square for bias binding
One piece of lightweight batting trimmed to 9″ x 10½”
One piece of freezer paper about 10″ x 11″
¼”-wide Steam-a-Seam 2 (double stick fusible web)
Two buttons 7/8″ – 1¼” in diameter
1. Download and print the pattern. The bottom edge of the pattern should measure 9½”. If the measurement is less than that, enlarge the pattern slightly. (If the bottom edge measures 9¼”, the pattern will still work just fine. All you need to do is alter the flap measurement in Step 10 to 2-5/8″.)
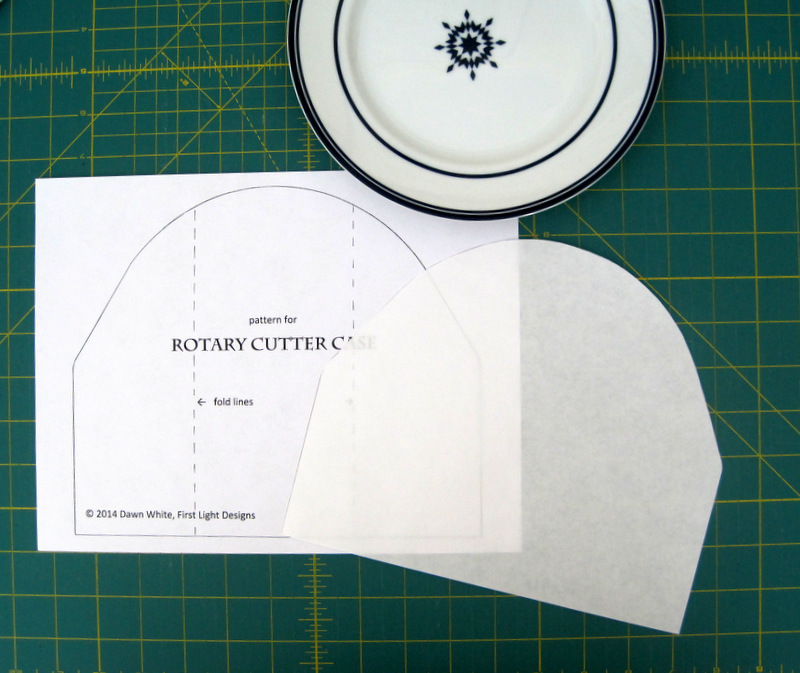
2. Trace the pattern onto the flat (not shiny) side of the freezer paper. Cut around the outside edges of the pattern. Set pattern aside.
Paper Pattern at Left, Freezer Paper Pattern at Right
Are you wondering what that blue and white plate is doing in the picture above? I thought it would amuse you to know that’s what gave me the shape for the rounded part of the pattern.
3. Lay the lining fabric wrong side up on a flat surface. Lay the batting fabric on top. Lay the outside fabric right side up on top of the batting. You now have a quilt sandwich. Baste and quilt as desired.
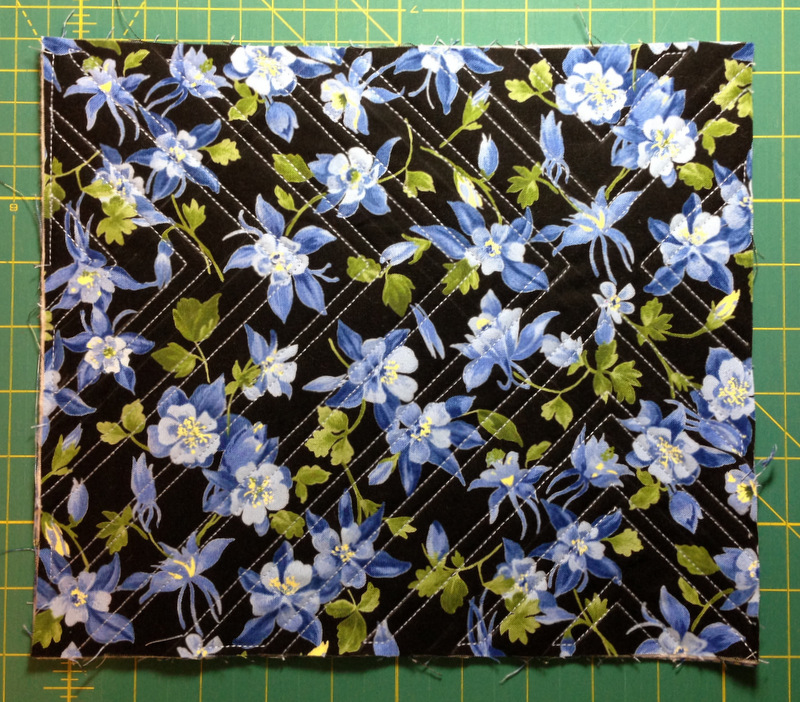
You can quilt any motif you desire. Free-motion quilting is an option but I usually take the easy route and quilt straight lines or random curved lines using my walking foot. With straight lines I often stitch on the diagonal about 1″ apart. In the example below I used straight lines at right angles to form a chevron design:
Straight Line Quilting (on the Diagonal)
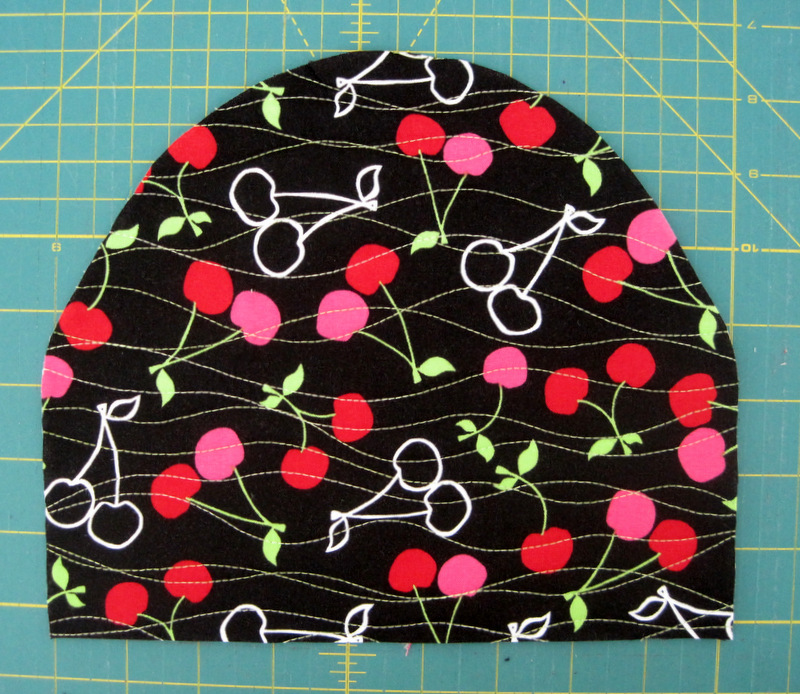
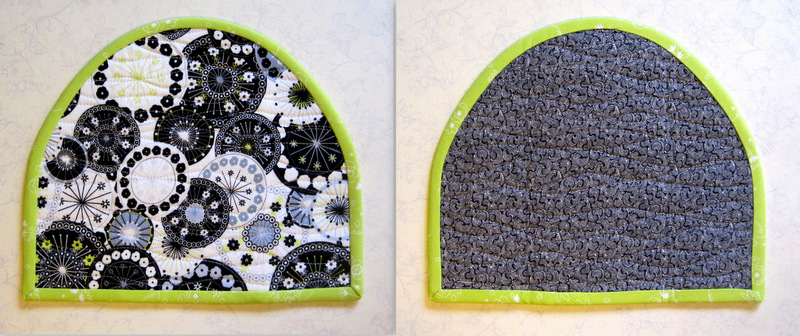
In the two rotary cutter coats pictured at the top of my post, I quilted random wavy lines horizontally in both, although vertical lines would look good too. In the one with the black background I used a 40-wt thread in a contrasting color. Here’s a close-up of that one (after I had cut the pattern out):
Random Wavy Quilted Lines
In the other one (pictured in the rest of this post), I wanted the thread to blend so I used a 50-wt thread in pale grey.
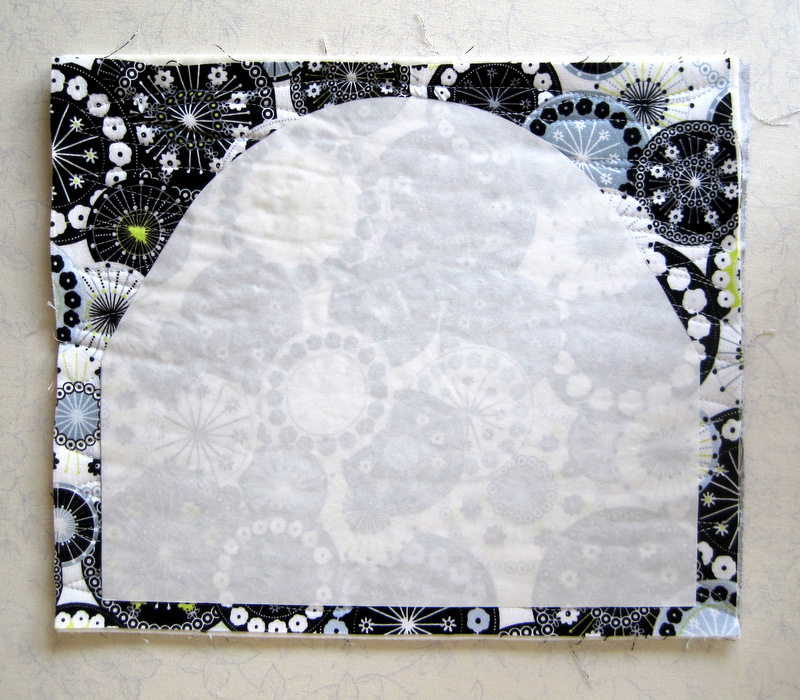
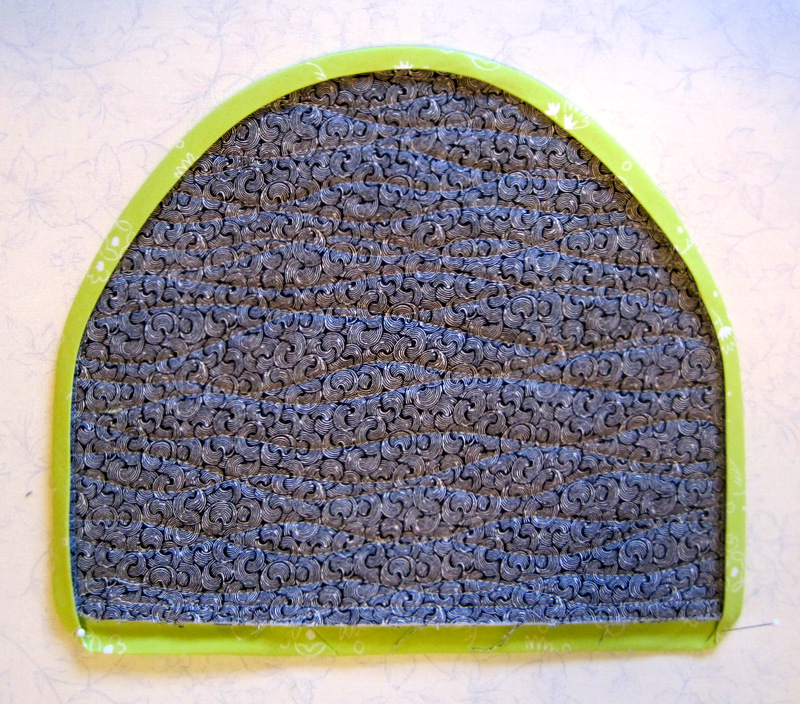
4. Center the freezer paper pattern (shiny side down) on the right side of the quilt sandwich and press with a dry iron:
Pattern Ironed to Quilt Sandwich
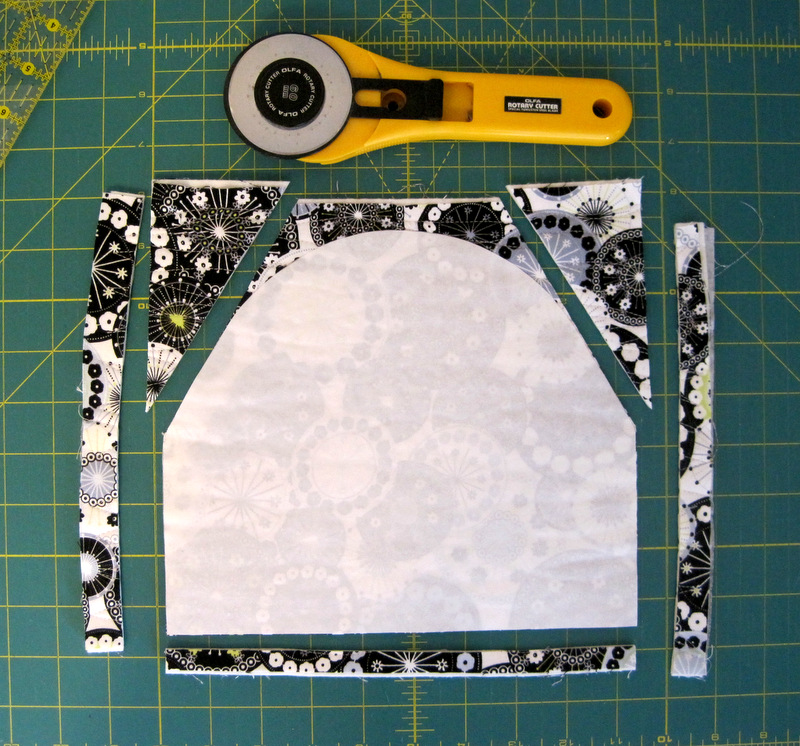
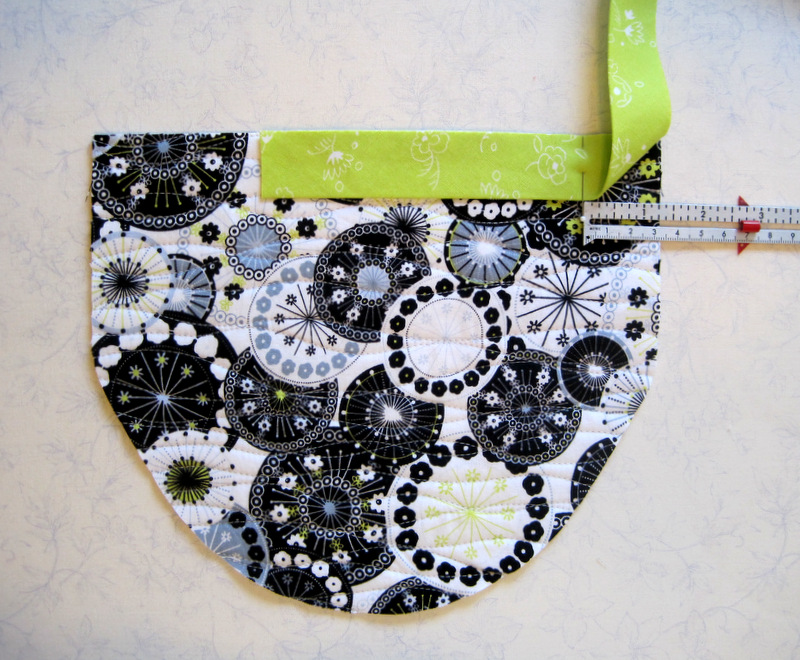
5. You could cut the pattern out with scissors but using your rotary cutter is faster and more accurate. Align the rotary cutter and ruler along the bottom and sides of the pattern and cut. Use the rotary cutter and ruler to cut the beginning of the curves as shown below:
Five Straight Cuts with the Rotary Cutter
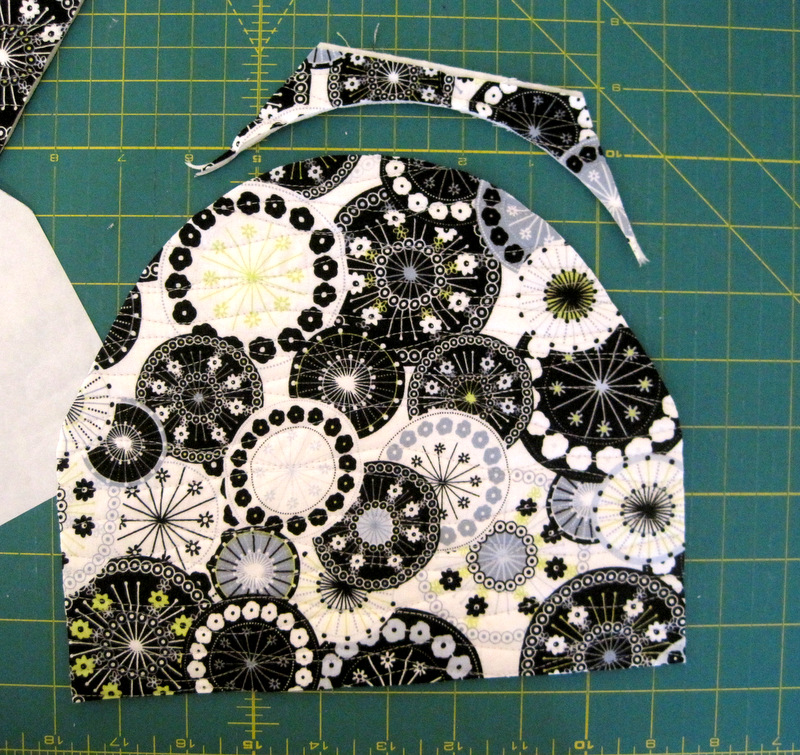
Use scissors to cut the rest of the curve:
Remainder of Curve Cut and Sides Rounded Off with Scissors
Peel off freezer paper pattern for repeated use. Use scissors to round off the side edges on the quilt sandwich.
6. Cut 18″ square of binding fabric corner to corner on the diagonal. From each piece cut a strip 2-1/8″ wide along the bias edge. Sew strips together using an angled seam. You need a length about 34″ long. Fold strip in half lengthwise and press.
7. With the walking foot still on your machine, attach binding to the right side of the case as you would for a quilt, starting and ending along the bottom edge. Leave a tail 5-6″ long and begin stitching 1-1/4″ away from the first corner:
Binding Has Begun!
Gently guide the bias binding around the curve of the quilt sandwich, stitching a scant 1/4″ seam. When you get to the other side of the bottom, end your stitching 1″ in from the edge.
8. Use your favorite method of joining the ends of the binding. This is the method I use:
Joining the Ends of the Binding Strip
See the red vertical line marked on the binding strip? When I trim the strip there, the two edges of the binding will overlap 2-1/8″, the exact measurement of the binding strip width. (That’s a scrap of the binding fabric at the bottom of the photo, placed there to show you that it’s the same width as the overlap of the two strips.)
Open up the binding strips and join them right sides together at a 90 ° angle, being careful not to twist the strips. See the red line? That’s my stitching line. I’ve got the ends pinned to the ironing board to give you a good look:
Joining the Binding Strips
Stitch the binding seam, trim to 1/4″, press open, and finish stitching the seam along the bottom edge, beginning and ending a few stitches beyond the original stitching lines:
Binding is Stitched in Place
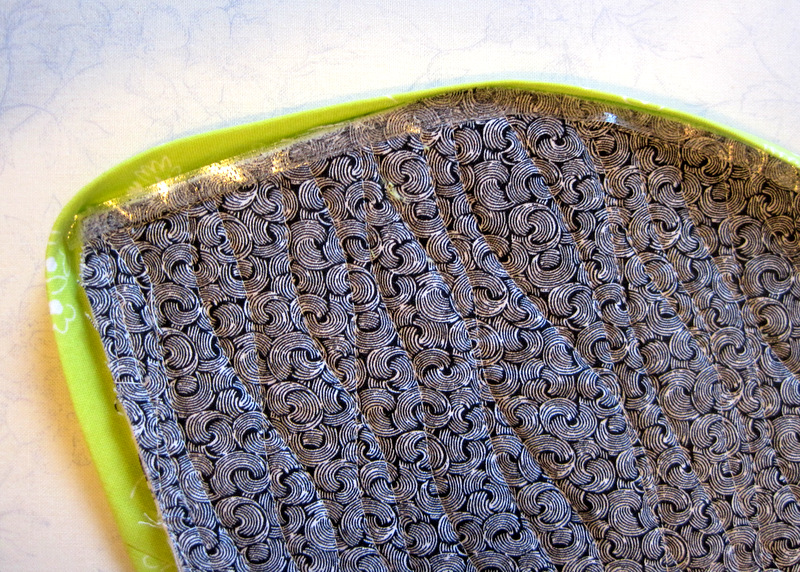
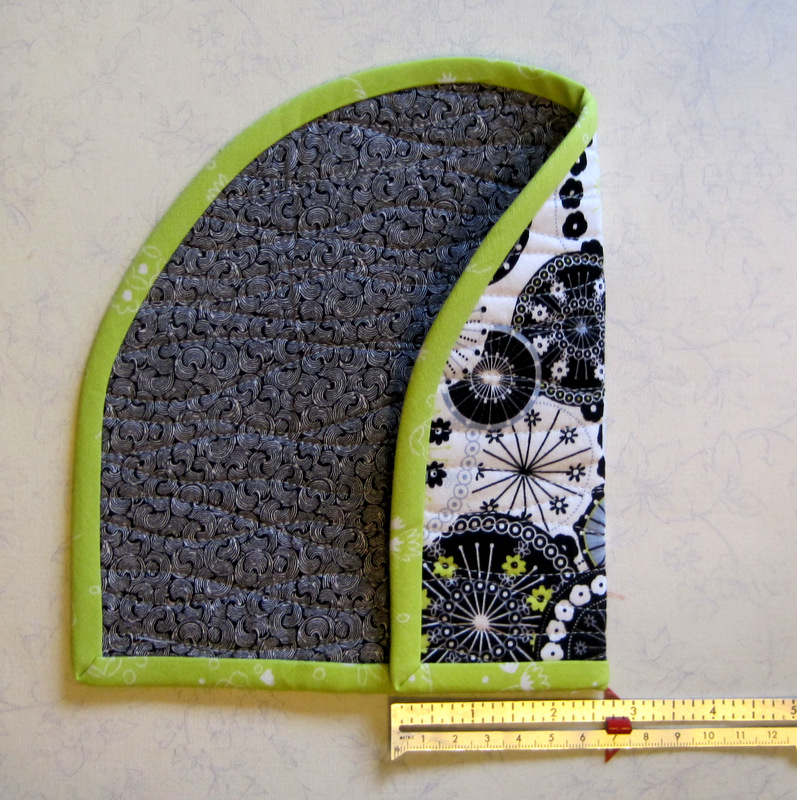
9. Turn the binding toward the inside (lining) of the case — it will cup nicely around the curve — and press in place. If the folded edge of the binding doesn’t completely cover the stitching line, trim the seam a bit. I find I usually have to do this around the curved edge.
The Bottom Edge Awaits Pressing
At this point you could stitch the binding down by hand — but if you can find Steam-a-Seam 2, why not give it a try? It’s a double-stick fusible webbing product made by the Warm Company that makes fast work of finishing a binding. It’s sold by the yard but also comes in rolls ¼” and ½” wide. If you can’t find it on a roll, buy about a half yard and simply cut off ¼” strips as needed.
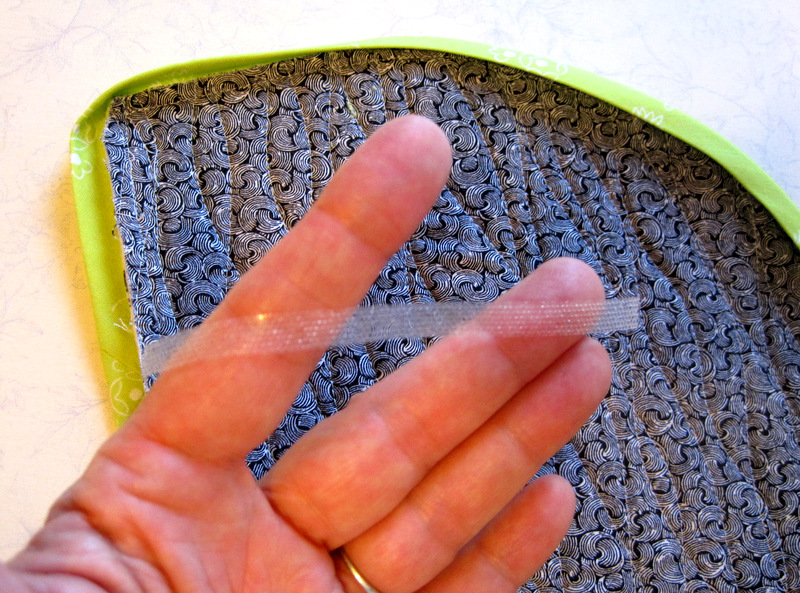
Using the ¼” wide roll, cut off a strip about 4″ long and peel off the release paper:
Steam-a-Seam 2, Up Close and Personal
The Steam-a-Seam 2 is sticky on both sides but not so sticky that you can’t manipulate it. It goes around curved seams beautifully. Lay the strip of Steam-a-Seam 2 along the seam line, with the edge right next to the stitching:
Putting the Fusible Webbing in Place
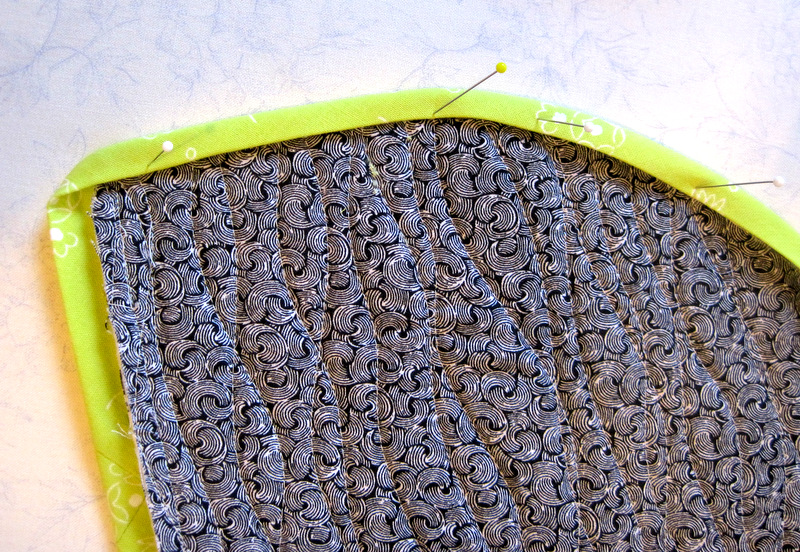
Draw the binding over the seam allowance so that the folded edge just covers the webbing. Hold in place on the ironing board with pins:
Pinning Webbing in Place Before Steam Basting
After you have two or three lengths of webbing in place, press the binding briefly to baste the webbing to the fabrics. Leave about an inch of webbing unpressed so that you can lift up the binding and see where the next strip needs to go. When you have worked all the way around, sandwich the rotary cutter coat between a press cloth and steam fully, following the directions on the package of Steam-a-Seam 2. In a very few minutes, your rotary cutter coat will look like this from the front and back:
Front and Back, Binding Done
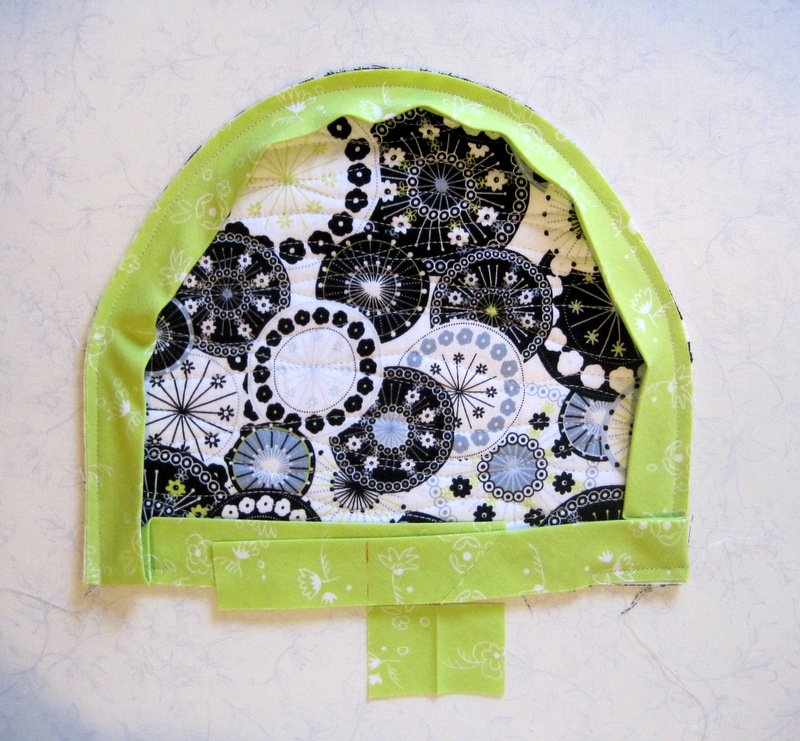
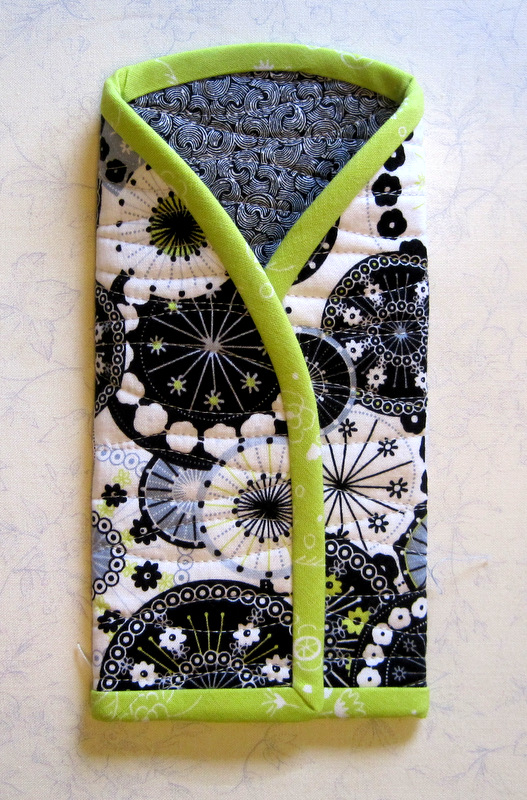
10. Fold case along fold lines, lapping one side over the other in front. (It doesn’t matter which side you lap first.) Both flaps should measure 2¾” from fold to outside edges of binding. Adjust this measurement slightly if necessary so that the finished case measures 3¾” wide. Cut a strip of Steam-a-Seam 2 the same measurement and insert it along the inside bottom edge. Fuse flap in place.
First Flap, Ready to Fuse
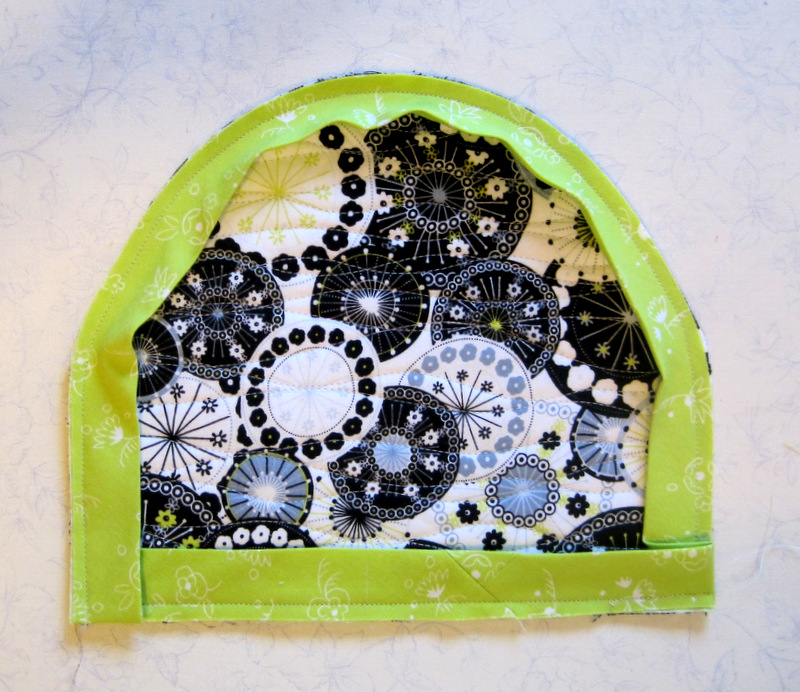
Fold second flap in place, making sure it also measures 2¾” from the fold to the outside edge:
Second Flap, Ready to Fuse
Use another strip of Steam-a-Seam 2 to fuse the bottom of the case completely closed (or whipstitch securely by hand).
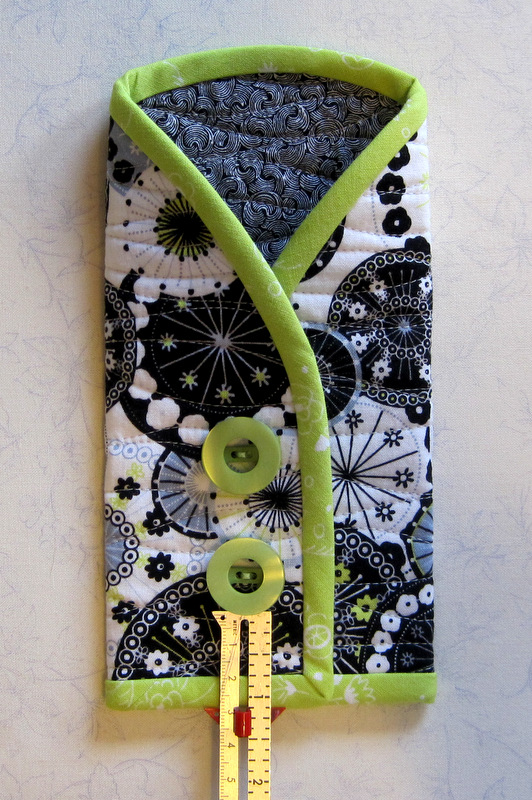
11. Now it’s time to sew on the buttons, which serve no function other than to look beautiful. And they are what makes this little rotary case a coat, so do add them. Sew them in place on the outer flap; no need to sew through both layers.
The bottom of the lower button should be 1-1/8″ or so from the bottom of the case:
Buttoning Up Your Overcoat
Let your eye and the size of the buttons guide you.
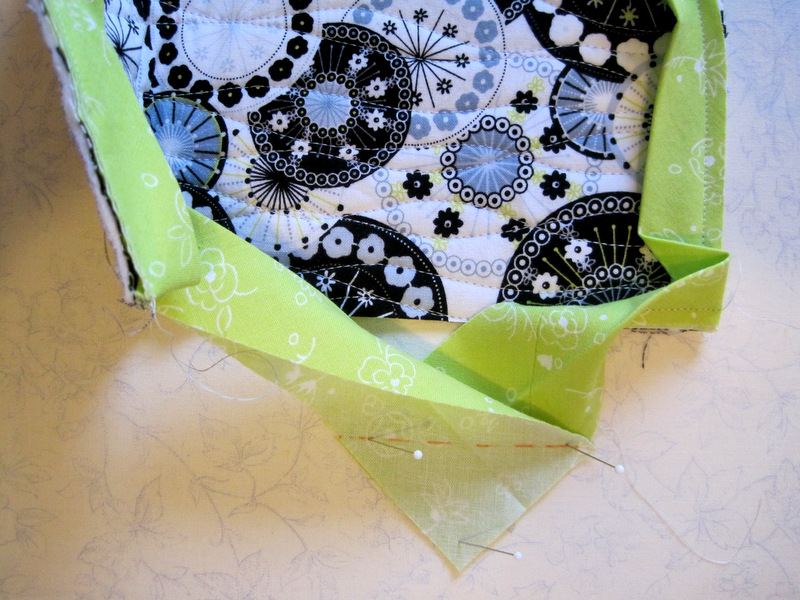
The last step: tacking the binding in place about 1″ down from the point where the bound edges meet:
Tacking Binding in Place Near the Top
Now tuck your rotary cutter into its elegant new coat:
What the Well Dressed Rotary Cutter Wears
Have fun with this tutorial! If you have any questions or run into a problem, let me know, and I’ll do my best to help you out.
The setting triangles and corners have been added to my Reach for the Stars series sampler quilt. Do take a look:
Reach for the Stars — Borders to Come
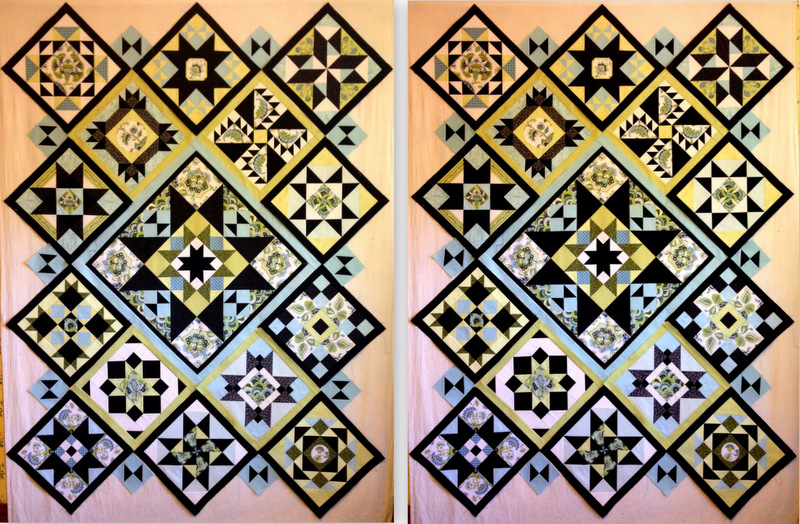
In my last post about Reach for the Stars, I was debating whether to set the hourglass blocks in the setting triangles vertically or horizontally along the long sides of the quilt. To refresh your memory, here’s another look at my two choices:
Vertical (Left) or Horizontal (Right)?
I was leaning strongly toward the horizontal placement and asked for feedback. Thanks to all of you who responded! The vast majority liked the hourglass blocks set horizontally. If you scroll up and look at the first photo again, you’ll see that I wound up setting them vertically along the sides.
Oddly enough, it was a nonquilter who helped me make up my mind. My nephew Gary suggested I rotate the photo 90 degrees and view the quilt along the long sides. When I did that, I realized I wanted the hourglass blocks to be horizontal when viewed that way — exactly the way they would look if the quilt were on a queen-size bed.
If I knew for sure I would be displaying the quilt on a wall, I would probably have left them all horizontal. Alas, I have no wall in my 1913 Craftsman house large enough for a quilt that will measure about 86″ x 106″ when finished. I do, however, have a queen-size bed.
Right now my version of Reach for the Stars measures about 60″ x 80″. How exciting to be at this point! I started this quilt at the beginning of the year after seeing Terri Krysan’s original design on the cover of the Oct./Nov. 2013 issue of Quilter’s Newsletter magazine. Directions for the quilt began with that issue and continued for the next six issues. Starting with the center medallion and then making 14 blocks over the better part of a year allowed for a somewhat relaxed sewing schedule — a boon for someone like me who likes to work on multiple projects at the same time.
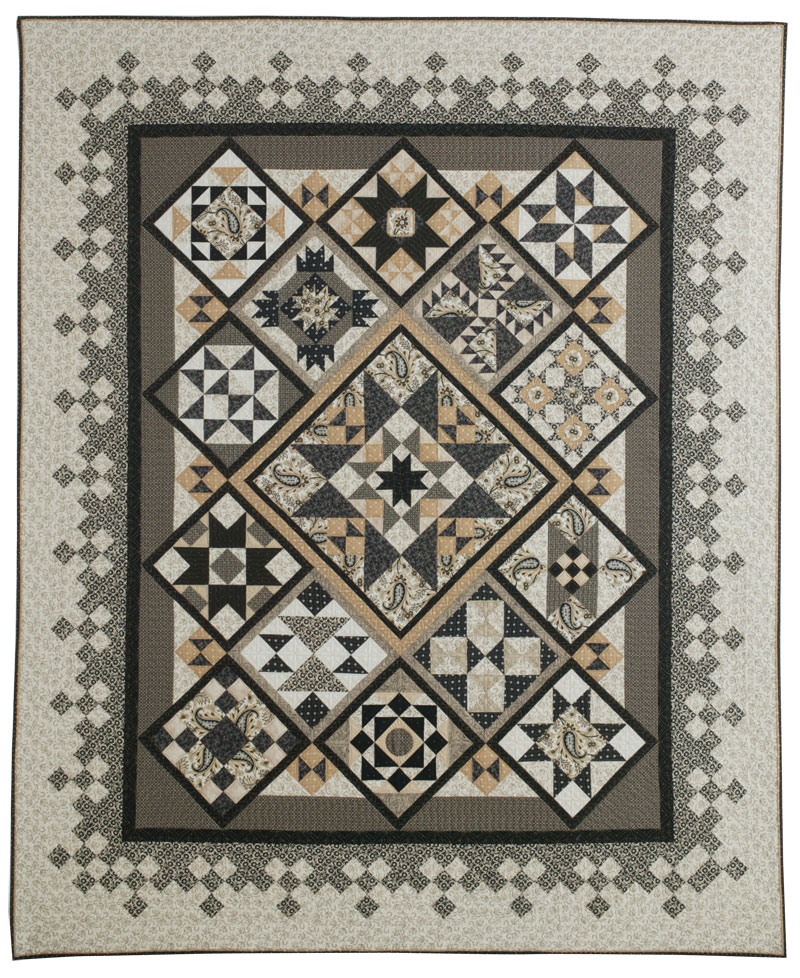
Now all that’s left are the borders. I say “all that’s left” but in fact there’s much more to the border than four strips of fabric. You’ll see what I mean when you look at Terri’s beautiful quilt:
Terri Krysan’s Quilt, 2012
(Copyright Quilter’s Newsletter. Used with permission. Photo by Melissa Karlin Mahoney.)
Viewed from afar, the border design looks almost like lace, doesn’t it? That effect is cleverly achieved by setting nine-patch units on point. For some reason, though, the lacy design is not the same in all four corners. The upper right and lower left corners are the same, and the upper left and lower right corners are the same. To me this quilt is all about symmetry. That means I have to figure out a way to make all four corners on my border the same while maintaining the lacelike effect. Just the kind of challenge I relish!

 In for a penny, in for a pound. I’ve decided to enter a second quilt in the Fall 2014 Blogger’s Quilt Festival, hosted by Amy Ellis at Amy’s Creative Side. (You can read about my first entry in yesterday’s post.)
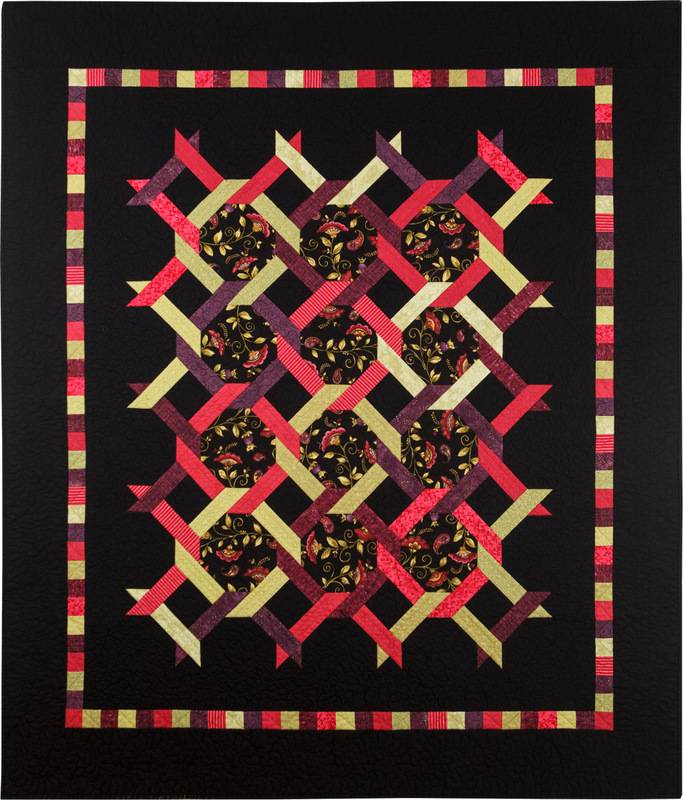
![churn-dash-2[1] (2)](https://firstlightdesigns.com/wp-content/uploads/2012/04/churn-dash-21-2.jpg)