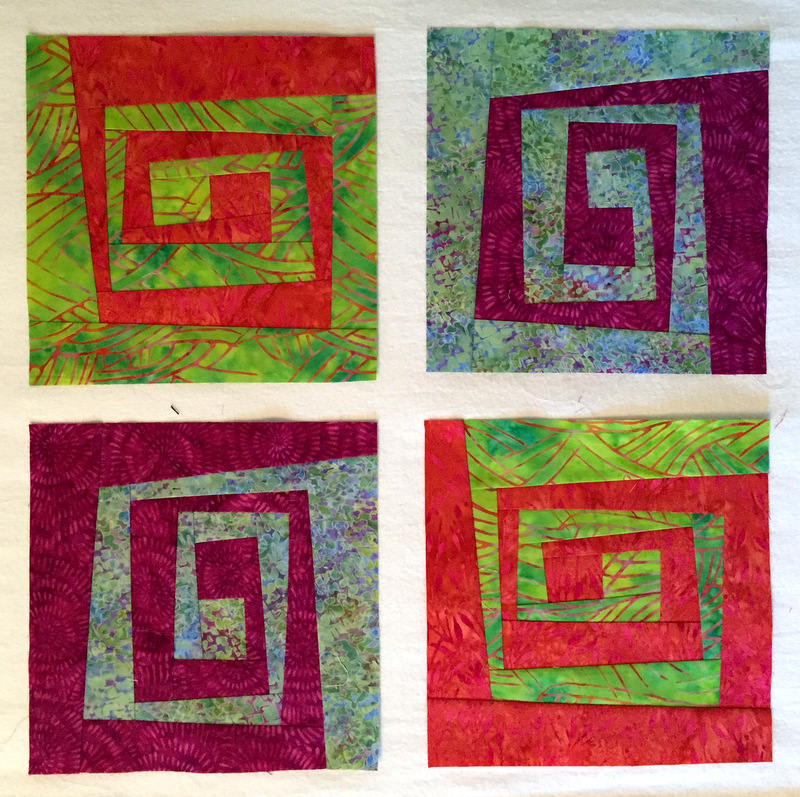
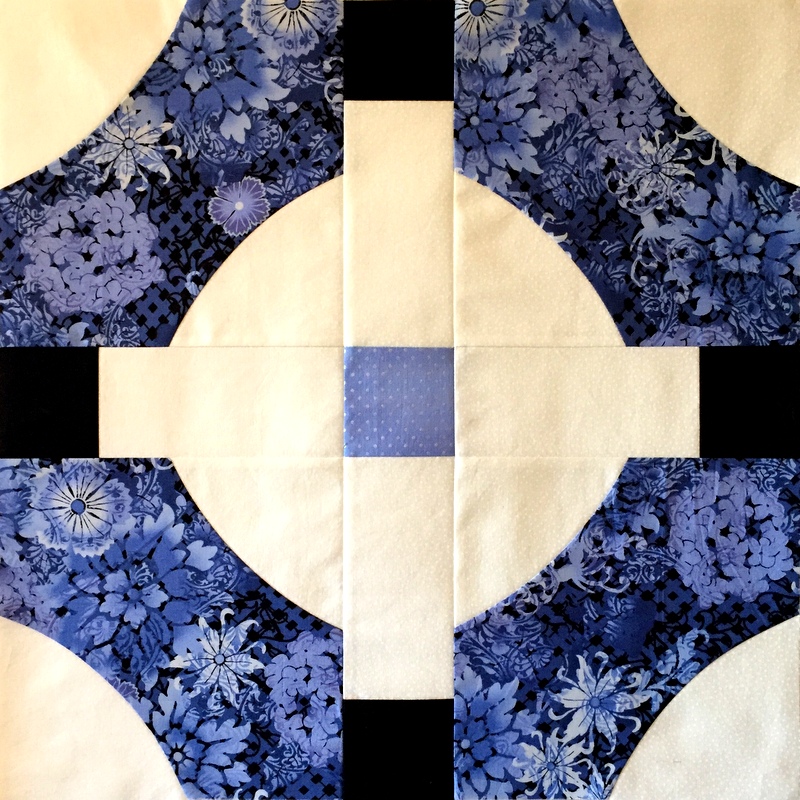
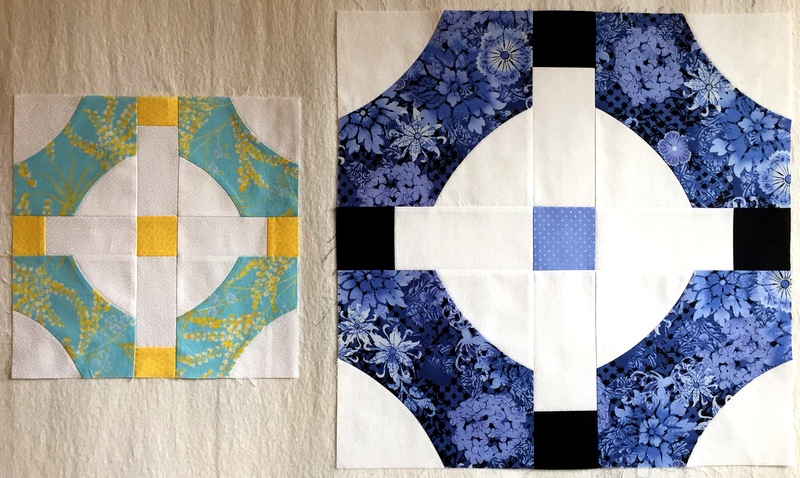
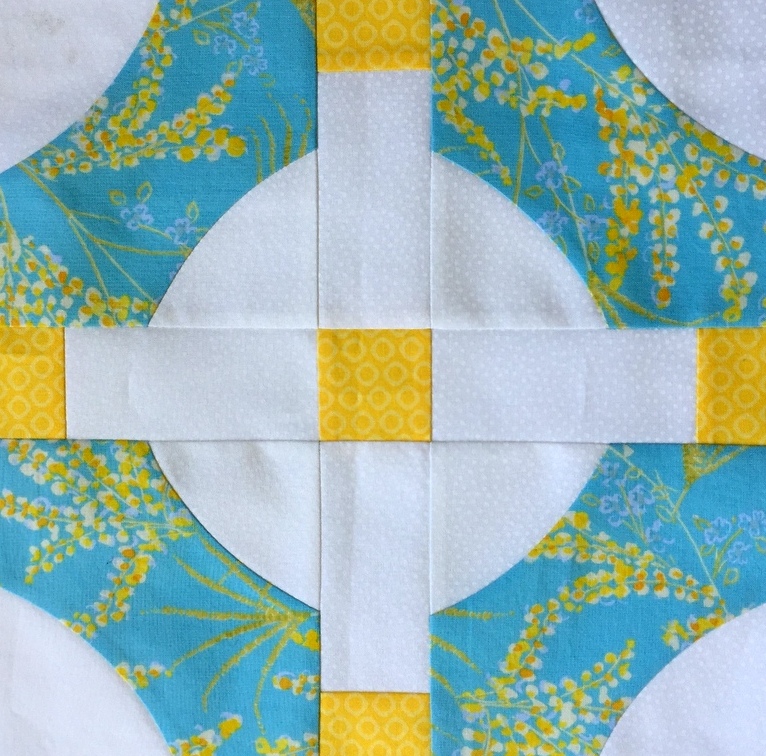
Except for the fabrics, it looks identical to my first test block (shown below), doesn’t it?
Ah, but there’s a difference. Here are the two blocks side by side:
That second block isn’t a mini at all. I supersized it!
The original mini block finishes at 10½” square and is made with the QCR Mini ruler. My supersized version finishes at 17½” square and is made with the original Quick Curve Ruler.
Since I’m teaching this design at a retreat on Hood Canal in Washington State next month, I decided to give my students the option of choosing which ruler they want to use and which size block they want to make.
Three weeks without a post! That’s the longest gap in the five years since I started this blog. What could possibly account for such a lapse? Two back-to-back trips followed by a fun-filled week of family visiting from out of town.
The first trip was to Paducah, Kentucky with my quilt group, the Quisters. Yes, Paducah — home of the National Quilt Museum and site of the American Quilter’s Society’s Quilt Week the last week of April. What a thrill! More on that in a future post.
Home for one day, then off to Central Oregon for a family reunion that my twin sister Diane and I were responsible for planning. It was a great success, with 83 family members coming from as far away as Texas, Virginia, and Florida. Most of the relatives are in Oregon, remaining in the state where our common ancestor settled after emigrating from Switzerland in the 1880s. This reunion has rekindled my interest in family geneaology, which I hope to pursue in between quilting projects. I could use a few more hours each day to accomplish that.
While my relatives were here last week, I squeezed in a bit of sewing time to make a sample block of the quilt design I have chosen for the Pine Needle Quilt Shop’s retreat on Hood Canal in June. I’m teaching two sessions back-to-back at a beautiful retreat center in Washington State.
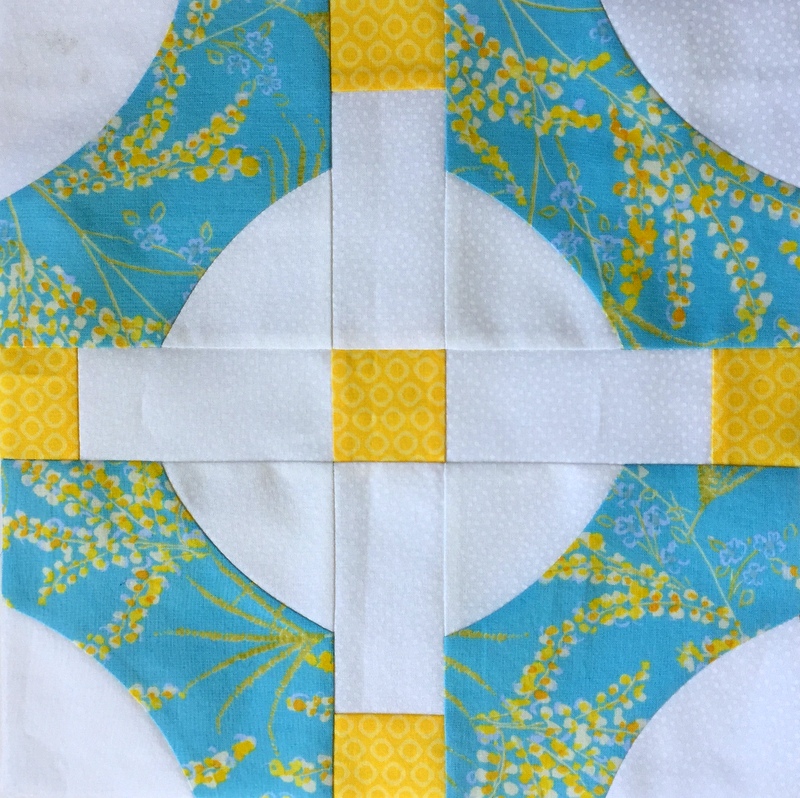
As my regular readers know, I am a huge fan of the Quick Curve Ruler and the designs created by those talented sisters (Jenny, Helen, and Sherilyn) at Sew Kind of Wonderful. For the retreat I chose one of their free patterns that call for the QCR Mini Ruler. The pattern is called Mini Mod Tiles and looks like this:
Isn’t that fabulous? This wonderfully scrappy quilt was made and quilted by Jenny Pedigo of Sew Kind of Wonderful, finishing at about 34″ square. (Photo used with permission.)
My sample block, finishing at 10½” square, is made from one focus fabric, a Dena Fishbein print from the Painted Garden line for Free Spirit:
That fabric was in my stash just waiting to be picked for this project. I chose a vibrant yellow tone-on-tone print for the connector pieces and couldn’t resist the temptation to add a square of color in the center of the block. My background fabric is a white-on-white dot.
It’s good to be back in the saddle with blogging and sewing.
Did you know that March is National Craft Month? Not only that, March 18 is National Quilting Day.
But wait — there’s more!
March 18 is also Worldwide Quilting Day — a day to celebrate the art and craft of quilting with like-minded friends around the globe:
I follow quite a few quilters in other countries through Instagram (are you on Instagram too? You can find me here) so I am delighted to know quilters around the world are celebrating the same day we are.
National Quilting Day is always celebrated on the third Saturday of March, coinciding this year with two quilt shows in the Portland, Oregon metropolitan area.
The 23rd annual “Airing of the Quilts” is this Friday and Saturday, March 17-18, at the Milwaukie Center, 5440 SE Kellogg Creek Drive in Milwaukie, Oregon. It’s a non-juried community quilt show exhibiting old and new quilts, traditional and non-traditional. Show hours are 9:00 am to 4:00 pm both days. For more information, visit www.MilwaukieCenterQuiltShow.org.
“Every Quilt Tells a Story” is the theme of the Metropolitan Patchwork Society’s one-day show Saturday, March 18, at the Beaverton Public Library, 12375 SW Fifth St., Beaverton, Oregon. Hours of the show are 11:00 am to 4:00 pm. This show is also non-juried and features quilts made primarily by MPS members.
I’m a member and have submitted two quilts I completed last year: Stella by Starlight . . .
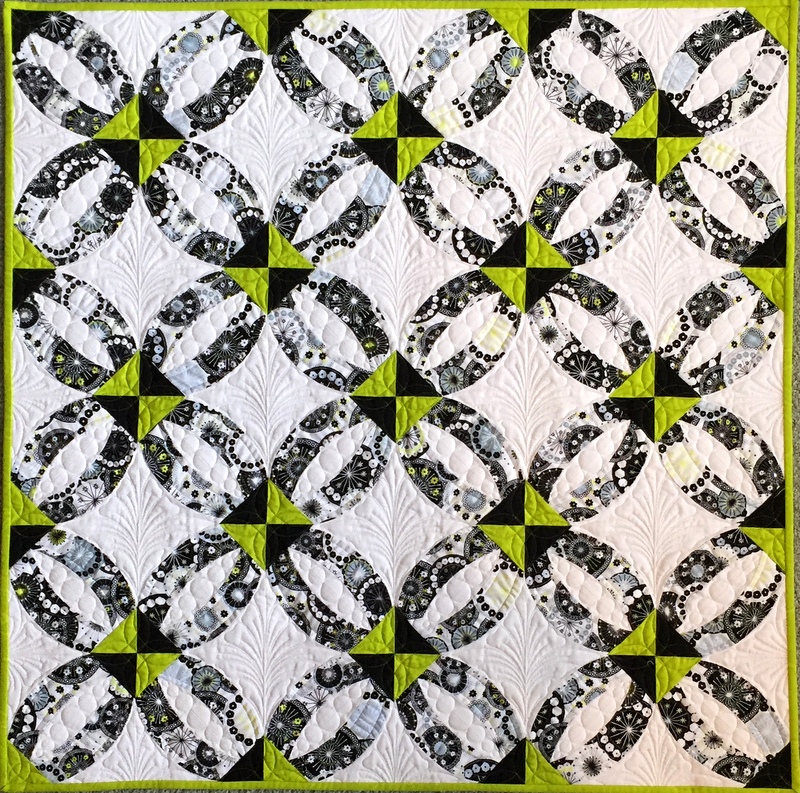
. . . and Ring Toss:
If you’re in the area, I hope you’ll visit one or both of these quilt shows.
Quiltmakers are always being exhorted to support their local quilt shops. In the spirit of National Quilting Day and Worldwide Quilting Day, consider this a call to support your local quilt guilds as well.
Here’s to 2017! Specifically, here’s to lots of sewing and quilting in 2017. I’m already looking forward to several projects — and not just new ones. There’s a stack of UFOs beckoning that I am actually enthusiastic about tackling. But not today.
On this fresh new day of the year, I’m looking back on what I created in 2016. Rather than going in chronological order, I’m grouping my finishes by categories.
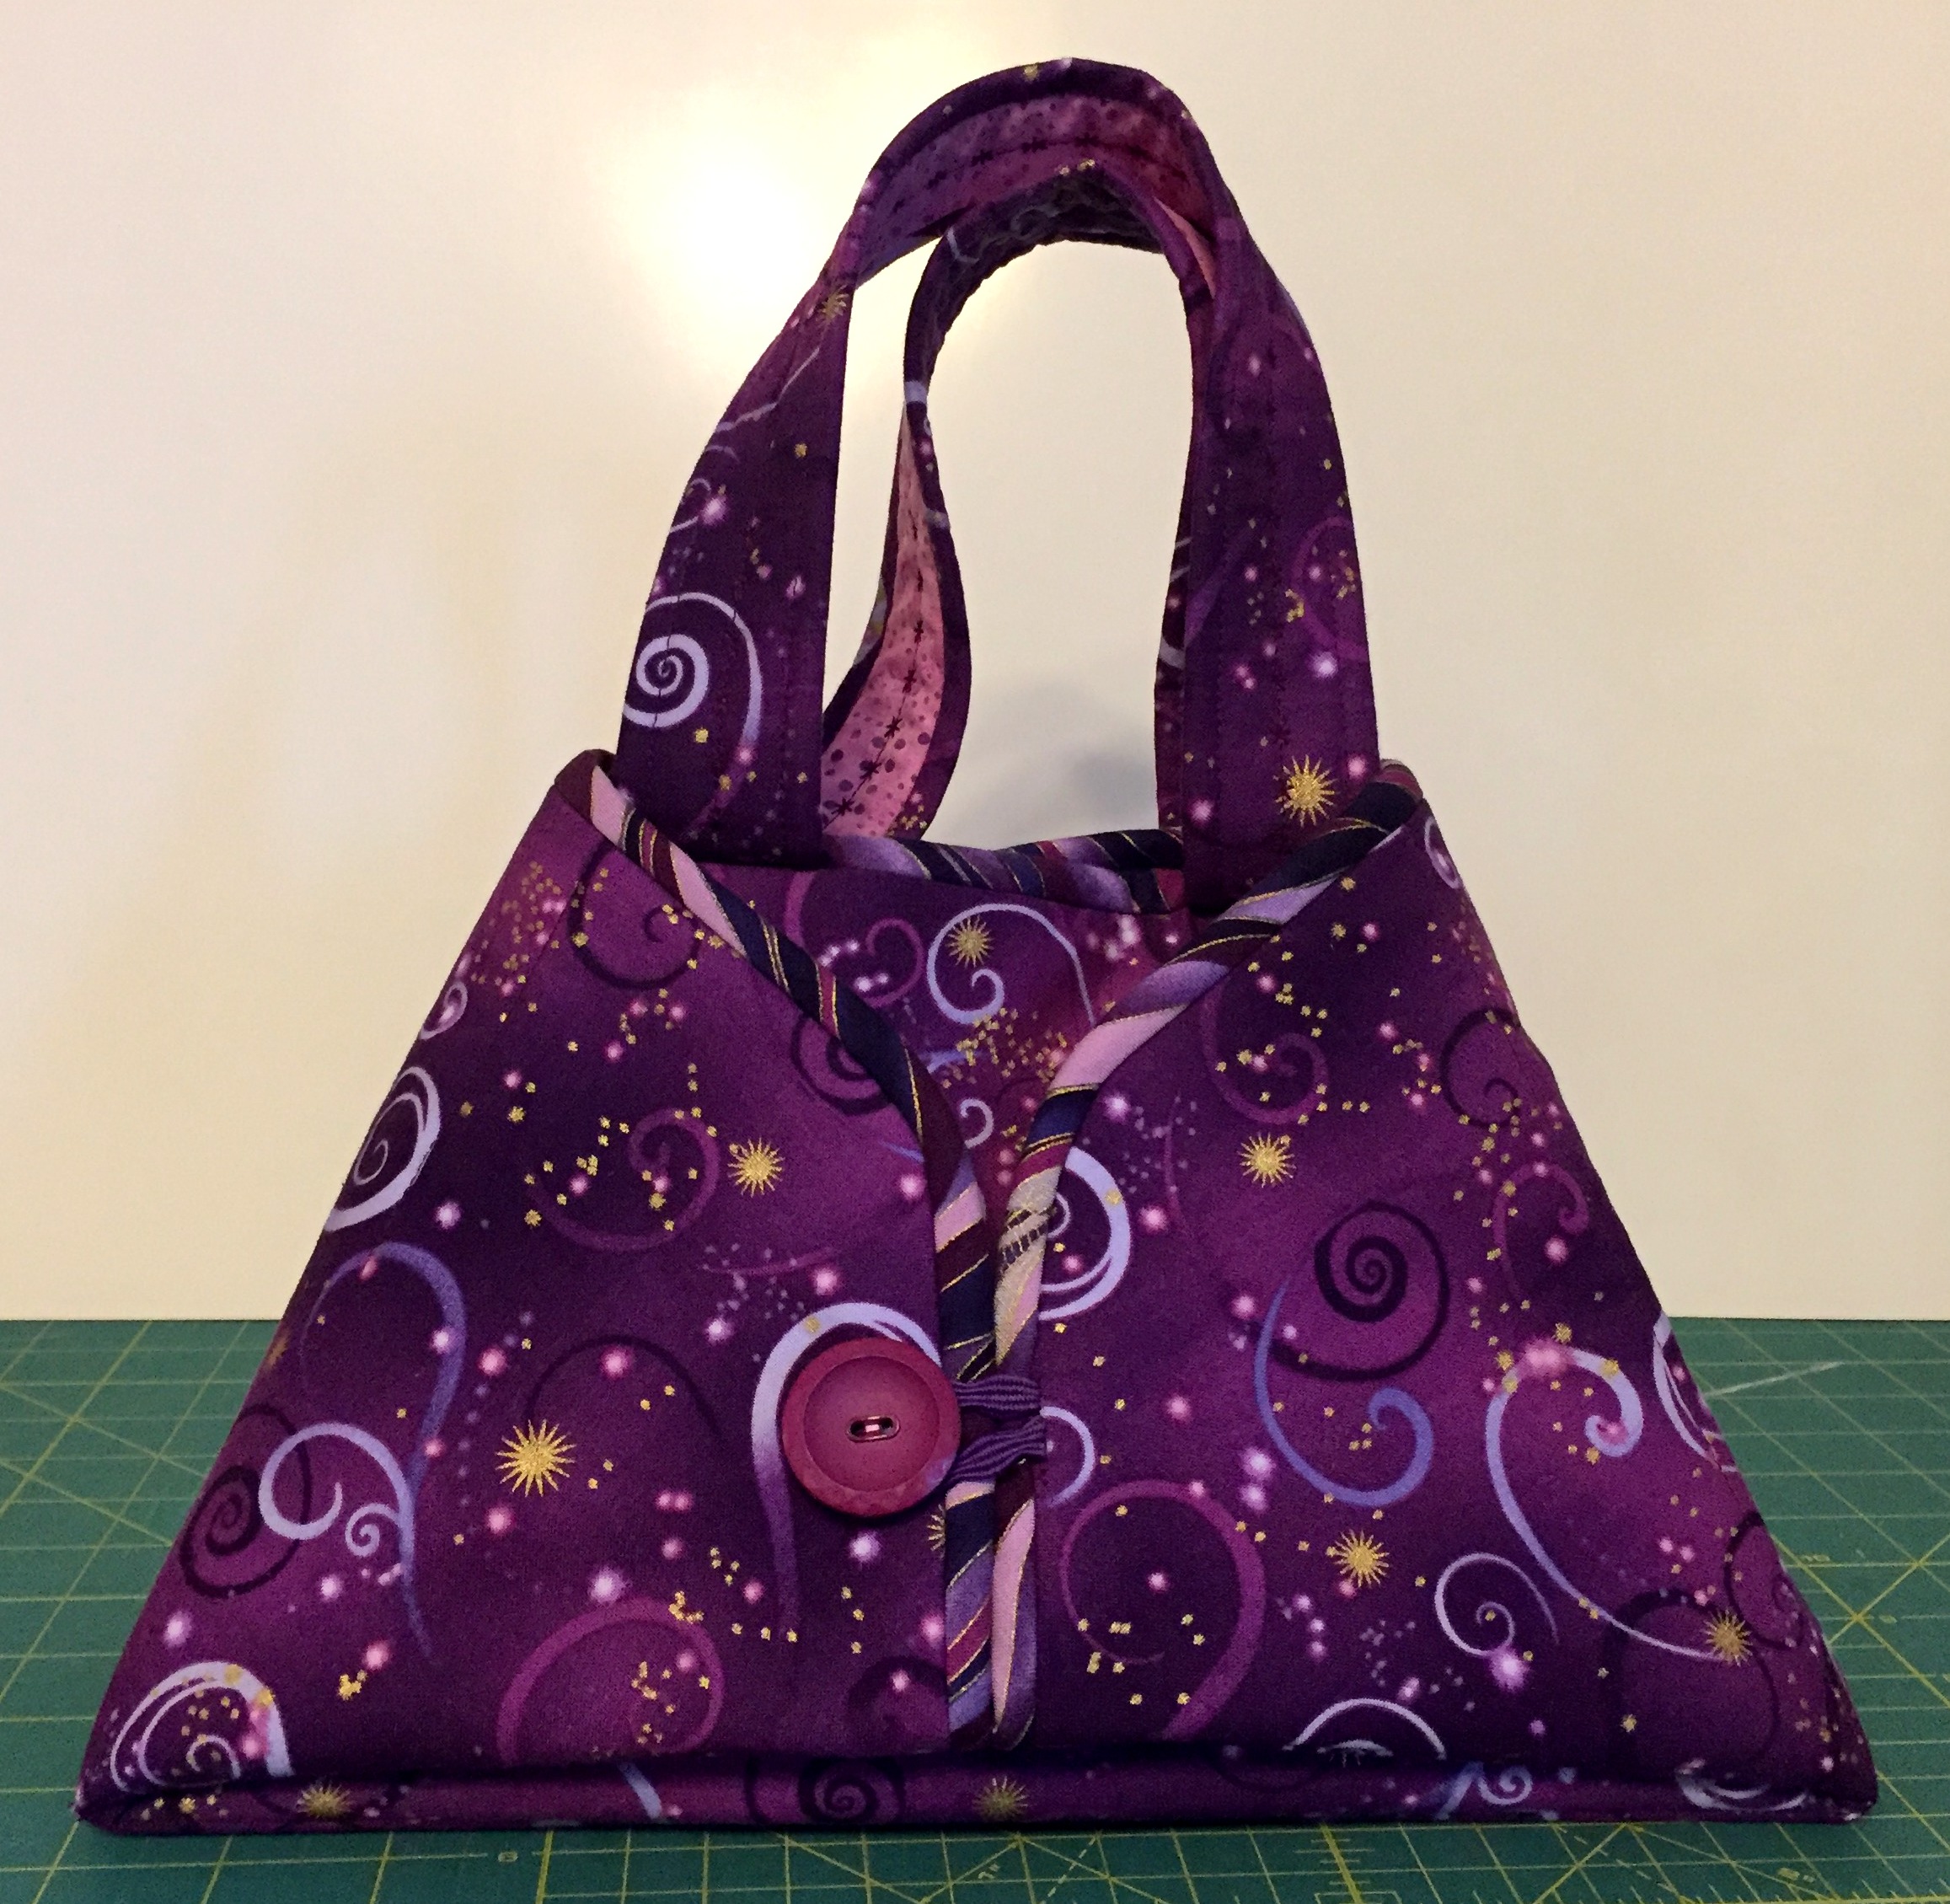
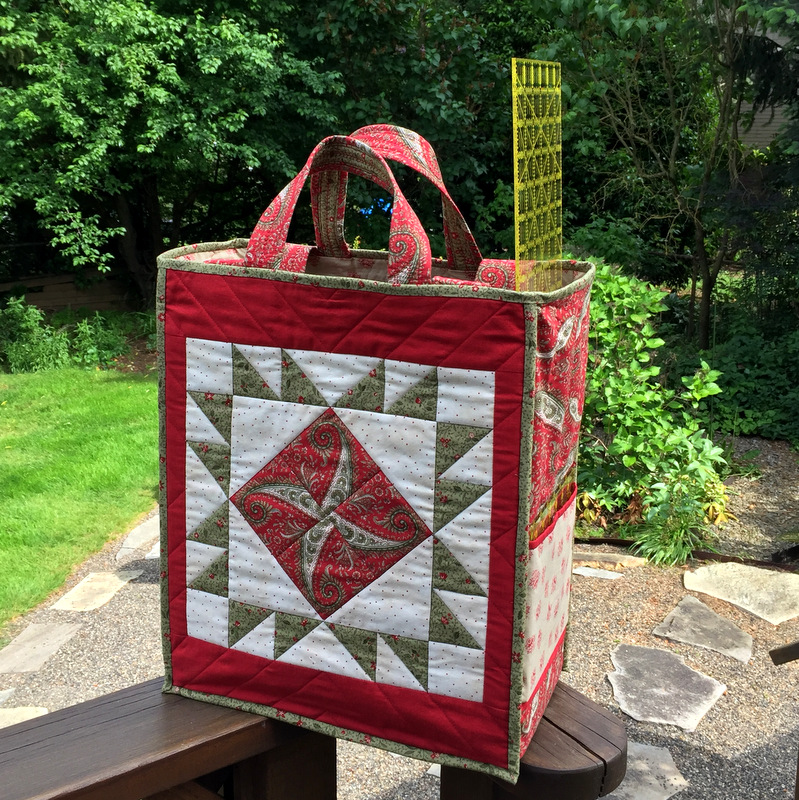
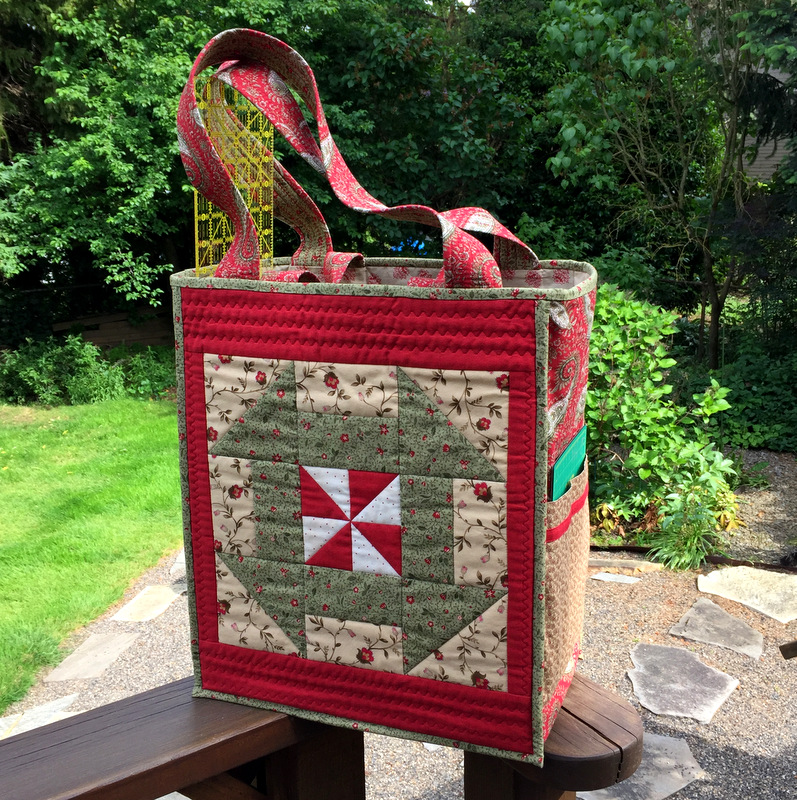
This was the year of the Junior Billie Bag, the quintessential quilter’s tote designed by Billie Mahorney. I made a bag for myself . . .
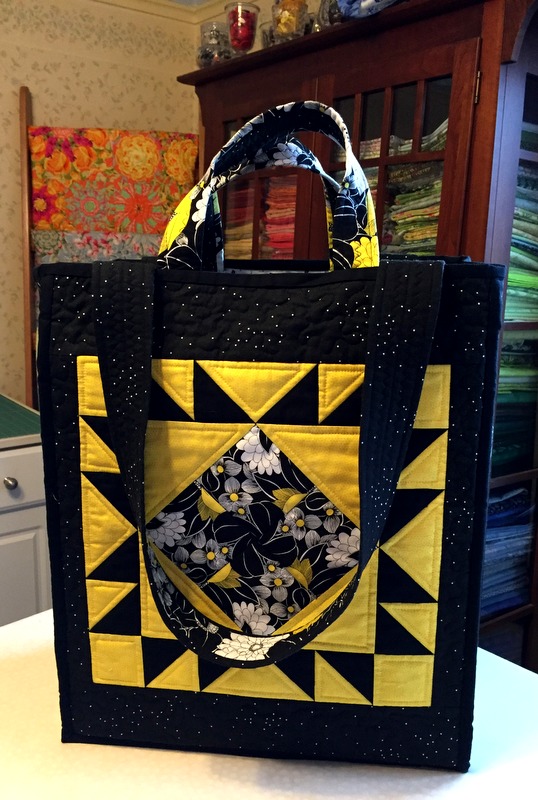
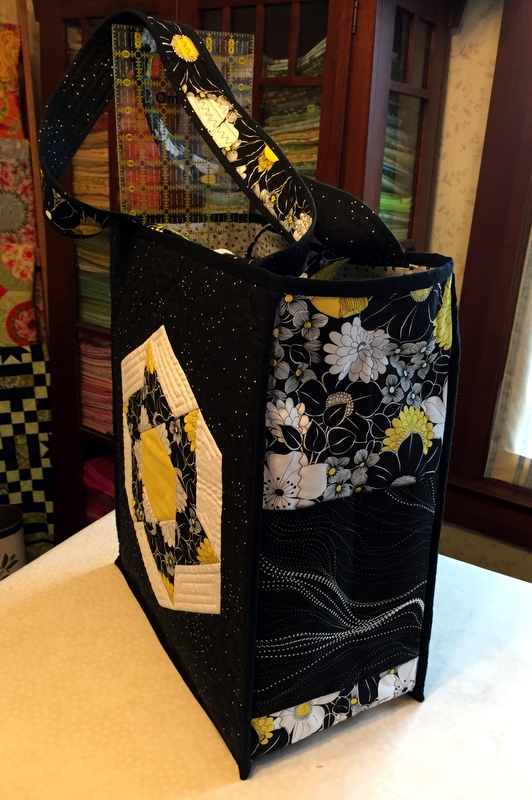
. . . and one for my friend Deborah . . .
. . . and one for my friend Miriam:
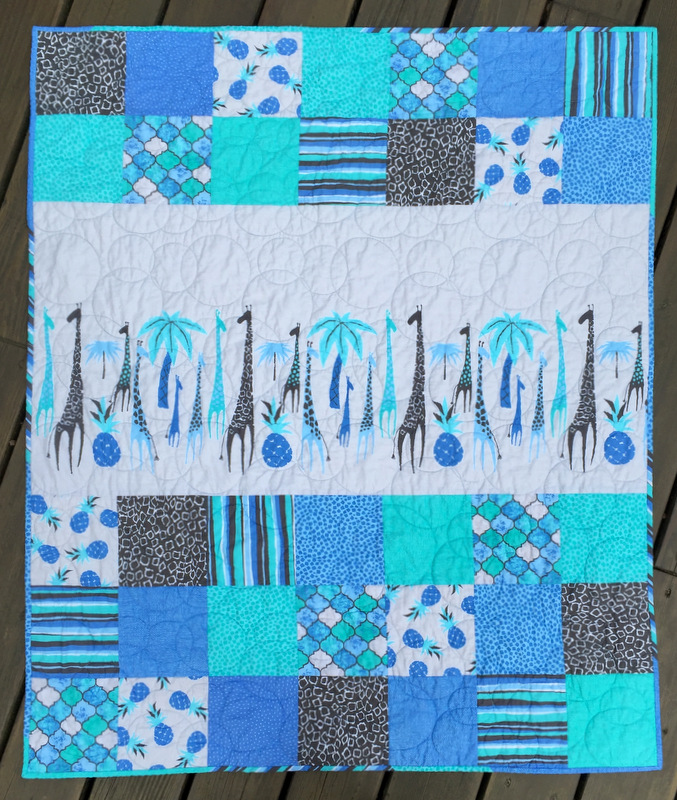
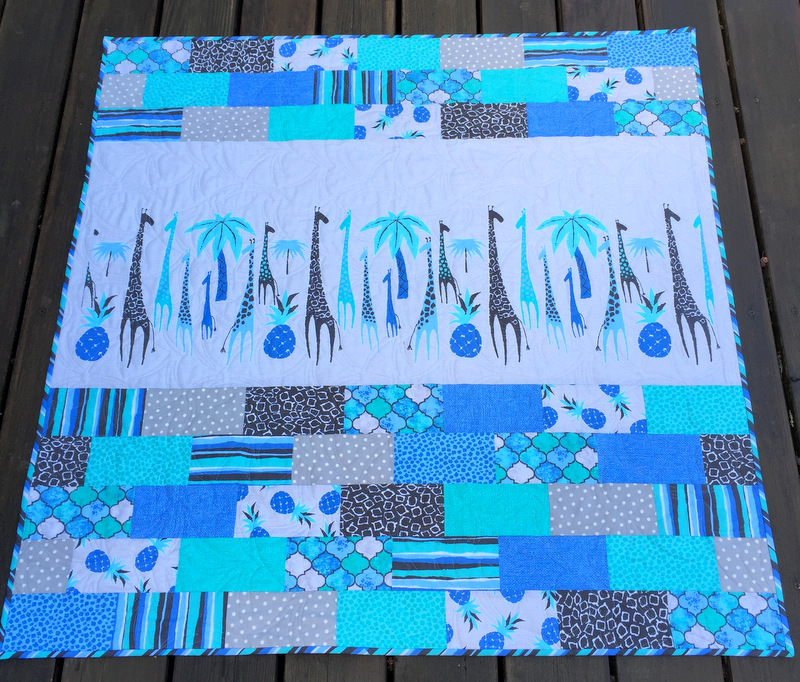
Next category: baby quilts. This is the first of two incorporating a charming giraffe-themed fabric panel:
Abraham’s Quilt, 40″ x 49″ (2016)
Here’s the second one, using the same fabrics in a slightly different setting:
Malachi’s Quilt, 41″ Square (2016)
I didn’t use a pattern for these quilts, preferring to play with simple shapes (squares and rectangles) so that the giraffes on the fabric panels would be the focal point.
My third baby quilt of the year was this one using the pattern Just Can’t Cut It from All Washed Up Quilts:
Stefan’s Quilt, 46″ Square (2016)
All three were quilted by longarmer Sherry Wadley.
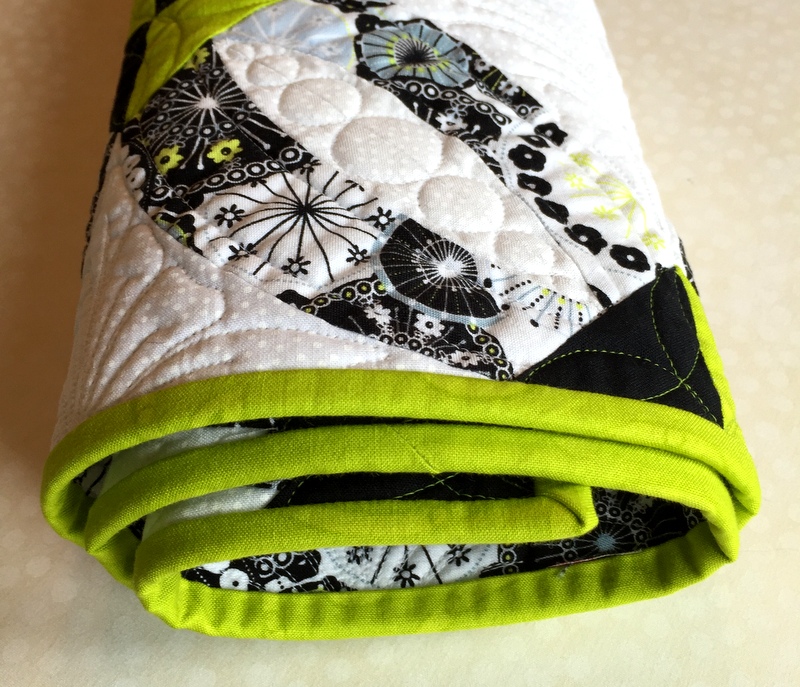
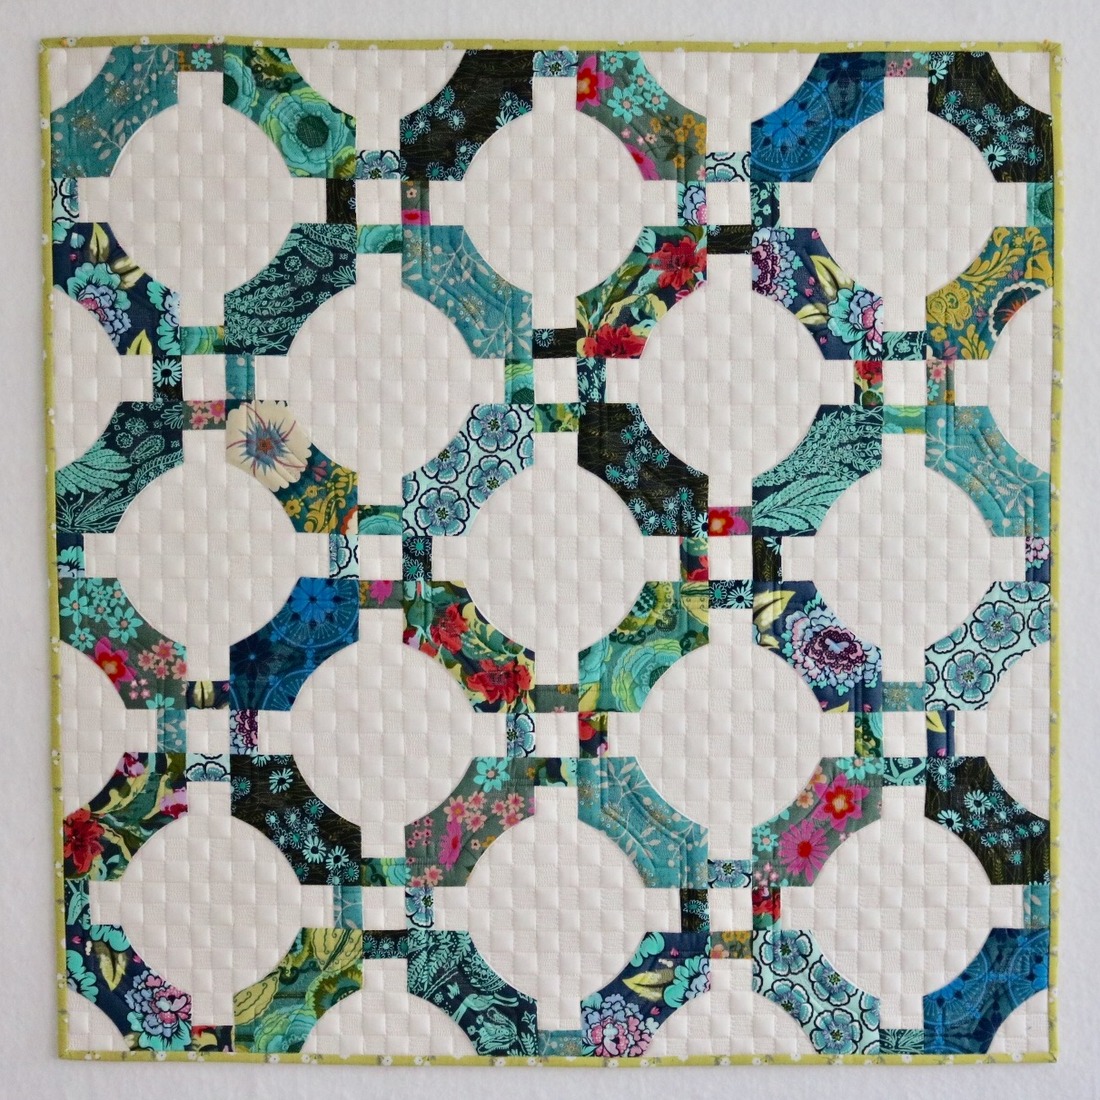
All by itself in the mini quilt category is Ring Toss, based on the pattern Mini Rings by Sew Kind of Wonderful:
Ring Toss, 32″ Square (2016)
Mini Rings was quilted by Karlee Sandell of SewInspired2Day. Oh, and that’s our new rescue kitty Princess Cordelia (Coco for short).
Lap quilts is the next category. Once again I used a Sew Kind of Wonderful design, adapting the pattern Chic Diamonds into this quilt I named Dragonfly Kisses:
It was quilted by Sherry Wadley.
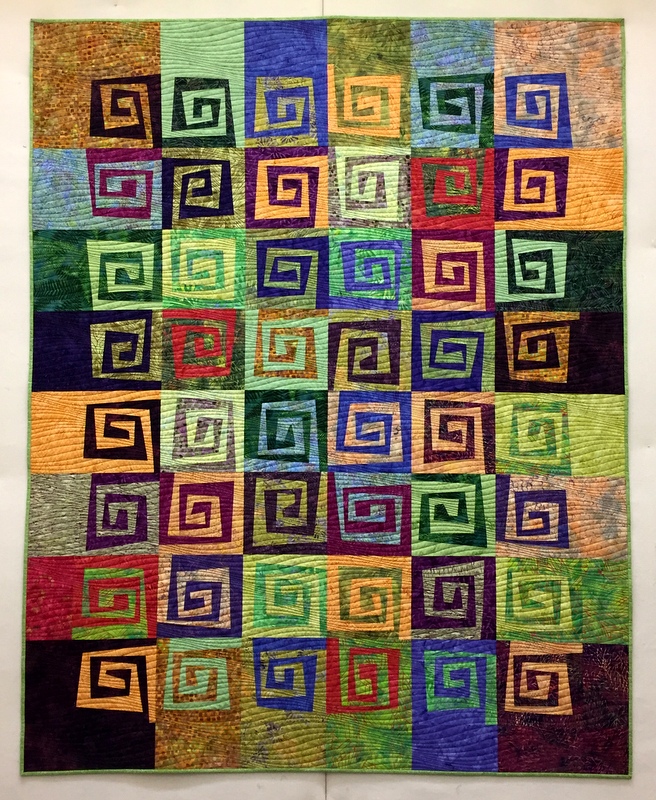
The next quilt, Where It’s @, was started in July in a class with Karla Alexander of Saginaw Street Quilts. It’s based on her pattern Rewind. I really stepped outside my comfort zone with this quilt, and I absolutely love the result:
Where It’s @, 57″ x 72″ (2016)
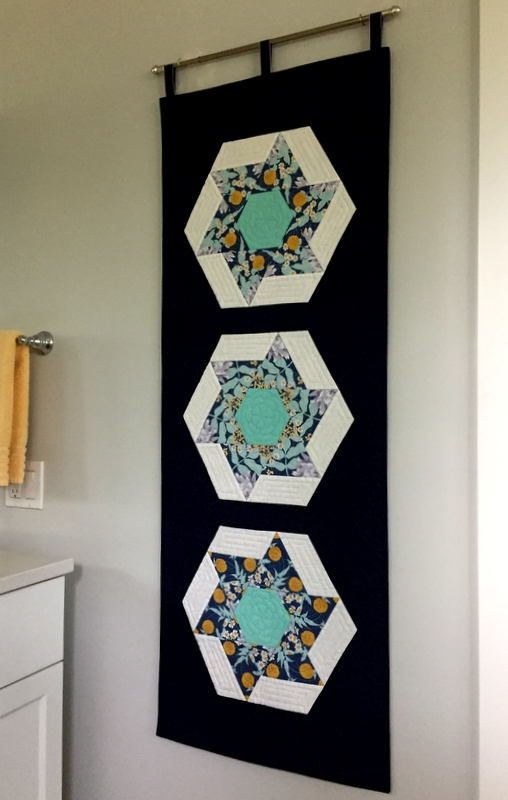
The last quilt in this category is Stella by Starlight, a “kaleido-spinner” using the Spinners block by Heather Peterson of Anka’s Treasures:
Stella by Starlight, 51½” x 71″ (2016)
I call it a “kaleido-spinner” because the six equilateral triangles in each block were cut from identical repeats of the focus fabric, creating a kaleidoscope effect of sorts. The four small hexagon blocks are true kaleidoscope blocks.
Both Where It’s @ and Stella by Starlight were quilted by Karlee Sandell.
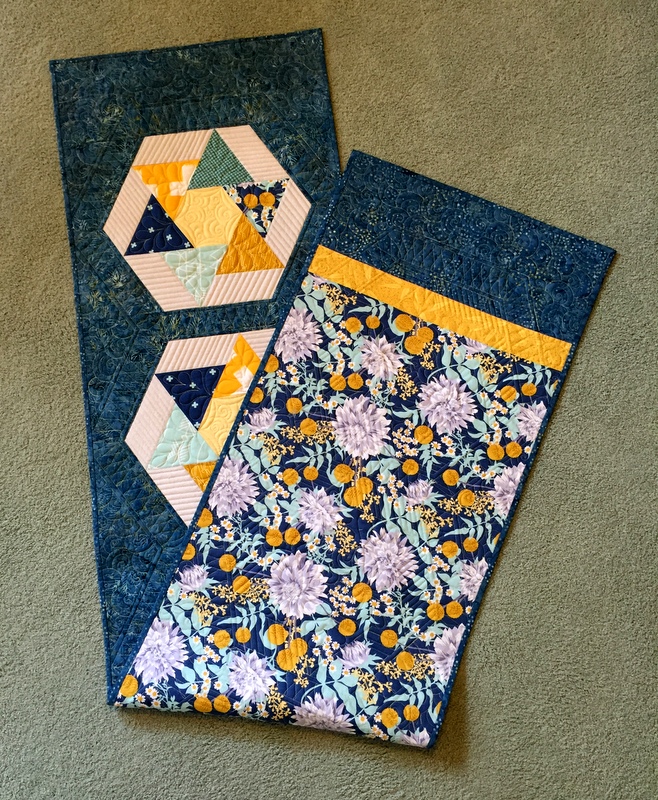
The next category is runners, both bed and table. I made one of each, using the same focus fabric in each (Wander by Joel Dewberry) and the same block design (Spinners by Anka’s Treasures) with completely different outcomes. Here is WanderLust I, the king size bed runner made with five blocks:
WanderLust I, 20″ x 88″ (2016)
I liked the focus fabric so much I made the bed runner reversible:
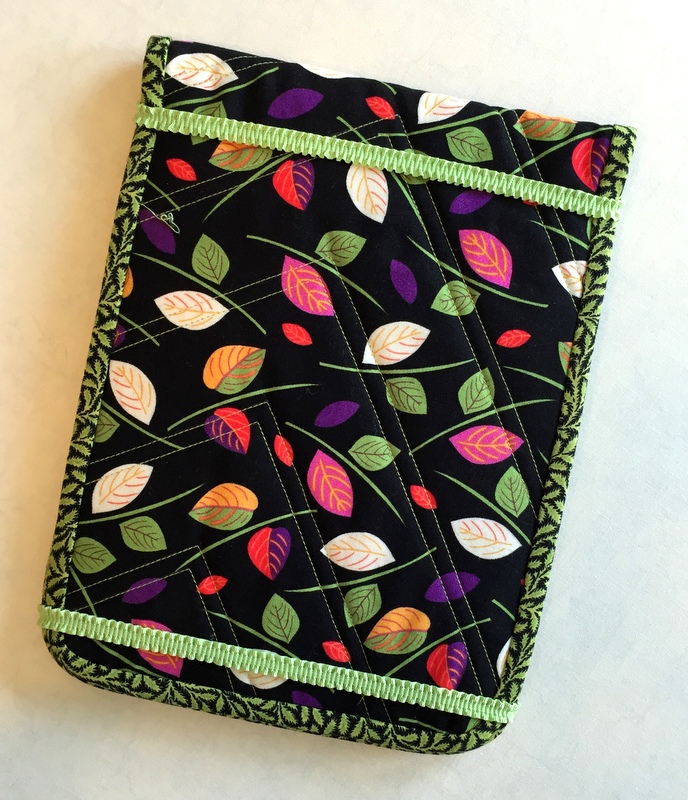
The final category is a bit of a hodgepodge. I made a quilted cover for my stepmother’s new iPad Pro . . .
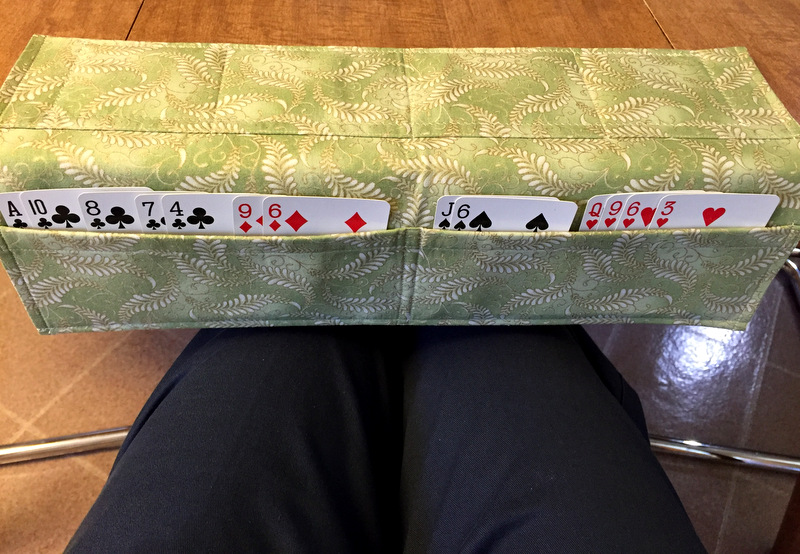
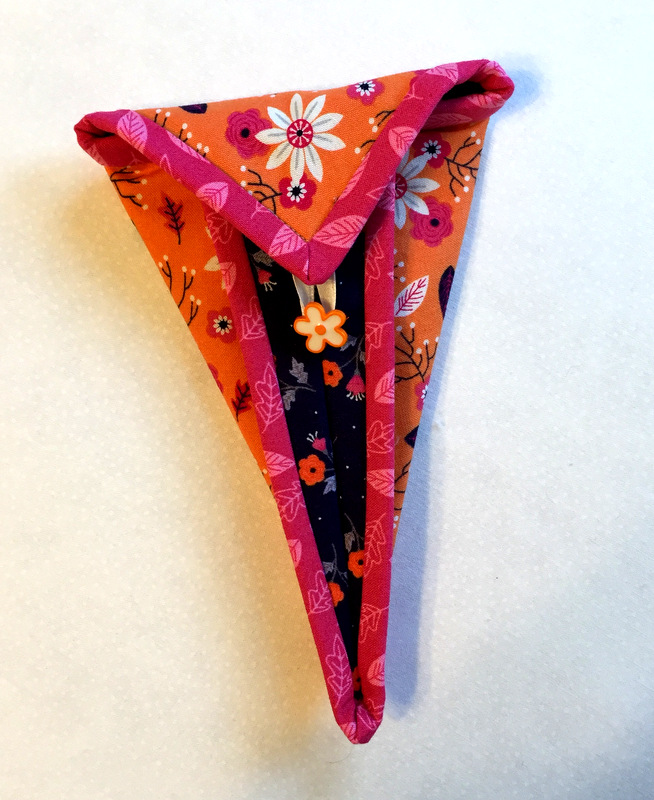
. . . and a cardholder for her bridge hands:
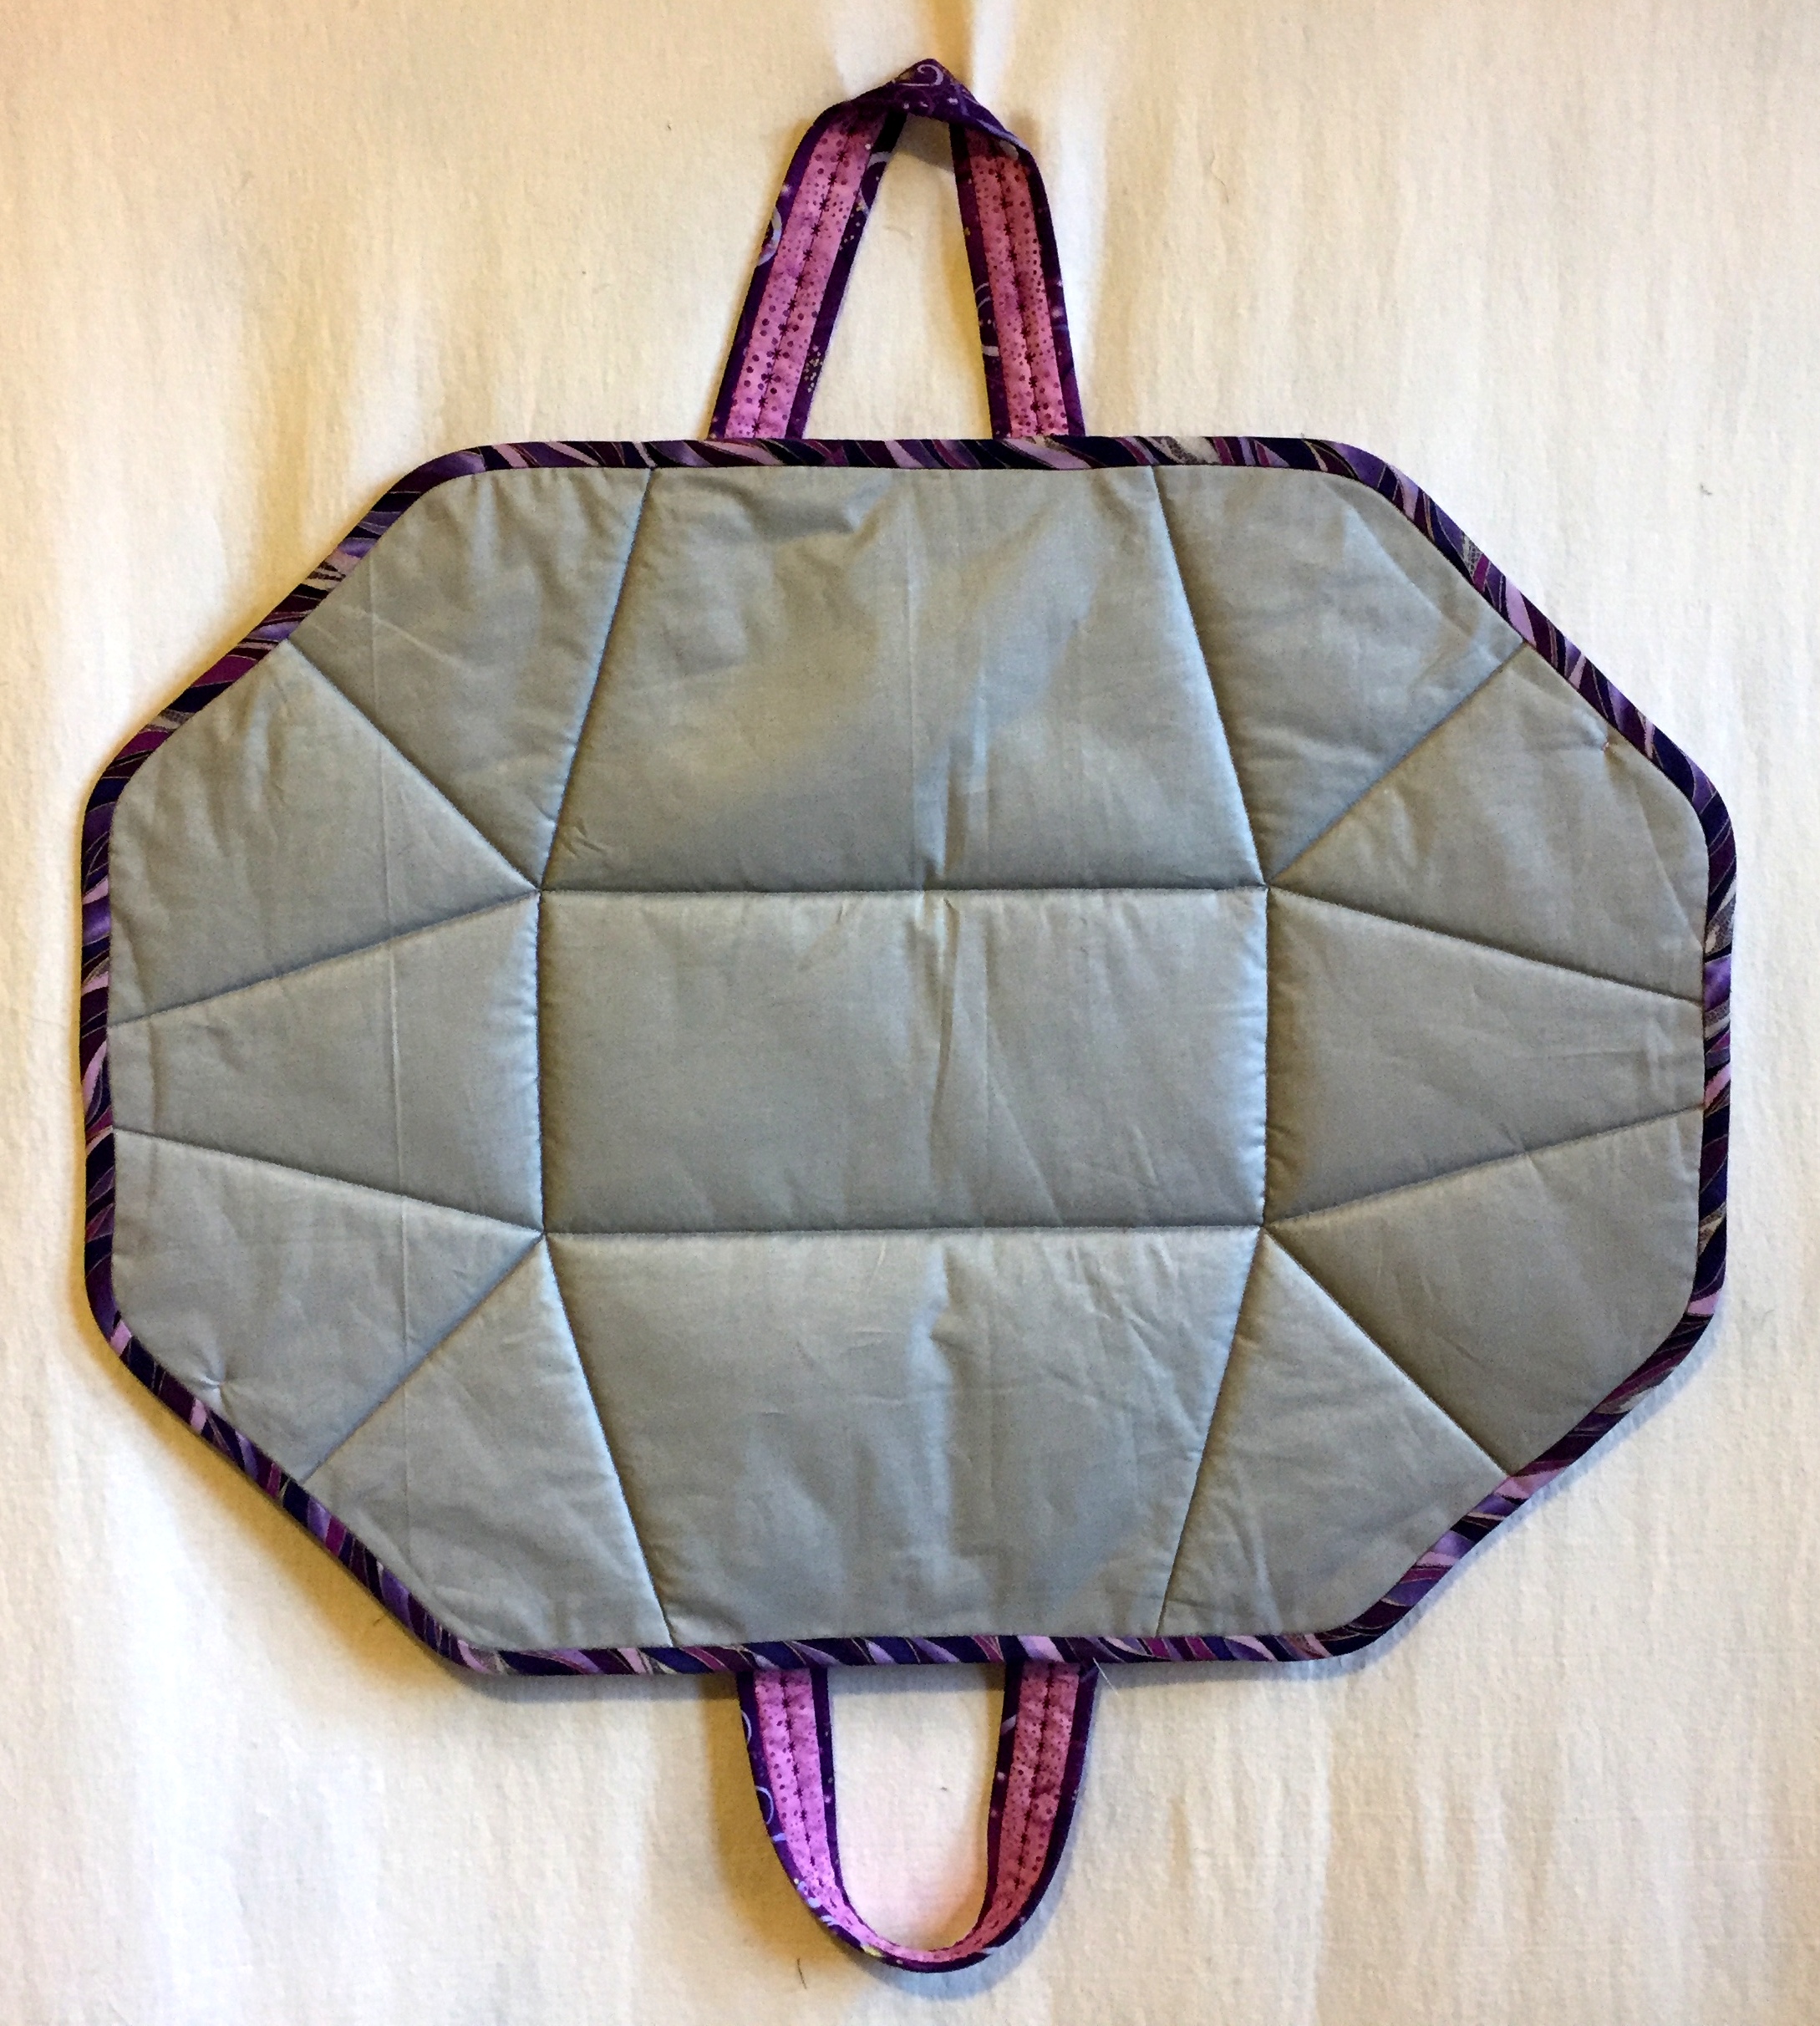
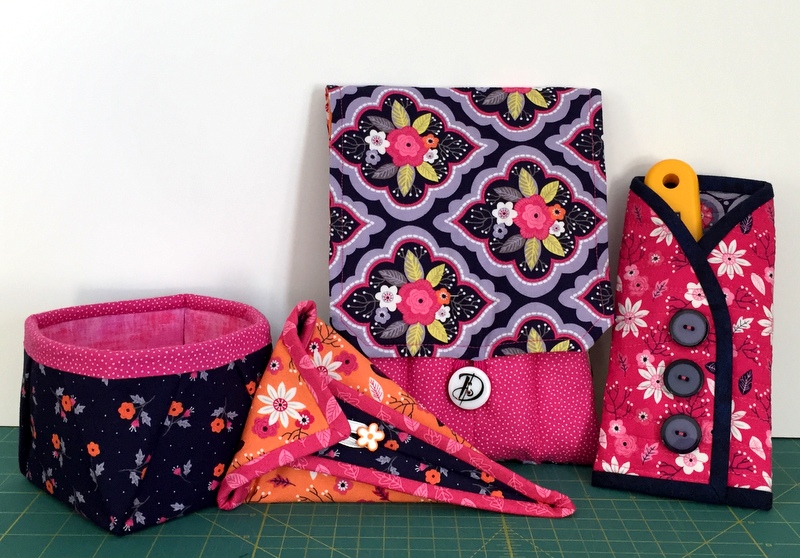
For my friend and fellow Quister (Quilt Sister) Vickie I made an iron caddy that doubles as a pressing mat . . .
. . . plus a matching 4″ x 4″ fabric box that she can use as a threadcatcher:
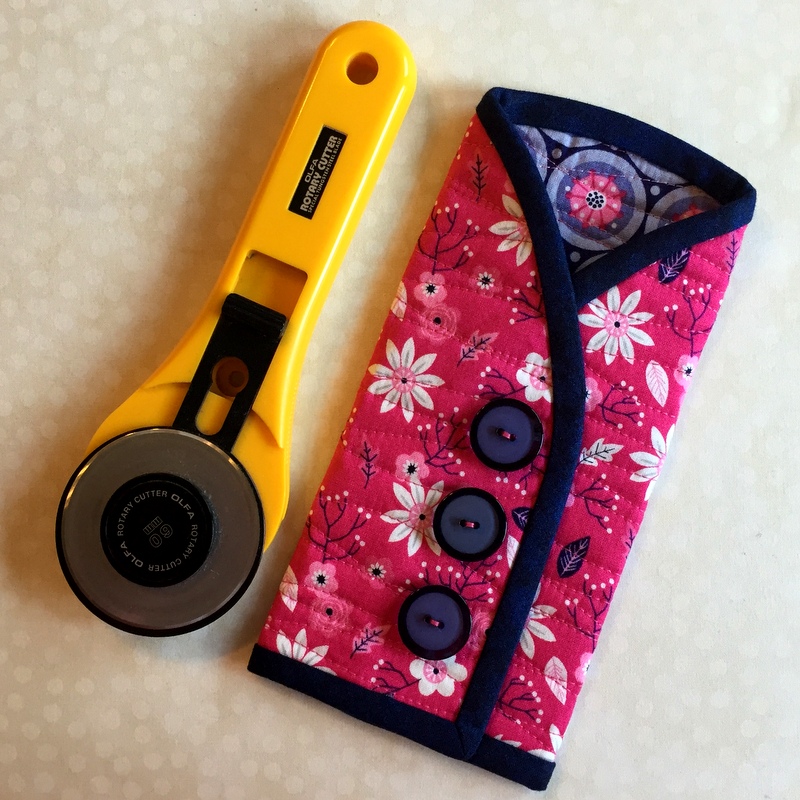
For myself I made some accessories to match my Junior Billie Bag: a rotary cutter coat made from my tutorial . . .
. . . and a scissors case . . .
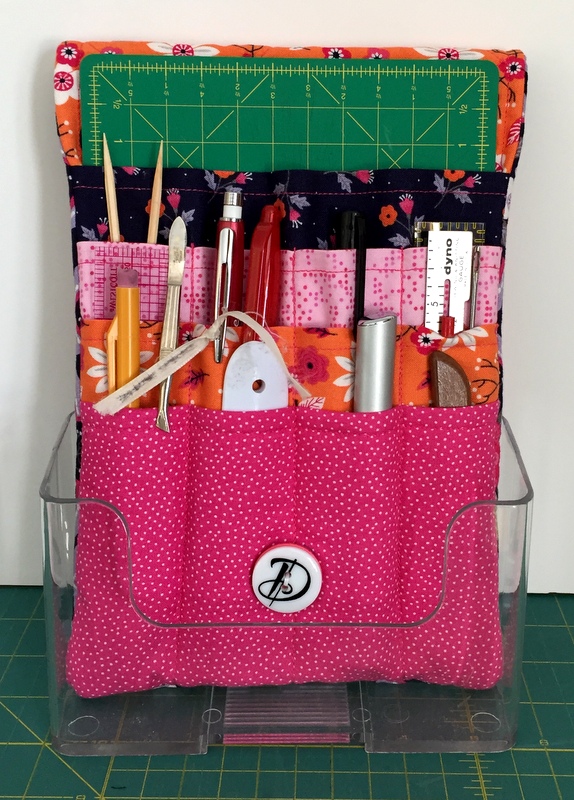
. . . and a sewing caddy that sits upright in a Lucite stand:
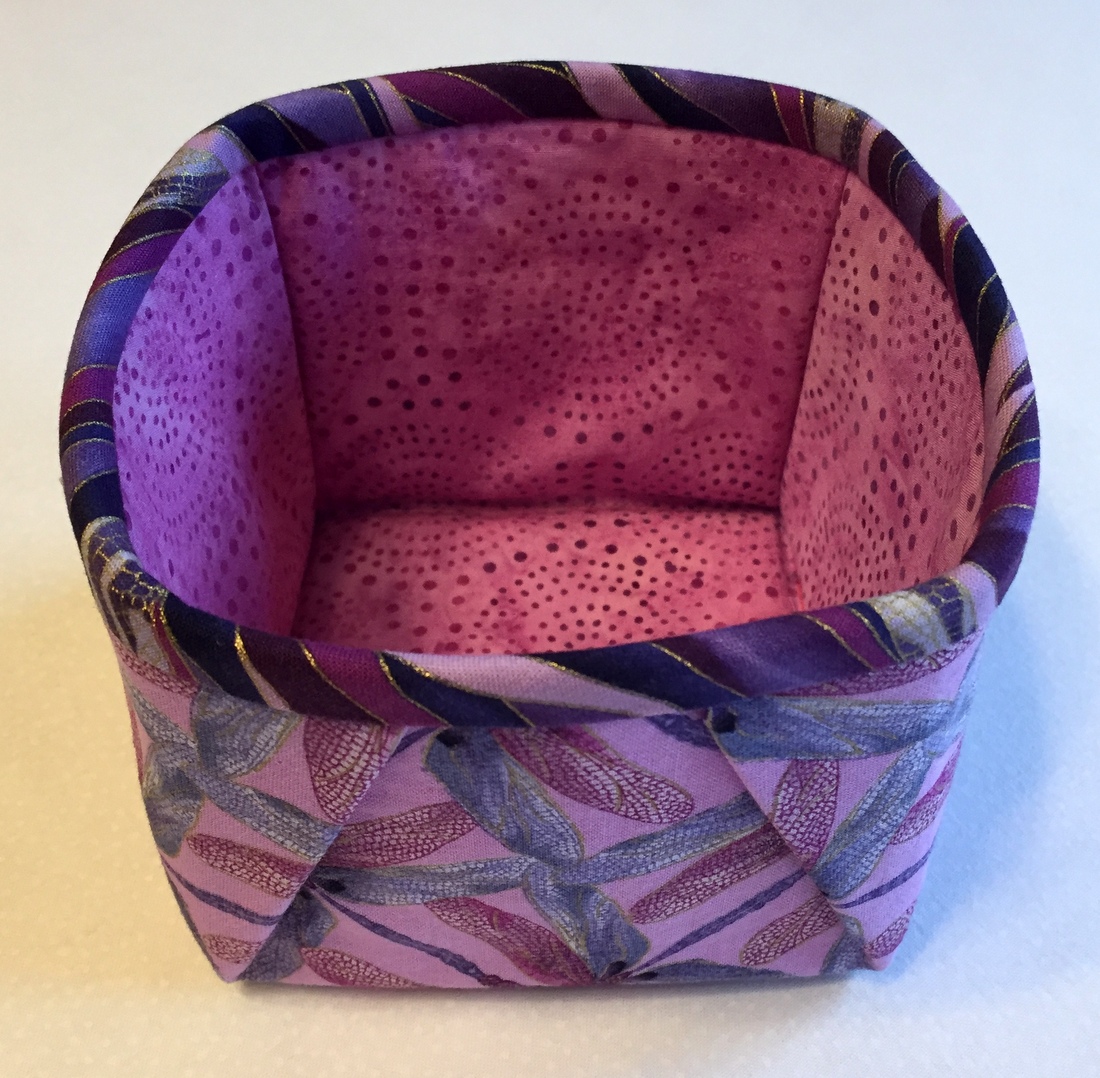
A 4″ x 4″ fabric box (yes, it’s a threadcatcher) completes the ensemble:
As you have surmised, I’m crazy in love with that fabric line (Paradise by Alisse Coulter for Camelot Cottons). I expect you’ll see more of it in 2017, as I bought a lot when it was released a couple years ago.
I’m sending a shout out to the talented longarm quilters who transformed my 2016 quilt tops into beautiful quilts — Coleen Barnhardt, Karlee Sandell, Debbie Scroggy, and Sherry Wadley — and to you, my loyal blog readers, for your continuing interest and support of First Light Designs.
If you’ve been quilting a while, you probably have a good-sized number of acrylic rulers on hand, the ones you use every day for cutting fabric and trimming blocks plus the specialty rulers you use on occasion. And let’s not forget the ones you bought (but maybe haven’t used yet) because they promised a faster, easier, more accurate way of cutting fabric or making a block.
With a few exceptions, these rulers tend to slip and slide on fabrics. How many of you have experienced a shift in position just as you were running your rotary cutter along a ruler’s edge? My hand is in the air.
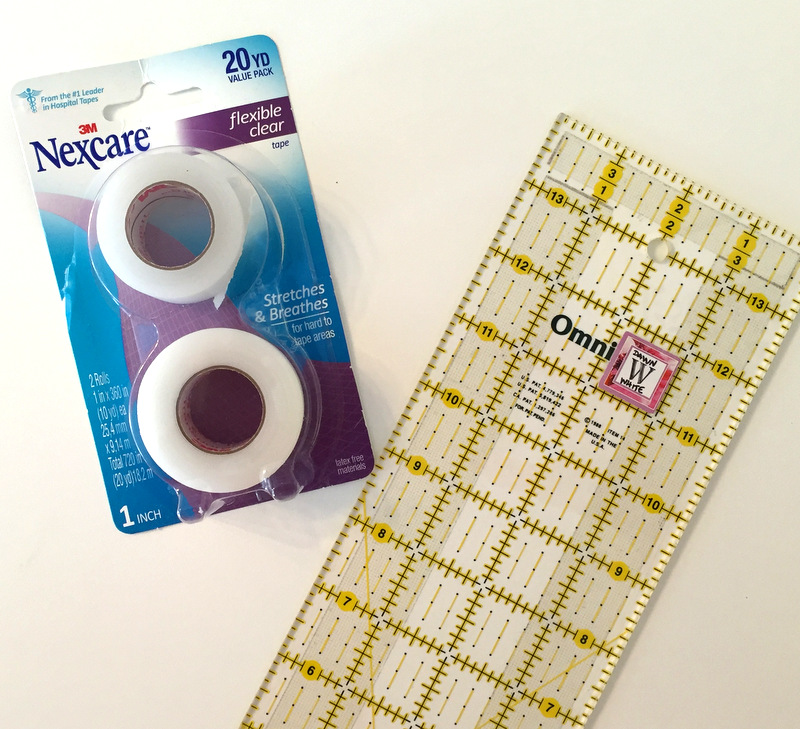
Enter a product that may already be in your first aid kit or medicine cabinet. It’s a flexible clear 1″-wide surgical tape called Nexcare made by 3M. My friend and fellow quilter Kathy Anderson told me about it and now I’m passing the word on to all my friends who quilt.
Here’s what the package looks like. If you look carefully, you can see I have applied it to my go-to 4″ x 14″ Omnigrid ruler.
For years I used a product called Invisigrip on the back of my rulers. Made by Omnigrid, it’s a roll of clear film that comes attached to a paper backing. You cut it into strips, peel the paper backing away, and apply the film to the back of rulers. Invisigrip works very well at keeping rulers from sliding on fabric but it does have a couple of disadvantages.
First, the film can loosen from the back of the ruler over time and need replacing. Second, after a package has been open a while, it becomes stale. That is, it becomes impossible to separate the film from the paper backing, rendering the rest of the roll unusable. I tried sealing the roll in a Ziploc bag between applications but it still got stale.
I found myself buying a new package almost every time I got a new ruler. Over the years I have spent a fair amount of money on this product. NexCare tape is much less expensive — I think I paid around $4.50 for this double-roll package containing 20 yards — and it is very easy to apply.
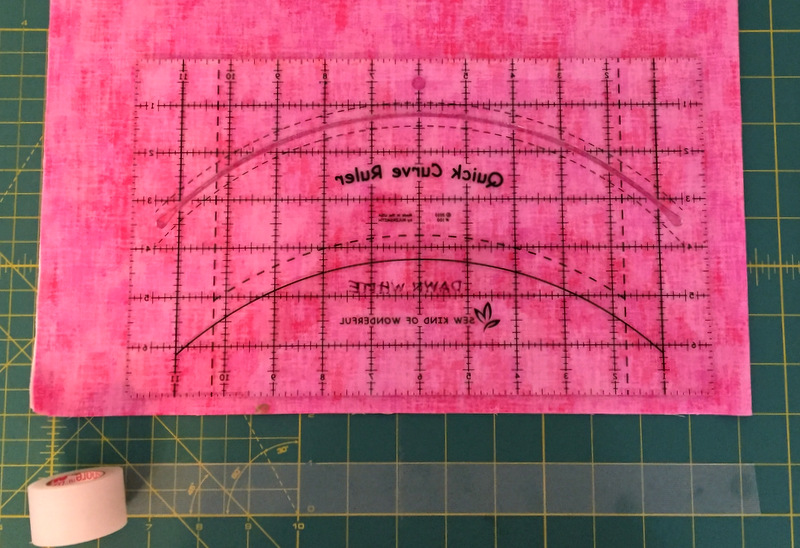
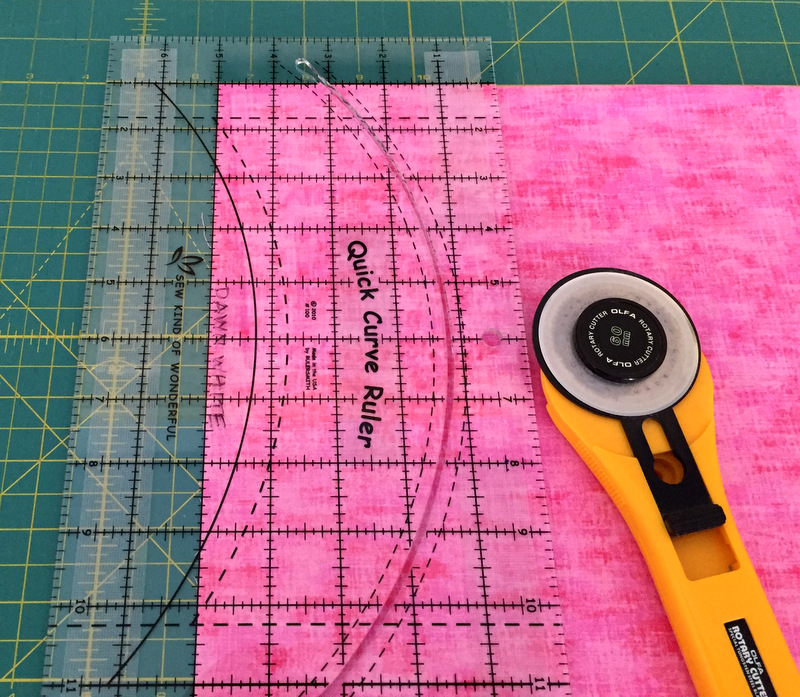
All you have to do is unroll the length of tape you need, cut it with scissors, and apply it to the back of the ruler. But, being a bit of a neatnik when it comes to my sewing tools, I like to use my rotary cutter to cut straight lines so the tape lines up with the lines on my rulers. In the photos below I’m putting it on the back of a specialty ruler that I use a lot, the Quick Curve Ruler.
I place the ruler wrong side up on my cutting mat. (I put the ruler on a piece of fabric here just so you can see the markings better.) Below the ruler I unroll a length of tape the same length as the ruler, following the marking lines on the cutting mat, and press the tape onto the mat:
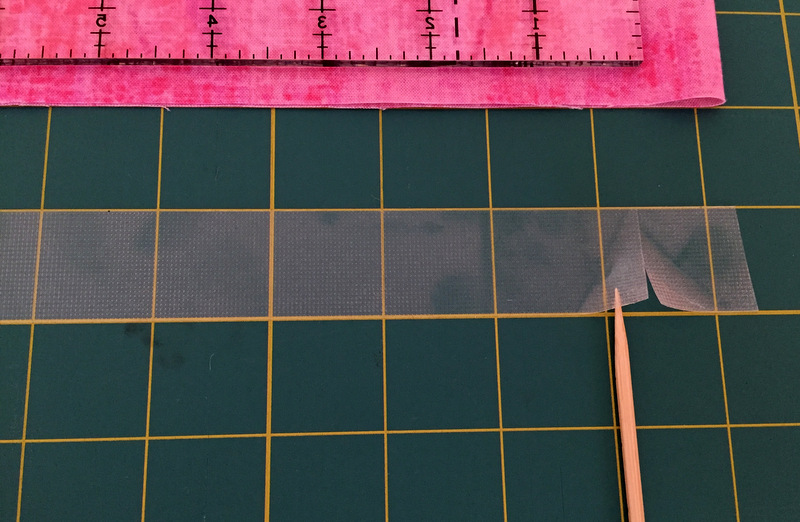
Next I trim the ends of the tape with my rotary cutter, allowing a ¼” margin between the end of the tape and the edges of the ruler. I use a stiletto (a bamboo skewer, actually) to lift up the edges of the tape where it was trimmed . . .
. . . and then peel the strip of tape off the mat.
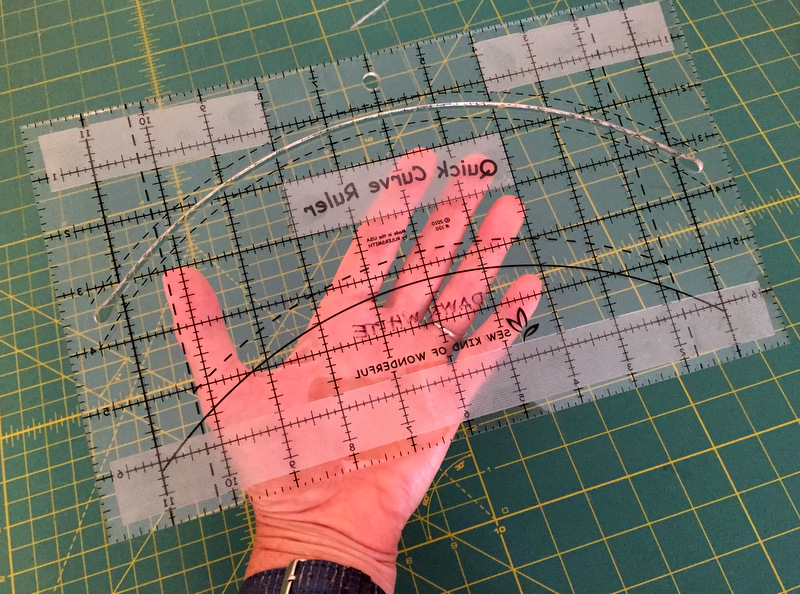
Using the markings on the ruler itself as a guide, I lay the strip of tape on the ruler, positioning it a quarter of an inch from the edges, and press it in place with my fingertips. Here you can see that I added strips to the top of the ruler, leaving the area around the hanging hole clear, and added an extra stabilizing strip under the curve cut-out.
You can put strips around all four sides of the ruler if you wish. You can put them anywhere, for that matter. Because the cutting channel on the Quick Curve Ruler comes within a half-inch of the sides, I opted not to put strips there, adding the stabilizing strip in the center instead.
When I’m ready to use the ruler, I can see clearly through the tape:
Pretty nifty, don’t you think?
Updated added June 21, 2019: Since posting this tutorial I have learned that Nexcare tape tears evenly because it has a slight grid embedded in it. If you want to avoid the steps of placing the tape on a mat and cutting it with a rotary cutter and if you’re not particular about the exact length of the piece that you are applying, simply tear off the amount you think you need and put it on the back of the ruler. Easy peasy.
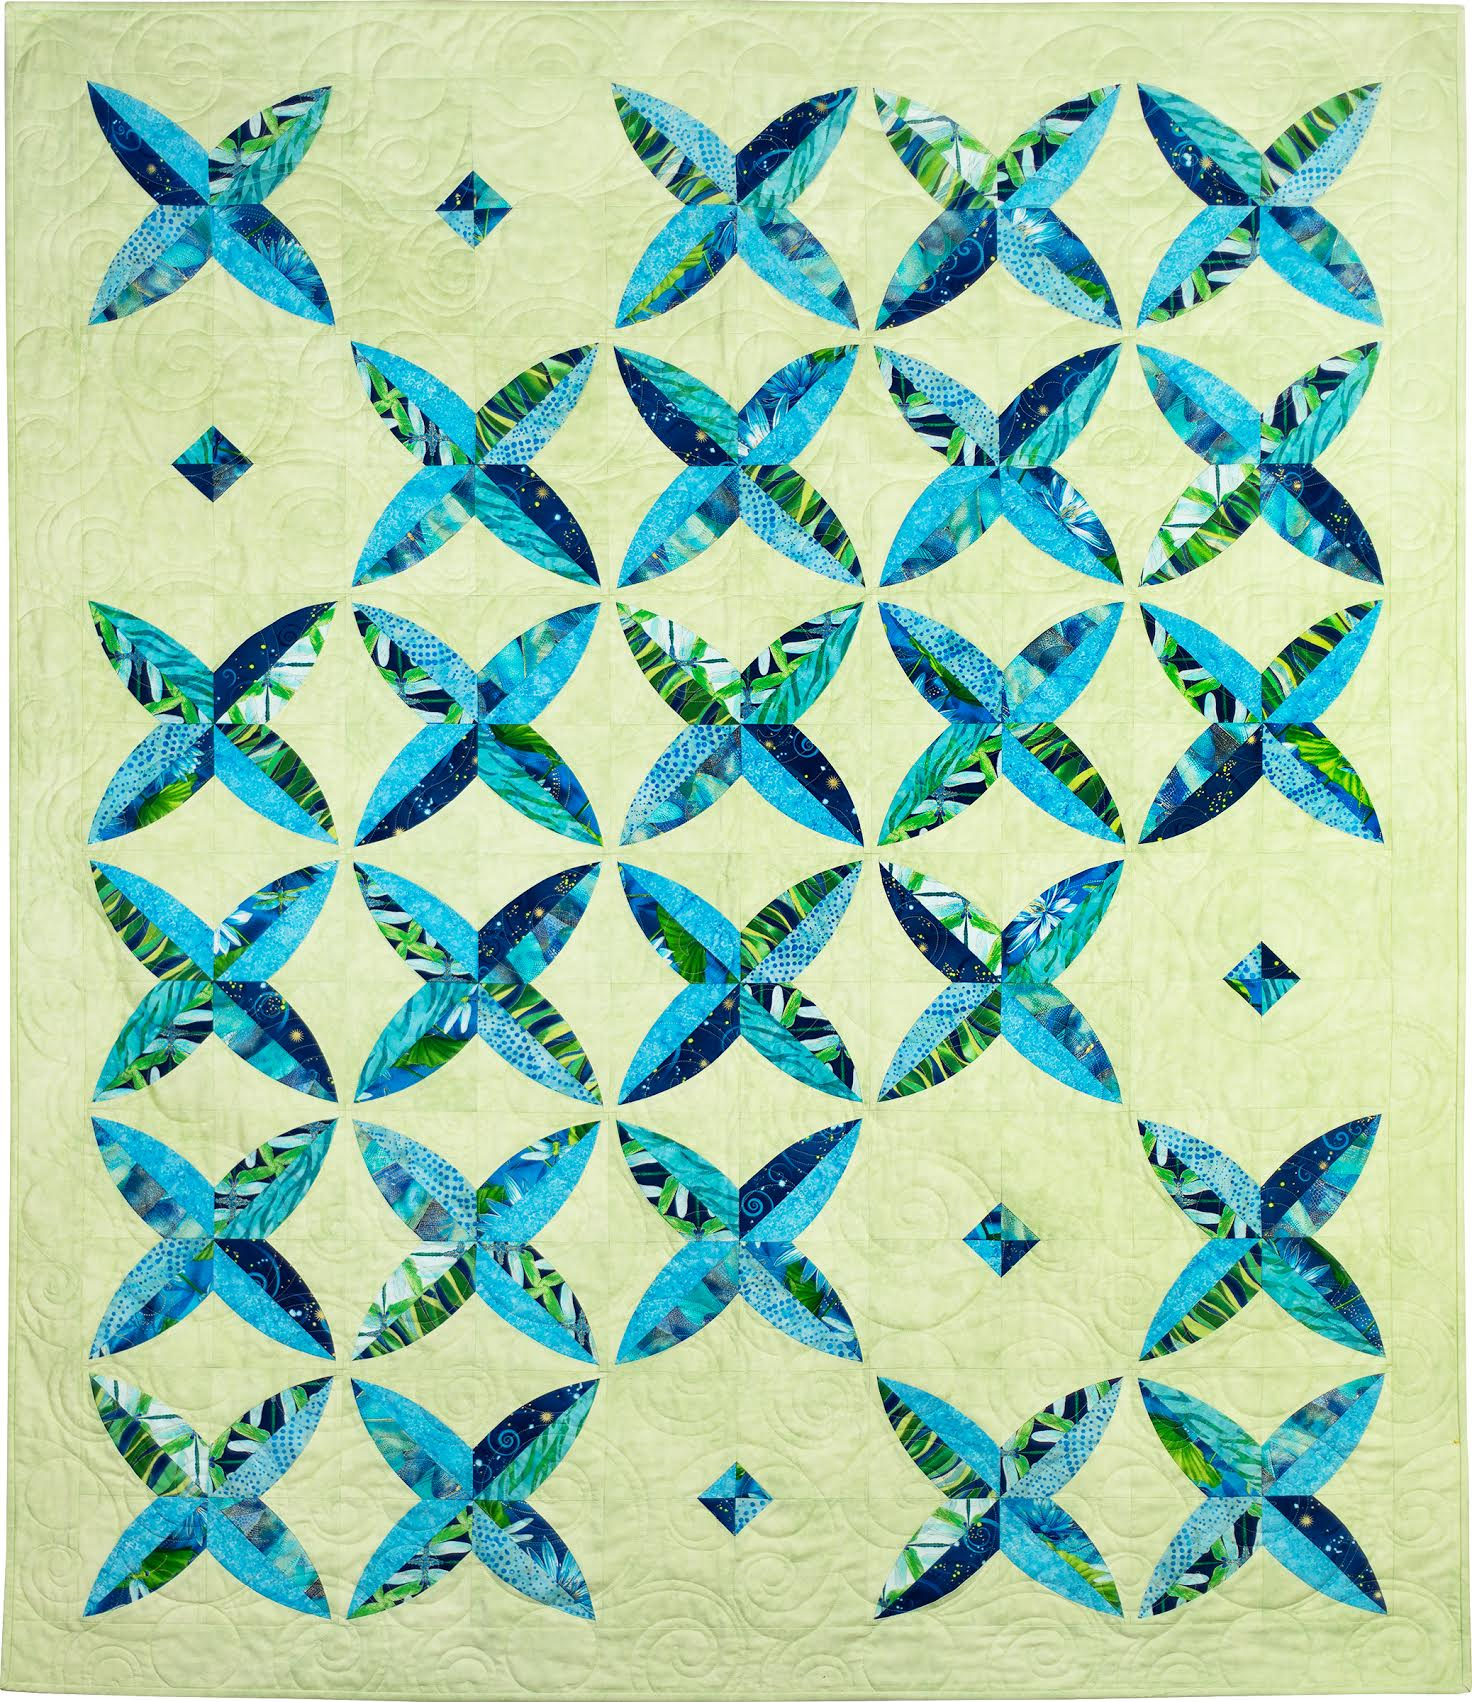
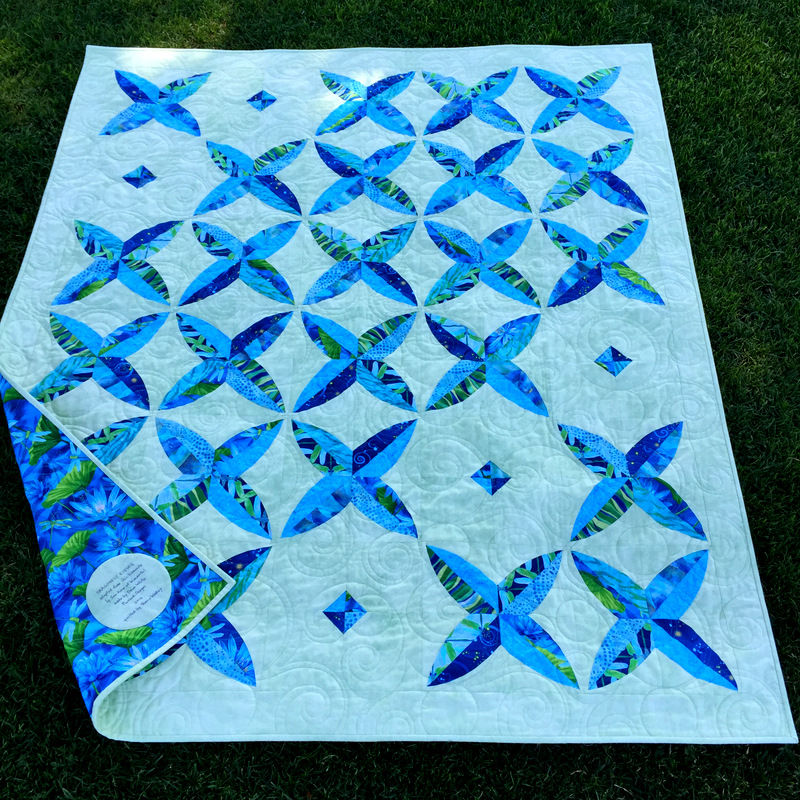
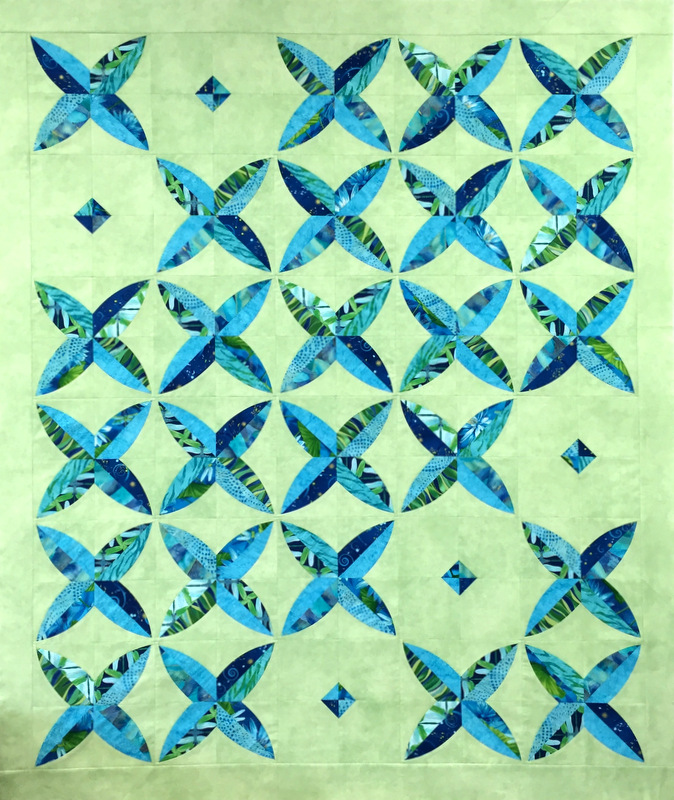
Dragonfly Kisses measures 50″ x 59″, a good size for a throw. The design is a variation of Chic Diamonds by Sew Kind of Wonderful.I believe this is the seventh or eighth quilt I have made using the Quick Curve Ruler, also made by SKW.
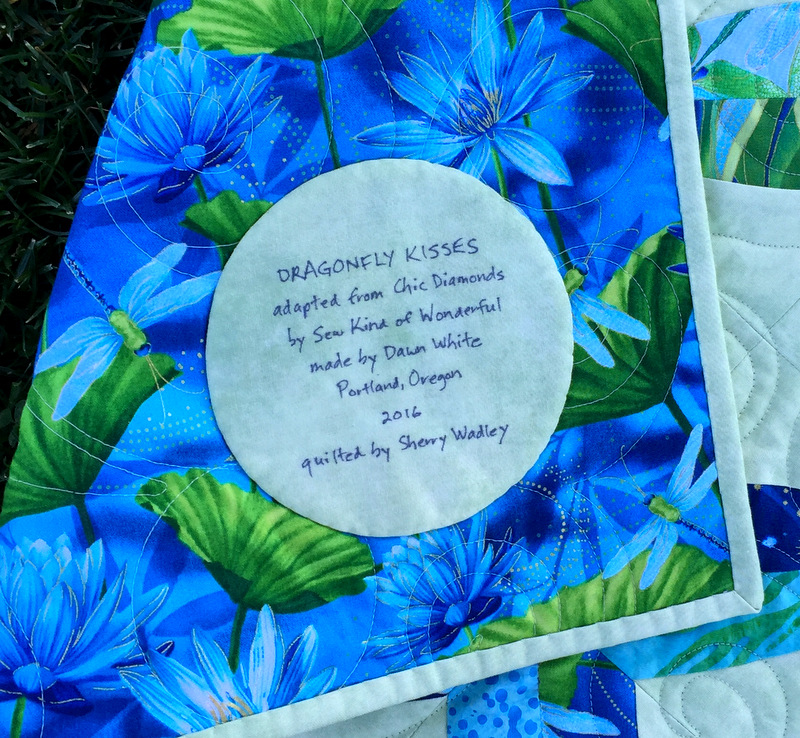
Here’s a close-up of the label, made with my favorite method using a compact disc for a pattern:
See that dragonfly just to the left of the label? There’s one in the lower right corner, too. That fabric is one of six I used from the “Dance of the Dragonfly” fabric line, due in quilt shops this month. The fabric line was designed by Maria Kalinowski for Kanvas Studio in association with Benartex. (Something tells me I need more of this fabric, which comes in an equally beautiful plum/olive green colorway.)
Dragonfly Kisses is officially a quilt. Longarmer Sherry Wadley delivered it to me last night, just a week after I finished piecing it. I’m always amazed at how much lovelier — and livelier — a quilt top is after it’s been quilted. It goes from being flat to having instant dimension.
In the case of Dragonfly Kisses, I wanted an allover design scaled on the spacious side, as I wanted the focus to be on the quilt design (my variation on Sew Kind of Wonderful’s new Chic Diamonds pattern) and on the gorgeous metallic-tinged fabrics from the aptly named Dance of the Dragonfly line by Kanvas Studios and Benartex.
The quilt has a lot of background space (negative space, in modern parlance), and I do think that some fairly dense custom quilting would have resulted in a beautiful quilt, but that wasn’t the look I was going after on this one.
Sherry and I chose a quilting motif whose circles and swirls are reminiscent of gentle ripples in water. I also chose a pale green thread that would almost vanish into the background fabric, providing just a touch of texture. Mission accomplished. (Thank you, Sherry!)
Here’s a look at the front of the quilt . . .
. . . and a close-up of the quilting:
The basic block, made with the Quick Curve Ruler, finishes at 9″ square so the four blocks above measure 18″ square. That should give you a better idea of the scale of quilting. Before I sent Dragonfly Kisses off to be quilted, it measured 51″ x 60″. The quilting process drew it up an inch all around, so now it measures 50″ x 59″.
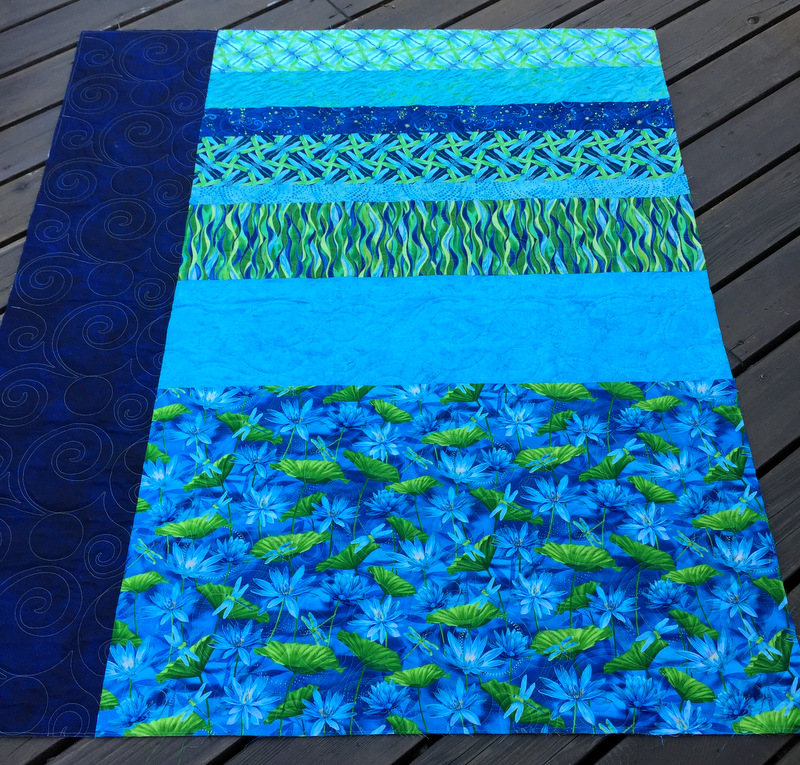
Here’s the back of the quilt, with five of the six fabrics from the Dragonfly line spliced with the three batiks I used . . .
Here’s a close-up of the beautiful lily pond fabric, where you can actually see those dancing dragonflies:
Now it’s on to the finish work: attaching the binding, sewing it down, and adding a label. My goal is to have this done by the end of the week. This could well happen if I don’t get too distracted by some of my other works-in-progress.
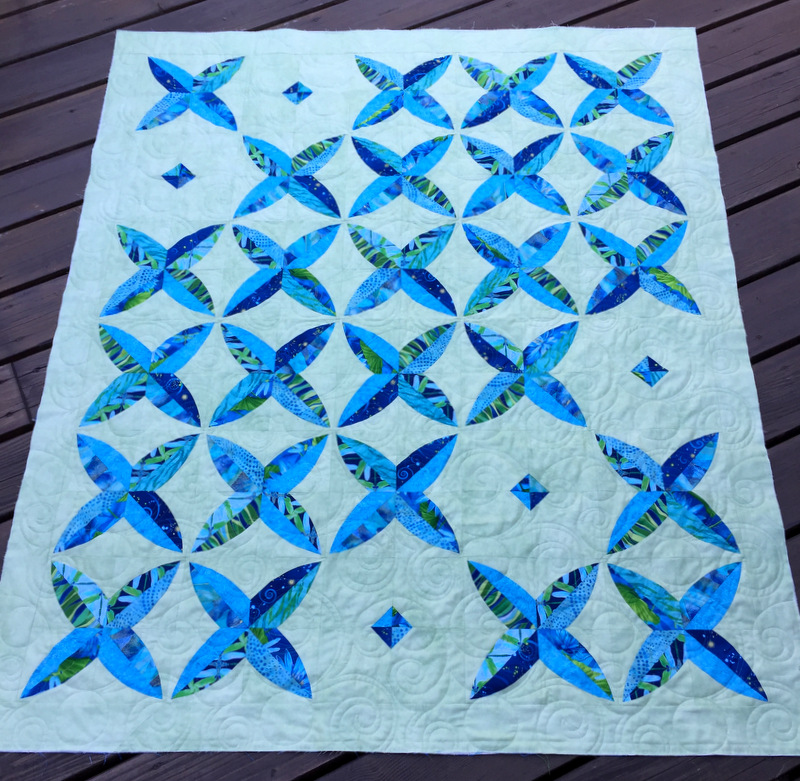
Yesterday I finished piecing Dragonfly Kisses, based on the pattern Chic Diamonds by Sew Kind of Wonderful:
I originally thought about using white or pale blue for the background but am so glad I went with the pale mint instead. It’s so refreshing, don’t you think?
Chic Diamonds was designed as a jelly-roll friendly pattern, since the pointed pieces (I call them blades) are made from 2½” strips that are sewn in pairs and then trimmed using the Quick Curve Ruler. Triangles cut from the strip pairs are saved and used in each block. Six blocks in the design are intentionally left blank as a design element, perhaps to give the eye a place to rest.
I decided early on not to use all the triangles, wanting to make my quilt less busy so a viewer’s eyes would be drawn to the X blocks (the kisses). I used only 20 triangles rather than the 240 called for in the pattern. And I put my triangles in the middle of the blank blocks rather than in the blocks with the blades. (Thanks to my friend Deborah for giving me that idea.) I like to think those triangles form the “chic diamonds” in my quilt.
The original design uses a 6 x 6 setting, finishing 54″ square. I went with a 5 x 6 setting using five blank blocks instead of six. I like the asymmetry of the look. And I added a narrow border of background fabric to float the outer blocks a bit, giving a bit more airiness to the design and making the top slightly bigger. It now measures 51″ x 60″ — a nice size for a throw or lap quilt.
Now to piece the backing. The dragonflies that gave my quilt its name are hard to spot among the narrow pieced blades so I’ll use my remaining strips of that fabric line (Dance of the Dragonfly by Kanvas Studio and Benartex) on the back.
I’m excited to report that I’ll be teaching Chic Diamonds (both the original design and my variation) at the Pine Needle Quilt Shop this fall. And rumor has it the Pine Needle is going to have kits available of Dragonfly Kisses!
While I ponder how to move forward on my Chipmunk Love quilt, based on the “Star-Crossed Lovers” class with Colleen Blackwood that I took last week in Sisters, Oregon, sewing continues on two other WIPs (works in progress).
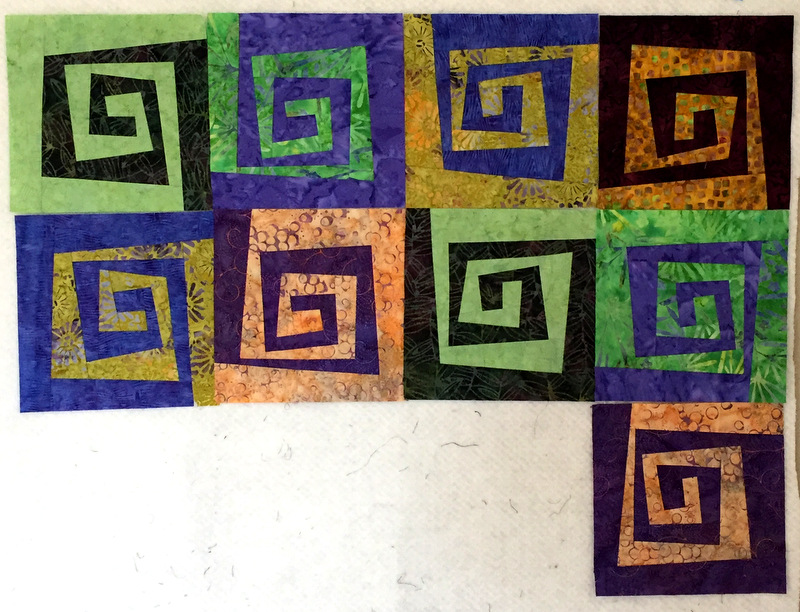
I’ve made a few more wonky Greek key blocks using the pattern from the other class I took in Sisters last week, Karla Alexander’s “Rewind” using her new pattern of the same name. Here are the blocks I made before we came home . . .
Blocks Measure 8½” Untrimmed
. . . and the ones I have made since then:
Four More
These last blocks along with two from the first group were made by cutting the strips free-form rather than following Karla’s template.
Despite the wonkiness, all of the blocks look a little like the @ sign on a keyboard. Because of that I’ve decided to name my quilt Where It’s @.
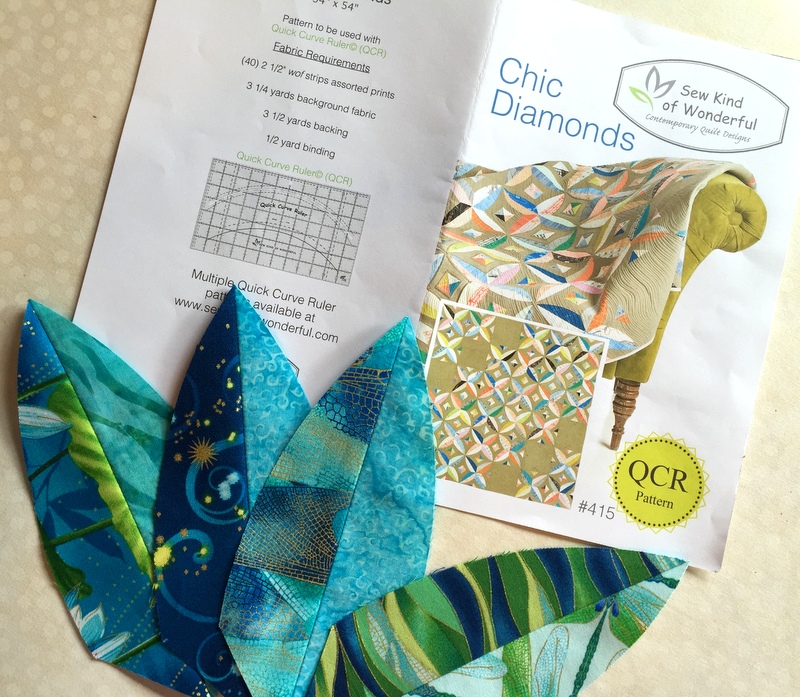
I’m also working on a quilt based on Chic Diamonds, a new pattern from those talented sisters at Sew Kind of Wonderful. This design calls for the original Quick Curve Ruler, and it’s been enjoyable working with these easy no-pin curves. Here’s one of my blocks:
Block Measures 9½” Unfinished
Aren’t those fabrics gorgeous? The prints on the dark side of each blade are from a brand new line of fabric called Dance of the Dragonfly. Designed by Maria Kalinowski for Kanvas Studio in association with Benartex, the fabrics are due in stores next month. The Pine Needle, where I teach, will be carrying several fabrics from the line. I paired the prints with batiks for my blocks.
I’m doing something a little different with the Chic Diamonds design. Here’s a hint: I’m naming my quilt Dragonfly Kisses. I’ll post a photo when I have the top together, which should be very soon.
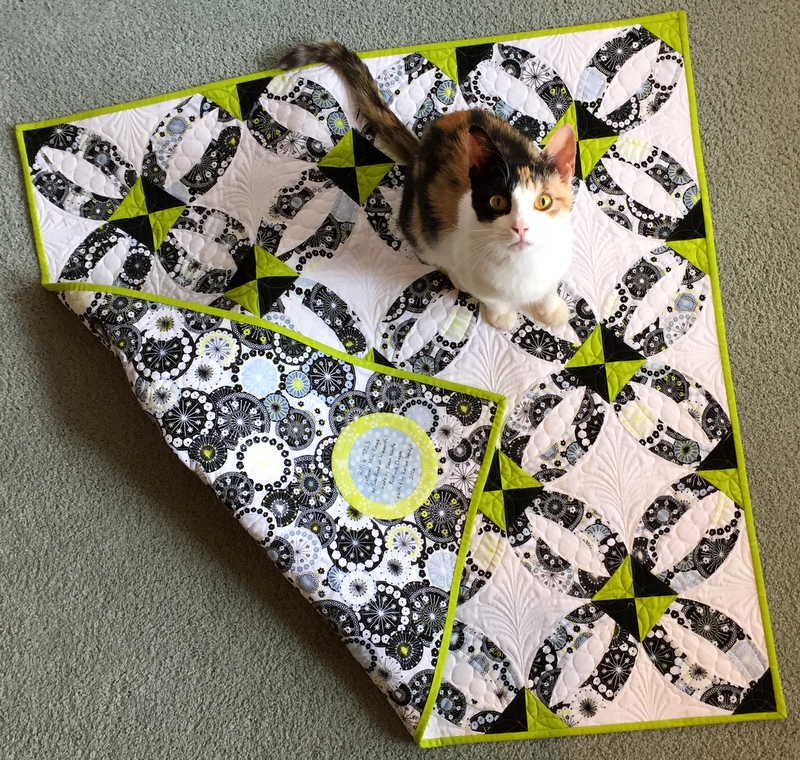
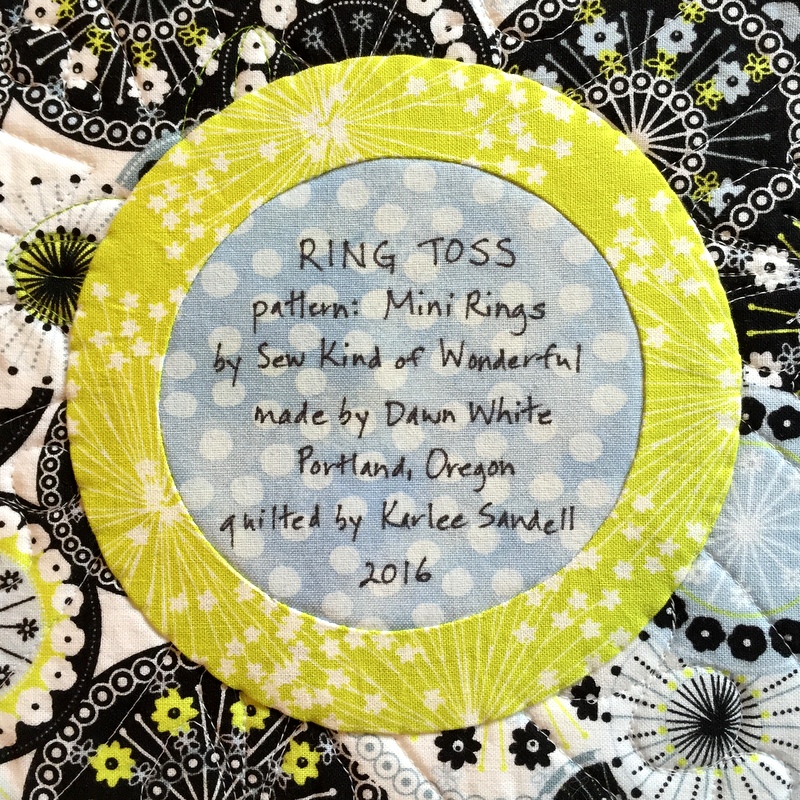
My quilt Ring Toss, based on the double wedding ring block, is finished. It measures 32¼” square. The pattern is Mini Rings by Sew Kind of Wonderful and was made with the mini Quick Curve Ruler.
As much as I liked this little quilt after getting it back from the longarm quilter (Karlee Sandell of SewInspired2Day), I like it even more now that it’s bound:
One of my friends wondered why I chose green for the binding over black. Black would have provided a strong dramatic frame for the quilt, it’s true. So why green?
First, I wanted to draw attention to the playful nature of the focus fabric used in the rings. That fabric (from the Doodle line by Alice Kennedy for Timeless Treasures) is mostly black and white with touches of lime green and light blue. The overlapping circles in the fabric remind me of ferris wheels and fireworks. A bright color seemed more appropriate than black for the happy mood I wanted to emphasize.
Second, instead of piecing a backing for the quilt with different fabrics, as I usually do, I used one piece, the same print used on the front. From a distance, the fabric reads primarily as black and white. If I had pieced the back I would have added quite a bit of lime green to liven it up. Since I wanted the quilt to be bright and cheerful from both sides, green binding was the obvious choice.
Oh, and then there is that third reason, which I think I’ve mentioned a few times before: green is my favorite color.
In keeping with the block design, fabric design, and quilt name, the label features — what else? — a double ring:

 But wait — there’s more!
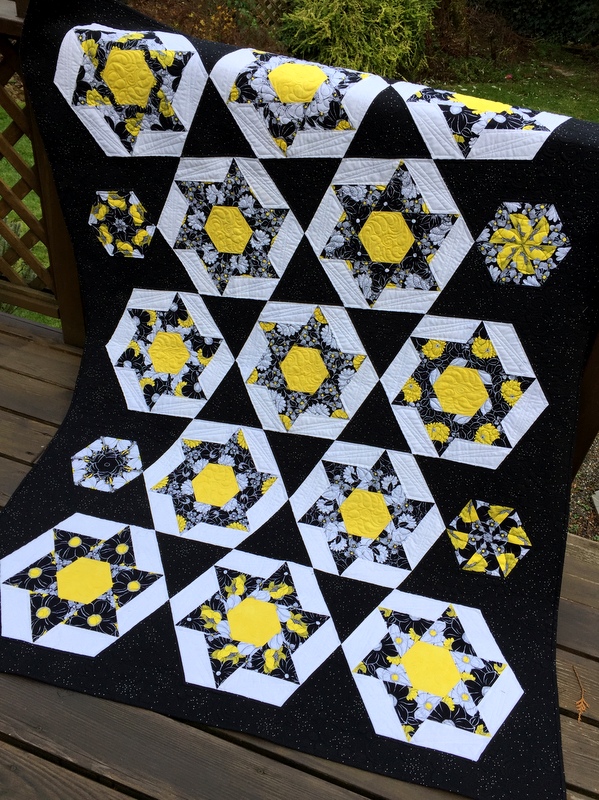

")