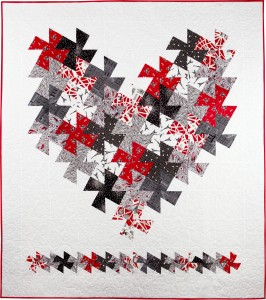
This tutorial shows how to make an interlocking pinwheel heart quilt with the same dimensions as I Love Paris. I made my own twister tool using a 6½” square acrylic ruler because I wanted my blocks to finish at 6”. I added a row of pinwheels along the bottom of the quilt using the smaller of the two Lil’ Twister tools made by CS Designs; those blocks finish at 3”.
Finished size of quilt: 58” x 64”
Size of block: 6”
Width of outer borders: 6”
My quilt was made of Paris-themed fabrics in black and white and red. There are lots of Paris-themed fabrics on the market now, but the pinwheel heart would look good in many other combinations of fabrics and colors.
If you haven’t used the Lil’ Twister tool before, I recommend that you watch an on-line tutorial. Many good ones are available; simply enter “lil twister tutorial” on a search engine such as Google.
Making a quilt with twister tools requires a lot of fabric, plenty of which falls by the wayside as scraps. In I Love Paris, the background and border strips were cut from the same fabric because I wanted the heart to float on the background. I kept going back to the quilt shop for more background fabric — a white on white print with hearts, by the way — because I didn’t know how much I needed; I was just making the quilt up as I went along. For this tutorial I calculated the yardage so you need to make only one trip to the fabric store.
Supplies
3½” square Lil’ Twister tool by CS Designs
6½” square acrylic ruler, any brand
Fine line marking tool, such as a Sharpie Ultra Fine Point, in black or other dark color
(optional) Digital camera
(optional) Spray starch or starch alternative, such as Mary Ellen’s Best Press
Fabric requirements
Heart motif: (33) 8½” squares of assorted prints (a few light, plenty of medium and dark values)
Row of small pinwheels along bottom: (15) 5” squares of assorted prints (mixed values, as above)
White background fabric: 3¾ yards
Binding fabric: ⅝ yd
Terms
WOF = width of fabric
LOF = length of fabric
Background strips = strips that are attached to the four sides of the quilt top after the initial squares have been sewn together but before the twister squares have been cut. These are distinct from the . . .
Border strips = strips that are attached to the quilt top after the twister squares have been sewn together.
Cutting the white background fabric
Cut in the order listed.
1. Cut (4) strips 8½” x WOF. Trim selvages. Unfold the strips, stack them, and cut (4) 8½” squares, for a total of 16 squares. These 16 squares will be used for the background of the heart motif.
From two of the leftover pieces cut (2) 3” x 5” strips; these are the side strips for the row of small pinwheel blocks along the bottom.
2. Cut (2) strips 5” x WOF. Trim selvages. These will be pieced to make 1 of the 4 background strips for the heart motif.
3. Cut (4) strips 3” x WOF. Trim selvages. These will be pieced to make the top and bottom background strips for the row of small pinwheel blocks along the bottom.
4. Cut a length of fabric 69” (you should have about ¼ yd left over. Keep that piece intact, just in case). Fold in half on the crosswise fold. Measure fabric width. You should have at least 42” of usable fabric, not counting selvages. Trim selvages.
Cut (3) strips 5” x LOF. These are 3 of the 4 background strips for the heart motif.
Cut (4) strips 6½” x LOF. These are for the outer borders of the quilt.
Note: Fabric widths can vary widely. If you have less than 42” of usable fabric, decrease the width of the outer border strips. For example, if you have only 40” of usable fabric, cut the (4) outer border strips 6” instead of 6½”.
Cutting the binding fabric
Cut (7) 2¼” strips x WOF.
Marking the 6½” square ruler
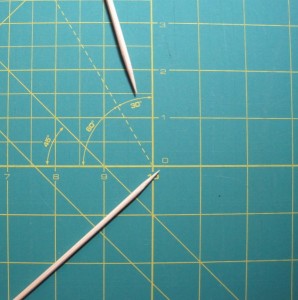
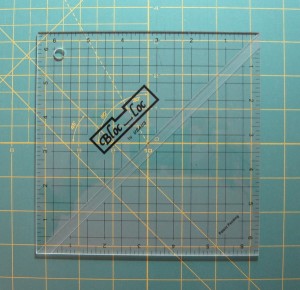
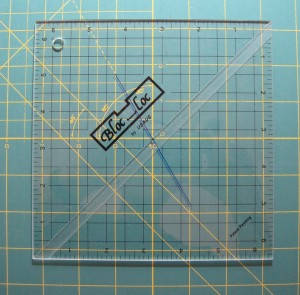
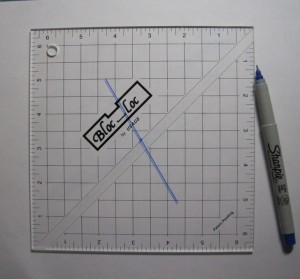
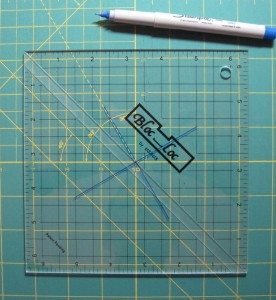
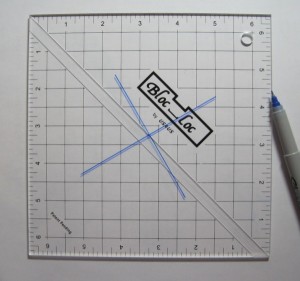
The Lil’ Twister tools are marked with two lines crossed at right angles and tilted 30°. There are two quick ways of making your own template for a 6” twister block. One is to center a 6½” square ruler on top of the 3½” square Lil’ Twister tool and trace the two intersecting lines with a fine point Sharpie marker or similar pen. (The lines can be removed later with polish remover.)
The second way is to mark the lines using the 30° angle on your rotary cutting mat as a guide. On my mat the 30° angle is indicated by a dotted line. Mark the center of the 6½” square ruler with a small dot. Center the dot over the zero mark on the mat. Lay a small ruler on top of the square ruler along the dotted line and draw a line extending about 2” on both sides of the dot. Rotate the ruler 90° — a quarter turn — and draw the second line.
Starching the squares
This is an optional step but one I recommend. The Lil’ Twister squares that emerge from these initial squares are cut on the bias, so starching the fabric at this point is a good idea. Lightly mist each square with starch (I really like Mary Ellen’s Best Press, a clear starch alternative), being careful not to distort the fabric by dragging the iron across it.
Making the quilt
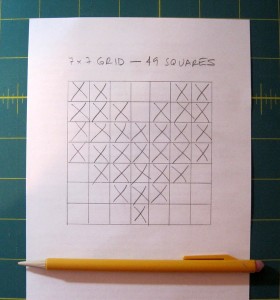
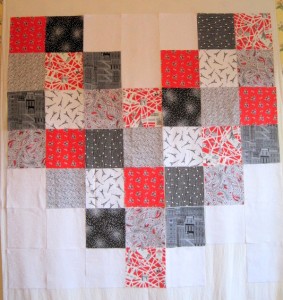
1. Arrange the 33 colored squares in a heart shape on a 7 x 7 grid, preferably on a design wall. Refer to the chart below for placement of squares. Colored squares are indicated with an X; the unmarked squares are where the background squares go.
2. Using a small stitch length – about 12 stitches to the inch — sew blocks together in horizontal rows. Row 1: press the first, third, and fifth seams to the left. Press the second, fourth, and sixth seams to the right. Do the same thing with rows 3, 5, and 7.
Row 2: do just the opposite: press the first, third, and fifth seams to the right; press the second, fourth and sixth seams to the left. Do the same thing with rows 4 and 6.
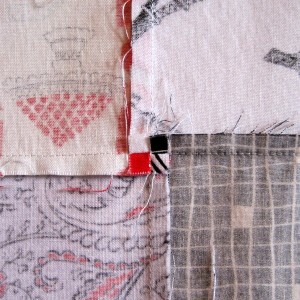
3. With right sides together, pin the first row to the second row, matching seams. The seams will be opposing, or “nesting.” Sew the rows together. With a seam ripper, pick out the seam allowance at each intersection on both sides of the seam. (That’s the reason for the small stitch length.)
Rotate or “pop” the seam allowance open, allowing the four connecting seams to be pressed in the same clockwise or counterclockwise direction. You’ll see a tiny 4-patch design emerge where the four seams intersect. Popping the seam allowances open is a bit of extra work but it gives each pinwheel a nice flat center – something you’ll really appreciate when it’s time to quilt it.
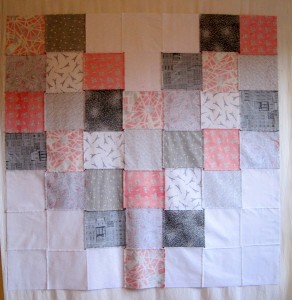
4. Trim two of the long 5” wide background strips the exact measurement of the length of the quilt top (should be 56½”). Sew strips to the sides. Press seams to the outside.
Trim the third long 5” wide background strip to the exact measurement of the width of the quilt top (should be 65½”). Sew strip to the top. Press seam to the outside.
Sew the two 5” x WOF background strips together to make one long strip; press seam open. Position the strip on the bottom of the quilt top with the seam in the middle of the fourth block, i.e. the center of the heart motif. (The seam becomes part of the waste fabric when the pinwheel block is cut from the larger square.) Trim strip even with the sides of the quilt top; the measurement should be the same as the strip across the top. Sew strip to the bottom. Press seam to the outside.
5. Cut pinwheel blocks using 6½” square ruler marked with 30° angle. Reassemble the blocks on your design wall and evaluate the design. Are you happy with the arrangement? Does your heart stand out from the background? This is the time to make changes, even if it means making new blocks or modifying existing ones. Please see “Using Directional Fabrics” at the end of this tutorial.
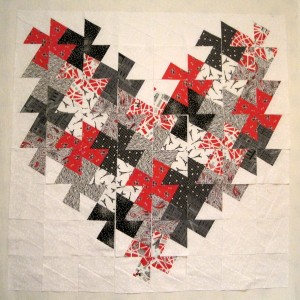
6. Sew blocks together in horizontal rows. Press the seams in each row in alternating directions as explained in Step 2 above, with the first seam pressed to the left in the odd numbered rows and the first seam pressed to the right in the even numbered rows. Sew rows together. Instead of popping the seam allowances at each block intersection, press each row seam in one direction (I usually press toward the top of the quilt, as I did on I Love Paris) or press the row seams open. I generally don’t press ¼” seams open but I find it works well on seams with bias edges.
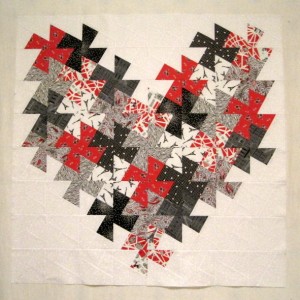
7. Sew (15) 5” squares of assorted prints in a horizontal row. Press the seams in alternating directions as explained above, with the first seam pressed to the left.
Sew a 3” x 5” strip to each side of the row of squares. Press to the outside. Sew two of the four 3” x WOF strips together to make one long strip; press seam open. Repeat with the other two strips. Position the strips above and below the row of squares, making sure the seams fall in the middle of a block. Trim strips to the measurement of the row of squares (should be 80½”). Sew strips to the top and bottom; press to the outside.
8. Cut pinwheel blocks using small (3½” square) Lil’ Twister tool. Sew blocks together in horizontal row. Do not press seams yet. Lay the quilt top face down with seams exposed and then lay the strip of small pinwheels face down along the bottom. The center seam of every other 3” twister block will be aligned with a seam from the quilt top. Using the tip of a pin as the point of an arrow, mark the direction those seams must be pressed to be opposing. The remaining pinwheel seams will fall in the middle of a 6” block and can be pressed in either direction. Press seams and sew strip to the quilt top.
9. Staystitch a scant ¼” inch around all four sides to stabilize the bias edges. This minimizes stretching when outer borders are applied.
10. Measure the quilt length on the sides and down the middle; take the average of the three measurements. Cut two 6½” strips the averaged length and sew to the sides, easing where necessary. Remember that the edges of the quilt top are bias; handle carefully to avoid stretching. Press seams toward the outside. Measure the quilt width at the top and bottom and across the middle; take the averaged width of the three measurements. Cut the remaining 6½” strips that width and sew to the top and bottom. Press seams toward the outside.
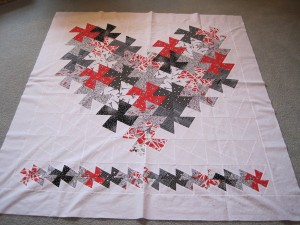
Your quilt top is now complete!
Using Directional Fabrics
The one quibble I have with the Lil’ Twister tool is no fault of the designer’s but rather an inherent feature of the tool itself: Because the four pieces that make up a pinwheel are all cut at a 30° angle, the pinwheel doesn’t spin. But isn’t that the point of a pinwheel? To spin, like a windmill? With solids and smallish prints, the lack of movement isn’t noticeable. What you tend to see is the contrast in value between the interlocking pinwheels.
But look what happens when a striped fabric or strong directional print is used:
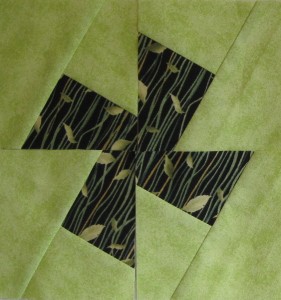
All of the lines are going in the same direction. Do you see how static that is?
Now look at the pinwheel with the top right and bottom left pieces replaced with new pieces going the other direction:
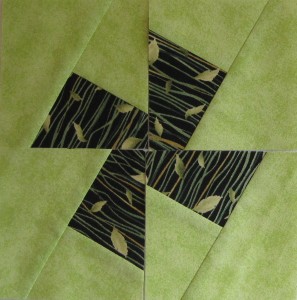
Do you see how much more movement it has?
Here are the two blocks side by side:
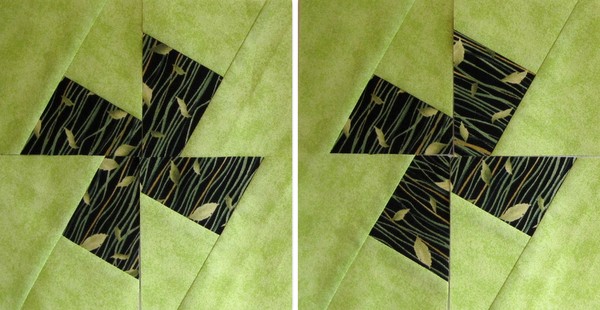
I think you can see that the block on the right is more dynamic. The bolder the stripe or directional fabric, the more dramatic the difference. While I was working on I Love Paris, I was so bothered by the lack of movement in my zebra print blocks that I took sections of the blocks apart and remade them.
I realize some quilters may not have a problem with this feature of the Lil’ Twister tool, and I’m fine with that. But if you are planning to make a twister quilt with some striped or directional fabrics thrown into the mix, you might want to plan ahead and put some spin in those blocks.
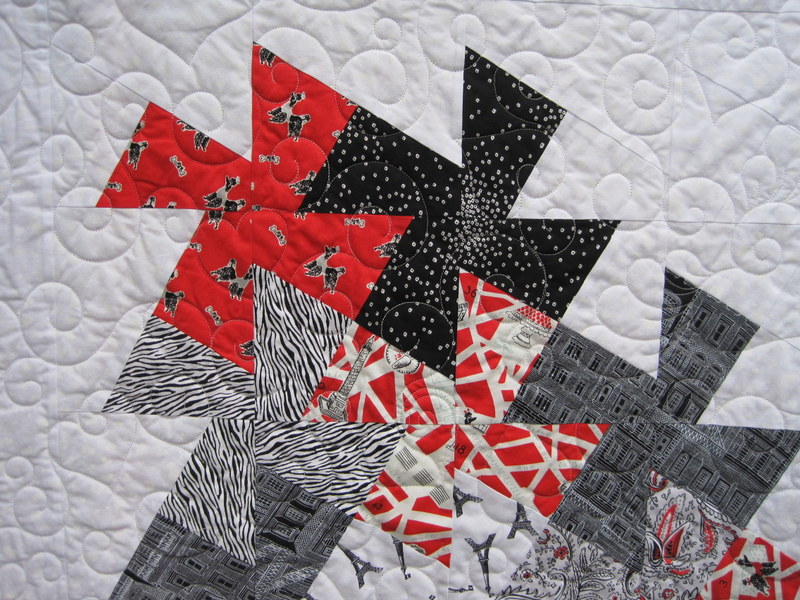
Here’s a close-up of the left corner of I Love Paris with one of those zebra print blocks in it:
Questions? Feel free to email me!

This was one of the best tutorials I’ve ever seen. You did an awesome job. Thanks so much for sharing. I don’t have a twister ruler, but have seen many of these made in the smaller size. No one has mentioned the problem with the directional or stripe fabrics, but I totally agree with you. The spinning is so much better.!! I love the colors in I Love Paris.
Thank you so much for doing this tute…..I am going to use it to make a lap quilt for our local Hospice.
I totally agree that the spinwheels should spin, but any pointers on how to make that happen other than taking the block apart and re-doing it?
Yes, Barb, but it does take a bit more time and fabric. Rather than taking the block apart and re-doing it, I usually make a new block. After I have my quilt blocks on the design wall and see which blocks need to spin, I remove them from the design wall and make new blocks, being careful to change the orientation of the directional fabric to get the spin I want. I have to make two new blocks for each pinwheel I want to spin, because two of the four blades of the pinwheel have to spin in the opposite direction. The discarded blocks can be put on the back of the quilt or saved for another project.
Thanks for the great tutorial, a couple things would make this even more fun. I would like a chart of the square size (finished) ie, 3″ and what size twister or (newly made) ruler is needed to work with that. Also be sure to mark the top of your newly marked ruler and be sure not to flip it over, ask me how I know this, it really goofs up the pinwheel blades and also the left over centers are a wierd size!! Keep up the good work. K
Un grand merci pour ces merveilleuses explications.