
Yesterday I finished Block 2 of Reach for the Stars, a lovely sampler quilt featured in Quilter’s Newsletter, with directions spaced over seven issues beginning with Oct./Nov. 2013. The quilt, designed by Terri Krysan, features a center medallion surrounded by 14 blocks, all on point.
I’ve already posted pictures of my Blocks 1 and 3 and the center medallion. To refresh your memory:

And here is Block 2:
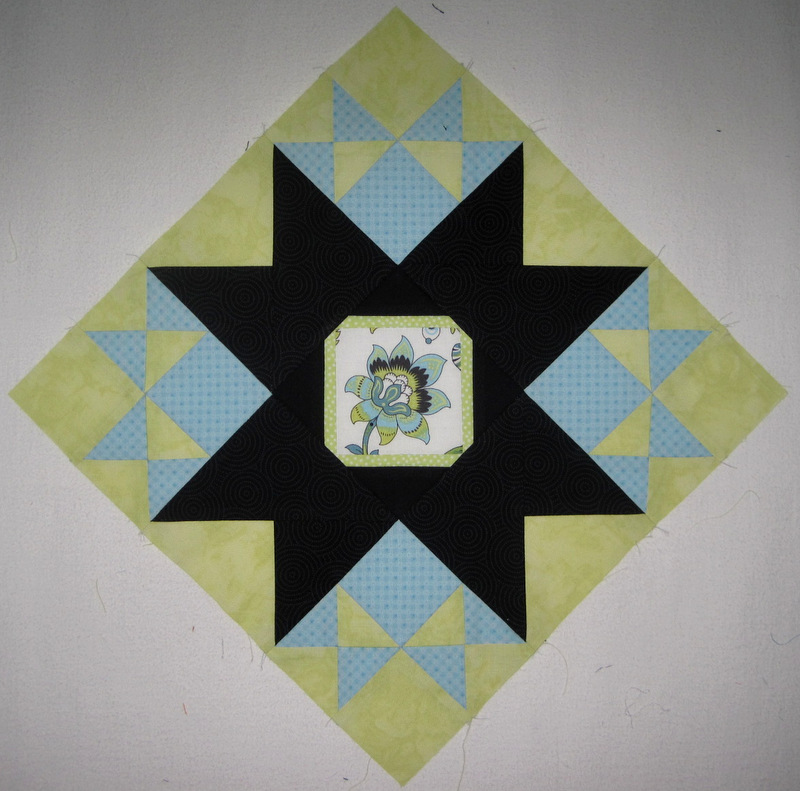
The magazine’s cutting and piecing directions are abbreviated at best, so I am studying each block in advance, challenging myself to figure out how to cut the fabrics and piece the components in a way that will yield the most accurate final block measurements.
Case in point: the hourglass blocks in the corner squares.
Each corner block contains two squares — one green and one blue, in my version — and two hourglass blocks, each composed of two blue and two green triangles. The hourglass blocks are sewn to the squares, forming a 4″ finished square. Each hourglass block finishes at 2″ square.
The magazine calls for the hourglass sections to be cut from 3-1/4″ squares. To be precise, four quarter-square triangles cut from one square. Do you have any idea how small these triangles would be and how difficult it would be to sew the bias edges together and press them without any distortion? I know I couldn’t do it. I press with a heavy hand and am sure I would wind up with wonky hourglass blocks.
I hit upon the idea of cutting my hourglass blocks from 4-patches, “popping” the center seam open so the intersections would be nice and flat. Then I cut the 4-patches on the diagonal into 2½” squares:
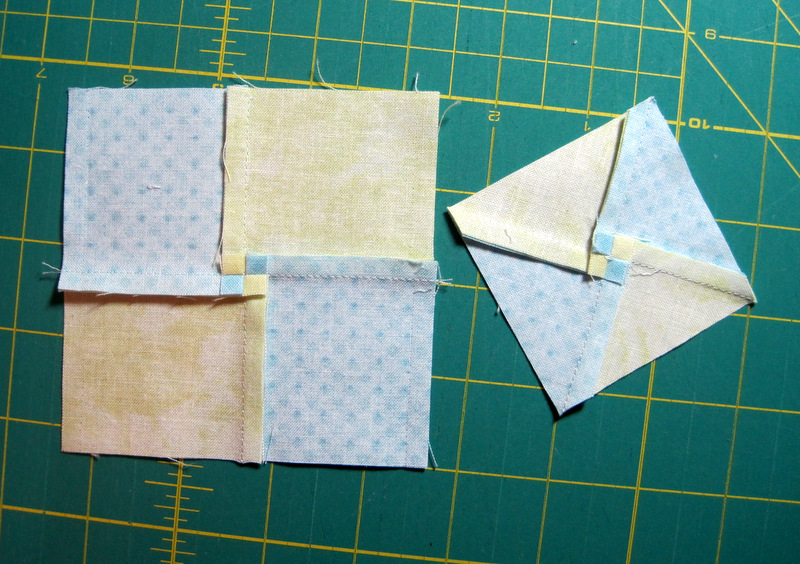
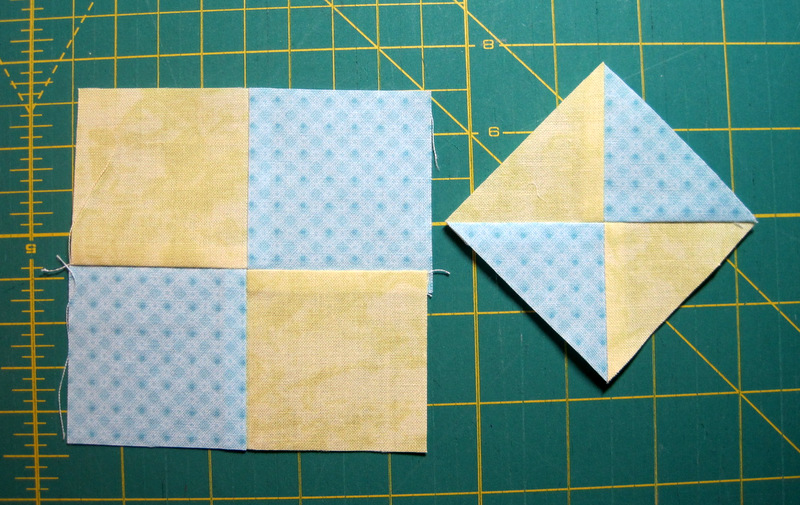
That hourglass block has bias edges but each edge is sewn to a straight-of-grain edge so no problem there. I’ll outline the full method if there is interest.
Jennifer Gwyn at Seams Crazy has finished her center medallion and made Block 1, and both are just beautiful! Be sure to take a look at her most recent posts. Sherri Crisp of Knoxville, Tennessee is sewing along with us, and Jennifer has a photo on her blog of Sherri’s center medallion. Simply gorgeous! Another quilter, Jennifer Thacker of Houston, Texas has started Reach for the Stars, too, and we are looking forward to seeing her blocks revealed.
The Feb./March 2014 issue of Quilter’s Newsletter is out now, with directions for Blocks 4, 5, and 6. I understand that Sherri is paper-piecing her RFTS blocks. As I look ahead to Block 5, I think I may give that method a try for part of the block. Stay tuned!
It’s fantastic! You are such a whiz at sewing, I am so impressed. Love the way you use black. Better watch out, the modern quilters might want to steal that great idea. 🙂
I did a similar BOM at a local quilt store and they had two employees who made the blocks in advance of our sessions. They also had problems with the cutting directions so improvised to come up with the best solutions for the entire class. For the most part they admitted they had to cut the pieces a bit larger than in the directions in order for things to come together correctly. Your blocks are beautiful. I look forward to each new posting.
I thought you were taking a break! Ha ha ha…. beautiful block again! I just finished block 2 last night and posted it about it now. Wish I had a bigger design wall 🙁 Love how vibrant your colors are!
Dawn your blocks are gorgeous! I love your use of color and texture. Simply awesome!