A Table Topper for My Twin

I drew my sister Diane’s name in the siblings and spouses Christmas gift exchange. And — she drew mine! That doesn’t happen very often. This is what I am giving her:

2012-12, table topper
It’s a table topper. You may remember seeing the unfinished top in an earlier post. Diane saw that post and fell in love with the fabric (from the Ainsley line for Northcott Fabrics) and the kaleidoscope block. When I drew her name, I decided to finish the table topper for her.

I didn’t want the topper to be poufy so I used flannel for the batting. It’s quilted very simply. First I stitched in all the ditches and then quilted on both sides of the straight lines in the center and outer edges. Then I quilted a triangle in each of the eight wedges of the kaleidoscope. The simplicity of the quilting keeps your eye focused on the flowers and leaves and vines in that gorgeous Jacobean print:

table topper detail
Here’s the back of the topper:

2012-12, table topper from back
I had never before applied binding to a quilt with obtuse angles (greater than 90 degrees but less than 180). Thanks to Heather Mulder Peterson of Anka’s Treasures, who posted a terrific tutorial on her blog, Trends and Traditions, it was a breeze.

Diane’s table topper — #5 in my series of kaleidoscope quilts — measures 22″ across and 22″ top to bottom.

I hope she likes it — and I hope she doesn’t see this post until after she opens her gift!


Posted in family, kaleidoscope quilts, table topper, update | 6 Comments

Pocket Watch

Do you have any idea how hard it is to find men’s shirts with two simple patch pockets? It’s the only kind the Dear Husband likes to wear. Most shirts nowadays are made with one pocket — or none at all. On the rare occasions when I spot dress or casual shirts with two pockets, I buy several. It’s been a few years since I’ve found some, and many of the DH’s shirts are wearing out. (If you see any two-pocket shirts during your holiday shopping expeditions, please email me!)

Macy’s was having a big sale on men’s shirts last week so I picked up a few. Alas, none of them came with two pockets. I’ll show you what I did to remedy that (something I’ve been doing for 30-odd years).

This particular shirt had no pockets:

shirt 1, before

First, I cut off the sleeves at elbow length and narrow hemmed them. I cut the lower part of one sleeve apart and pressed it flat:

shirt 2, sleeves off-001

These sleeves were extra long so I was able to fashion two pockets out of one sleeve remnant. Here’s one of the pockets as seen from the front . . .

pocket front 500

. . . and from the back:

pocket back 500
Here are both pockets made and sewn onto the shirt:

shirt 3, after
It’s a little hard to see these pockets because the stripes are matched. Here’s a close-up:

shirt 4, pocket detail-001
Oh, and here’s the best part: the price tag:

shirt 5, price tag-001


Posted in family, update | 1 Comment

Batik Bowties

Here is a little top I just finished that features raw-edge machine appliqué in the bowtie blocks and a gradated fabric in the alternating blocks and setting triangles:

gradated-bowtie
Raw-edge machine appliqué is a technique I avoided for years because of concerns about fabric fraying around the edges. Then in October, Nicole of Sister’s Choice Quilts wrote about machine appliqué using Steam-a-Seam-2, a double-sided fusible web. I’ve used Steam-a-Seam-2 on other projects but not in combination with machine appliqué. Nicole reports that she has never had a problem with frayed edges and proved it by showing pictures of one of her quilts that’s been washed multiple times. Based on Nicole’s photos, comments, and excellent instructions (see them here), I decided to give machine appliqué a try.

I chose the bowtie block, one of my all-time favorites, which I’ve always made the traditional way using Y-seams. Y-seams are a little time-consuming but the results are wonderful. (A note to those of you who avoid Y-seams like the plague: I have my own little trick in sewing them, which I will share in a future tutorial).

The bowtie blocks shown above came together much more quickly: each block is a simple four-patch with a contrasting square for the knot, fused in place and finished with a blanket stitch. The fastest bowtie block ever!

Here’s a close-up of a block with the fused knot . . .

bowtie block before 400-001

. . . and the same block with the blanket stitch added:

bowtie block after 400
Here’s the same block from the back:

bowtie block from the back 400
When I made the four-patch blocks, I rotated or “popped” the seam allowances open, allowing the four connecting seams to be pressed in the same clockwise direction. This gives each block a nice flat center — an important consideration when you are fusing another layer of fabric to it.

For the alternating blocks I chose an ombre fabric from the Daiwabo Collection by E. E. Schenck that gradates from a pale lemony yellow to a burnt sienna. Because the alternating blocks are set on point, I had to cut them on the bias to achieve the gradated effect.

The result is Bow-tique Sunrise, a colorful, quirky little quilt. It measures 35″ x 43″, and the blocks are 6″ square. Instead of adding borders, I’m going to finish it as is, binding it in the multicolored batik featured in the bowtie blocks. Don’t you think it will make a cute baby quilt?


Posted in bowties, gradated fabric, machine applique, update | 1 Comment

Sewing Machine Dust Cover: Still Experimenting

A couple of months ago I made a very simple dust cover for my sewing machine and wrote a post about it. Here’s one of the photos from that post:

Sewing Machine Dust Cover


As I was working on it, I was thinking about modifications I would make on the next one: rounded corners, for one thing, and incorporating some kind of trim. Last week I had a chance to experiment, and here is the second version:

The Experiment Continues
A Slightly Different View


The patterned fabrics are from the Enchantment line by Kathy Davis for Free Spirit Fabrics. I used a soft mottled green (Krysta by Michael Miller) for the flange trim and binding.

I like this version a lot but have a couple more tweaks in mind. Stay tuned . . . there will be Version 3. At this rate, my sewing machine will have a full wardrobe of dust covers.


Posted in sewing machine cover, update | Leave a comment

RIP Elfie

I had no idea, when I took this photo in September, that we would be saying goodbye to Elfie so soon. She was 18, and we had her for 16 years, the longest we’ve had any cat. We had her put to sleep last night after a very short illness. At least she didn’t suffer long.

We got Elfie at the Oregon Humane Society when she was about two. She came with the name Monkey, which we promptly changed. All our cats are named after royalty — this is what happens when your husband is a retired history professor — so she was renamed Queen Elfgifu, Elfie for short. (In case you’re not up on your 10th century English history, Queen Elfgifu was married to King Eadwig — and yes, we once had a cat named Eadwig.)

Elfie wasn’t allowed on my quilts because she was a kneader. I was refolding quilts one day in September and when I turned around, there she was stretched out on the quilt pictured above, looking very content. I grabbed my camera and took a couple of photos before ushering her off the quilt.

She was the sweetest cat ever. The Portland White House won’t be the same without her.


Posted in family, update | 4 Comments

Embellishment

Last spring when I was visiting my sister Diane in Atlanta, I renovated a guest room shower curtain and posted the photo in the Home Dec section of my Gallery. Here’s a shot of the renovated shower curtain:

Diane and I were both pleased with the result. Then, during my recent visit over Thanksgiving, we were at Frugal Fabrics in Norcross, Georgia when Diane spotted some wonderful ball fringe trim. I’m telling you, it was made for that shower curtain.

It took just a few minutes to stitch it on, and look what a difference it made:


Here’s a close-up of the trim:

We liked the shower curtain before. Now we love it!


Posted in shower curtain, update | 2 Comments

Guest Room Glamour

When I visit my twin sister Diane in Atlanta, there’s usually a home decorating project in the works. During my current two-week Thanksgiving stay (nearing its end, alas), I made a new bedskirt and window treatment for her downstairs guest room.

When Diane and her husband Ed moved into their present home 10 years ago, I made simple tab curtains for the windows:

The ruffled bedskirt, which I had made several years before, was a carryover from their old house:

This time around Diane wanted a tailored bedskirt and some kind of window treatment that could be raised and lowered. She wasn’t happy with the idea of Roman shades or any variations on that theme, so she came up with her own design: a simple pointed panel in the “down” position that folds and buttons into a valance in the “up” position.

She made a sketch of what she had in mind:

Here is Diane’s vision, transformed into reality:

She had the bright idea of adding tassels on the sides of the panels to disguise the brackets holding the curtain rods. Clever sister!

In the “down” position, the panels just cover the tops of the plantation shutters on the bottom half of the windows, completely blocking outside light:

In the “up” position, natural light floods the room:

The panels measure 34½” wide and 36½” long and are lined with blackout fabric. Five inches from the top of each panel are five self-fabric loops enclosed in a seam. About 21” down from the top are five ¾” buttons covered in the same fabric. The loops and buttons blend into the background so well you barely see them. A deep pleat is formed when the buttons are raised to meet the loops.

Here is a close-up of button and loop:

The fabric is a screen print by Mill Creek Fabrics that Diane found at Frugal Fabrics in Norcross, Georgia. The new pleated bedskirt is made from the same fabric:

The reward for my labors? I’m going home with the castoffs! I’ll probably be able to use the old tab curtains in my own home, and I’ll cut the bedskirt apart and add the ruffle fabric to my stash.

Here are a couple before-and-after shots. First the windows:

And now the bedskirt:

Let’s finish with a view from across the room:

Another successful collaboration with my twin!


Posted in bedskirt, family, update, valance | 7 Comments

Tiles in Style: A New Scrabble Bag

Scrabble is on the daily agenda at my sister Diane’s house in Atlanta where my husband and I are visiting. During our two-week visit over Thanksgiving this year, we will probably play at least 20 games. The three of us are pretty evenly matched in skill and extremely competitive — unless one of us has the possibility of a seven-letter word, in which case the other two jump in to help.

The bag that holds Diane’s Scrabble tiles was in pretty sad shape so I decided to make her a new one. I found some soft sueded fabric at JoAnn’s the other day when Diane and I were picking up notions for the home dec projects I’m working on while here (subject of a future post).

It took a mere half hour to make the Scrabble bag. Instead of making a casing at the top for a drawstring, I sewed Velcro strips.

We went from this:

to this:

Quite an improvement, wouldn’t you say?


Posted in family, Scrabble, update | 2 Comments

Make Mine Mitered: A Tutorial on Table Napkins

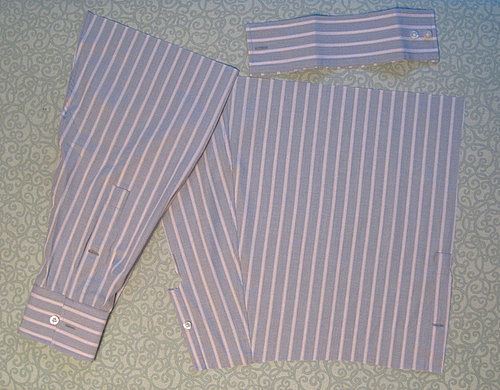
This tutorial is for a 19″ square napkin with a ¼”-wide hem and mitered corners. Here’s a look at the corners from both sides:

For two napkins, you’ll need ⅝ yard cotton fabric 42-44″ wide. Wash and iron fabric.

Supplies
acrylic ruler with 45° angle marking
sewing stiletto (I use a bamboo skewer)
removable marking pen or pencil (I like the Frixion pens)

1. Trim selvages from fabric. Cut a 20″ square.

First Light Designs tip: trim ¼” from one of the sides that is parallel to the selvage. This reduces the crosswise width by a quarter inch. Why this step? The crosswise grain has more give than the lengthwise grain. With repeated use and washing, the napkin will relax along the crosswise grain. Trimming the fabric at the beginning compensates for that bit of stretch. To identify the crosswise and lengthwise grains, give the square a gentle tug in both directions; you should be able to tell immediately which side has more give. (Of course, you can cut the napkins 19¾” x 20″ initially but somehow I find trimming a 20″ square easier.)

2. At the ironing board, align 45º marking on ruler with top right edge of napkin as shown below. With a removable marking pen or pencil make a mark 1½” in from the edge of the napkin (not the edge of the ruler):

See the pink dot I made with the Frixion pen? It’s exactly an inch and a half in from the corner.

3. Bring point of fabric in to meet the mark and press:

4. Fold raw edges a generous ½” down and press all the way around. The pressed edges should form a miter at each corner:


5. Bring the raw edge in to meet the fold and press about 2″ in from the corner:


6. Fold again, forming a ¼”-inch miter. Press fold in place, again about 2″ in from the corner. Repeat for all corners. Do not press all the way around. Do not insert any pins yet.


7. Open up folds at each corner and trim a ¼”-square from the point of fabric. (You don’t need to use pins to hold the folds open before trimming; I did it here for photography purposes only.)


8. Place a pin at each corner to hold the miters in place:


9. Starting in the middle of any side, bring raw edge in to meet fold, fold again to form ¼”-inch fold, and finger press in place. The finger-pressed area is at the left edge of the photo:


10. Move to the sewing machine. Set stitch length at about 12 stitches to the inch (2.4 on computerized machine). Insert needle right next to the fold and begin stitching. Stop every couple of inches to make the two folds that form the quarter-inch hem.


11. As you approach the corner, remove the pin and use the point of a stiletto to hold the fold in place as you stitch toward the corner. Pivot when the needle is at the point the two folds meet. Remove second pin and continue stitching. When you get to the starting point, change stitch length to almost zero. Stitch three or four tiny stitches. Bring threads to the back and cut close to the line of stitching. Give the napkin a final press to set the stitches.


Add a pretty napkin ring, and you’re ready to set the table!


Posted in mitered corners, table napkins, tutorial, update | 5 Comments

Leaving on a Jet Plane

Very early tomorrow morning, at a time I would much rather be sleeping, my husband and I are boarding a plane for Atlanta, Georgia to spend two weeks with my twin sister Diane and her husband. I have no doubt we’ll have a wonderful time. We always do!

As a hostess gift, I made Diane 12 table napkins:

A Dozen Table Napkins for Diane


The napkins, which measure 19″ square, will look good with Diane’s everyday white dishes from Pottery Barn and the beautiful Spode china in the Rosalie pattern that her mother-in-law gave her many years ago. The fabric is Heavenly Peace by Verna Mosquera for Free Spirit Fabrics. It’s been in my stash for a couple of years.

My plan was to make 16 napkins but I didn’t get them all done, so I’m taking four with me that are cut but not sewn. I can finish them while I’m there. Diane usually has a crowd at Thanksgiving, and I want to make sure there are enough to go around.

We use cloth napkins all the time at the Portland White House. Over the years I have experimented with mitered corners and have finally come up with a method I really like. In the next few days I will post a tutorial on how I make mitered corners for my table napkins. I hope you will come back for a lesson!

My Mitered Corners


Posted in update | 1 Comment