I recently spent two delightful days in Kirkland, Washington with Sandy, my best friend from college. We met the first day of fall term our freshman year, when we discovered we were in two classes together, Survey of English Lit and First Year Italian.
That was over 40 years ago, and though there have sometimes been long gaps in our contact with each other, we’ve always picked right up where we left off.
Sandy is a professional book club facilitator, a gifted poet, a quilter, and a gourmet cook. I was the beneficiary of her culinary expertise, so when I came home I decided to make an apron for her as a thank you gift. I think it will look right at home in her French country kitchen.
Timtless Treasures fabric
The fabric, ‘Blue-C’ from Timeless Treasures, has been in my stash for two or three years.
Oh, yeah! Since giving myself permission a few days ago to spend part of my sewing time playing with fabric (and not fretting too much about projects set aside for the time being), I’ve been sketching out ideas, making sample blocks, and washing and ironing the fabrics I have (ahem) recently acquired.
I even finished a quilt top. It’s a small top, but it’s still a top. Remember that Northcott fabric line called Ainsley that I was swooning over a couple of posts ago? I made a large kaleidoscope block out of the Jacobean floral border print:
22″ x 22″
One block, eight 45° triangles. Very simple. Since I was making only one block, I fussy-cut the triangles rather than stacking eight layers of fabric. I added the narrow black and green strip and the outer small geometric — both part of the Ainsley line — to the triangles before sewing them together. Here’s the back:
Back of Block
I haven’t decided yet which fabric to use for the binding on this little table topper. Once I do, it shouldn’t take long to finish it.
This project barely put a dent in the fabric I bought. Not to worry. You’ll be seeing plenty more of it. I already know what I’m going to make next.
If my Dear Husband were reading this post, he would look perplexed and say, “An apron for the Designated Hitter?” No, dear. Not even close.
I made him an apron today because his old one was pretty worn out. Here’s what his new apron looks like:
Carrots and Onions and Peppers, Oh My!
It’s a basic cobbler’s apron made from a Simplicity pattern dating back to the 1980s. I’ve probably made him a dozen aprons over the last 30 years using that same pattern. He wears one in the morning when he makes breakfast and in the evening when he cleans up the kitchen after I’ve made dinner. (You can see why I’m happy to keep making aprons for him.)
My DH is the gardener of the family so the veggie fabric, Metro Market by Pickens Design Studio for Robert Kaufman, was the perfect choice for him. I found it at cool cottons in SE Portland. It was the selvage that sold me. Look how the colors are printed on the selvage:
A Peck of Pickled Peppers?
Speaking of veggies, we had a bountiful crop of tomatoes this year, including some that continued to ripen during our unusually warm and dry October. My husband harvested all of the remaining green ones and decided to preserve them. He started with five alternating layers of sliced green tomatoes and onions . . .
Tomatoes and Onions, Sliced
. . . and ended with six pints of green tomato pickles and six of green tomato relish:
With little more than two months left of 2012, I’m feeling anxious about the number of projects I started this year but haven’t finished. I think of them as works-in-progress rather than UFOs, which means I have every intention of finishing them sooner rather than later. Quilt Camp is coming up in mid-November. I’ll have a three-day reprieve from cooking, cleaning, and (I have to confess it) wasting time on the computer. That should help me move at least a couple of projects from the “to do” list to the “ta da!” list.
Still, I’m chomping at the bit to start some new projects, inspired by ideas spinning in my head and by fabrics I’ve acquired lately (i.e. found utterly impossible to resist). I’ve decided to grant myself permission to spend the next two weeks and at least part of the remaining weeks of 2012 yielding to those impulses to play with fabric and be creative. The tradeoff is that I will devote the first month of 2013 to working only on my WIPs and UFOs. Okay. There it is in print.
So . . . where to begin? I want to do something with these fabrics, which include some of Denise Schmidt’s Flea Market Fancy in the aqua and red colorway, a large chevron stripe from Riley Blake, and an ombre that gradates from white to charcoal gray:
A Winning Combo: Red, Aqua, Grey, White
As you can see, I’ve already cut strips. I’m experimenting with the Disappearing 9-Patch design, for which free tutorials abound. At this point I don’t know how many of these fabrics I will actually use — but isn’t that part of the fun of playing around with them?
I don’t often buy several fabrics in the same line but I fell in love — deeply in love — with these prints from the Ainsley line for Northcott fabrics:
Beautiful Fabrics from Northcott
I have a weakness for Jacobean florals, and this grouping features the most delicious shade of green, which happens to be my favorite color. I added that herringbone batik to the mix; doesn’t it look good with the other fabrics? I’m not sure what I’ll do with this grouping yet but don’t be surprised if kaleidoscopes make an appearance.
A few months ago I saw this giant poppy print with companion fabrics online and then found the real thing at a quilt shop near Kirkland, Washington earlier this month while visiting my best friend from college:
Scarlet Line from Clothworks
The line is Scarlet, designed by Pamela Mostek for Clothworks. I read somewhere that the poppy print is a rerelease. If so, I completely missed it the first time around. The fabric in this line has a lovely soft hand — and it was on sale, which sealed the deal.
I am surrounded by beautiful fabric. Let the creativity begin!
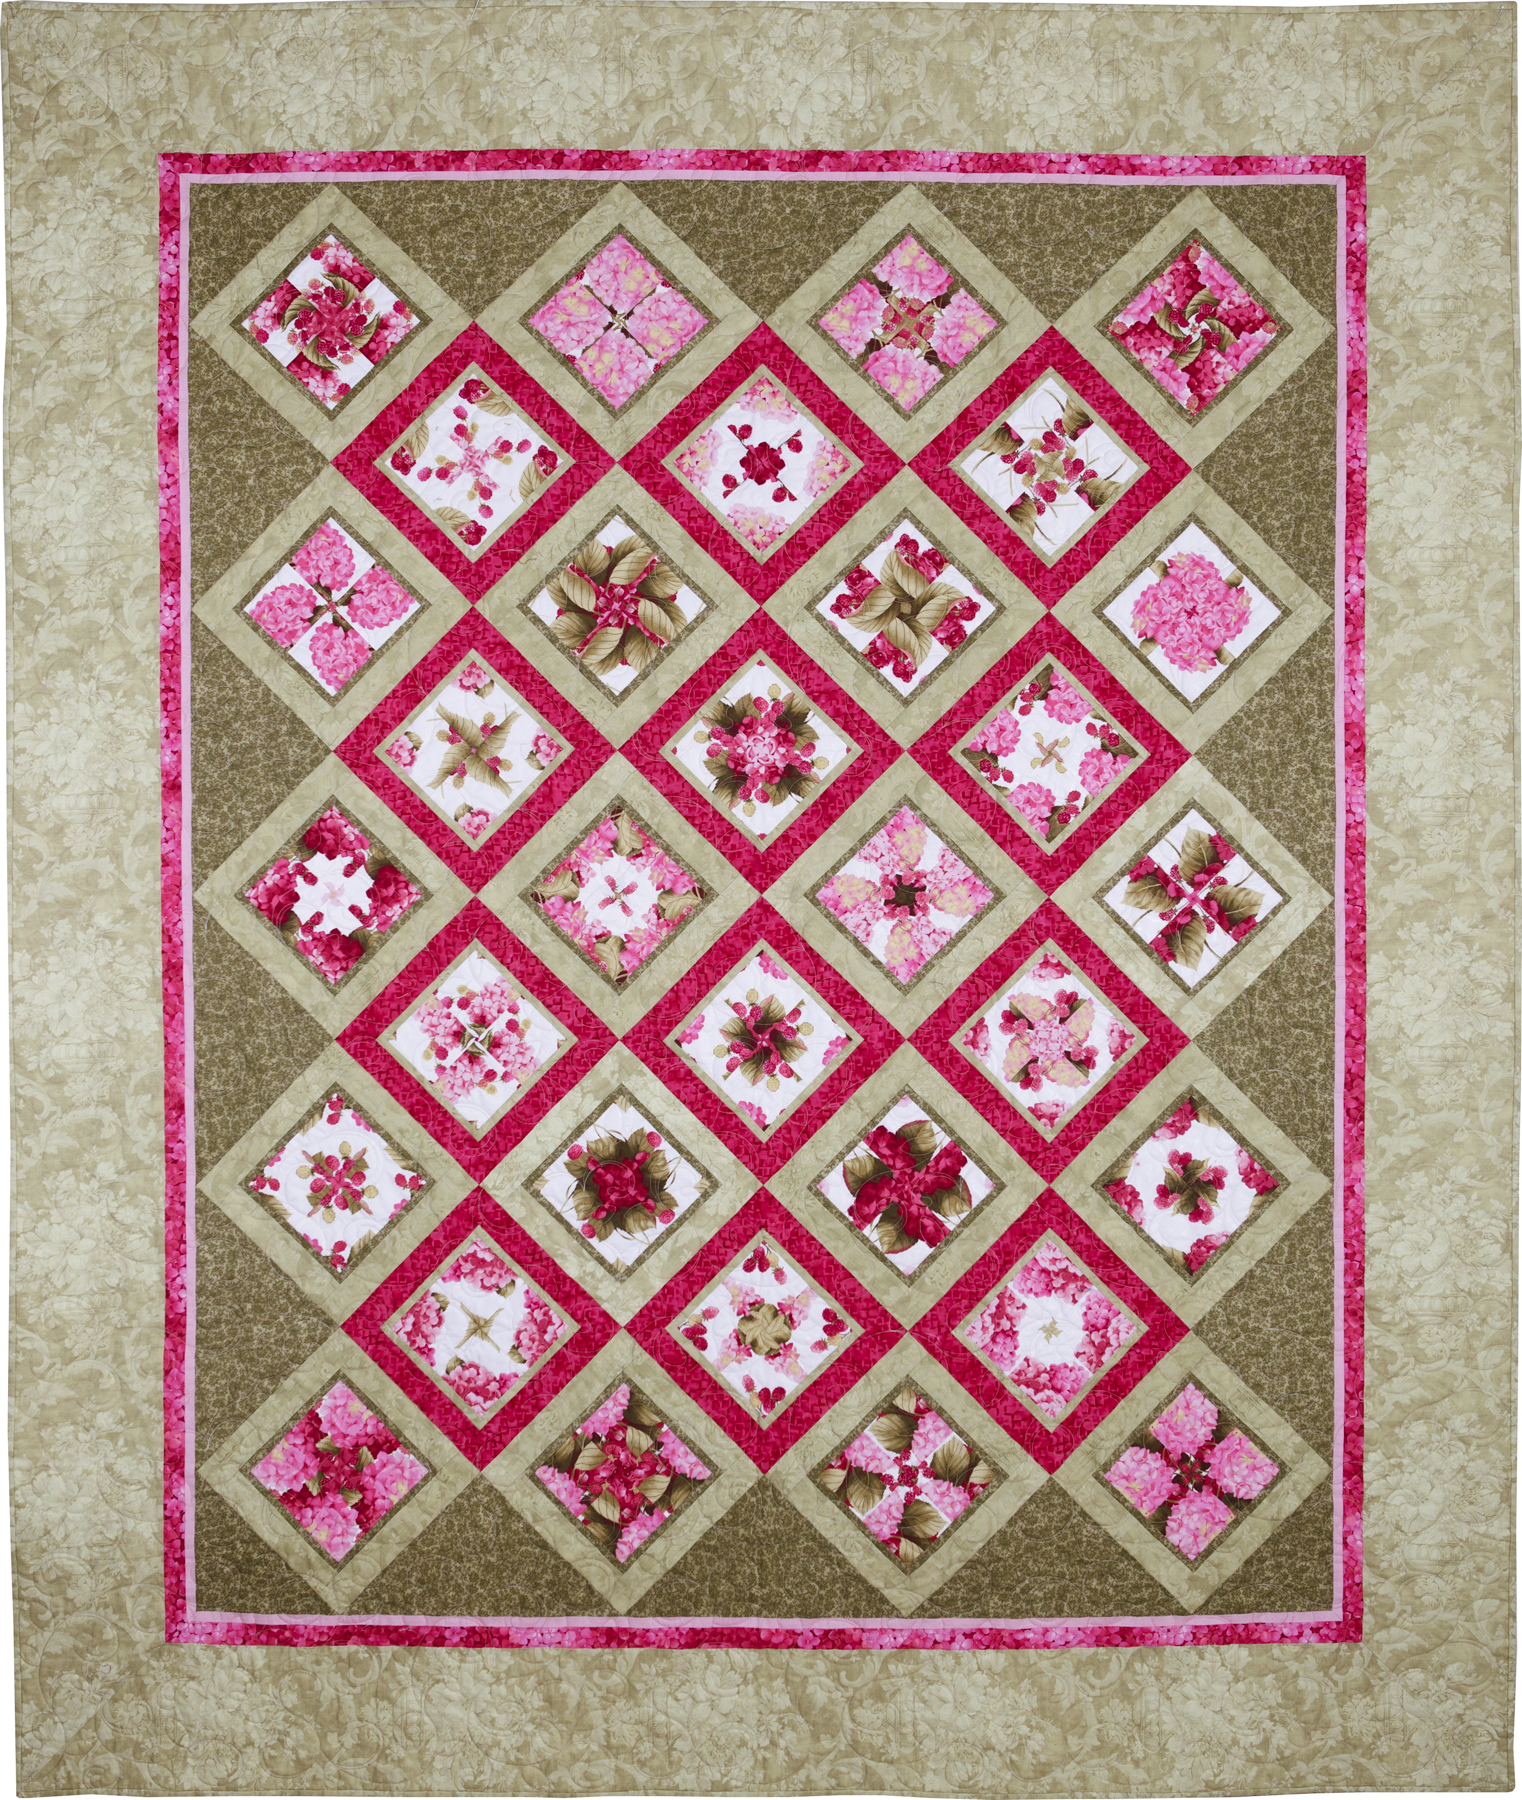
I’ve finally added Framboise to my Quilt Gallery. I’ve learned that one way to keep your patterns current is to make new versions in updated fabrics. I didn’t do that here, though. I used fabric that’s been in my stash for some time (Hydrangeas and Raspberries by Holly Holderman for Lake House Dry Goods) because I knew it would make a striking 4-Patch Wonder quilt. I actually put these blocks together early last year. It’s taken me this long to finish the top and get it backed, quilted, bound, labeled and photographed.
Framboise, 69″ x 84″ (2012)
I wish I had documented the process of arranging the blocks on my design wall. I usually start by putting my favorite block in the upper left hand corner but sometimes I have to move it for the sake of balance. Here’s a close-up of my favorite block, which wound up in the upper middle center of the quilt:
Dawn’s Favorite Block
Framboise was quilted by Melissa Hoffman. I asked Melissa to choose an edge-to-edge design with vines, leaves and scrolls and to use a light pink and green variegated thread. The effect is soft and subtle, just what I wanted. Here’s a better look at the motif:
Quilting Detail
I usually play around with leftover blocks on the back but I was in “get ‘er done” mode at the time so all I did was add a strip of the original focus fabric:
Back of Framboise
You can’t see it in the photos but the white background on the Lakehouse fabric has a secondary design that is very lightly frosted. It adds a glow to the quilt that I love. The rest of the backing fabric is a pastel batik that I’ve had for quite a while. Here’s a closer look at the quilting on the back:
Detail of Quilting on Back
Naming this quilt did not come easily. A host of alliterative titles came to mind – Blossoms and Berries, Berries and Blooms, even a pun on the Bloomsbury Group. In the end I decided on Framboise (raspberry in French) on the basis that it refers not only to the berry but to the color of the hydrangeas.
Regular readers may remember the sewing machine cover I started in July when I was in Sisters OR with my quilt group. My intention was to make a cover for the Janome 6500 that spends most of its time in my sewing room. I have a smaller Janome for classes but the big one goes with me on extended trips.
My Janome 6500 was with me in Sisters when I took its measurements and made the block for the front. Weeks later, when I was ready to work on the cover again, I realized the measurements I had taken in Sisters, while accurate, were wrong for this project. My sewing table features a drop-in ledge for the sewing machine so that the bed of the machine is flush with the table top. My sewing machine sits a full 3″ below the surface of the table, something my original measurements didn’t take into account. Oops.
The block I had already made couldn’t be cut down so I decided to finish the sewing machine cover and use it for traveling, and then make a new one that would stay in my sewing room.
That’s what I’ve been experimenting with. I decided to make a really simple cover without batting or quilting — and without a pattern. I just followed the lines of the vinyl cover that came with my Janome 6500. Rather than making a test version in muslin, I chose to use a beautiful cotton print. My rationale was that if I made the cover in muslin and it turned out well, all I would have was a plain muslin cover. If I made it in a pretty fabric and it didn’t turn out well, I could cut it apart and save the scraps for another project.
But it did turn out well! Take a look:
Sewing Machine Dust Cover
The main fabric is from the Garden Medley line by Susie Johnson for RJR and the binding fabric is a lime green Kona Bay blender. Here’s a slightly different view:
Another View
The fabric on the inside is a soft striped batik from my stash:
Batik Stripe on the Inside
I interfaced the inside fabric to give the dust cover extra body. Instead of finishing the binding by hand, I fused it with 1/4″-wide Steam-a-Seam 2.
Now my mind is racing with ideas on refining the design. I don’t really need another sewing machine dust cover but I’d love to make one in different fabrics — I already know which ones — incorporating some patchwork and/or applique. I’d also like to try piping on the top and side edges and double-fold bias tape around the bottom edge.
I probably won’t get to it right away but — you never know. Sounds like a good rainy day project to me.
Part 1 of this tutorial, joining two lengths of bias tape, is available here.
Part 2 of this tutorial, overlapping ends of bias tape on an apron, is available here.
Part 3, Joining ends of bias tape on an apron
If you have ever finished attaching binding on a quilt by joining the two loose ends with a diagonal seam and then sewing the newly-joined strip to the quilt edge, this method will look familiar. On a quilt edge, you are normally working with binding that’s at least 2″ wide, 1″ when folded. On an apron edge, you are working with bias tape that’s 1″ wide and a mere quarter-inch when folded. That makes finishing the seam both challenging and time-consuming but the result is a seam that is almost invisible. Take a look at the bias trim on this apron belt piece:
Look for the Diagonal Seam
On my Monterey Bay Apron, I use the overlapping method (described in Part 2 of this tutorial) on the inside edge around the neckline. There’s just no straight stretch long enough to accommodate the method described below. But you can use this method on the outer edge of the apron (along the bottom front, for example) and on both belt pieces. Look for straight lines on other apron patterns using bias tape to see where the most unobtrusive joining spots are.
Remember that ¼”-wide double-fold bias tape is pressed in such a way that one side of the tape is slightly narrower than the other (from the fold to the outside edge). The narrow side always goes on the right side of the fabric. When the fabric of the apron is inserted into the fold of the bias tape, the wider side of the tape, underneath, is always caught in the line of stitching from the top.
1. Leave 6″ between the beginning and ending points of stitching and leave 6″ tails on each side. Make a mark at the midpoint on the apron and 3″ from the starting point of stitching on the right-hand tail. The marks should be at the same point, as shown below:
Marking the MidpointAllowing 6″ between the beginning and ending points of stitching leaves enough room to manipulate the loose ends of the binding before they are joined, and the binding strip after joining is short enough that it can be stitched to the apron edge without getting distorted.
2. Press the right-hand tail open about an inch and a half from the end. Don’t try to press the fold lines completely out. With the right side up, make a diagonal cut as shown about 1/4″ to the left of the mark on the bias tape:
Trimming the Right-Hand Tail
3. Lay the left-hand tail over the edge of the fabric. Lay the right-hand tail on top. With a removable marking pen or pencil, make a diagonal mark next to the cut edge of the right-hand tail.
Marking the Left-Hand Tail
4. Open out the left-hand tail and press open about an inch and a half from the end. With right side up, draw a diagonal line exactly 1/2″ to the right of the mark made in Step 3. Cut along that line.
Trimming the Left-Hand Tail
This is what the two cut ends should look like:
Left and Right-Hand Tails Cut on the Diagonal
5. With right sides together, pin the two ends as shown, overlapping 1/4″ at each end.
Pinning the SeamBe sure ends are not twisted!
6. Draw two lines 1/4″ apart on a small scrap of paper. Lay the pinned edges of bias tape on top, aligning the two cut edges with the line on the right. Leaving tails at both ends, sew a 1/4″ seam, using the drawn lines as guides. Use 15 stitches to the inch or 2.0 on a computerized machine.
Sewing the Seam — on Paper
7. Gently tear the paper away. Trim seam to a scant 1/4″ and press open. Trim dog ears from seam but leave thread tails in place. Carefully press folds back into place, using just the tip of the iron. Be very careful not to stretch or distort the length of tape.
Pressing Folds Back into PlaceIn the photo above, you are looking at the back side. You can tell it’s the back because the stitching is not as close to the inside folded edge of the bias tape.
8. Now open the bias tape and trim the thread tails. On the right side, encase raw edge of fabric between the folded edges of the bias tape and finish stitching the seam, beginning and ending with tiny stitches.
Do you know about quilter’s caulk? I heard about it from a quilting friend who in turn learned about it from a fellow quilter. Here’s what it looks like:
Quilter’s Caulk??
Yep. That’s right. You’re looking at a collection of Sharpie Ultra Fine Point permanent marking pens. Calling one of these pens “quilter’s caulk” is a misnomer, really. You can’t use it to fill a gap or seam, which is the definition of the verb “to caulk,” but you can use it to color correct a seam or some other part of an item made with fabric.
I’ve had occasion in the last couple of days to use quilter’s caulk, so let me show just how handy it is. While stitching in the ditch around the borders of a baby quilt, I wandered out of the ditch and onto a border. My thread is light aqua, and those five stitches really showed up on the bright pink border:
Errant Stitches in Border
Now here it is after applying fuchsia-colored ink on the offending stitches:
Errant Stitches Minimized
On another project, I was using red thread to sew pockets on an apron because I wanted the thread to blend into the background. I had trimmed the top edges of the pocket with black bias tape. Just look how that red thread pops out against the black bias tape:
Red Thread on Black Bias Tape
Quilter’s caulk to the rescue:
Bias Tape After “Color Correction”
Quite an improvement, wouldn’t you say?
Be sure to test the ink color first to make sure it’s a good match. And don’t forget that these Sharpie Ultra Fine Points are permanent markers.
I’m scheduled to teach a class on Fractured Images in a couple of weeks so this seems like a good time to update my class notes and look over my class samples.
Fractured images are created when four identical layers of fabric are cut into squares and sewn together. Three of the four repeats are trimmed different ways before being cut into squares. When the four sets of squares are arranged in a grid and sewn together, a striking ripples-in-a-pond effect emerges. Squares can be cut in many different sizes but 2” and 3” squares are the most common. Bold floral designs with secondary motifs in the background and lots of contrast fracture especially well.
When I taught this class last spring at the Pine Needle, the shop had just received some fabrics in the Hickory House line by Faye Burgos for Marcus Brothers Fabrics. I was curious to see how one of the florals in that line would fracture and whether it would be more striking made from 2” or 3” squares. Here is the image before fracturing . . .
Hickory House floral, unfractured
. . . and here are the two fractured images side by side:
Fractured Images made from 2″ and 3″ Squares
The image on the left, which measures 13″ square, contains 81 squares, each square finishing at 1½”. The image on the right, which measures 14″ square, contains 25 squares, each square finishing at 2½”. Which one do you like better?
One way of cutting the fabric for a fracture is to pin the layers together, matching design elements, and then cut only the image intended for the fracture. What to do with the remaining fabric that’s already layered and pinned? Why, cut it into 4-Patch Wonder blocks, of course. (“4-Patch Wonder” is my name for a block made of four identical layers of fabric that are cut in squares and then rotated to make a pleasing symmetrical design. If you’ve looked at the quilts in my Gallery, you know that I’m a big fan of this faux-kaleido block, as well as its more sophisticated cousin, the kaleidoscope block.)
Look how dramatic these 4-Patch Wonder blocks are that were made with leftover Hickory House fabric:
These 4-Patch Wonder blocks are 5″ squareThese blocks are 6½” square
Let me show you another fractured image made from a beautiful tropical floral fabric a friend brought me from Hawaii. Here is the image before fracturing. . .
Tropical Flowers, Unfractured
. . . and after:
Tropical Flowers, Fractured
This one was made a little differently. Instead of sewing the squares together, I arranged them on a piece of featherweight fusible interfacing and fused them in place. Then I covered the raw edges with grosgrain ribbon held in place with ¼”-wide Steam-a-Seam-2. I added a pink polkadot flange and a wide black border. The squares were cut 3″, by the way, and the piece is 21″ square including the border.
I haven’t decided what to do with this fractured image. I think it could hold its own as a finished piece, but it looks so good set on point that I can also see it as a center medallion in a larger quilt . . .
On Point
. . . perhaps accompanied by some of these 4-Patch Wonder blocks made from the leftover fabric:
4-Patch Wonder Blocks (6½” Square)
If you’ve never fractured an image before, I recommend that you try it. It’s a lot of fun, and I predict that it will forever change the way you look at fabric!
(Part 1 of this tutorial, joining two lengths of bias tape, is available here.)
Part 2, Overlapping ends of bias tape on an apron
Several of the vintage apron patterns in my small collection feature aprons edged in double-fold bias tape. As I was working on my Monterey Bay Apron pattern, I consulted my vintage patterns to compare notes on how the edges were finished. To my surprise, none of them – not a single one – explained in detail how to finish the edges. “Turn under one end” was the most common instruction. I tried that, every way I could think of. The result was always a lumpy bump (a bumpy lump?) where the edges overlapped. After much experimentation I was finally satisfied with two methods. The first method is described below, and the second method is described in Part 3 of this tutorial (coming soon).
I really like the method I am showing you here because it’s fast and easy. It leaves one cut edge of bias tape exposed but the cut is made perpendicular to the folded edges of the tape, i.e. on the bias, so it won’t ravel. It leaves a crisp clean finish, but you can cover the cut edge with a tiny satin stitch if you wish. Here’s what the joined ends looks like:
Bias tape ends joined
Before you begin, determine where on the apron you want the bias edges to be joined. Look for straight stretches of fabric at least 4” long. My Monterey Bay Apron pattern calls for the bias tape ends to be joined in the places least likely to be noticed: on the back left inside neckline just below the shoulder seam, on the front right side close to the curve along the bottom edge, and in the middle of both apron belt pieces. Look for straight lines on other apron patterns using bias tape to see where the most unobtrusive joining spots are.
Remember that ¼”-wide double-fold bias tape is pressed in such a way that one side of the tape is slightly narrower than the other (from the fold to the outside edge). The narrow side always goes on the right side of the fabric. When the fabric of the apron is inserted into the fold of the bias tape, the wider side of the tape, underneath, is always caught in the line of stitching from the top.
1. On a straight stretch of fabric, insert fabric into the fold of the bias tape. Leaving a 2” tail of bias tape, insert the needle right next to the folded edge of the tape. Take two or three individual stitches to start. Continue stitching right next to the fold, stopping every inch or so to insert more fabric into the fold of bias tape and to adjust for any curves.
Leaving 2″ tail
2. Stop stitching 3” from the starting point. Change stitch length to almost zero and take two or three tiny stitches. Clip threads. Cut off the excess bias tape, leaving a 3” tail from the end of stitching.
3″ tail on left, 3″ between beginning and ending stitches
3. Trim the right-hand tail to 1½”:
Right-hand tail trimmed to 1 1/2″
4. Trim the left-hand tail so that it overlaps the right tail by ½”. The cut should be perpendicular to the folded edges of the bias tape.
Tails overlapping by 1/2″
5. Cover the tape on the right side with the tape from the left side. Using the point of a small sharp-pointed instrument such as a stiletto (I use a bamboo skewer), coax open about an inch of the first fold of the bias tape on top and tuck it under the bias tape beneath it:
Fold of bias tape on top tucked under bias tape on bottom
6. Do the same thing on the back side:
Tucking under fold of tape on the back
7. Finish sewing the bias tape to the apron, beginning and ending with tiny stitches as shown:
Bias tape ends joined
And there you have it! In Part 3, I’ll show you how to join ends of bias tape on an apron using a diagonal seam, similar to finishing the binding on a quilt but with the added challenge of using inch-wide bias tape with multiple folds. This method is quite labor-intensive but it is definitely do-able and the result is a seam that is almost invisible.