It’s official. I have decided to make a second version — along with my first — of Reach for the Stars, the sampler series quilt introduced in the Oct./Nov. 2013 issue of Quilter’s Newsletter magazine. Last week I started playing with fabrics in my stash from the William Morris-inspired lines by Barbara Brackman for Moda and wound up making a sample block, hoping to tempt my friend Colleen into dipping into her stash of Morris fabrics and joining the small band of quilters who are Reaching for the Stars. And my ploy worked! This quilt is now on Colleen’s to-do list.
Once I had one block made, I couldn’t resist the temptation to make another one. Here is my Block 2:
Verson 2, Block 1
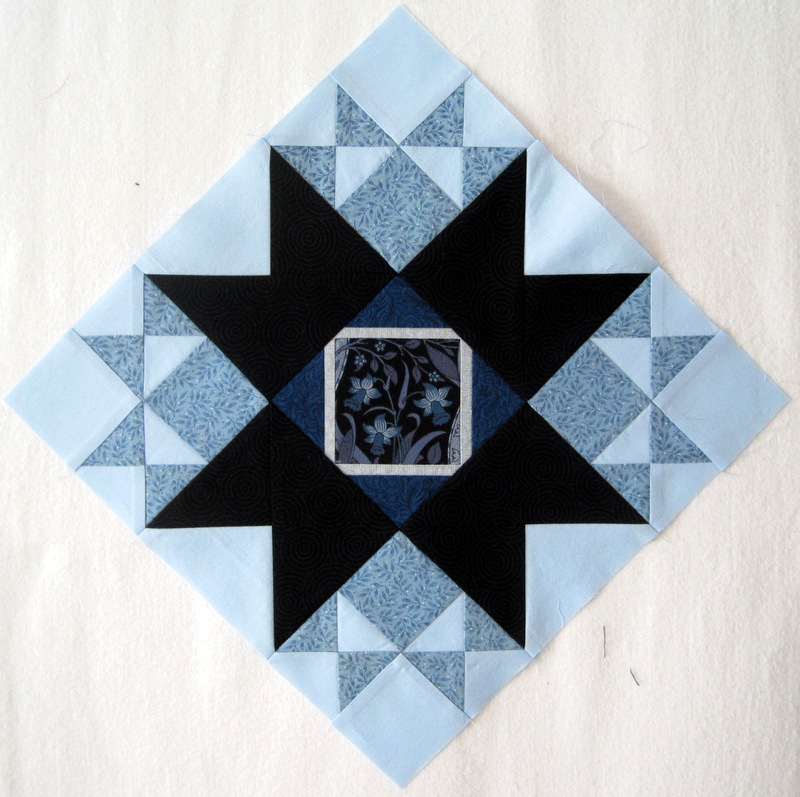
Do any of you recognize that print in the corner blocks? It’s been in my stash for at least 15 years. Here is Block 2 on point . . .
Properly on Point
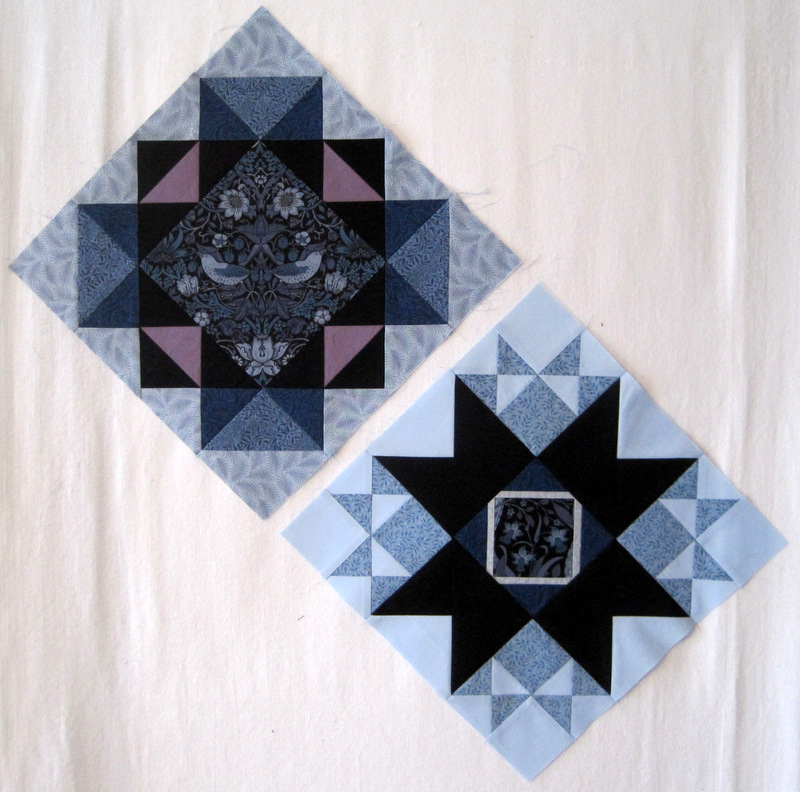
. . . and here are Blocks 1 and 2 together:
Fussy-Cut Centers in Both Blocks
The palette is quite subdued, especially compared to the bright greens and aquas in my Version 1 . . .
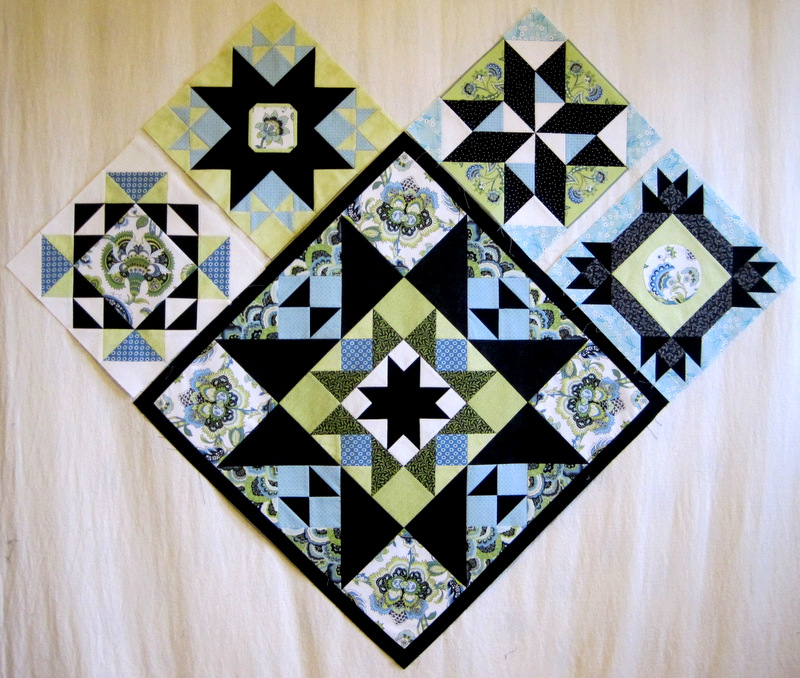
To Date: One Center Medallion and Four Blocks
. . . but I think Version 2 will be very pretty, don’t you?
Perhaps you thought this post would be about Block 5 in Reach for the Stars, the series quilt in Quilter’s Newsletter magazine that I — and a few likeminded quilters — embarked on a couple of months ago. I finished Block 4 last week and intended to start right away on the next one.
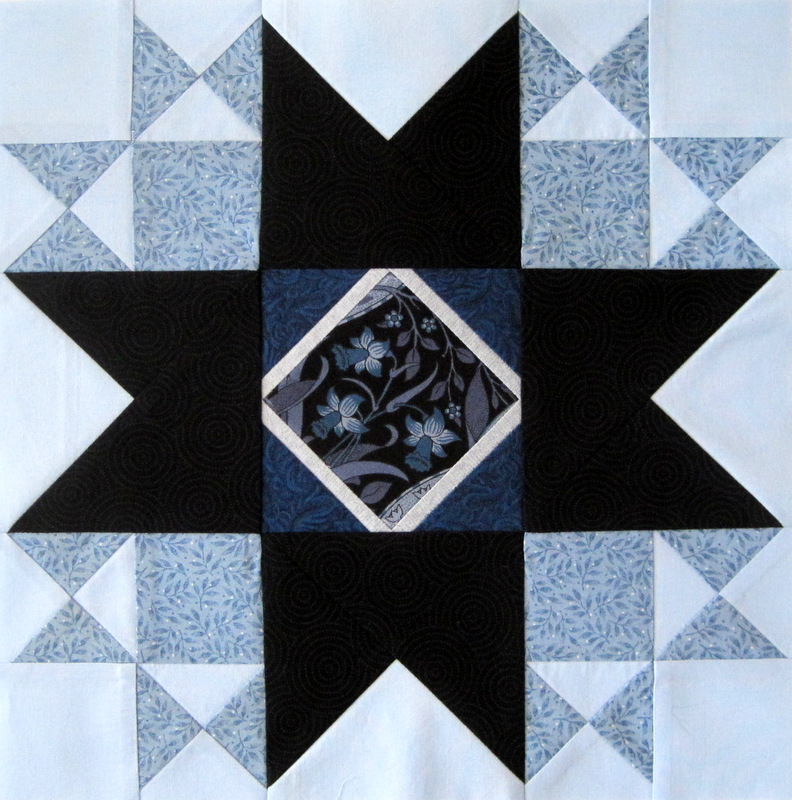
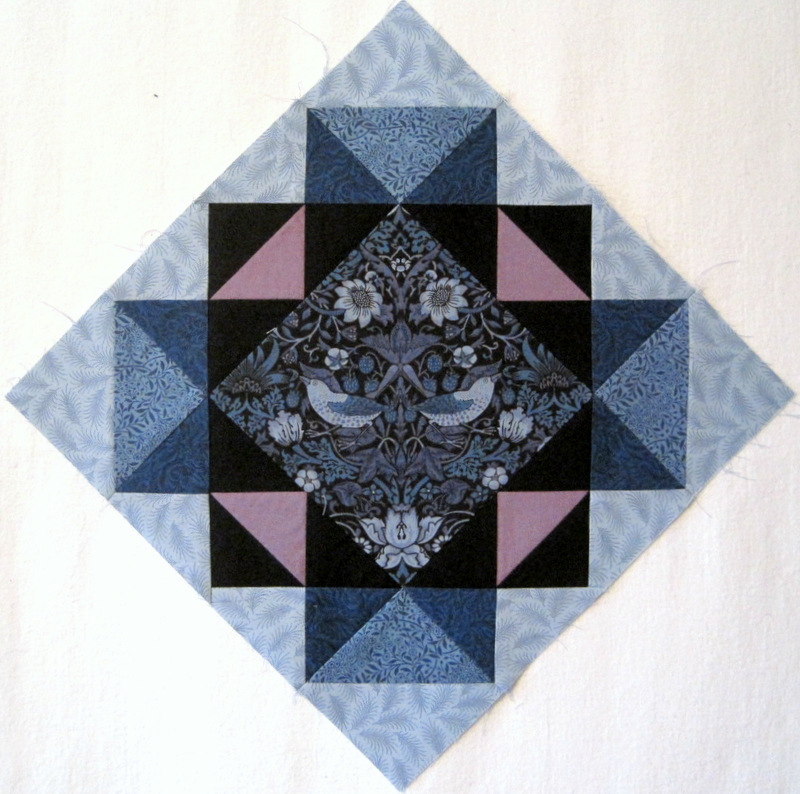
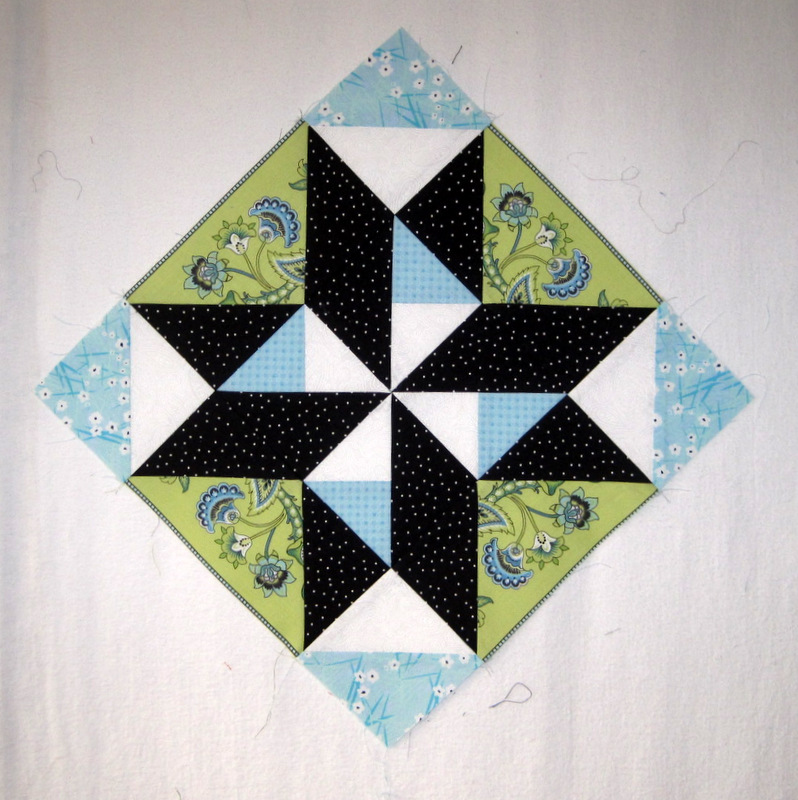
Instead I made a new Block 1 . . . out of a completely different set of fabrics:
A New Block 1
Am I making a second version of Reach for the Stars? I’m not sure! Then why did I make this block? Well, my friend Colleen has been thinking about reaching for the stars, too. Her stash includes several pieces from the Morris Tapestry and Morris Apprentice lines of fabric, both by Barbara Brackman for Moda. I have a few (ahem) pieces of those fabrics myself. I wanted to see how they would play together in a block, perhaps giving Colleen a little boost to join our party.
Here is the block on point, with those birds of a feather properly oriented:
On Point
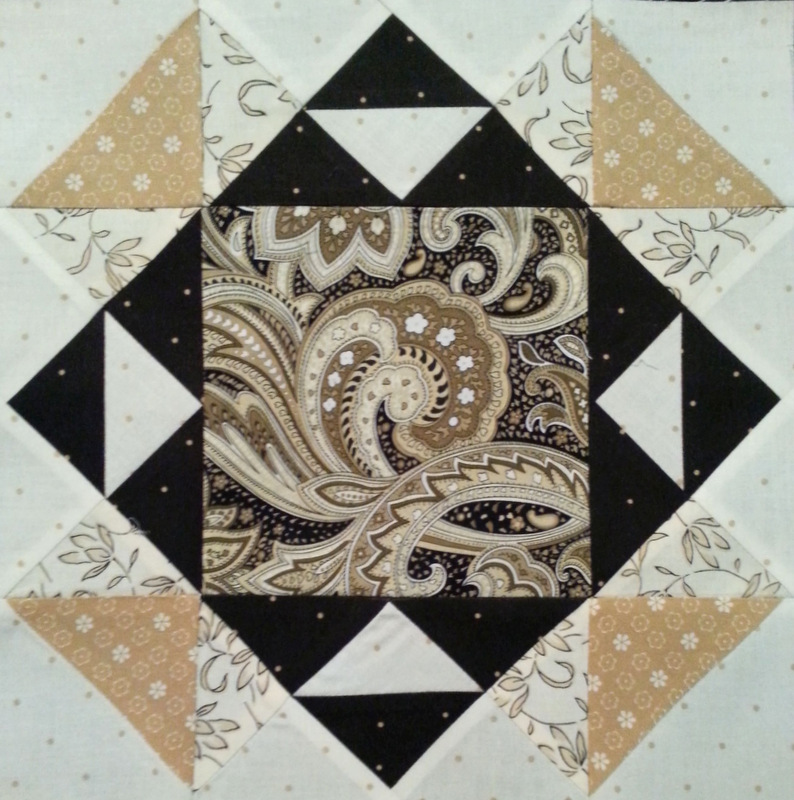
And I’m not the only one with a new block to show off. Jennifer Thacker of Houston, Texas shared a photo of her Block 1:
Jennifer Thacker’s Block 1
Jennifer was able to find most of the fabrics used in designer Terri Krysan’s quilt, which graced the Oct./Nov. 2013 cover of Quilter’s Newsletter magazine. That paisley print in the center of the block — so rich and lush — is a substitute. I think it is even more beautiful than the original!
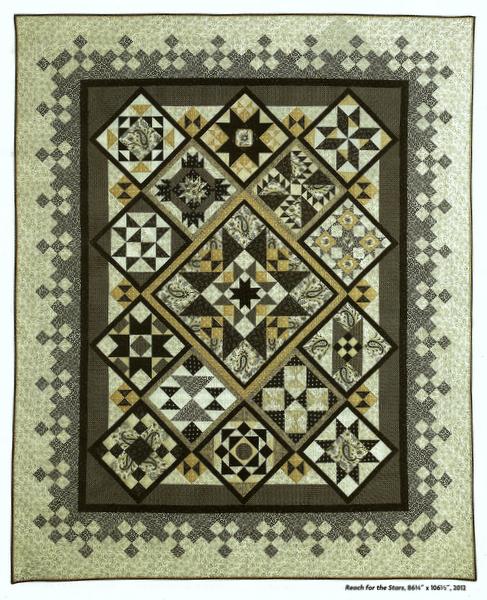
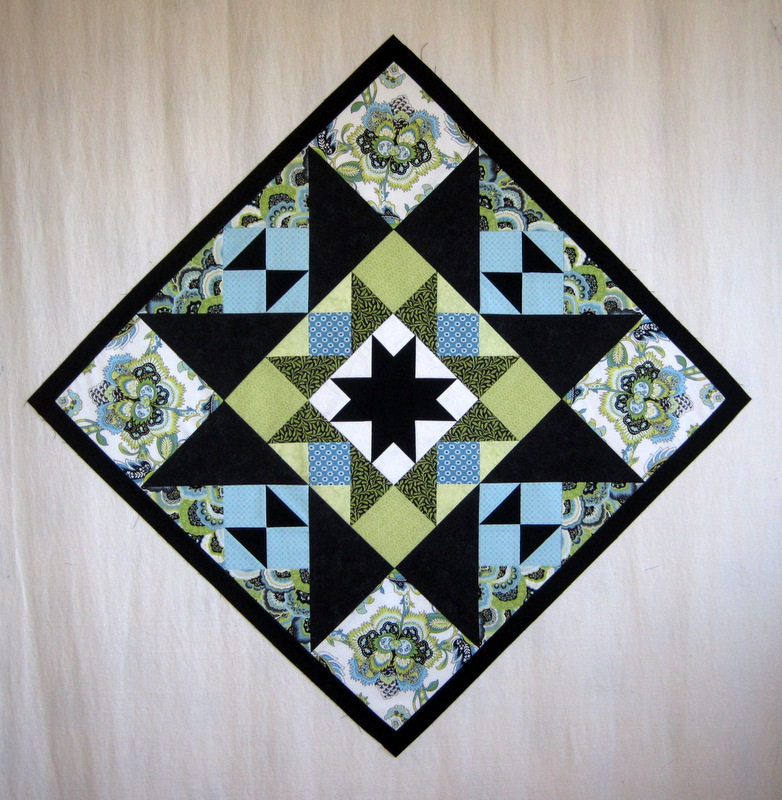
Before I show you my Block 4, I must confess that I modified the design. I’m making Terri Krysan’s queen-size medallion sampler quilt, seen here in the pages of Quilter’s Newsletter magazine:
(Copyright Quilter’s Newsletter. Used with permission. Photo by Melissa Karlin Mahoney.)
Terri Krysan’s quilt is a vision of loveliness in creams, tans and black fabrics. I’m using greens and blues instead of creams and tans in my version.
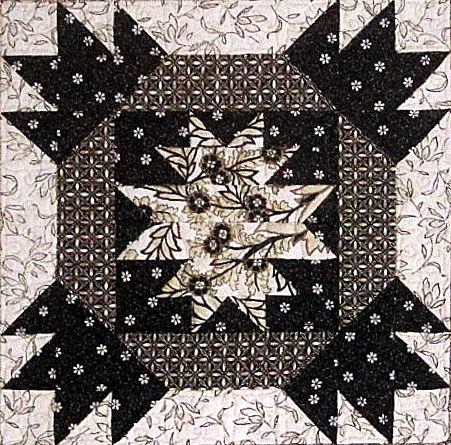
Here’s a shot of the original Block 4:
(Copyright Quilter’s Newsletter. Used with permission. Photo by Melissa Karlin Mahoney.)
I just wasn’t loving the center of the block. I saw that Terri Krysan incorporated circles in two of the 14 blocks that surround the center medallion so I decided to put a circle in the center of my Block 4:
That circle (fussy-cut, of course) is not appliquéd — it’s set in, using my favorite freezer-paper method. You may have also noticed that I changed the fabric placement slightly in the corner blocks to accentuate the solid black star points.
Here is my Block 4 on point:
I hope you’re also following the progress of fellow Reach for the Stars quilters Jennifer G. and Jennifer T. in Texas and Sherri C. in Tennessee. You can see photos of their blocks on Jennifer G.’s blog, Seams Crazy.
And please check back in with me. It’s been snowing for three days — very unusual for Portland, Oregon. We are effectively snowed in — the perfect excuse to hunker down and start working on Block 5!
In my last post I mentioned a Work-in-Progress that needed some free-motion quilting (FMQ). Remember this?
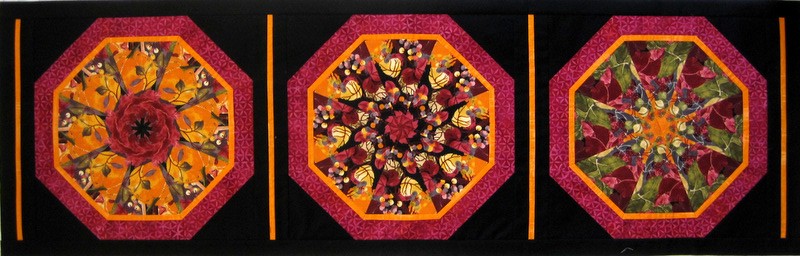
18″ x 56″ Before Quilting
Back in October, continuing my love affair with kaleidoscope quilts, I made three large kaleidoscope blocks from a piece of autumn-themed fabric from In the Beginning Fabrics (you can read about it here) and put them together into the table runner/wall hanging you see above. After assembling the quilt sandwich, I did a fair amount of stitching in the ditch and then I put the piece aside. Why? Because FMQ is by far the most challenging aspect of the quilting process for me and it is far too easy for me to procrastinate.
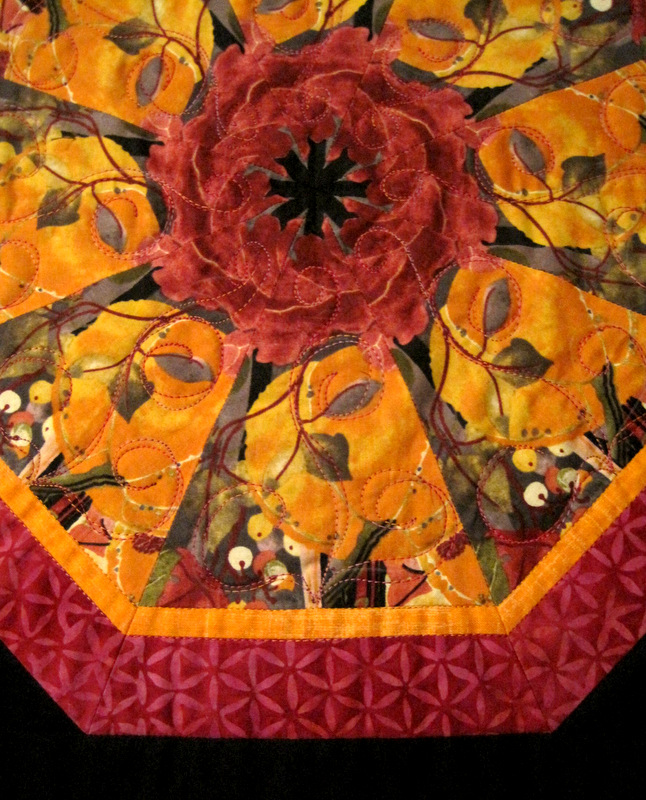
This week I decided I absolutely had to finish it. And I did! I quilted a curvy motif in each triangle of the octagons — that’s 24 total, not counting the ones I made first on my practice quilt sandwich. Here’s a close-up of the quilting on my favorite block:
Up Close and Personal
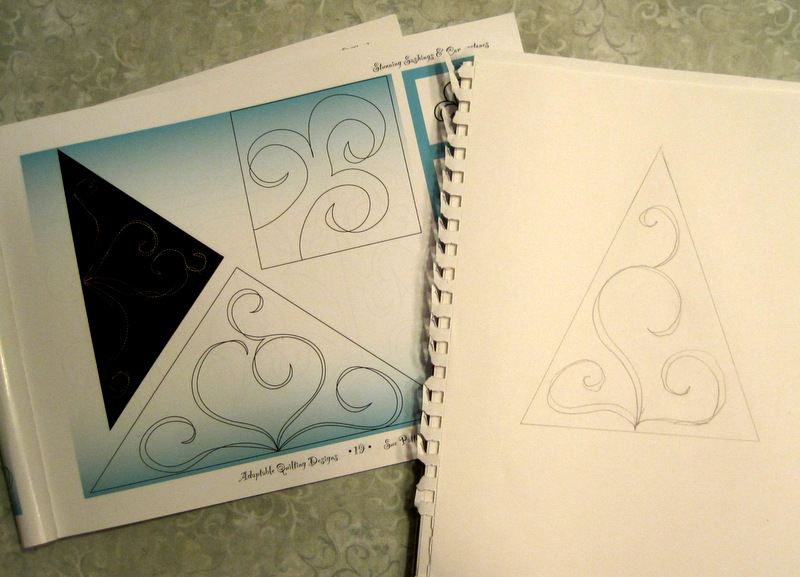
My inspiration for the quilting design came from the book Adaptable Quilting Designs by Sue Patten (American Quilter’s Society, 2010):
I modified her design so that it would fit in my 45 degree triangles. The quilting lines are meant to cross each other so it’s a very forgiving design for a novice free-motion quilter like me.
Well, what can I say? My FMQ isn’t going to win any awards but I’m pleased with this effort. And I’m not going to get better unless I do more of it, right?
This post is labeled “February Finish” but in fact my little quilt isn’t done yet. It doesn’t have a label because I haven’t thought of a name. I’m thinking about making a second kaleidoscope runner like this one in spring fabrics, and then I can call them Spring Forward and Fall Back. Just kidding. Hmm. Maybe not!
The first month of 2014 has come and gone. Didn’t it go fast? It sure did for me! I got quite caught up in January making blocks for my Reach for the Stars sampler quilt (see the three previous posts) but still managed to complete a five-year-old Unfinished Object.
That would be Checkerboard Square, designed by Alex Anderson and featuring her line of fabric, Never Enough Romance, for P&B Fabrics. My progress as of Jan. 12:
Checkerboard Square, Underway
As of Jan. 30, the inner section of the quilt was pieced:
58″ x 75″ Before Borders
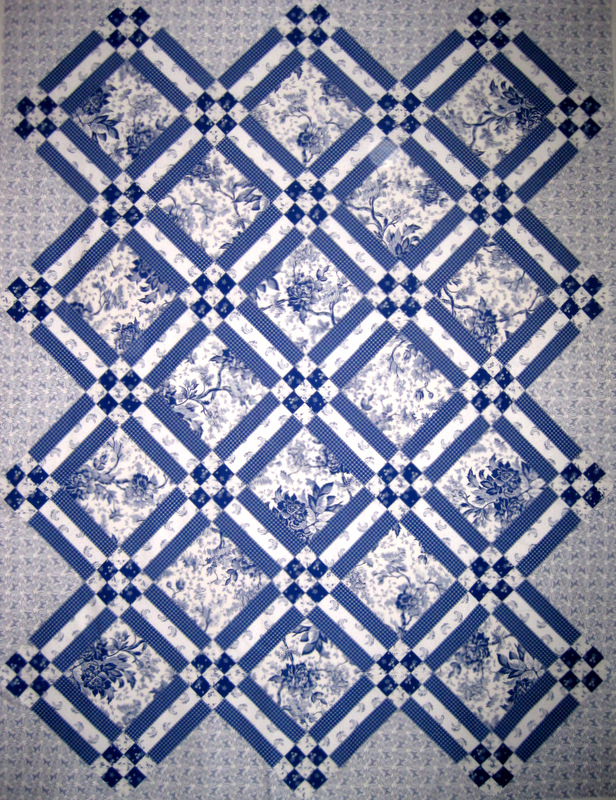
And on the last day of the month I got the borders sewn on. I had to wait till today to photograph the completed top outdoors. I woke up to overcast skies and no breeze — perfect! — but by the time I was ready to take photos, the sun had come out and was reaching for the only part of the back deck — the arbor — where I could hang my quilt top. And a breeze had come along with the sun.
This is the best shot, taken between puffs of air that caused the quilt to billow:
Checkerboard Square Quilt Top, Finished
The top measures 75½” x 92½”. I added an inch and a half to the outer borders so it’s about 3″ longer and wider than the pattern measurements. Sometime in February I’ll make a backing (and think up a name) for this top.
As much as I’d love to start work on the next Reach for the Stars block, there’s a different Work-in-Progress calling my name, one that needs a little free motion quilting. I’m gearing up for it.
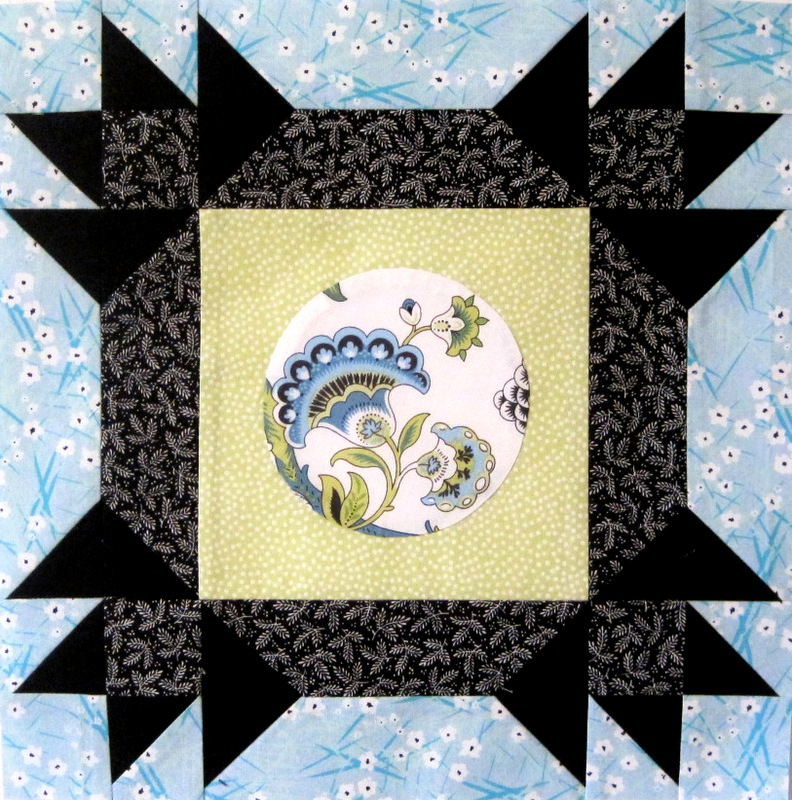
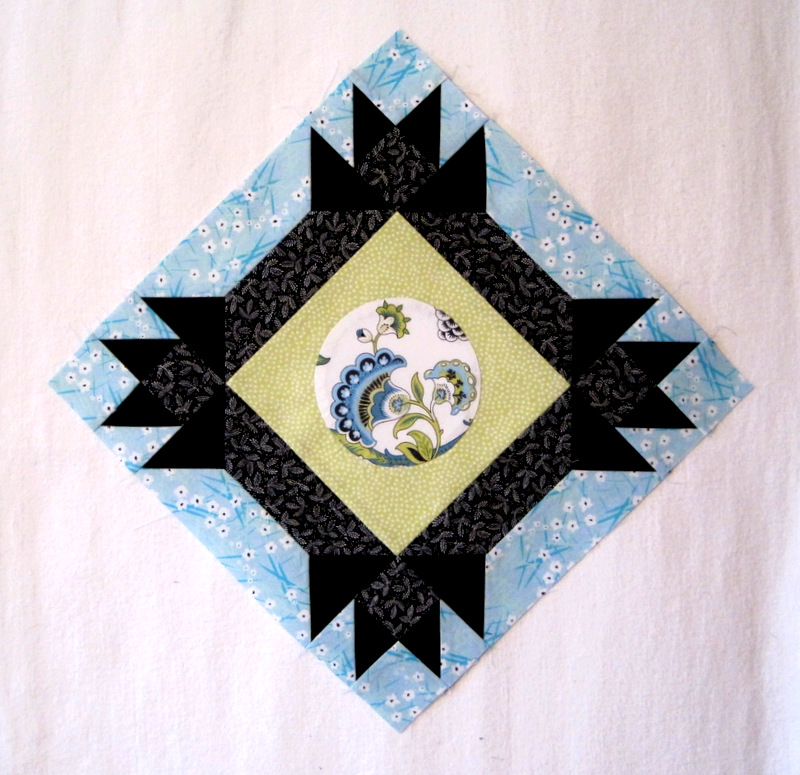
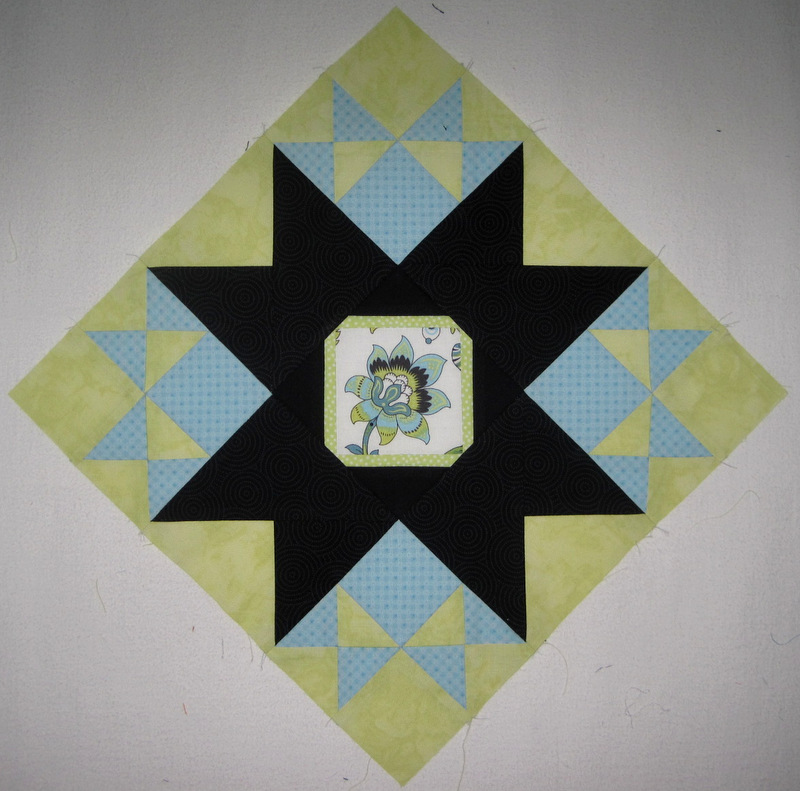
Yesterday I finished Block 2 of Reach for the Stars, a lovely sampler quilt featured in Quilter’s Newsletter, with directions spaced over seven issues beginning with Oct./Nov. 2013. The quilt, designed by Terri Krysan, features a center medallion surrounded by 14 blocks, all on point.
I’ve already posted pictures of my Blocks 1 and 3 and the center medallion. To refresh your memory:
Reach for the Stars: My Blocks So Far
And here is Block 2:
Block Measures 17″ Across on Point
The magazine’s cutting and piecing directions are abbreviated at best, so I am studying each block in advance, challenging myself to figure out how to cut the fabrics and piece the components in a way that will yield the most accurate final block measurements.
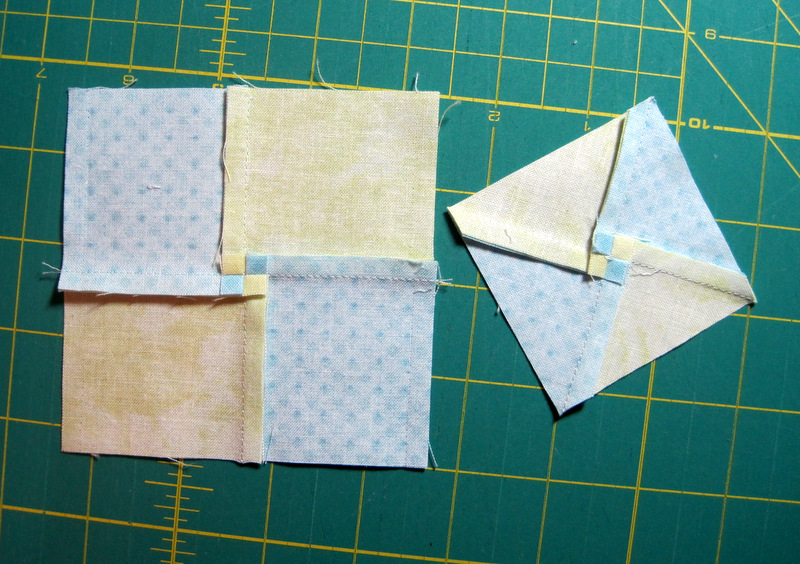
Case in point: the hourglass blocks in the corner squares.
Each corner block contains two squares — one green and one blue, in my version — and two hourglass blocks, each composed of two blue and two green triangles. The hourglass blocks are sewn to the squares, forming a 4″ finished square. Each hourglass block finishes at 2″ square.
The magazine calls for the hourglass sections to be cut from 3-1/4″ squares. To be precise, four quarter-square triangles cut from one square. Do you have any idea how small these triangles would be and how difficult it would be to sew the bias edges together and press them without any distortion? I know I couldn’t do it. I press with a heavy hand and am sure I would wind up with wonky hourglass blocks.
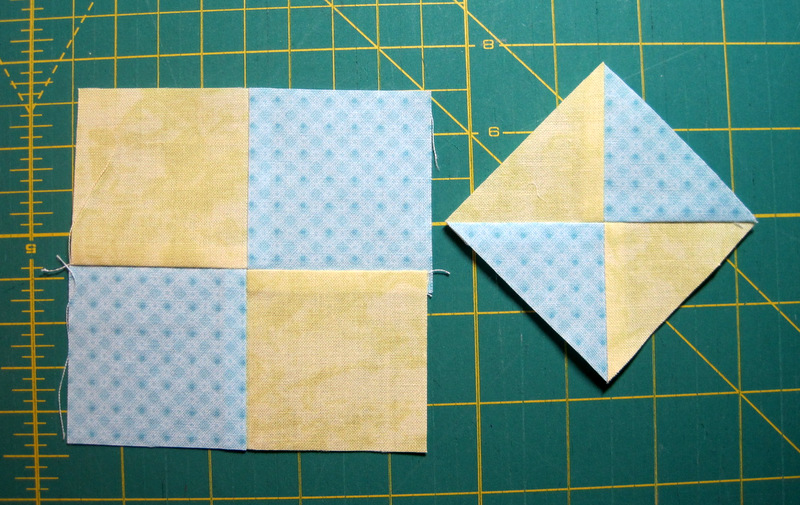
I hit upon the idea of cutting my hourglass blocks from 4-patches, “popping” the center seam open so the intersections would be nice and flat. Then I cut the 4-patches on the diagonal into 2½” squares:
4-Patch and Hourglass From the Back . . .. . . and from the Front
That hourglass block has bias edges but each edge is sewn to a straight-of-grain edge so no problem there. I’ll outline the full method if there is interest.
Jennifer Gwyn at Seams Crazy has finished her center medallion and made Block 1, and both are just beautiful! Be sure to take a look at her most recent posts. Sherri Crisp of Knoxville, Tennessee is sewing along with us, and Jennifer has a photo on her blog of Sherri’s center medallion. Simply gorgeous! Another quilter, Jennifer Thacker of Houston, Texas has started Reach for the Stars, too, and we are looking forward to seeing her blocks revealed.
The Feb./March 2014 issue of Quilter’s Newsletter is out now, with directions for Blocks 4, 5, and 6. I understand that Sherri is paper-piecing her RFTS blocks. As I look ahead to Block 5, I think I may give that method a try for part of the block. Stay tuned!
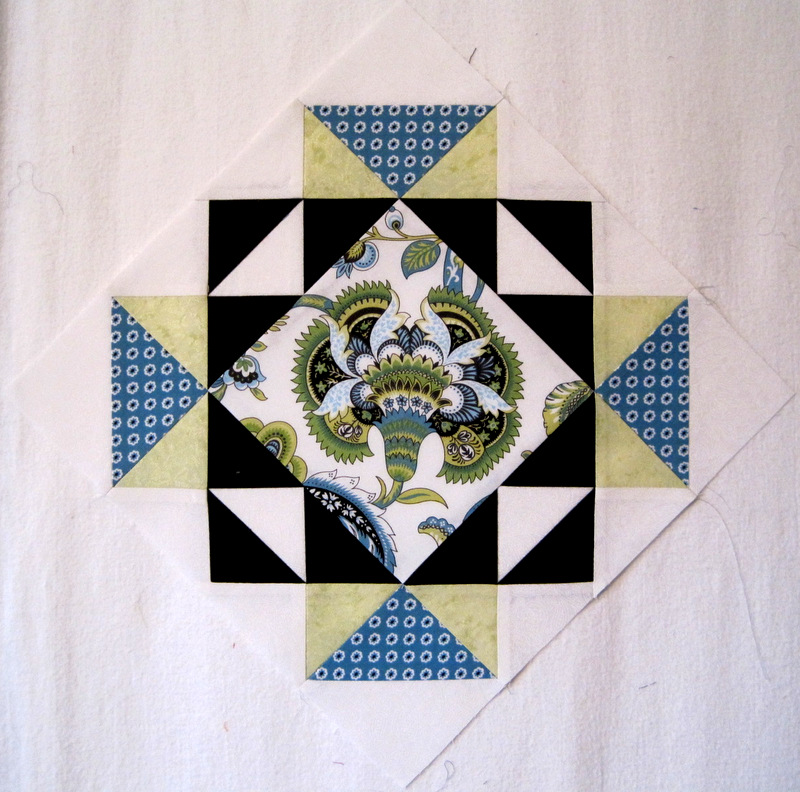
It took the better part of a day but I finished Block 1 of Reach for the Stars, a queen-size sampler quilt designed by Terri Krysan of Lakeville, Minnesota:
Reach for the Stars, Block 1
The editors of Quilter’s Newsletter magazine, in which the directions are currently appearing as part of a seven-part series, have placed the project under the category “Challenging Workbook,” and they’re not kidding. The blocks are more complex than they appear. Just look at how many points and/or seams have to be matched in the block above. Two dozen, if I counted correctly!
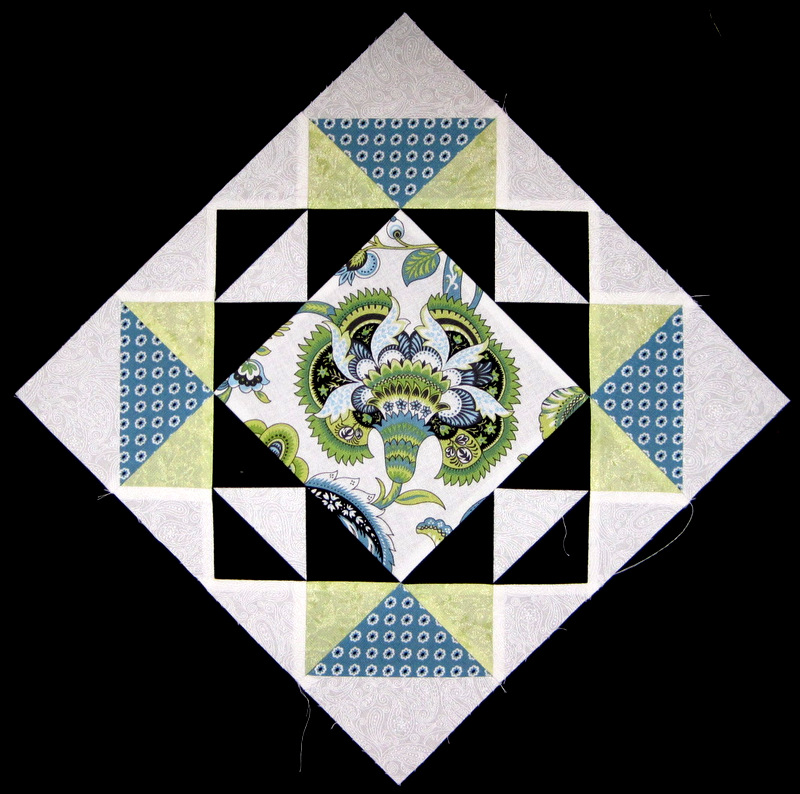
Here is Block 1 in its proper orientation on point:
Reach for the Stars Block 1, on Point
Oh dear. It’s disappearing on my design wall because of the white background. Here’s a look at it on black fabric:
A better view of Block 1
Block 1 is one of 14 surrounding a center medallion. So far I’ve made the center medallion and two blocks:
Center Medallion flanked by Dawn’s First Two Blocks
The smaller blocks are 12″ (17″ on point), and the center medallion is 26″ (37″ on point).
Jennifer at Seams Crazy is also making Reach for the Stars, in an absolutely gorgeous neutral palette of cream and tan and black. She’s currently working on the center medallion, and it is going to be a knockout! I know of a couple of other quilters who are thinking about making this quilt. Wouldn’t it be fun to have our own little community of quilters who are Reaching for the Stars?
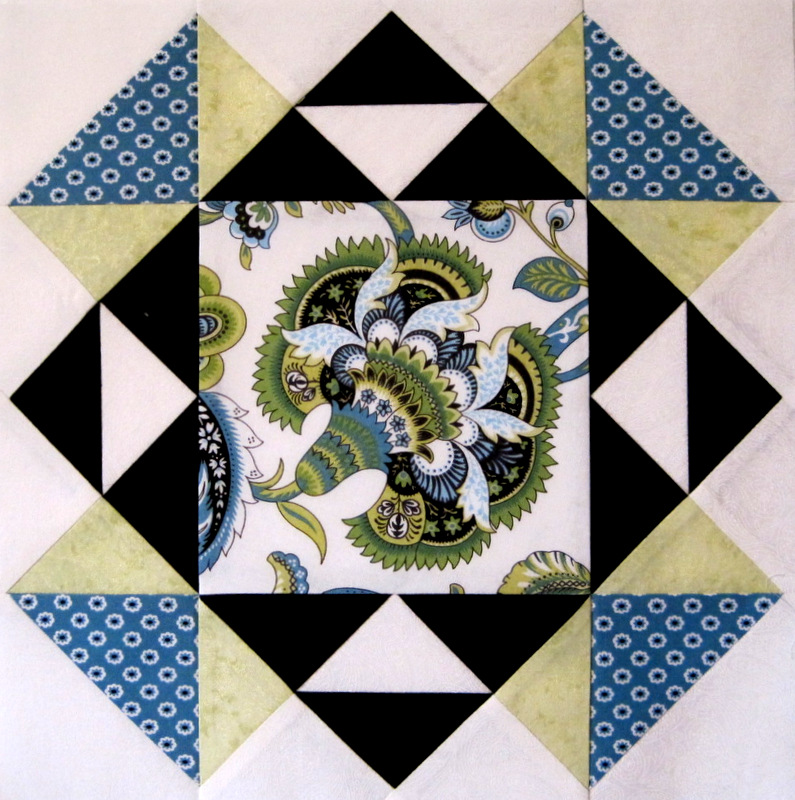
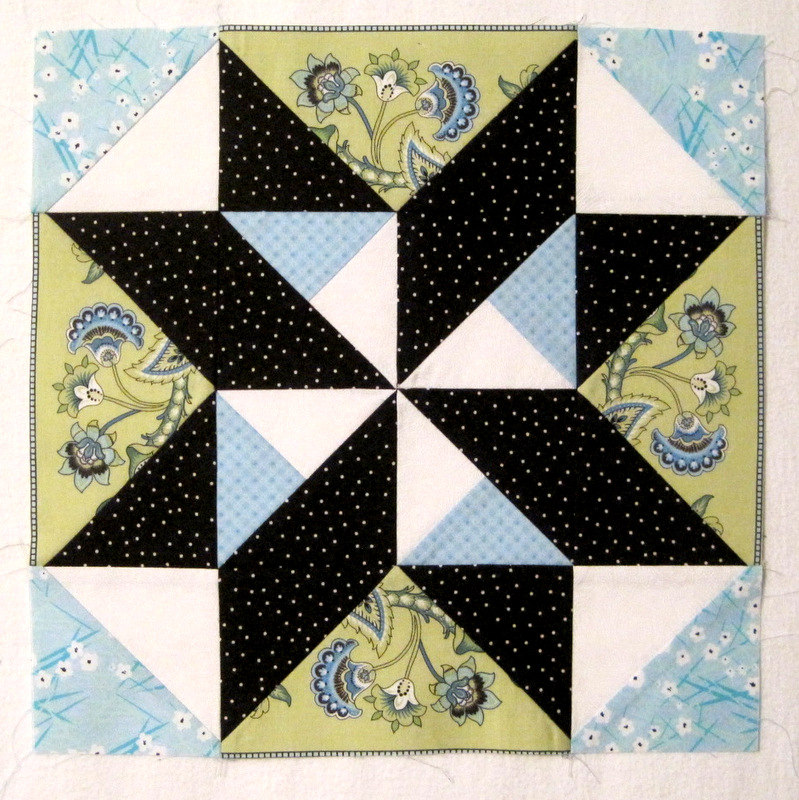
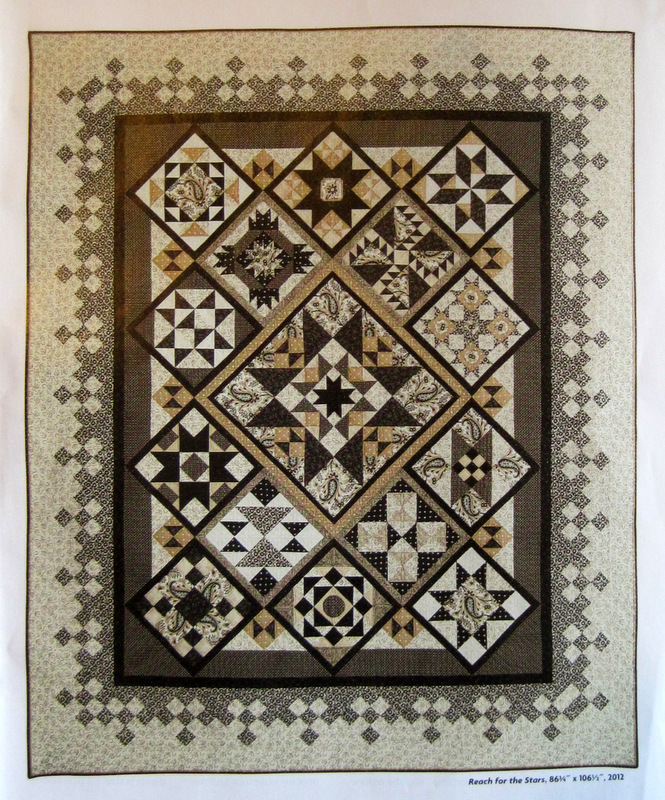
No, you didn’t miss Blocks 1 and 2. I haven’t made them yet. The block you see above is number 3, one of 14 different blocks that surround a center medallion in a gorgeous quilt, Reach for the Stars, designed by Terri Krysan. Her quilt was featured in the Oct./Nov. 2013 issue of Quilter’s Newsletter . . .
Terri Krysan’s Quilt, 86½” x 106½”
(Copyright Quilter’s Newsletter. Used with permission. Photo by Melissa Karlin Mahoney.)
. . . and I decided to make it, using fabrics in my stash and a different colorway. The magazine is offering directions in a seven-part series that began with the Oct./Nov. 2013 issue.
Block 3 is in the upper right hand corner in the original quilt. It is set on point, so this is the proper orientation for my Block 3:
Reach for the Stars Block 3, on point
I have two spectacular Jacobean florals in my fabric mix and will be looking for ways to use them. Perhaps I should challenge myself to incorporate a fussy-cut image into every block.
I made the center medallion block a couple of weeks ago. Since then I’ve added a black strip, the first of two sashings:
Medallion with one of two sashing strips
The medallion block now measures 26″ square; on point it measures 37″ at the widest point. Once I have a few more blocks made, I’ll decide whether the second set of sashing strips should be aqua or green.
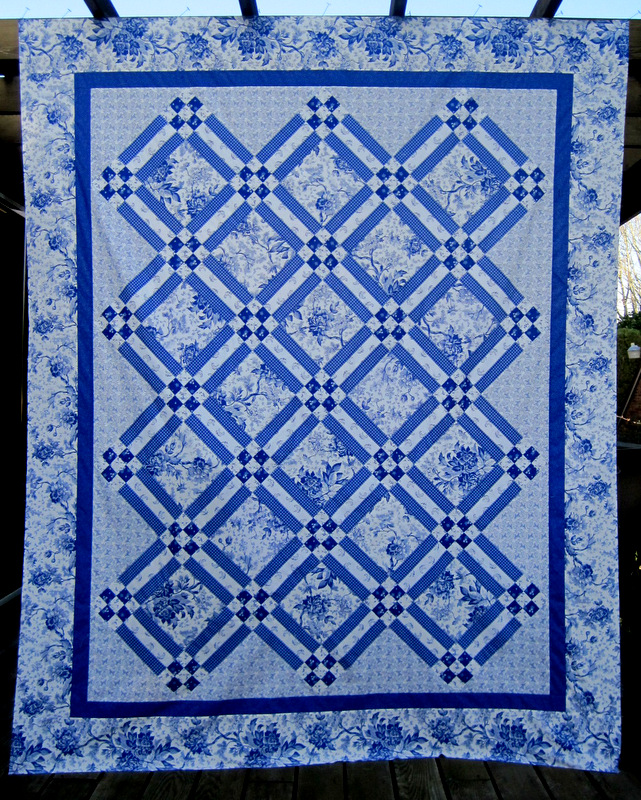
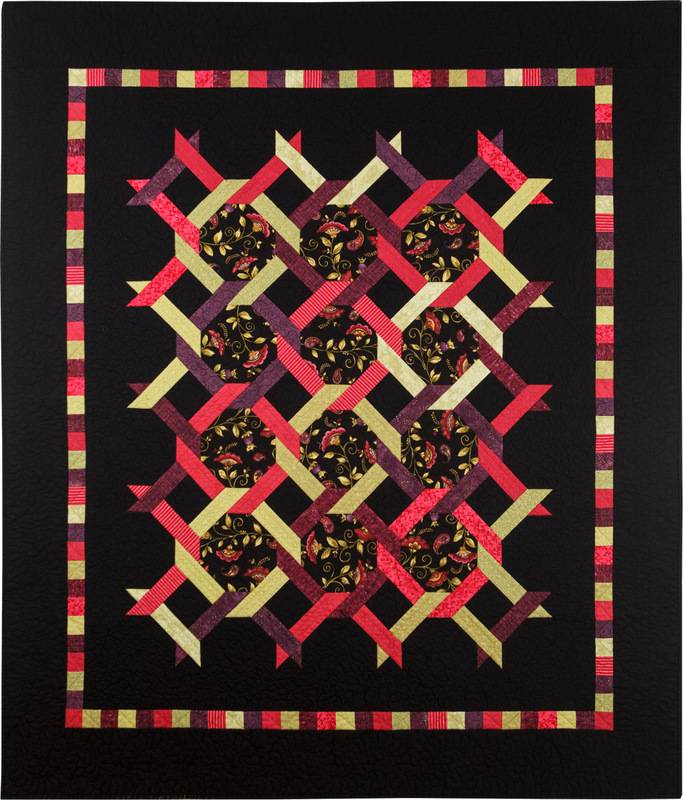
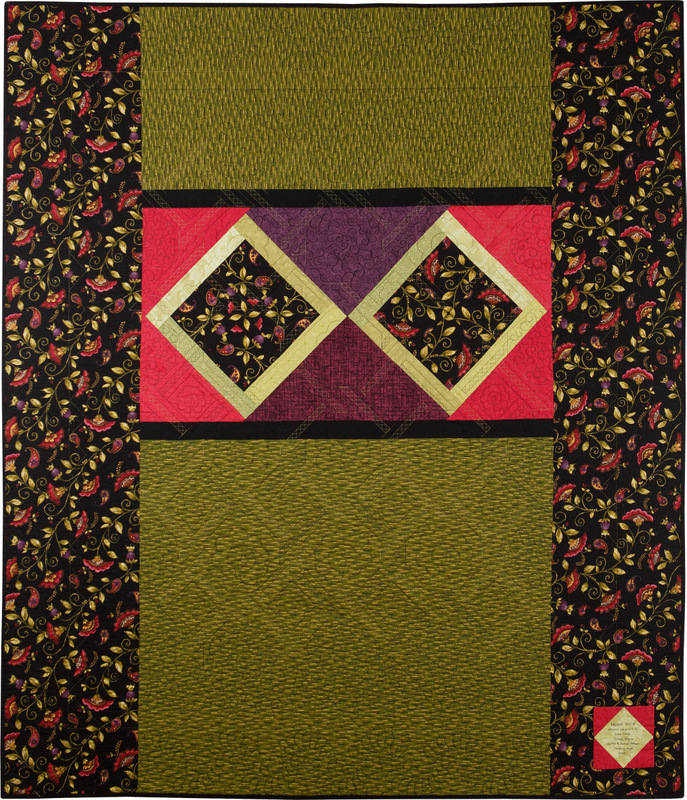
“First finish of 2014.” Ah, it feels good to say that. May I present Square Dance:
Square Dance, 55½” x 64½”
Just 18 months from conception to completion. Not bad for me! To read about the inspiration for this quilt and how it evolved, see my first post about it and a follow-up.
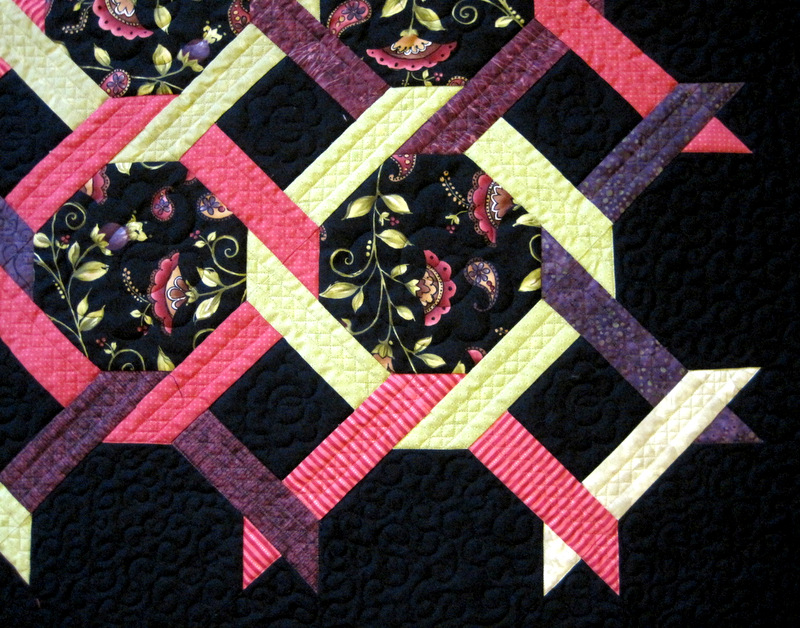
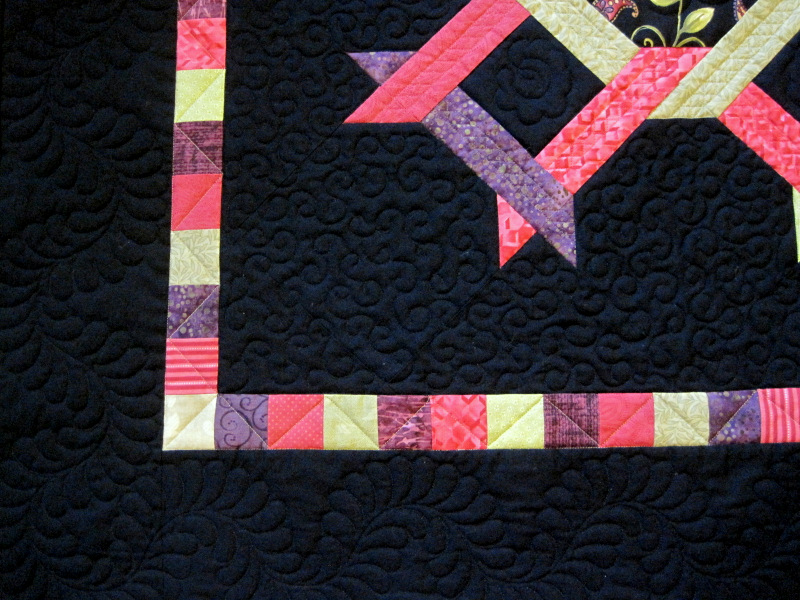
Square Dance was quilted by Melissa Hoffman, one of many talented longarm quilters in the Portland metropolitan area. Here are a couple of close-ups:
Quilting Detail
Feathers and Filigrees
Don’t you love the way quilting adds texture? The filigree motif in the inner black background was free-motion quilted.
The back of the quilt:
Leftover Blocks on the Back
Just for fun, the label is a square in a square:
Final Task: the Label
Square Dance will hang in the Stitches in Bloom quilt show at the Oregon Garden next week (Jan. 24-26). If you happen to be in the neighborhood of Silverton, Oregon then, I hope you’ll stop by.
The Spring 2008 issue of Designer Quilts magazine featured a red and white quilt called Checkerboard Square, designed by Alex Anderson using fabrics from her Never Enough Romance line for P&B Textiles. As quilt designs go, it’s pretty basic: 18 squares set on point, surrounded by nine-patches and sashing strips. The fabric line really made her design sing, though. It included a large toile and seven companion fabrics, and it came not just in red but also in black and royal blue colorways.
I decided to make the blue version, and in the fall of 2008 I cut the entire quilt out. And, for some reason I can’t explain, I put the quilt aside. For five years. Last week I decided that this UFO would be the first one to tackle in this fresh New Year.
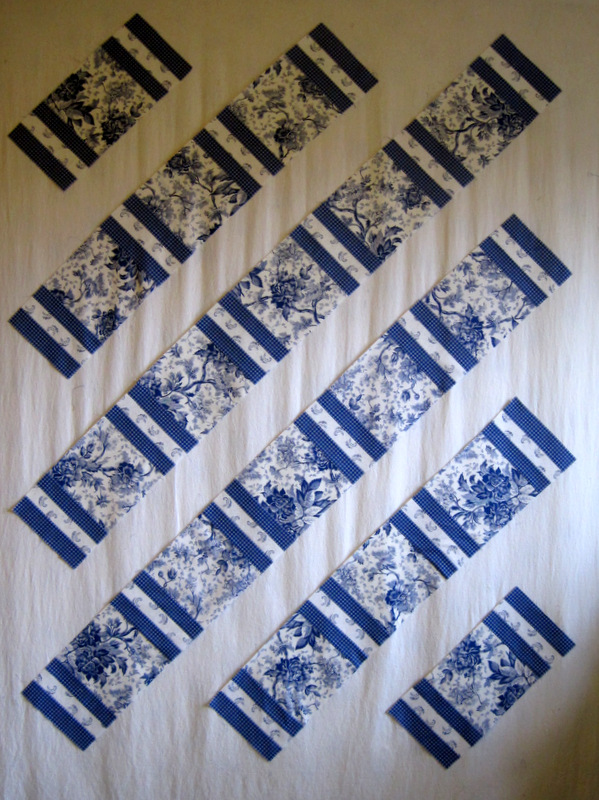
First I made 48 sets of sashing strips. (No, that’s not quite accurate. I cut the first four sets an inch short and had to make new ones.) Then I made 31 nine-patch units. Then, because I am admittedly obsessive about such things, I arranged the 18 squares on point on my design wall and moved them around until I felt the blooms and vines in the toile design were more or less evenly distributed. Here are my toile squares:
Here they are with the sashing strips attached:
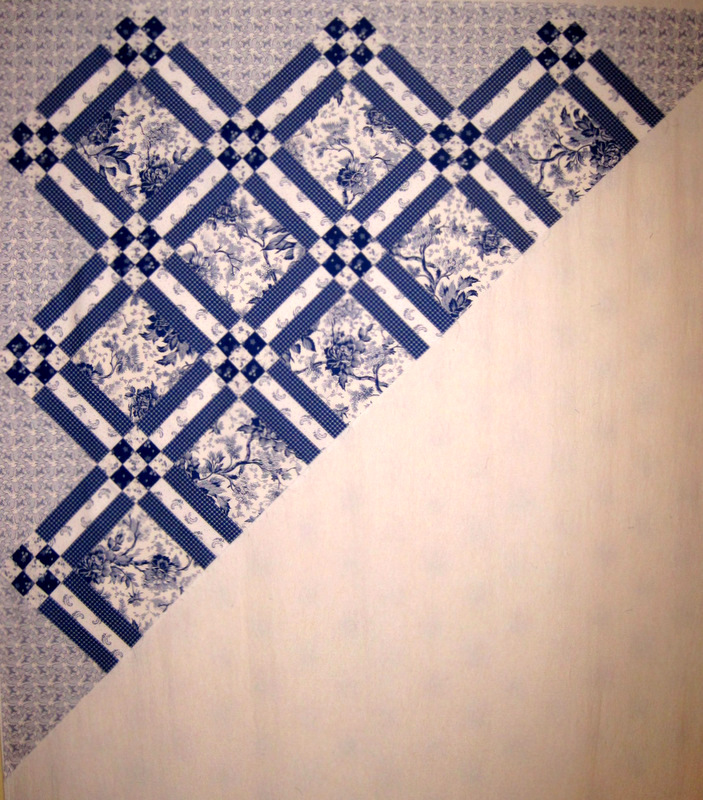
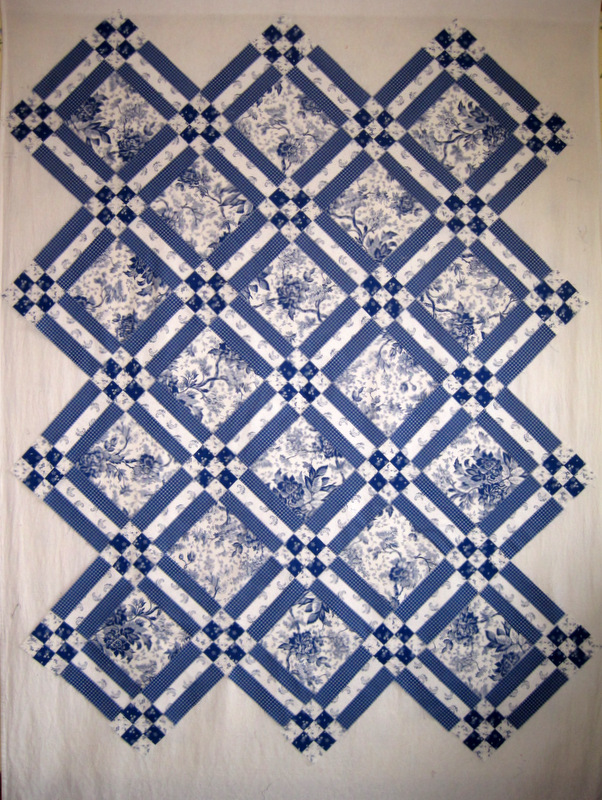
After the nine-patch/sashing strips that make up the connector rows were joined, I arranged them on my design wall, filling in the blank spaces you see in the photo above:
The angle is a little wonky but now you can see what this quilt is going to look like.
I’m almost half done joining the rows. With the setting triangles attached, it’s starting to look like a real quilt:
With two borders — a narrow blue one and a larger one made of the toile print — the quilt top will measure about 71″ x 88″.
My New Year is off to a promising start. I hope yours is, too!