Playing Around with the Twist Block

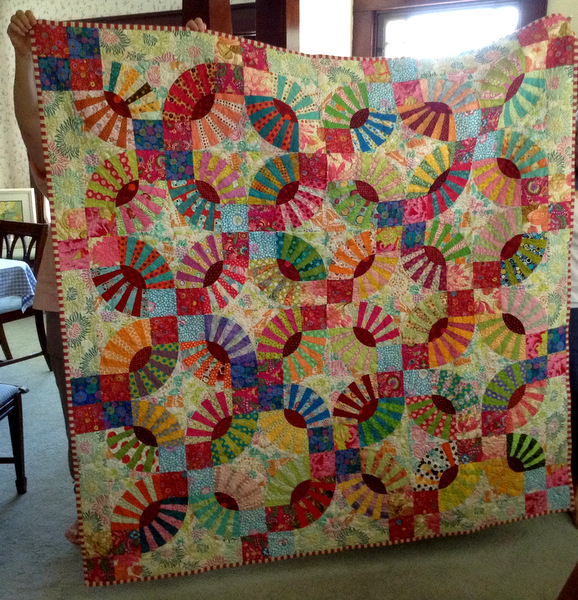
Time to show you more of the project I’ve been working on since my last post. I actually started this project over a year ago, when I got a bug to make a new quilt based on my 4-Patch Wonder with a Twist pattern. This is the first quilt, which is on the cover of the pattern:

2011-9, It's All in the Twist, 57x65

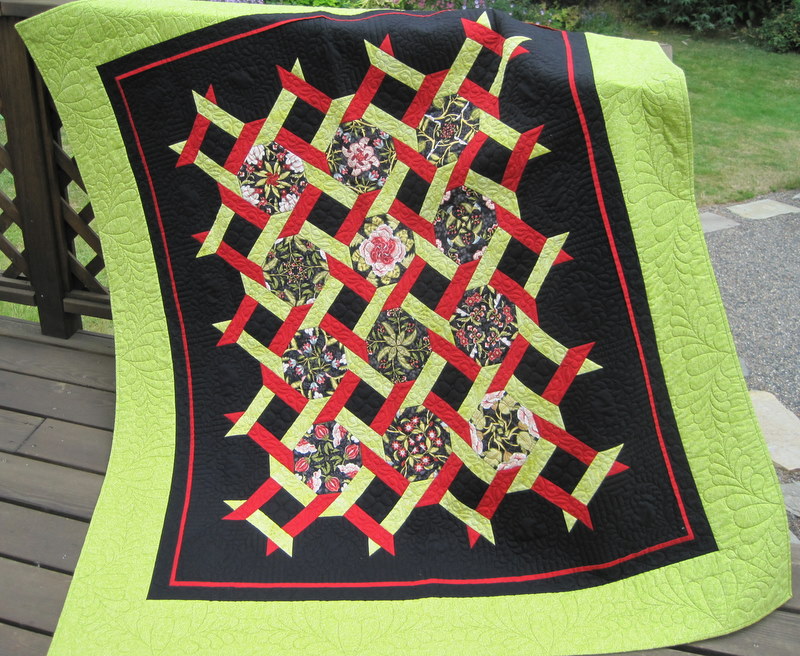
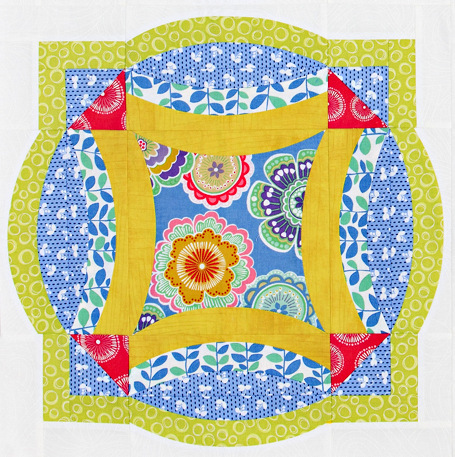
The 12 snowball blocks are very different from each other but they are all from the same piece of focus fabric, made into 4-Patch Wonder blocks (my name for blocks made of four identical layers of fabric that are stacked, cut in squares, and then rotated to make a pleasing symmetrical design). An alternating block — red and green in this case, on a black background — helps create the illusion of interlocking strips. The quilt looks contemporary but the twist block actually dates back to 1870.

The fabric I had in mind for a second version was this lovely print, Ella, by Kathy Brown for Red Rooster Fabrics:

Ella fabric

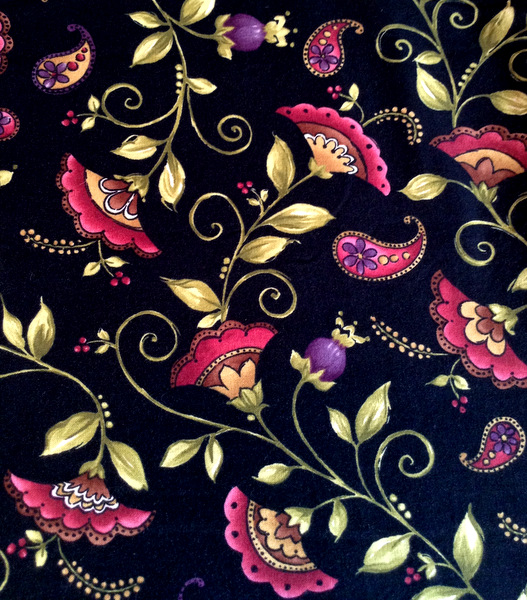
I was attracted to the folk-art feel of her design and the rose and purple tones set off by green vines on a black background. My thought was to make the lattice strips out of three colors — rose, purple, and green — instead of two colors as I did in my first quilt. And I thought the Ella print would make great 4-Patch Wonder blocks

Trouble was, the first couple 4-Patch Wonder blocks I made were — well, they were pretty but not nearly as pretty or as interesting as the original fabric:

Ella 4-pw blocks

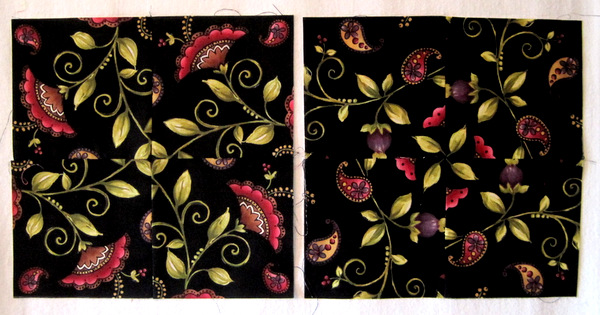
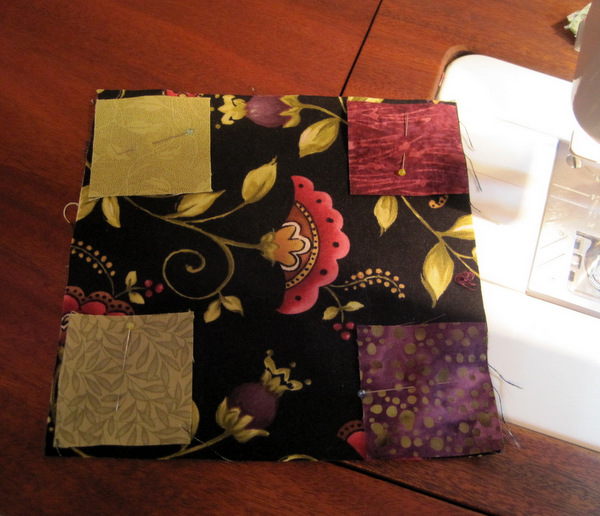
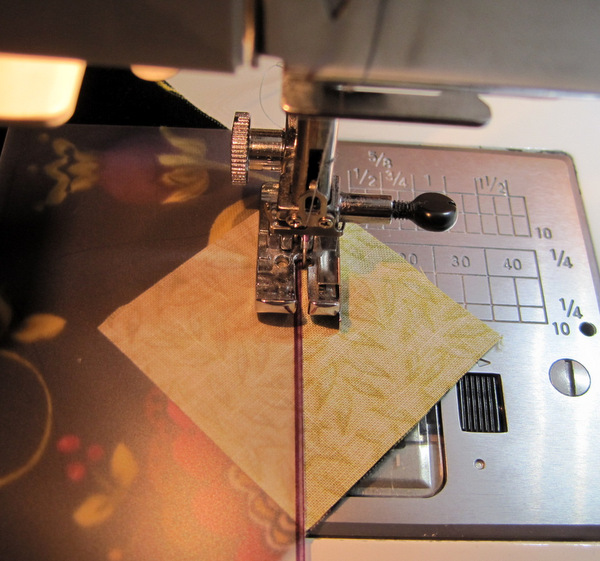
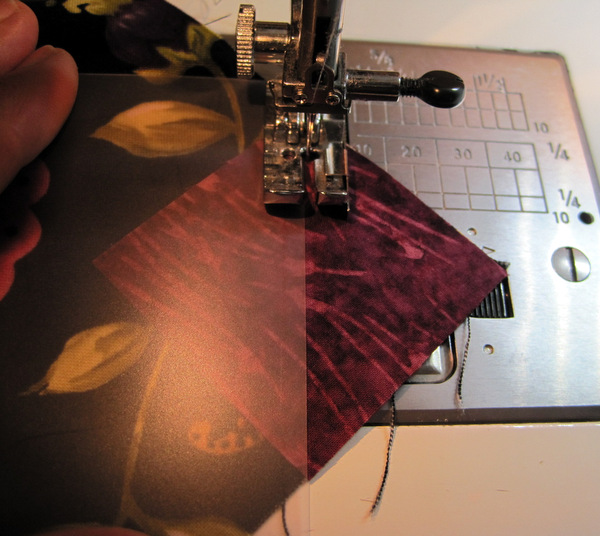
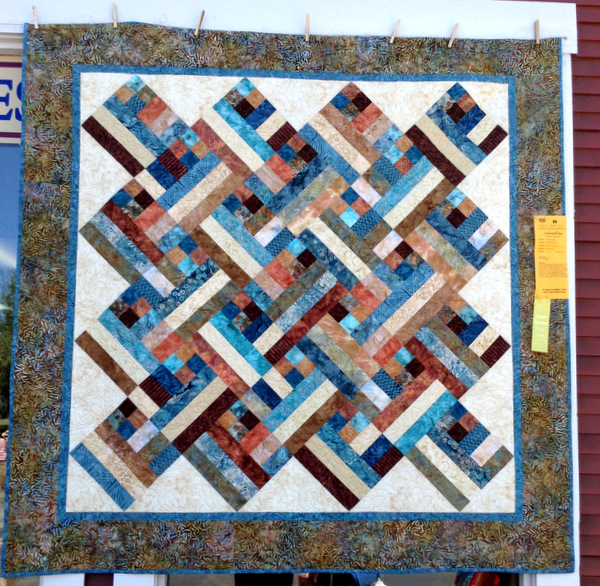
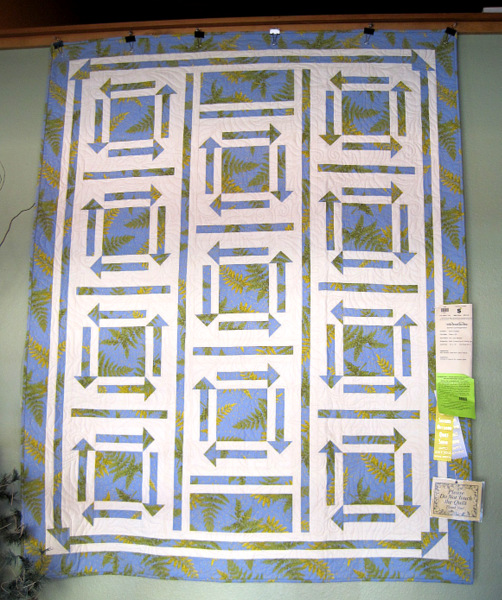
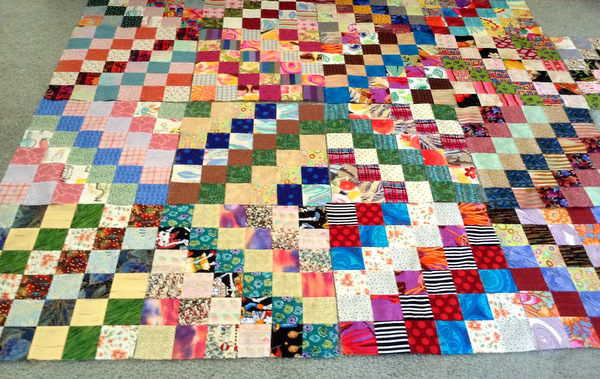
I abandoned the plan for 4-Patch Wonder blocks and simply cut squares. Then I dug into my stash for the rose, purple, and green fabrics needed for the twist strips. I pulled out quite a few pieces, all reading as textured solids. Pretty soon I had several options for each color. (What does this tell you about the size of my stash?)

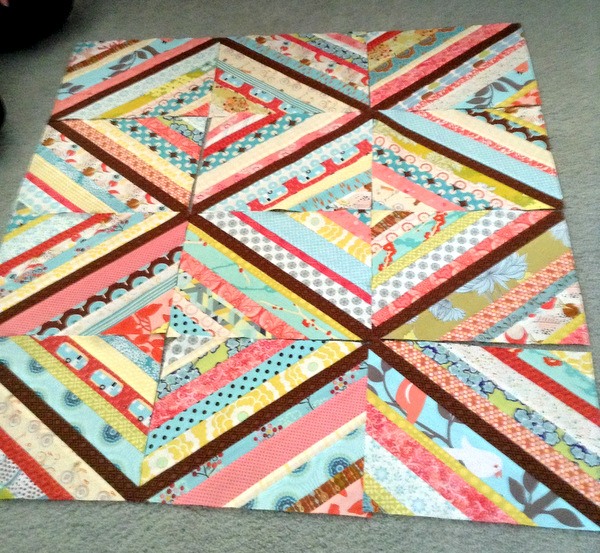
Somewhere along the line I got the idea of using four different fabrics for each of the three colors. That’s right — 12 different fabrics for the twist strips. I just about drove myself crazy deciding which strips would go where, and then devising a way to keep track of them once their positions were assigned. Maybe that’s why I made just a few blocks and put the project away for over a year. Another Work-in-Progress, languishing . . .

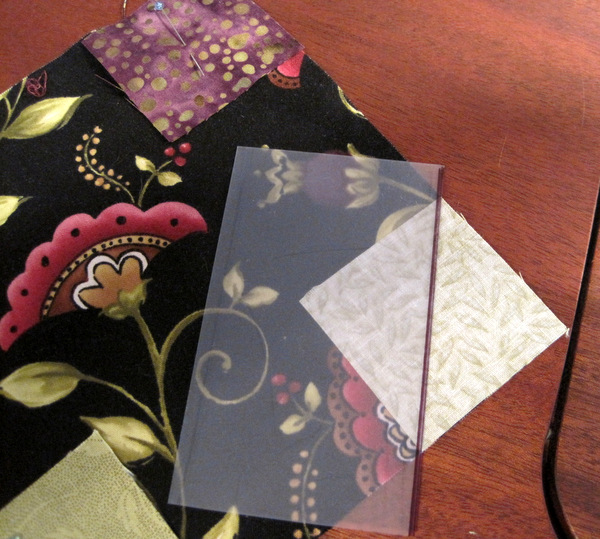
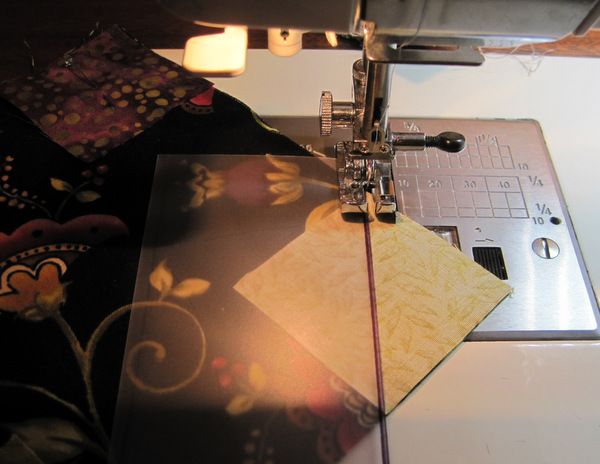
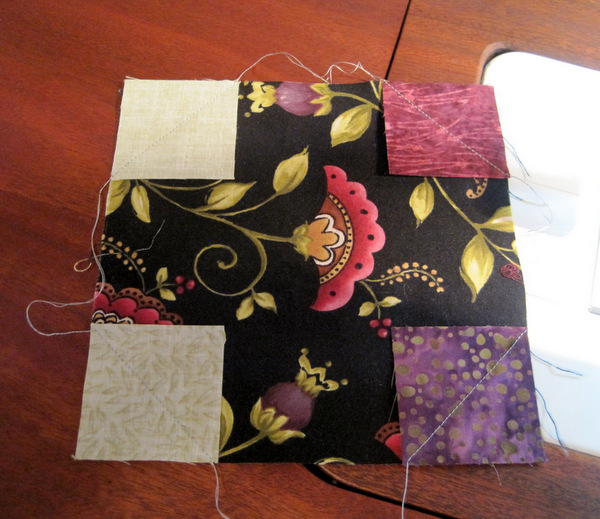
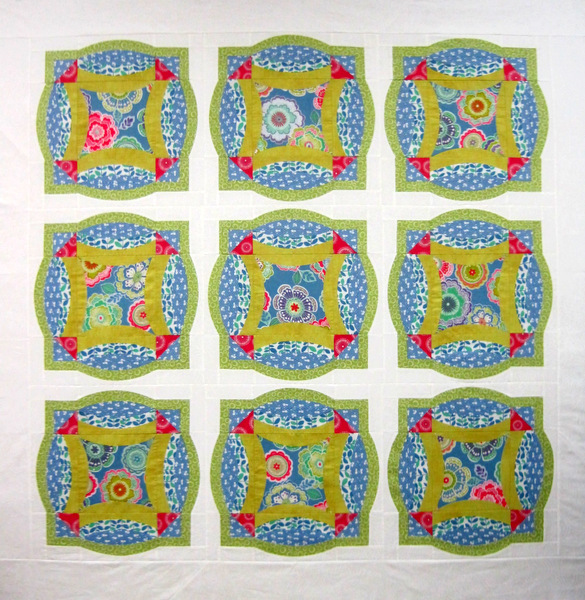
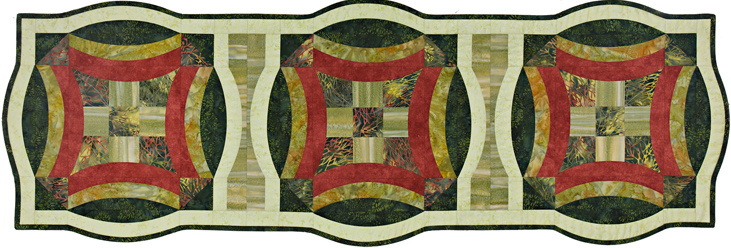
Out it came last week, ready for some close personal attention, and here is the result so far:

Ella 800p

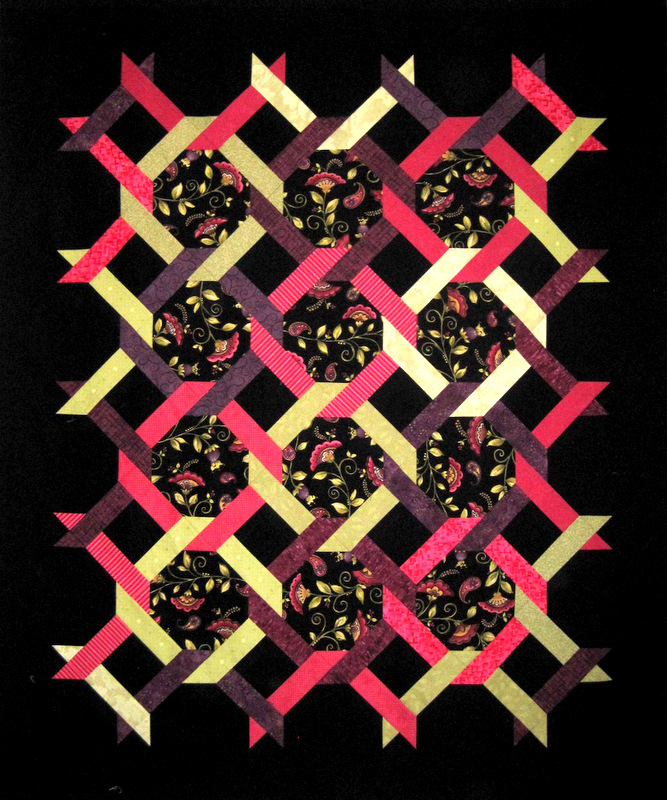
I’m very pleased with it! Still to come: borders. With quite a few 2½” strips left over from the lattice, I’m thinking about making an inner border of 2″ squares using all 12 lattice fabrics. I hope you’ll check back in a few days to see what I’ve done.


Posted in 4-Patch Wonder, faux-kaleido quilts, snowball blocks, update | 5 Comments

The Fastest Snowball Block Ever!

I’m working on a quilt (another Work-in-Progress, begun over a year ago) that contains several snowball blocks — you know, the ones that have a triangle sewn to each corner, like this:

corner triangles #8

I’ve seen these edges referred to as foldover corners and stitch-and-flip corners. Whatever they’re called, the usual method of making them is to place a small square in each corner of the larger square, sew diagonal lines from corner to corner, trim the seams, and press the resulting triangles to complete the square.

Pretty basic, pretty fast. Except that it’s usually necessary to draw a stitching line on the small squares and sometimes to pin them to the larger square. It can get pretty tedious drawing all those lines on fabric, and it’s surprisingly difficult to stitch a perfectly straight diagonal line, especially when you are starting out at a corner.

Well! I recently learned a new way to sew these squares that doesn’t involve either pins or drawing lines. It’s faster than the old method and has resulted in improved accuracy in my stitching. I experimented a bit with the method and the materials, and this is what I came up with that works best for me:

corner triangles #1

It’s a piece of template plastic, about 4½” wide and 2½” long, the perfect size for a block that finishes at 6″. I placed the plastic on a piece of scratch paper and, using an acrylic ruler and black Fine Point Sharpie pen, drew a thin line along one long edge. You’ll see what the dark edge is for in a moment.

Here is my large square and the four smaller squares I need to make the corner triangles:

corner triangles #2

(The only reason I have pins in the smaller squares is to make sure they are in the correct position for the quilt I am making. If I were using the same fabric in all four corners, I wouldn’t need pins at all.)

I start by positioning one of the smaller squares right side down in one corner of the larger square. Then I lay the template plastic right along the stitching line, from corner to corner, with the edges of the template plastic extending beyond the beginning and ending points of the stitching line. The inked side of the template plastic helps me see the edge of the plastic better on light fabric:

corner triangles #3

Next I position the fabric with my needle (in the down position) right next to the template at the exact corner of the small square. Holding my left hand (not shown in the photo below) firmly on the template plastic, I start stitching right at the corner:

corner triangles #4

You can see the needle is right next to the edge of the template plastic, eliminating the possibility of straying off the stitching line:

corner triangles #5

It feels a little bit like stitching in the ditch, with the edge of the template plastic serving as the ditch. Being able to see the fabric through the plastic helps me make sure the fabric isn’t shifting.

I use the uninked long edge of the template on dark fabrics, as it is easier to see the needle as it goes in and out right next to the edge of the template plastic:

corner triangles #6
I sew all four corners in this manner, rotating the large square as I go and not cutting the thread between corners:

corner triangles #7
Now all I have to do is cut the threads, trim the seams, and press. Voila! My snowball block is done:

corner triangles #8
This method works for flying geese blocks, sawtooth edges, just about any block that calls for a triangle to be made from a square or rectangle. The templates can be made with cardboard or other stiff materials, but I’m sticking with template plastic because I like being able to see through it as I sew along next to it. I’ll make larger templates for larger blocks.

My thanks to Kelly at BlueBird Sews for introducing me to this new method. I love learning from fellow quilters!


Posted in snowball blocks, stitch-and-flip corners, tutorial, update | 8 Comments

Mission Accomplished

I’ve been working on a quilt top based on the pattern Urban Tiles by Jenny Pedigo of Sew Kind of Wonderful. The top is done, and here it is:

UrbanTiles 600
Urban Tiles Quilt Top, 58½” Square


This was fun to work on because the fabrics are so bright and cheerful. I could see this as a table topper or a little girl’s quilt.

Now to consider quilting motifs. . . . I could go with an all-over design. On the other hand, maybe I should choose a motif that highlights the secondary design in the white fabric around the blocks. What do you think?


Posted in table topper, update | 4 Comments

WIP Wednesday, a Day Late

Urban Tiles deb h photo - Copy

Yes, it’s a new Work-in-Progress. (The older ones will just have to wait.) I’m making a quilt using the pattern Urban Tiles by Jenny Pedigo of Sew Kind of Wonderful because I’ll be teaching a class on it in October at the Pine Needle Quilt Shop.

The center of the block was designed as a nine-patch but I wanted to show off the playful floral fabric (from the new Dori line by Mitzi Powers for Benartex) so I opted to use a solid piece. The block finishes at 16½”.

Regular readers may recognize the pattern, as I made a table runner last year from Jenny’s design, before her pattern was published:

Into the Woods, Dawn's Urban 9-Patch table runner
Into the Woods, 17½” x 51″ (2012)

Isn’t it amazing how fabric changes the look of a design?

I hope you’ll stop by in a couple of days to see my WIP transformed into a finished quilt top!


Posted in update | 3 Comments

4-Patch Coaster Fun

Between family birthdays, reunions, and weddings — joyous occasions all — I’ve spent very little time in my sewing room in the last month. My two youngest granddaughters, Bonnie (13) and Beatrice (10), are currently visiting from San Francisco, so the last week has been filled with activities such as picnicking in the Columbia Gorge, attending a professional women’s soccer game, frolicking in the pool at our nearby community center, and shopping for school clothes.

Yesterday we stayed home. Beatrice had a playdate with My Little Neighbor (MLN), who just turned 11. Both girls were in the mood to “make something crafty.” They picked out some fabrics from my stash, and here is what they created:

2013-8, MLN and Bea
My Little Neighbor and Granddaughter Beatrice Display Their Coasters
2013-8, MLN and Beatrice
Their Coasters from the Back

The girls had so much fun they’re going to make a few more coasters tomorrow.


Posted in 4-patch coasters, family, My Little Neighbor, update | 4 Comments

More Quilts from the Sisters Outdoor Quilt Show

Picking up where I left off a couple of days ago, here are more of my favorite quilts from among the 1300+ displayed last Saturday, July 13 at the Sisters Outdoor Quilt Show (SOQS) in Sisters, Oregon.

Gypsy Kisses, 92 x 103, by Kathy Doughty of Sydney NSW
Gypsy Kisses, 92 x 103, by Kathy Doughty of Sydney, Australia


No Spurs Needed, 30 x 40, by June Jaeger of Prineville OR


Daisies in Red and Black, 60 x 60, by JanniLou Creations of Philomath OR


Contemporary Totes, 24 x 32, by Tonye Belinda Phillips of Camp Sherman OR


Neighborhood, 45 x 60, by Elizabeth Hartman of Hillsboro OR


Storm Warning, 20 x 40, by Rayna Gillman of West Orange NJ


Sea, Sand and Sky, 67 x 80, by JanniLou Creations of Philomath OR


Pressing Matters, 41 x 51, by Laura Wasilowski of Elgin IL


Bullseye, 54 x 60, by Ann Zick of  Hinsdale IL
Bullseye, 54 x 60, by Ann Zick of Hinsdale IL


Our View of Sisters-Friendship, 50 x 50, made for Anne Zick of Hinsdale IL by Joan Bratton, Maureen Creed, Joyce Freehill, Jan Johnson, Betsy Maloney, Marilyn Montgomery, Valerie Rodelli, and Coleen Walter


50 Shades of Red, 62 x 72, by Terry Johnson


Blossoms, 52 x 60, by Christine Day of Fallbrook CA


Blue Moon, 86 x 104, by Alice Besler of North Powder OR


Garden Maples, 77 x 78, by Chris Jones of Sisters OR


Garden of Leaves, 68 x 68, by Pamela Hylton of Grand Ronde OR


Light Up, 46 x 57, by Maron Johnston of Santa Barbara CA


Senorita Hankie Ladies, 36 x 45, by Bonnie Guzman of Lathrop CA
Senorita Hankie ladies, 36 x 45, by Bonnie Guzman of Lathrop CA
detail of Senorita Hankie Ladies by Bonnie Guzman of Lathrop CA


Kristin Shields of Bend OR was a featured quilter. Here are a few of her wonderfully whimsical creations:

Castle Peeps, 32 x 44, Kristin Shields of Bend OR
Castle Peeps, 32 x 44, by Kristin Shields of Bend OR


In the Night Garden, 41 x 52, by Kristin Shields of Bend OR


Whimsey, 39 x 41, Kristin Shields of Bend OR
Whimsy, 39 x 41, by Kristin Shields of Bend OR


The Cover to Cover book club created quilts inspired by The Invention of Hugo Cabret by Brian Selznic. My favorites from this group:

Clock Parts Mania, 61 x 46, by Pat Busby of Lake Oswego OR

A peek at the back revealed that these kaleidoscope blocks were made from a focus print of . . . mushrooms!

focus fabric on back of Clock Parts Mania by Pat Busby of Lake Oswego OR
Focus Fabric Used by Pat Busby to Make Clock Parts Mania


Connectivity, 47 x 47, by Dianne Kane of Portland OR


Gears, 72 x 81, by Linda Reinert of Oregon City


I hope you’ve enjoyed this little presentation of the quilts that caught my eye this year. The quilts you see here and in my last post represent fewer than 4% of the quilts that were displayed. Simply astounding when you stop to think about it.

Is it any wonder that I have already marked my calendar for July 12, 2014 — the second Saturday in July — for the 39th Annual Sisters Outdoor Quilt Show?


Posted in kaleidoscope quilts, Sisters OR Outdoor Quilt Show, update | 5 Comments

“The Biggest Outdoor Quilt Show in the World”

Saturday, July 13. A perfect summer day in Central Oregon: temperatures in the low 80s with a light breeze. Thirteen hundred quilts hung just for the day on the fronts, backs and sides of buildings in the tiny town of Sisters. Dozens of other quilts hung inside businesses all over town. Thousands of quilt lovers and other spectators strolling the streets taking in the sights and sounds of the 38th Annual Sisters Outdoor Quilt Show (SOQS).

I was lucky enough to be there for the show and the week leading up to it. For the last seven or eight years (we’ve lost count), my quilt group, the Quisters, has rented a house for the week leading up to the quilt show in order to participate in Quilter’s Affair, a week of classes organized by the Stitchin’ Post Quilt Shop in Sisters. In addition to the talented teachers living in Central Oregon, instructors come from across the country and overseas to share their expertise.

This year I opted not to take any classes so I could continue to work on my ever-growing stack of Works-in-Progress. I was sorry not to have taken at least one class, especially after seeing how excited my fellow Quisters were about the ones they were taking, but I did come home with three completed projects — WIPs no longer! — and the show itself provided a plethora of ideas for new ones.

There was something for everyone at this year’s show: beautiful traditional quilts, edgy modern quilts, and everything in between. Below, in no particular order, are a few of the quilts that caught my eye:

Mid Century Modern by Brita Kimmerly of Seattle WA, 52 x 60
Mid Century Modern, 52 x 60, by Brita Kimmerly of Seattle WA


Glacier Star by Pam Nichols of Powell Butte OR, 98 x 98
Glacier Star, 98 x 98, by Pam Nichols of Powell Butte OR


In a Spin by Gill Miller of Cambridge UK, 30 x 30
In a Spin, 30 x 30, by Gill Miller of Cambridge UK


He Watches by Janie Adams of Bend OR, 56 x 62
He Watches, 56 x 62, by Janie Adams of Bend OR


Spring Surprise, 41 x 57, by Beth Rietveld of Corvallis OR


What You See by Kathy Doughty of Sydney NSW, 47 x 67
What You See, 47 x 67, by Kathy Doughty of Sydney, Australia


anns quilt
Cascade Kaleidoscope, 38 x 42, by Ann Richardson of Sisters OR


Two Color Mystery, 53 x 67, by Karen Shadley of Sisters OR


The Portland Modern Quilt Guild was represented by several beautiful quilts, including these three:

Spring String, 48 x 64, by Gail Weiss of Portland OR


Sticks and Stones, 36 x 42, by Rachel Kerley of Hillsboro OR


Gray Improv I by Cris Pera of Portland OR


Every year the Stitchin’ Post Quilt Shop issues a challenge to its employees to make a quilt based on a theme, and all of the quilts are displayed on the side of the Stitchin’ Post building on show day. This year’s theme was “Streams of Color.” This shot captures most of the quilts:

challenge quilts made by staff of Stitchin Post
Challenge Quilts Made by Staff of the Stitchin’ Post

Two of my favorites are this one, incorporating hexagons . . .

one of the Streams of Color challenge quilts
made by Jean Wells, owner of the Stitchin’ Post and founder of the Sisters Outdoor Quilt Show

. . . and this one featuring New York Beauty blocks:

Streams of Color challenge quilt
made by Paige Vitek, employee at the Stitchin’ Post in Sisters

Continuing on with the show:

The King -- Elvis, 82 x 90, by Randall Cooper of Madera CA
The King — Elvis, 82 x 90, by Randall Cooper of Madera CA


J'Adore Paris!, 41 x 42, by Kristin Shields of Bend OR
J’Adore Paris!, 41 x 42, by Kristin Shields of Bend OR


Barbara's Baskets, 68 x 80, by Janet Storton and Barbara Fergusun
Barbara’s Baskets, 68 x 80, by Janet Storton and Barbara Fergusun of Sisters OR


Parallel Lives, 44 x 52, by Patty Six of Santa Barbara CA


Forest Path, 53 x 68, by Patty Six of Santa Barbara CA


IMG_0283
Green Orphan Blocks, 42 x 42, by Colleen Blackwood of Pendleton OR


Random Windows, 46 x 28, by Hilde Morin of Portland OR


Oh my! I just realized I’m not even halfway through my photos. I think I will end today’s post here and present another batch of quilt photos in the next day or two. I hope you will come back for more.


Posted in hexagons, Portland Modern Quilt Guild, Quisters (Quilt Sisters), Sisters OR Outdoor Quilt Show, update | 11 Comments

Giveaway Winners

Are you a winner?

Last week I had my first Giveaway, offering up my new Sewing Machine Dust Cover pattern to six winners and a custom sewing machine dust cover to be made (by me) for one of the six. I used a Random Number Generator to pick the numbers, having decided in advance that the sixth number drawn would be the big winner. I also disqualified comments #2 and #9, since they were made by me and my husband.

Here is what the dust cover looks like:

Dawn's sewing machine dust cover

And the winners of the pattern, in the order I drew their names, are . . . (drum roll) . . .

Jennie B.
Merethe S.
Patch G.
Mallory J., and
Joyce M.

The winner of the pattern and custom sewing machine cover is . . . (drum roll) . . . Susan S., who wrote, “I’d love to win your sewing machine cover . . . I’ve been meaning to make one for years and haven’t gotten around to it yet.”

Congratulations to the winners! Please email me with your full name and mailing address, and I will get the patterns in the mail next week. (I’m out of town this week, hence the slight delay.) Susan, let me know what colors and fabric styles you like so I can send you some fabric combinations to choose from.

Thank you all for entering my Giveaway!


Posted in sewing machine cover, update | 4 Comments

A Summer’s Day Show and Tell

My quilt group, the Quisters, met at my house last week on a perfect summer day. Between bites of marionberry pie, we had quite a show-and-tell session. Here is Peggy’s Paperweight quilt top, started last summer in a class taught by Pamela Dinndorf of Aardvark Quilts:

6-13 Peg's Paperweight quilt top

Such a happy and colorful top! Peggy also designed and hooked this fabulous rug, perfectly capturing the charm of her beach house on the Oregon coast:

6-13 Peg with Sandy Toes rug

The scene includes her goldendoodle, Lucy, on the left, and her grandchildren on the right.

Peg is already at work hooking another rug, Cat’s Paws, designed by Sharon Smith of Off the Hook Wool Rugs:

6-13 Peg's Cat's Paws rug in progress


Deborah recently competed a quilt she started a few years ago in a class taught by fellow Quister Lee Fowler.  This is Sushi Rolls:

Deborah's Sushi Roll quilt top

Love the red and green color combo! I can see this on the back of Deborah’s couch at Christmas but it would work all year round.

Here is Lee’s newly completed Pickle Dish quilt:

6-13 Lee's Pickle Dish quilt

Twenty-five of Lee’s friends contributed one or more paper-pieced arcs, and Lee put the rest of the quilt together with fabric from her stash (and a little more help from her friends). I spy lots of polka dots — one of Lee’s favorite design elements — and quite a few Kaffe Fassett prints.

Lee has also been making blocks for a Scrappy Trip Around the World quilt. Here are some of those blocks:

Lee's Scrappy Trip blocks

What a great way to use up strips left over from other projects!

Vivienne is currently working on a strippy diamond quilt:

6-13 Viv's diamond blocks

Isn’t that a luscious combination of colors and fabrics?

I spent much of June working on my Sewing Machine Dust Cover pattern. Here’s a picture of the dust cover I made as a class sample:

sewing mach dust cover

By the way, I’m giving away a custom sewing machine dust cover and some patterns as part of my first Giveaway, which ends this Saturday, July 6. If you’d like a chance to win, just leave a comment at the end of my previous post, telling me what projects you’re working on this summer.

Have a safe and happy Fourth of July!


Posted in Quisters (Quilt Sisters), sewing machine cover, update, wool rug hooking | 1 Comment

A New Pattern — and a Giveaway!

I’m pleased to announce the release of my newest pattern from First Light Designs. Here’s a picture of the cover:

sewing machine dust cover


It’s available at the Pine Needle Quilt Shop in Lake Oswego, Oregon and the Rose of Sharin’ Quilt Shop in Danville, Pennsylvania.

Would you like to have a pattern? I’m hosting a Giveaway this coming week — my very first! You have six chances to win. I’m giving away five copies of my pattern, and the sixth winner is going to get a pattern and a custom sewing machine dust cover made by me. It might be you!

To enter, simply leave a comment at the bottom of this post telling me what you hope to accomplish this summer on the sewing/quilting front. Multiple projects? One big finish? It’s always fun to know what’s going on in sewing rooms around the world.

I’ll keep the Giveaway open through Saturday, July 6 and announce the winners the following week. Be sure your contact info is included in your comments. For the winner of the sewing machine dust cover, I’ll be in touch to give you some fabric and color options.


Posted in Giveaway, sewing machine cover, update | 23 Comments