Cheryl at Meadow Mist Designs is hosting a Best of 2017 Linky Party, inviting bloggers to highlight their top five posts of the year. It’s a fun way to look back over the last 12 months and identify some of the high points.
My top five are below, in reverse order. Clicking on the links will take you to the original posts.
5. Dutch Treat. Although I didn’t finish this quilt till June, I started it in January during an epic snowstorm that kept me and many Portlanders indoors for several days.
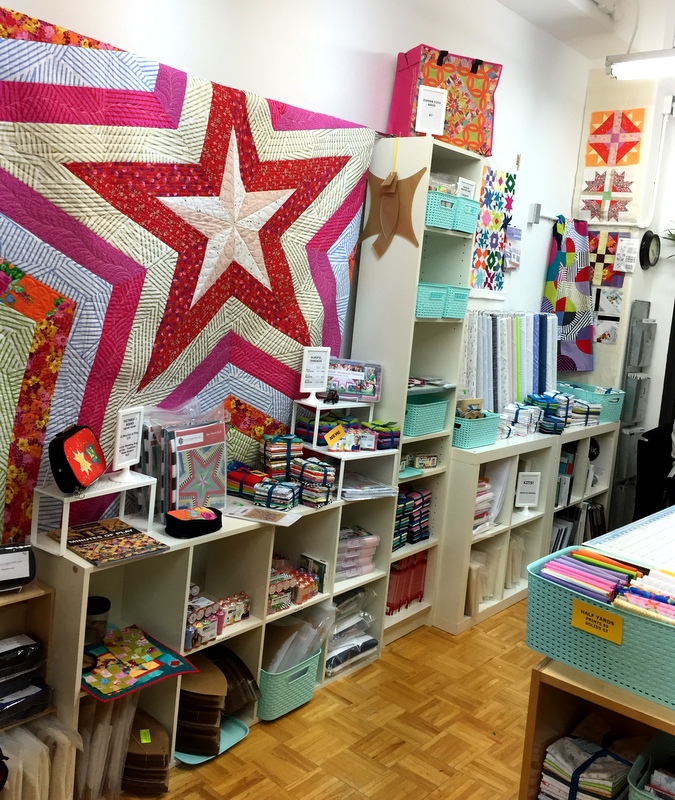
4. NYC and VFW. A trip to New York City with my twin sister in March combined many of the things I love in life: family, travel, theater, museums, and quilting. The quilting part? A visit to the Manhattan shop of Victoria Findlay Wolfe:
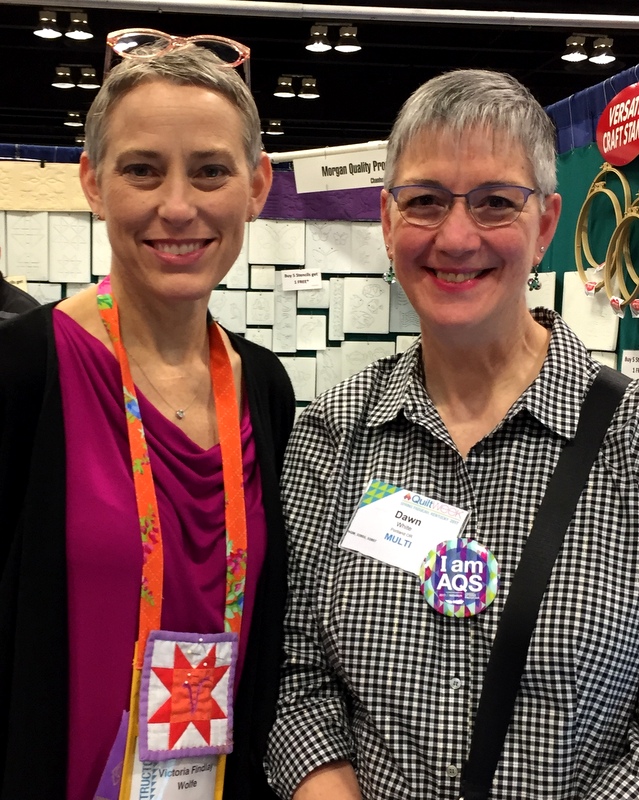
Victoria didn’t happen to be there that day but I had the pleasure of meeting her the following month in Paducah, Kentucky during AQS Quilt Week:
The larger one was made by “supersizing” the original pattern, using the larger of the two curved rulers Sew Kind of Wonderful designed for cutting curves. I wrote a tutorial showing how I did it.
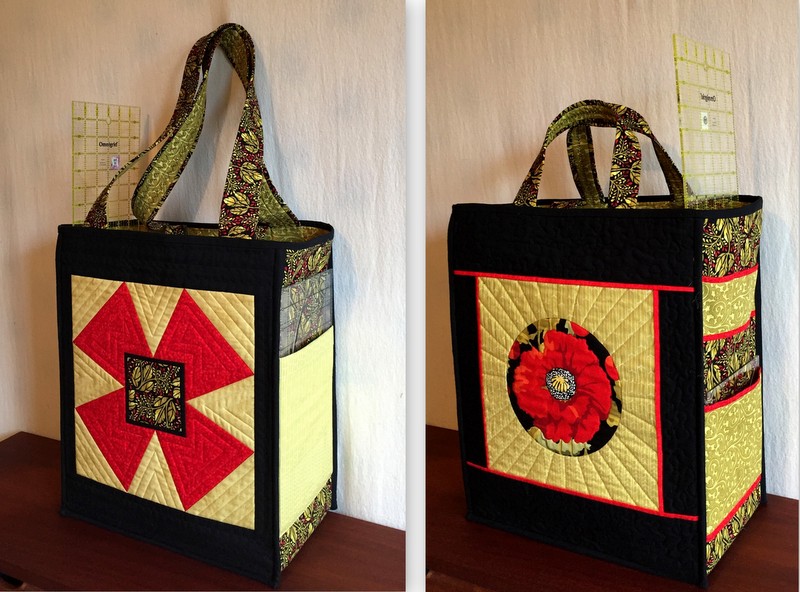
2. Junior Billie Bag. This was the first of two JBBs I made in 2017:
Designed over 20 years ago by Billie Mahorney, it’s a fabulous quilter’s tote personalized by each maker, starting with the design on the front and back panels and ending with the pockets inside and out. Two years ago Billie turned the teaching of her design over to me, and I make a bag every time I teach a class. This may be my favorite of the eight I have made so far.
Without consciously planning to, I wound up making a suite of accessories to go with my Junior Billie Bag:
(See the rotary cutter coat in the lower left corner? I wrote directions for it in 2014 and it remains my most popular tutorial. Every now and then when I see a huge spike in the number of views on my website/blog, I know it’s because someone provided a link to the tutorial.)
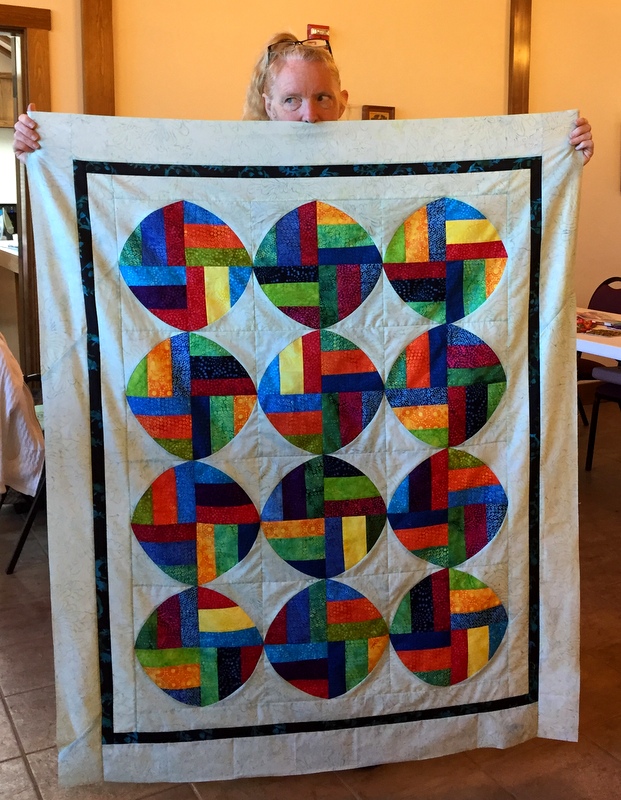
1 . Where It’s @. Much to my surprise and delight, this quilt won a second place ribbon at the Northwest Quilting Expo in Portland, Oregon in September:
The design is Rewind by Karla Alexander of Saginaw Street Quilts. I started the quilt in a class with Karla in Sisters, Oregon in July 2016. Getting a ribbon was honor enough but the award came with a check for $500. My first reaction? “Think how many yards of fabric I can buy with that!”
Well, this has been a nice little trip down memory lane. Do you want to join Cheryl’s party, too? The link is open until January 2. Be sure to check out the top five posts of the other quilting/blogging partygoers. And thank you for checking out mine!
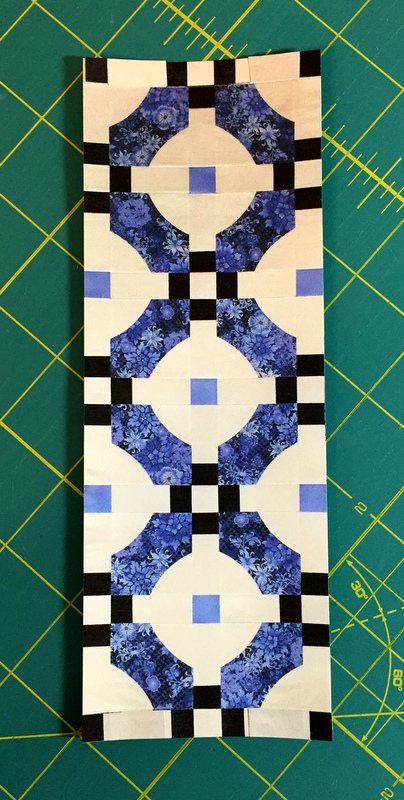
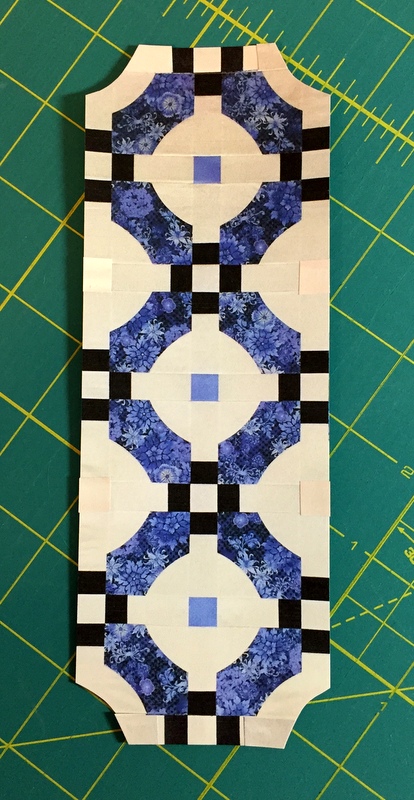
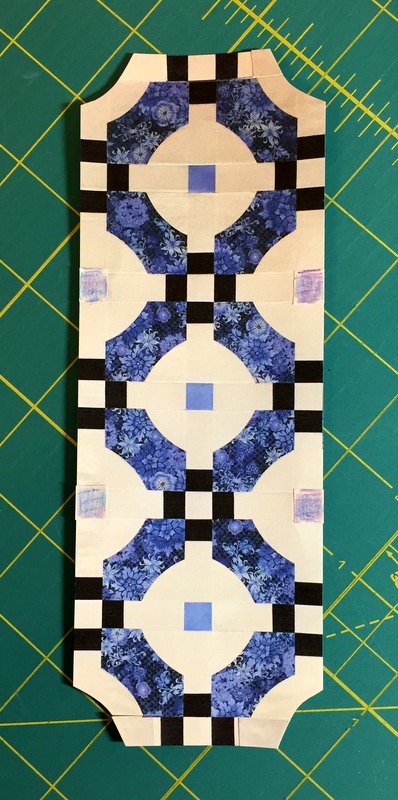
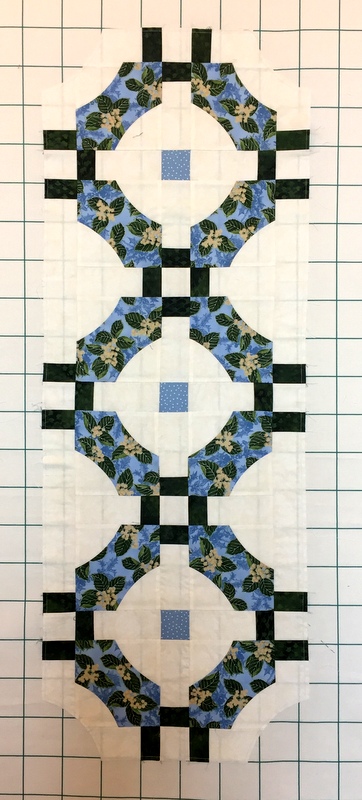
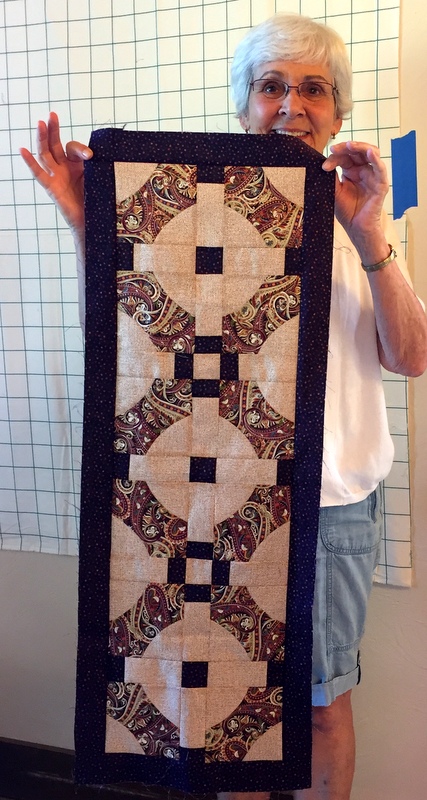
I finished a UFO at Quilt Camp last week. It was the table runner I started as an experiment when I was teaching at the Pine Needle‘s quilt retreat in June. Remember this?
It’s a bit difficult to see from the photo but the outer edges of the runner were cut to match the curves inside. I wanted the binding on the quilt to echo the design, which you may recognize as Mini Mod Tiles, that marvelous free pattern from Sew Kind of Wonderful that has been the subject of several posts over the last few months.
I had just enough of the dark green batik fabric for the binding:
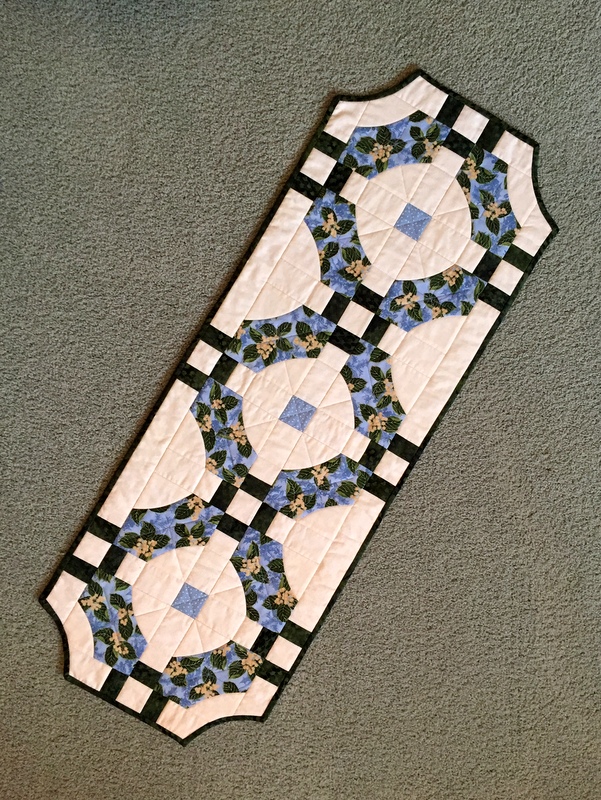
Didn’t that turn out nicely? I machine quilted it very simply with my walking foot, stitching in the ditch and adding a simple starburst in the center of the curved shapes featuring the focus fabric:
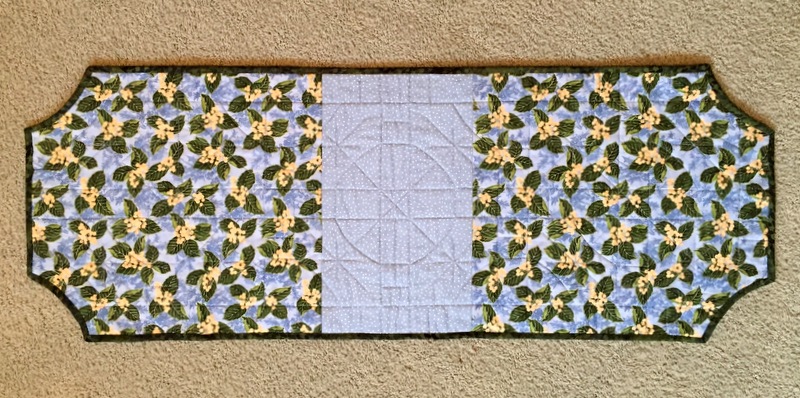
There wasn’t enough of the wintry blue print to cover the entire back so I inserted a strip of the blue polka dot:
I used light blue thread on the back to blend in so the runner is essentially reversible. The label can go in the very center, to be covered by a candle or bowl.
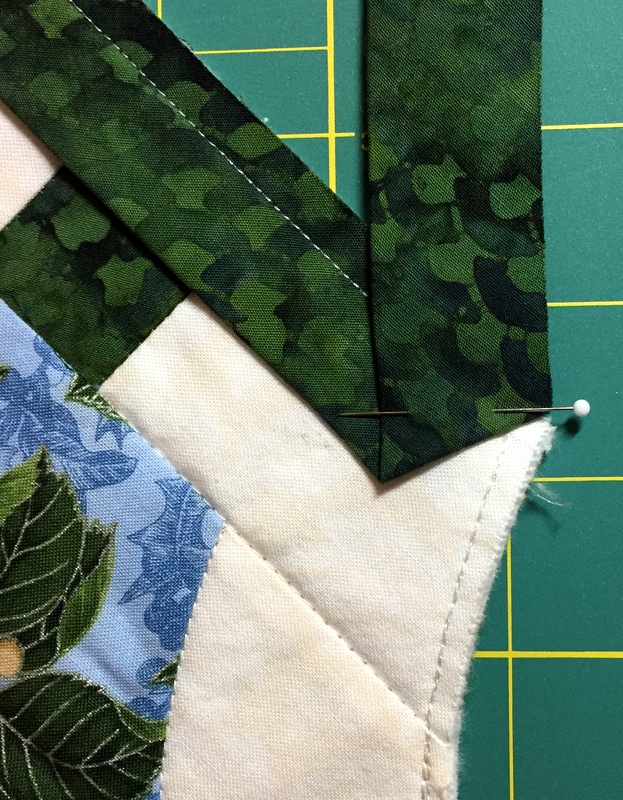
Binding the curved edges presented quite a challenge, as the angle is greater than 90 degrees plus you have the curve to deal with. Fortunately, Heather Peterson of Anka’s Treasures has a wonderful tutorial on her website that shows how to bind an outside edge greater than 90 degrees. Following her excellent instructions, I was able to bind those corners. Here’s a look at the pinning technique:
I don’t think I would ever have figured that out on my own. Thanks, Heather!
The runner measures 13″ x 38½”, a nice size for the center of a table or dresser. I’m giving it to my twin sister in Atlanta this weekend as a birthday/hostess gift; my husband and I are headed there later this week for our annual extended visit over Thanksgiving.
I’m very pleased with this variation on the Mini Mod Tiles design. And, having made two quilts (a mini and a supersized version) from the pattern, I am finally ready to put MMT behind me. Just in time, too! The Sew Kind of Wonderful team has come out with some marvelous new patterns. I have no doubt there is another Quick Curve Ruler quilt in my future.
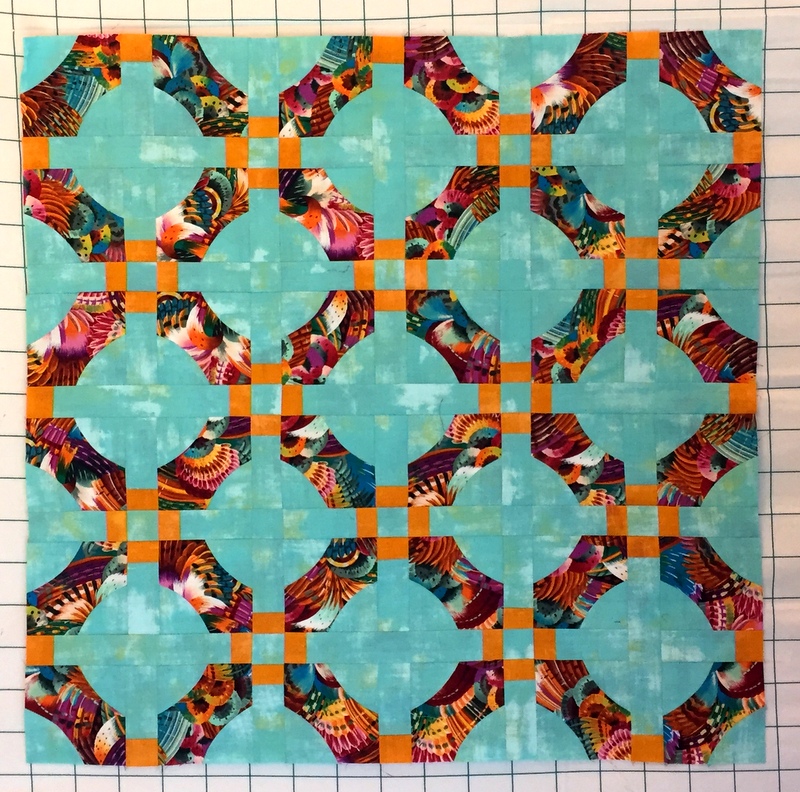
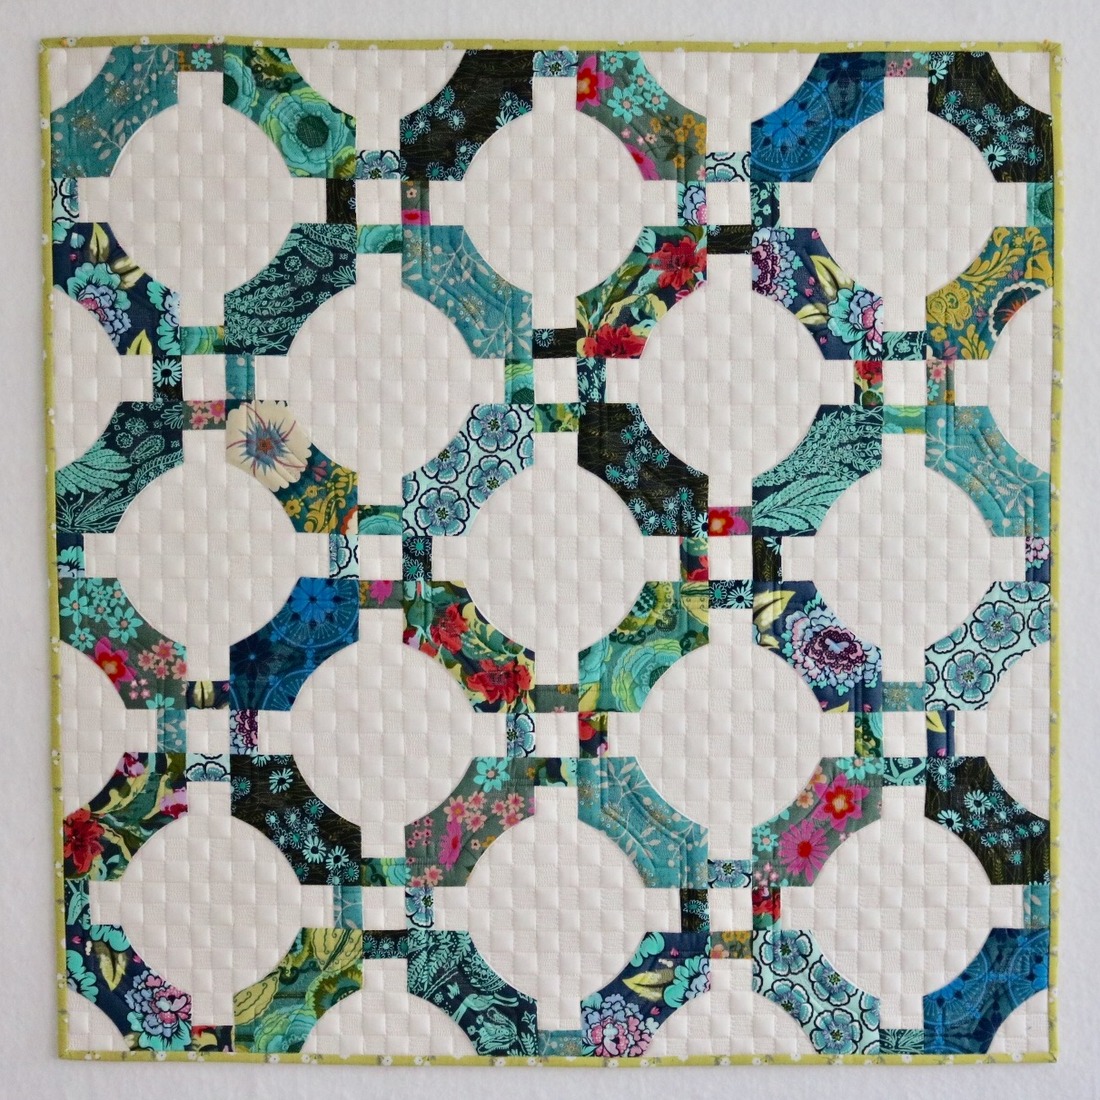
Last spring the talented sisters at Sew Kind of Wonderful released a free pattern called Mini Mod Tiles:
Mini Mod Tiles, about 34″ Square, made by Sew Kind of Wonderful (2017). Photo used with permission.
I was instantly enchanted. I downloaded the directions from Sew Kind of Wonderful’s website and made my own version using just three fabrics:
Piccolo Terrazzo Tiles, 34½” Square. Made by Dawn White, Quilted by Karlee Sandell.
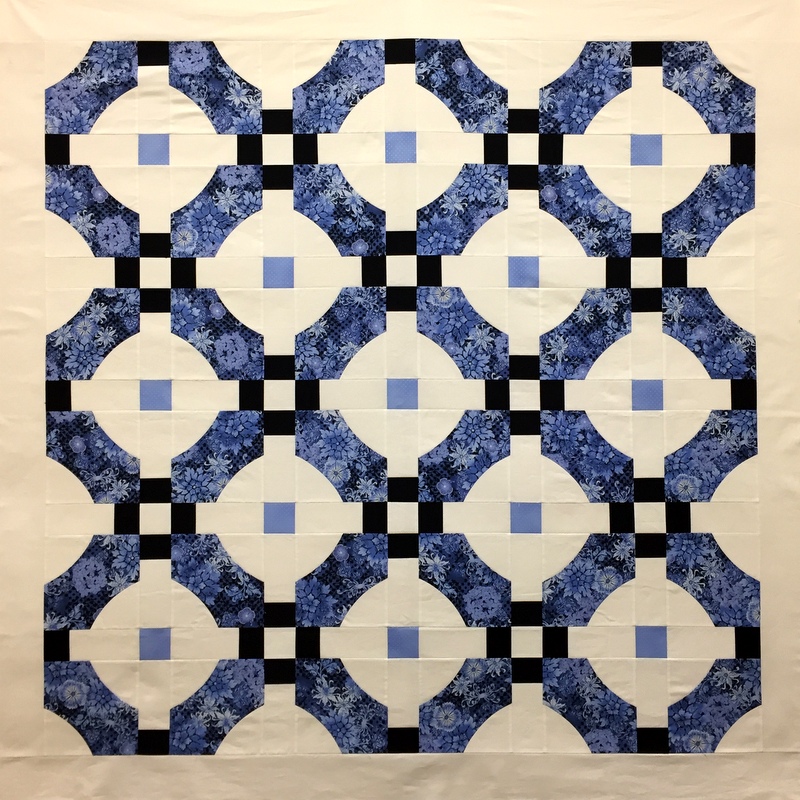
I knew this was the design I wanted to teach at a quilt retreat in June. But I wanted to give my students the option of making a larger quilt. Sure, they could have added more blocks to increase the size of their quilt — but I was thinking of a bigger block. Thus was the “supersized” version of Mini Mod Tiles born:
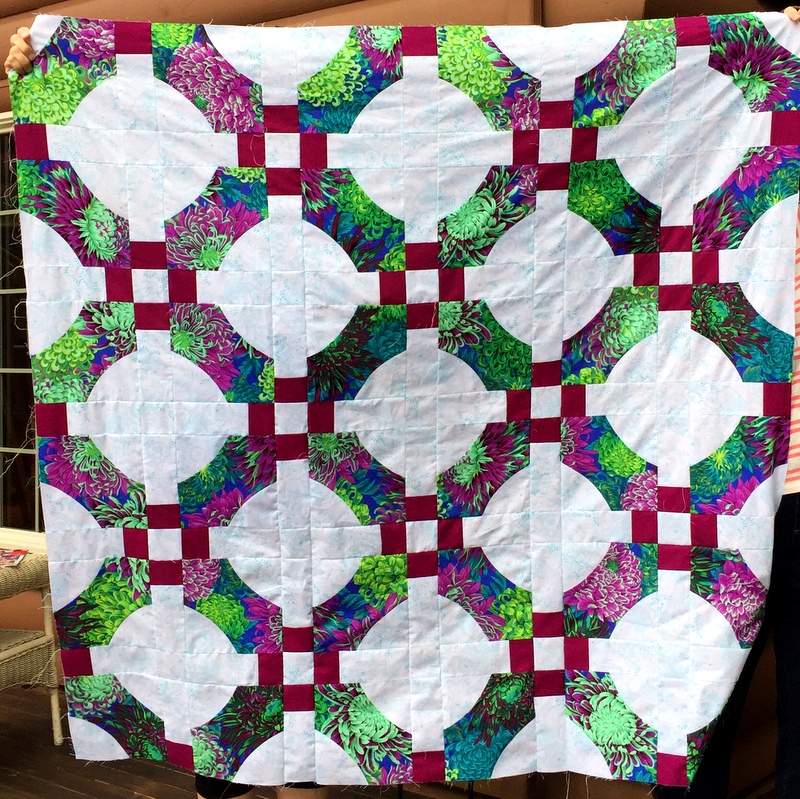
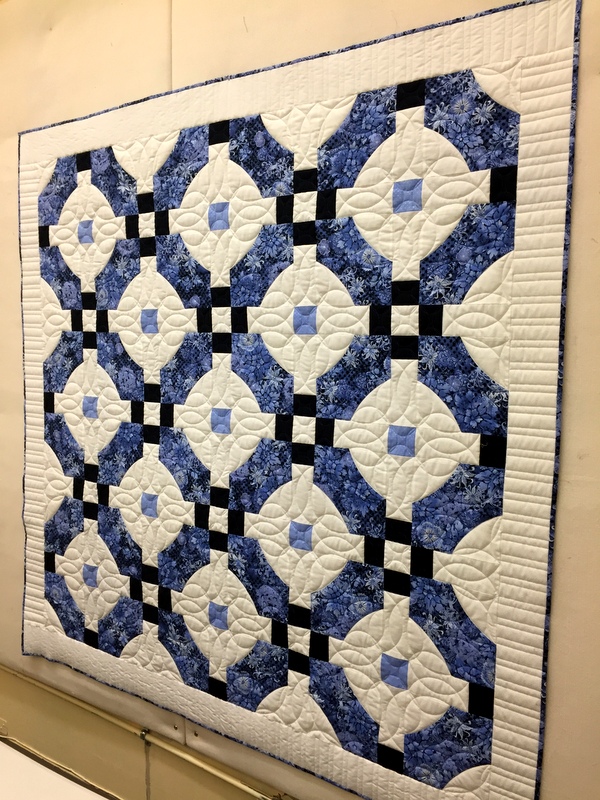
Terrazzo Tiles, 63″ Square (2017). Made by Dawn White, Quilted by Karlee Sandell.
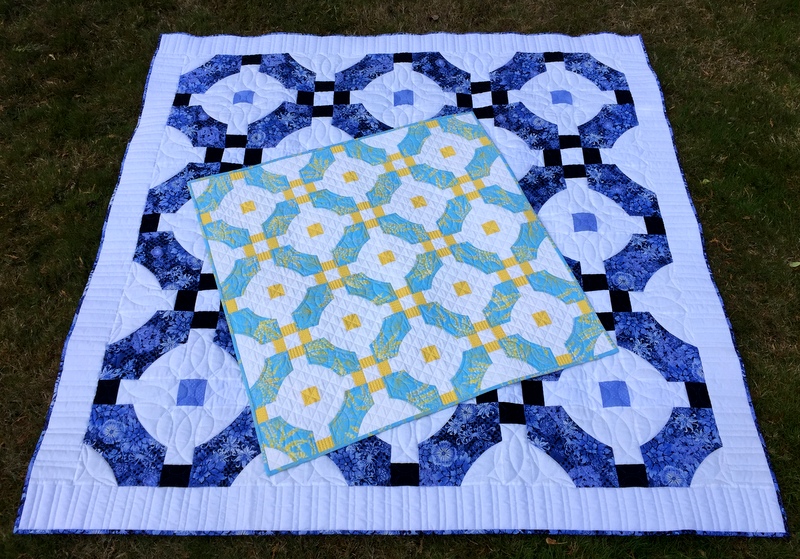
The supersized version was made with the original Quick Curve Ruler whereas the original Mini Mod Tiles was made with the QCR Mini. Here are both quilts to give you an idea of the relative sizes:
Two Versions of Mini Mod Tiles: Original and Supersized!
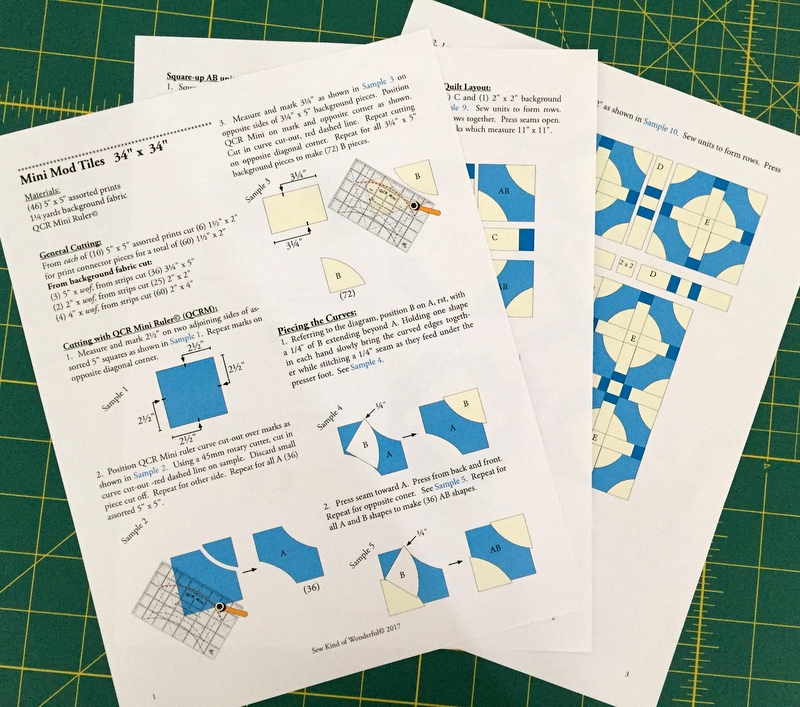
The SKW sisters graciously gave me permission to show how I supersized their pattern, hence this tutorial. My directions will be easier to follow if you have already made a quilt using the original Mini Mod Tiles pattern.
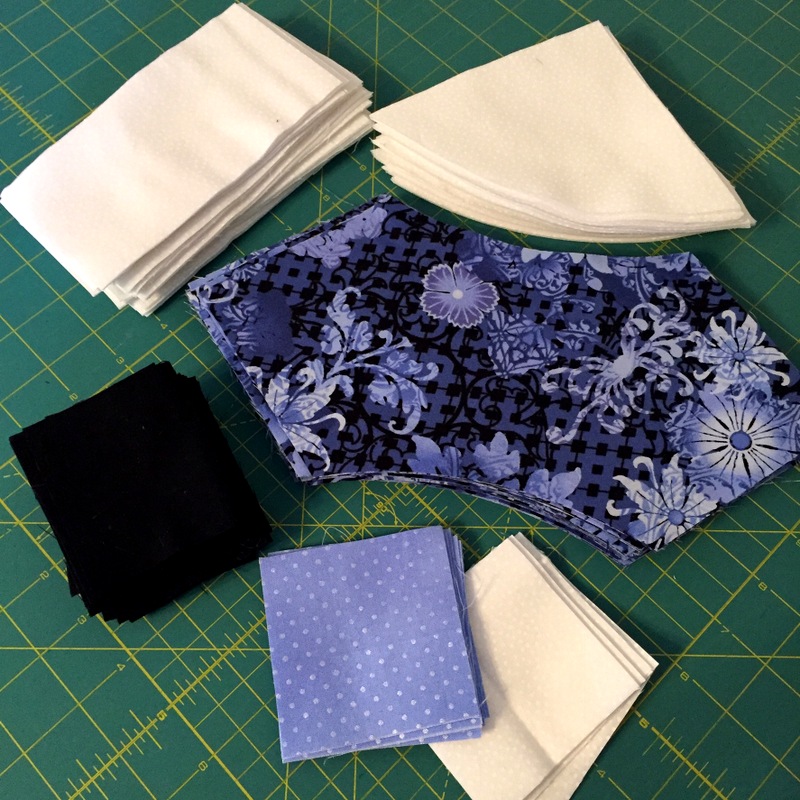
This tutorial has two parts. Part 1 is a two-page handout showing fabric requirements and advance cutting for both a scrappy version using multiple prints like the original SKW version and the more controlled version I made with just four fabrics. Download Part 1: Fabric Requirements and Advance Cutting.
Part 2: Sewing Directions for Mini Mod Tiles “Supersized”
Required: Quick Curve Ruler by Sew Kind of Wonderful (available at many local quilt stores and at Sew Kind of Wonderful’s website).
Required: free pattern Mini Mod Tiles, downloaded from the SKW website.
Download the three-page pattern by going to the Free Patterns link on SKW’s website and double clicking on the photo of Mini Mod Tiles — the same photo you see at the top of this tutorial. Click on the print icon on the upper right side. Print in color:
Free download: Mini Mod Tiles pattern by Sew Kind of Wonderful
Study the directions carefully. The cutting, sewing, and squaring up instructions are almost the same as for the mini. The main differences are the cut sizes of fabric and the fact that you are using the original Quick Curve Ruler.
Here are my cut pieces, neatly stacked and ready for sewing:
Ready, Set, Sew!
Cutting with the Quick Curve Ruler (QCR) (Page 1) Refer to the illustrations on the pattern marked Sample 1, Sample 2, etc.
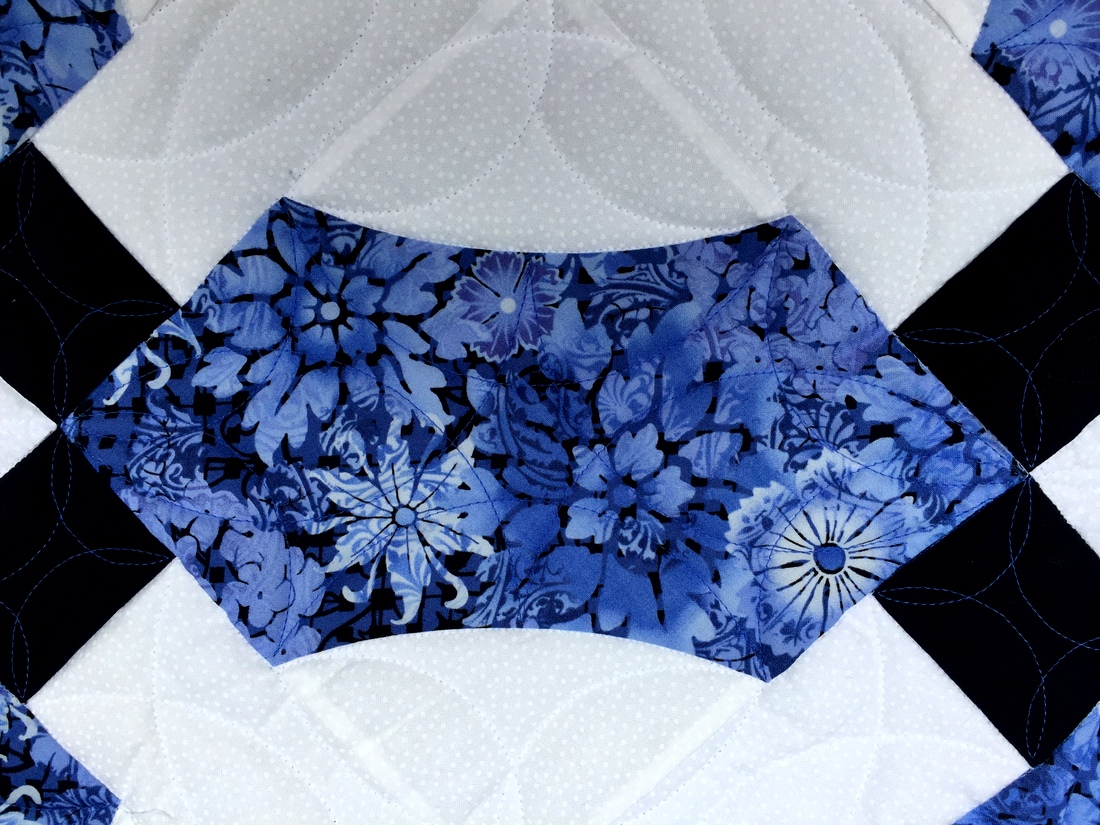
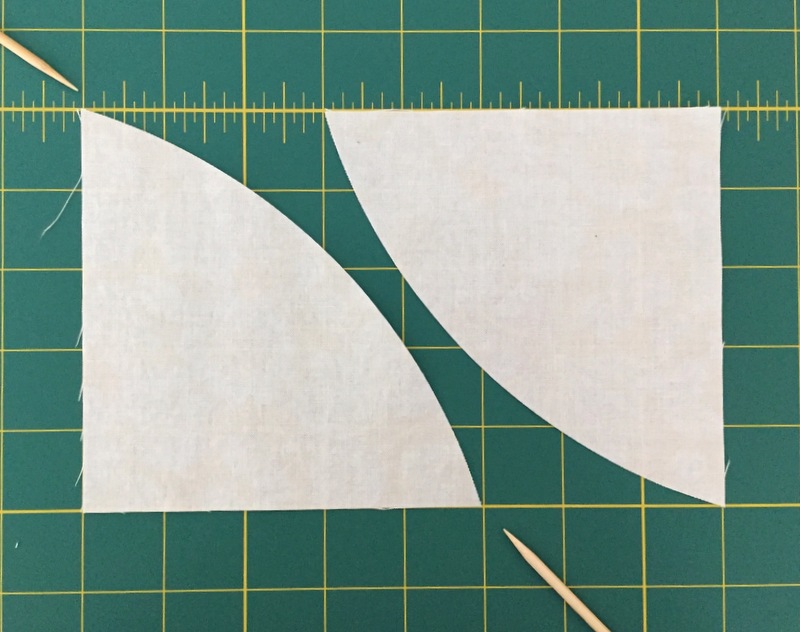
“A” shapes, cut from 8″ focus fabric squares: Referring to Sample 1, measure and make registration marks at the midpoints of the outside edges (4″ from the corners) of all four sides of a square (Sample 1).
Refer to Sample 2 illustration showing the position of the QCR on the fabric square. The red dashed line indicates the curve cut-out you follow with your rotary cutter. You can see that the cut-out curve is right over the registration marks on the left and bottom sides of the square.
First Light Designs tip: Note that the curve cut-out in the QCR is about ⅛” wide. Rather than centering that ⅛”-wide channel over your registration marks, position the ruler so that the inside edge of the channel is right over your registration marks. When you make your cut, follow the inside edge of the channel with your rotary cutter just as you would when making a cut with a straight-edged ruler. Your cut curves will be more uniform in size.
After making the first cut, rotate square 180º and repeat on other side. Repeat with remaining squares. Total: 36 A shapes.
First Light Designs tip: Instead of marking every square four times, arrange the square on a rotary cutting mat with all four sides aligned with the inch lines printed on the mat. (It doesn’t matter where on the mat as long as it’s several inches from outer edges.) Count over 4″ from the corners of the square and position the inside channel of the cutout curve over those points at the edge of the fabric:
Curves Begin and End 4″ from the corners
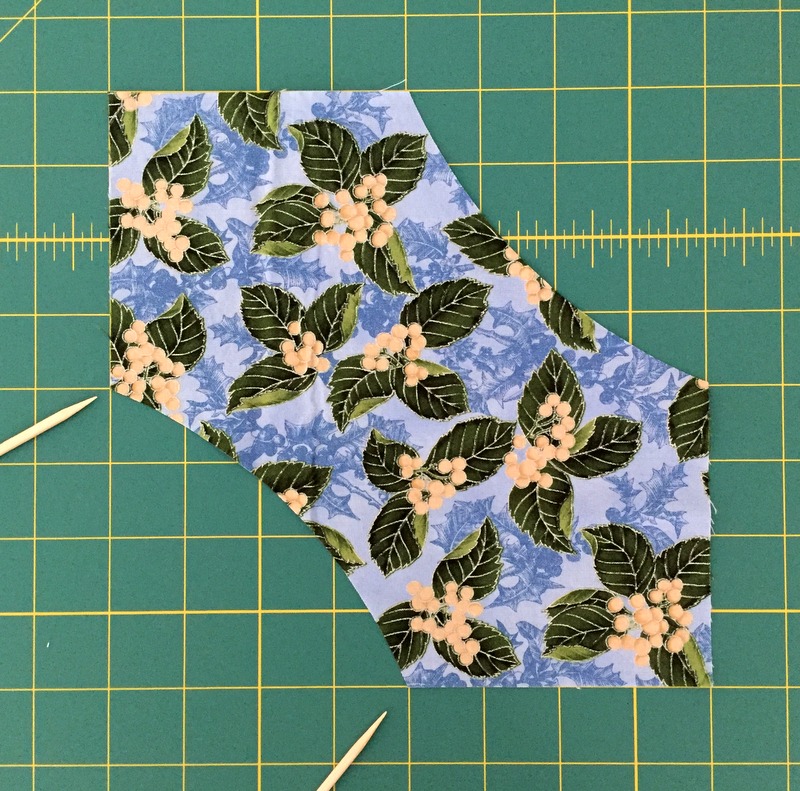
By the way, don’t discard the leftover curved pieces! They are a great size for appliqué or paper piecing projects or can be cut into 2¼” or smaller squares for another quilt.
“B” shapes, cut from 5″ x 8″ rectangles: Measure and make registration marks 3″ in from the top left edge and 3″ in from the bottom right edge. Refer to Sample 3 illustration. Note that the ruler is positioned so that the dotted red line showing the cutting channel goes from the upper left corner of the fabric to the registration mark on the bottom right side. After making the cut, rotate the block 180° and repeat. Discard the slivers of leftover fabric.
First Light Designs tip: Instead of marking the fabric rectangle, arrange it on a rotary cutting mat with all four sides aligned with the inch lines printed on the mat. Position the QCR so that inside channel of the cutout curve is over the upper left corner of the rectangle and the 3″ mark from the bottom right edge:
Curve begins in upper left corner, ends 3″ in from opposite corner
Did you know? You can stack your squares and rectangles and cut multiple units at one time if your rotary blade is very sharp. Try cutting two layers first. If that works, try up to four.
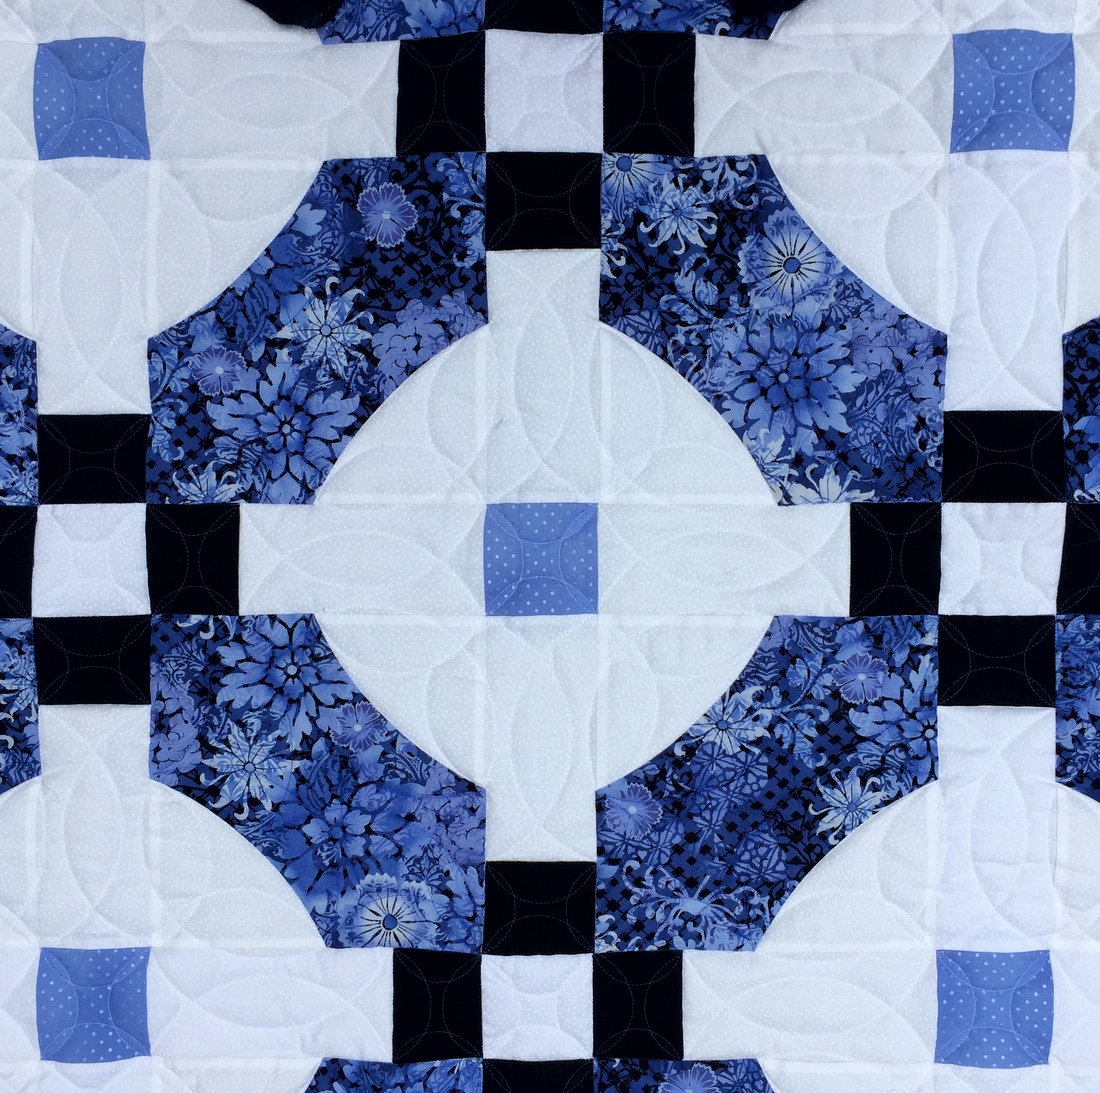
Piecing the Curves (Page 1) Referring to Sample 4 and Sample 5 illustrations on page 1 of the pattern: See the arrow pointing toward the 1/4″ that Piece B extends beyond Shape A? Change that measurement to 3/8″. When you position Shape B on top of Shape A, right sides together, be sure the tip of B extends 3/8″ beyond the tip of A. Press seam toward A. Note in Sample 4 how the edges of Shape B extend beyond Shape A at the curved seam. This is what you want, as the excess fabric is trimmed when the block is squared up.
Squaring up AB Units (Page 2)
With two B shapes sewn to a shape A, the unit is now called AB.
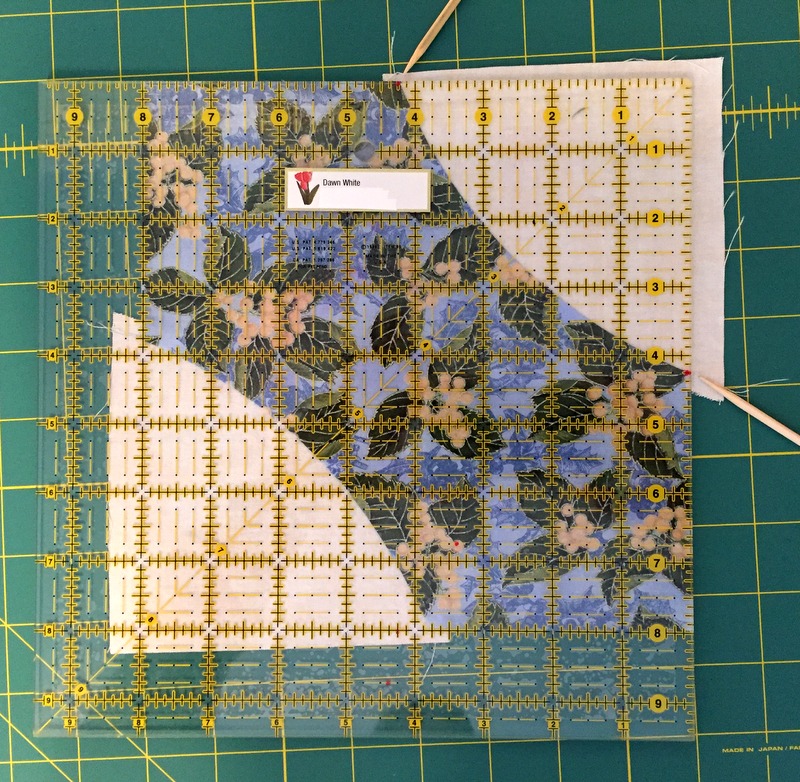
Referring to Sample 6 on page 2 of the pattern: Square up AB unit to 8″ square. Using an 8½” or larger square ruler, position the ruler so that the straight edges of AB (upper left and lower right corners of the block) measure 8″ square. Trim right side and top. Rotate block 180º, reposition ruler so that bottom and left side of block are on the 8″ lines of the ruler, and trim right side and top. Repeat with remaining squares.
First Light Designs tip: On your squaring up ruler, use an Ultra Fine-Point Sharpie marker to make two small dots — the first one 4¼” to the left of the upper right corner and the second one 4¼” down from the upper right corner, right at the edge of the ruler. When you square up your block, the curved seam that joins Shapes A and B should be right under those dots:
See the red dots?
If you find your curved seam falls a bit on either side of the 4¼” measurement, that’s okay. The important thing is that your blocks are hitting the same mark consistently. (The Sharpie marks come off the ruler easily with a drop of nail polish remover, by the way.)
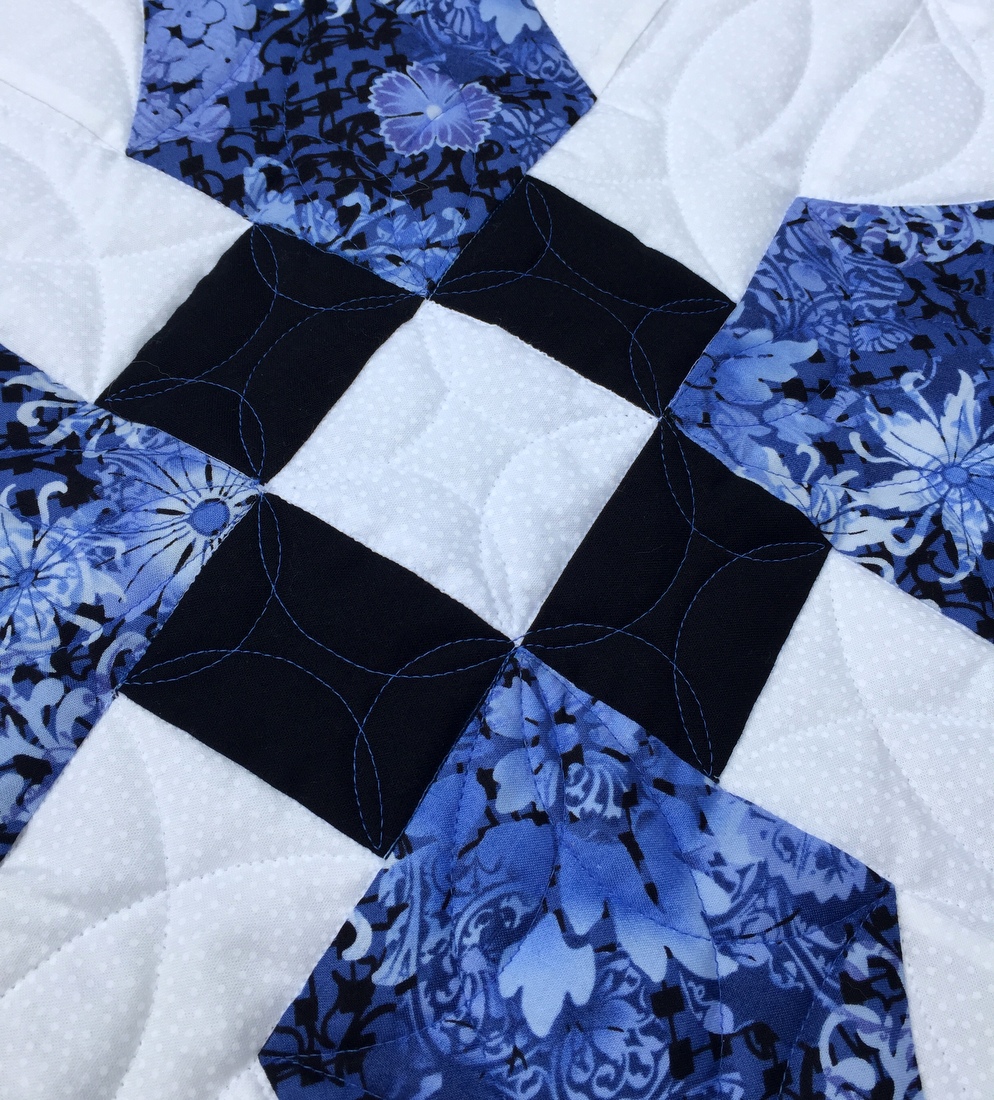
Sashing Assembly (Page 2)
Follow the directions, keeping in mind that your (60) C units are made with connector pieces measuring 2½” x 3″ and sashing strips measuring 3″ x 6″. Likewise the D units are made with two C units and a 3″ square of background fabric in the middle. Note: it would be more efficient to make these C and D units in strip sets but I decided to match my tutorial as much as possible to the original directions.
Block Assembly and Quilt Layout (Pages 2 and 3) Follow pattern directions, keeping in mind that the center of the block is a 3″ square of accent fabric, not a 2″ x 2″ background piece. Make (9) blocks which measure 18″ square.
Pressing I did deviate from the pressing directions. Instead of pressing seams open where directed, I always pressed toward the focus fabric, even when sewing rows together. Why? I was planning ahead, in case I wanted to stitch in the ditch around my focus fabric. It’s very difficult to do that when a seam has been pressed open. As it happened, I decided to have both quilts custom quilted; the longarmer stitched in the ditch on both quilts at my request and I really like how much extra definition the stitching gave to the focus fabric shapes.
If you have any questions, please feel free to ask. And if you make a supersized version of Mini Mod Tiles, I would love to see a photo. I know the Sew Kind of Wonderful sisters would, too!
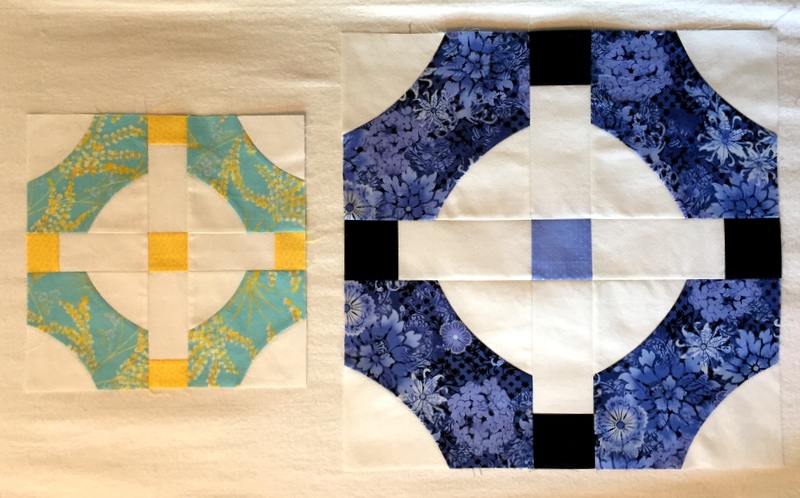
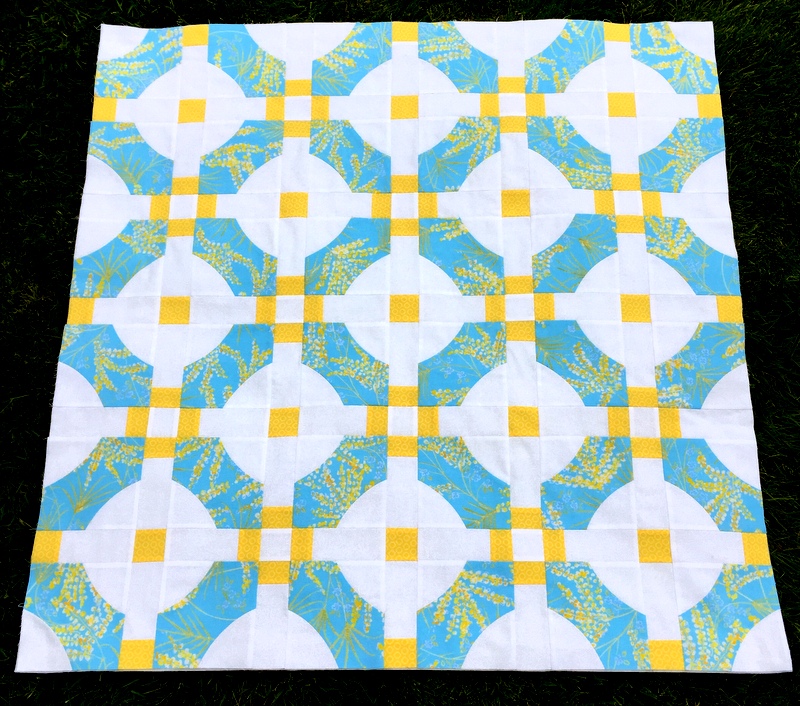
Recognize the pattern? It’s Mini Mod Tiles from Sew Kind of Wonderful. The aqua and yellow quilt was made with the QCR Mini — the smaller of the two Quick Curve Rulers designed by Sew Kind of Wonderful — and finishes at 34½” square. SKW offers this pattern as a free download on its website.
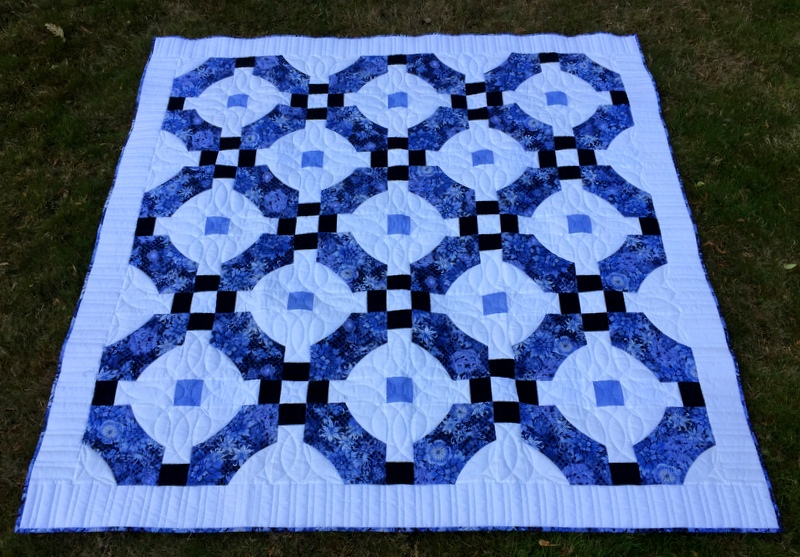
The bigger quilt? I “supersized” SKW’s design to make a larger block using the original Quick Curve Ruler, resulting in a lap quilt measuring 63″ square. Why two sizes? I had chosen Mini Mod Tiles as the pattern to teach at the Pine Needle’s summer 2017 quilt retreat and wanted to offer my students two options.
Both quilts have been back from the longarm quilter for several weeks but it took me a while to get them bound and then labeled. Now I get to show the finished quilts together.
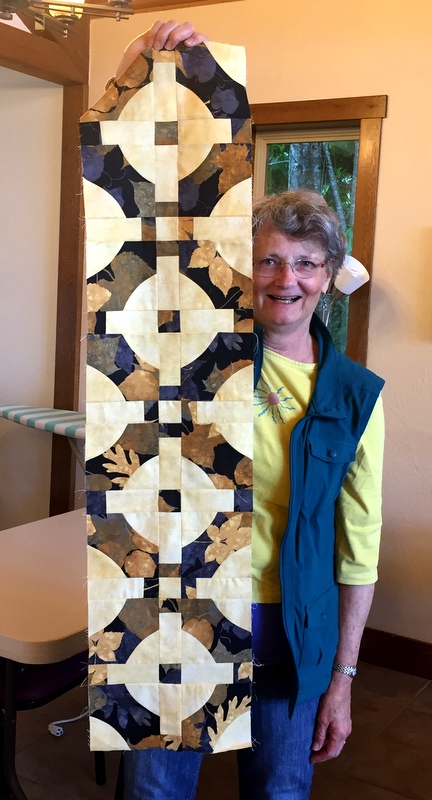
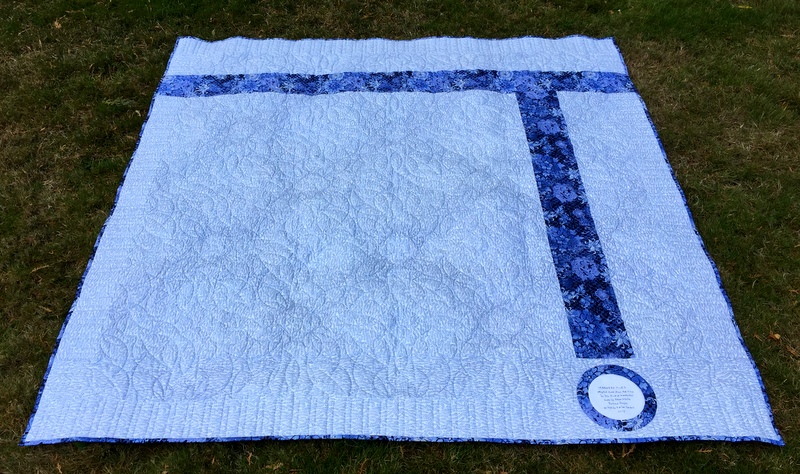
Let’s start with the larger of the two, named Terrazzo Tiles:
Here it is from the back:
I used every bit of the leftover focus fabric on the back, even piecing scraps to make the ring around the label:
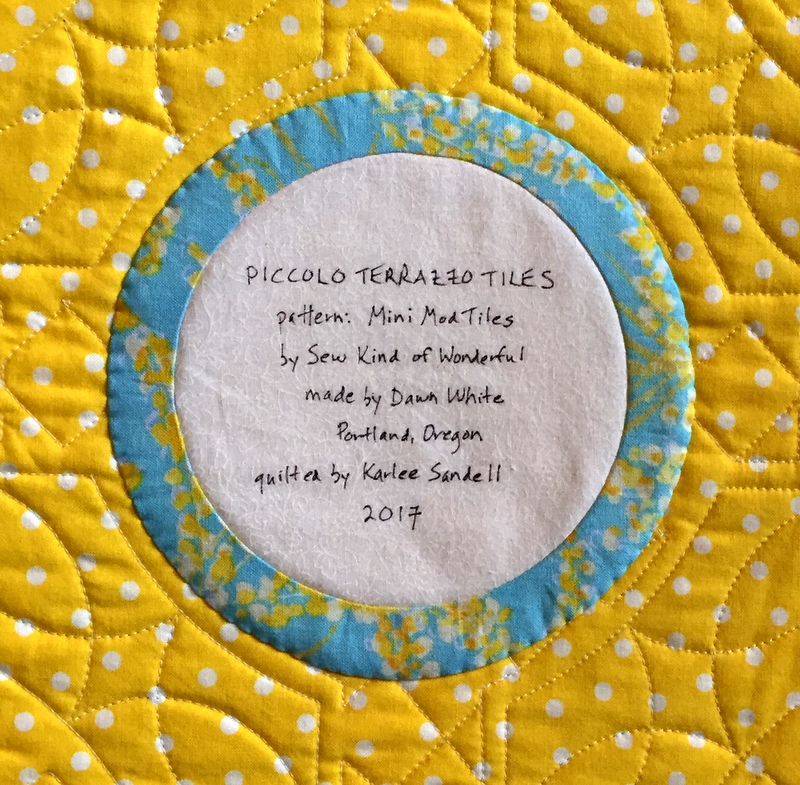
Since the bigger quilt is called Terrazzo Tiles, it made perfect sense to name the mini quilt Piccolo Terrazzo Tiles:
My first inclination was to bind this one with the yellow tone-on-tone fabric you see above, but I had used a different yellow on the back and they just didn’t look good together. The solution was to bind the quilt with the aqua and yellow focus fabric so it provided a frame for the quilt as seen from the back:
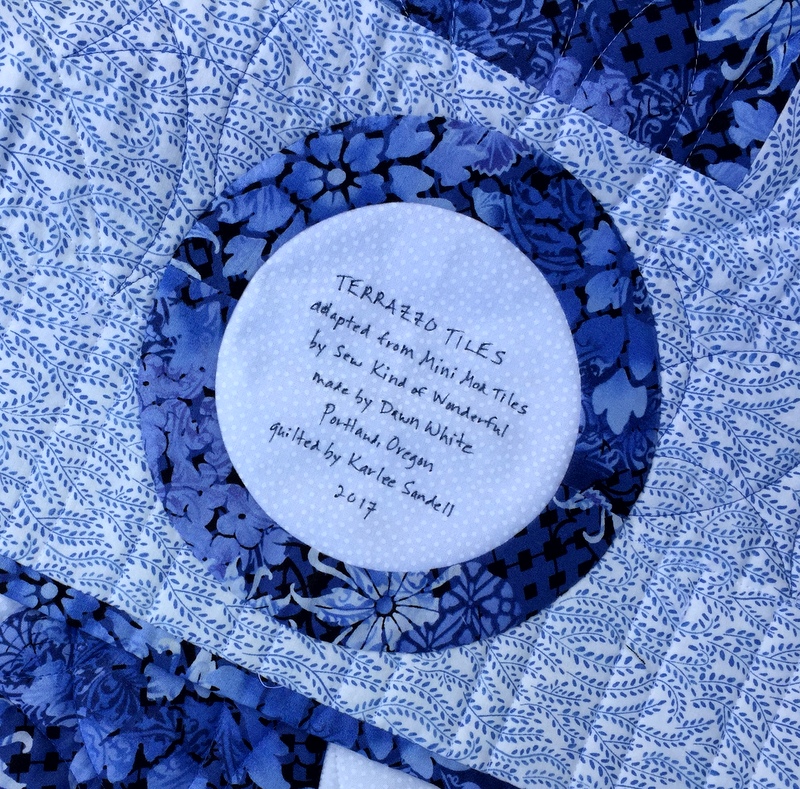
The hand-guided quilting (by Karlee Sandell of SewInspired2Day) is so lovely I hesitated to add a label, loving the look of a whole-cloth quilt. But it needed a label — to identify the designer, the maker, and the quilter. Sometimes all three are the same person but more often than not the result is a combination of efforts, and it’s important in my book to give credit where credit is due:
Next week the Pine Needle is planning a reunion for the retreat participants. It will be fun to see the students’ finished projects — both mini and supersized!
One more thing: the talented women of Sew Kind of Wonderful have kindly given me permission to show you how I supersized the mini version. Coming very soon: a new tutorial on my Tutorials page.
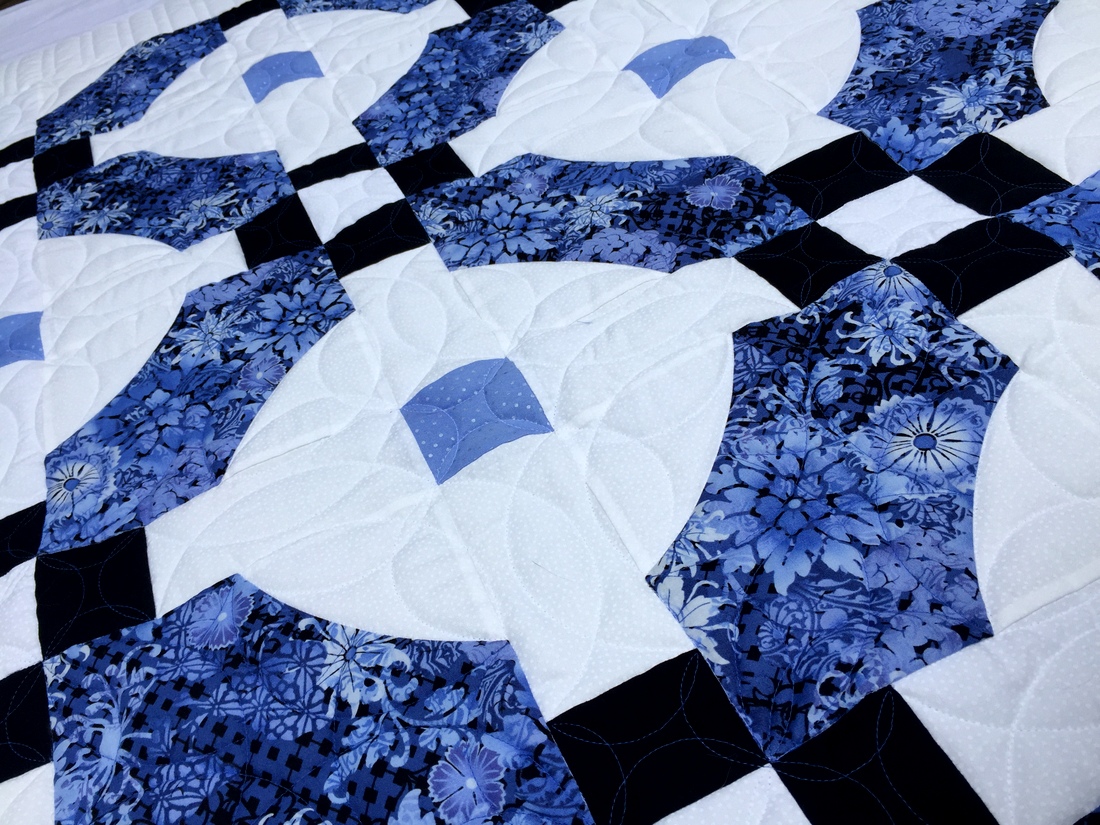
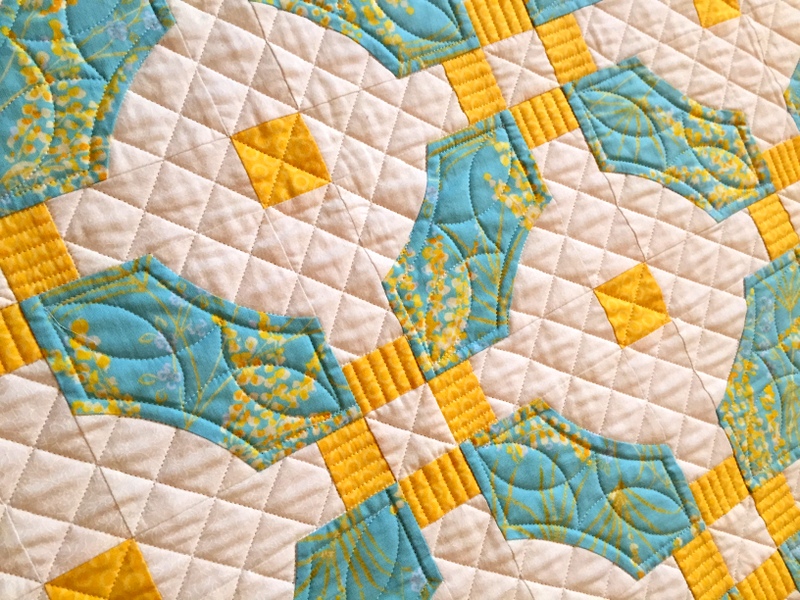
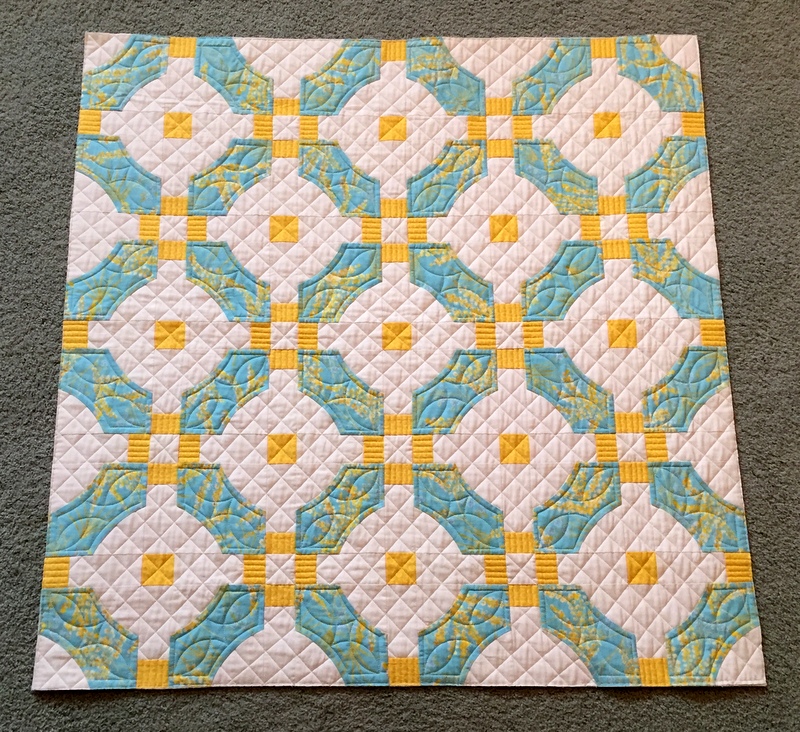
Isn’t that a lovely sight? You’re looking at a detail of the beautiful custom quilting by Karlee Sandell of SewInspired2Day.com. The quilt is Mini Mod Tiles, made using Sew Kind of Wonderful‘s free pattern and the smaller of the two Quick Curve Rulers.
The mini quilt measured 36″ square when I handed it over to Karlee. After quilting it measures 34½” square. Here’s a look at the entire quilt:
I don’t like my quilts too densely quilted. This is exactly the look I was going for. I especially like the contrast between the quilted grid in the background and the curves in the aqua and yellow floral print.
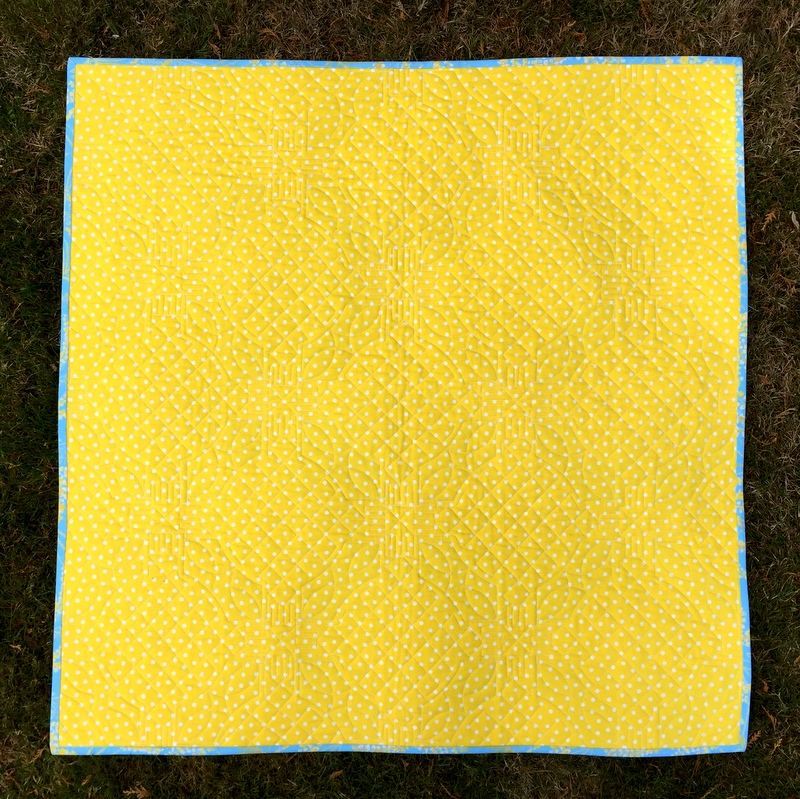
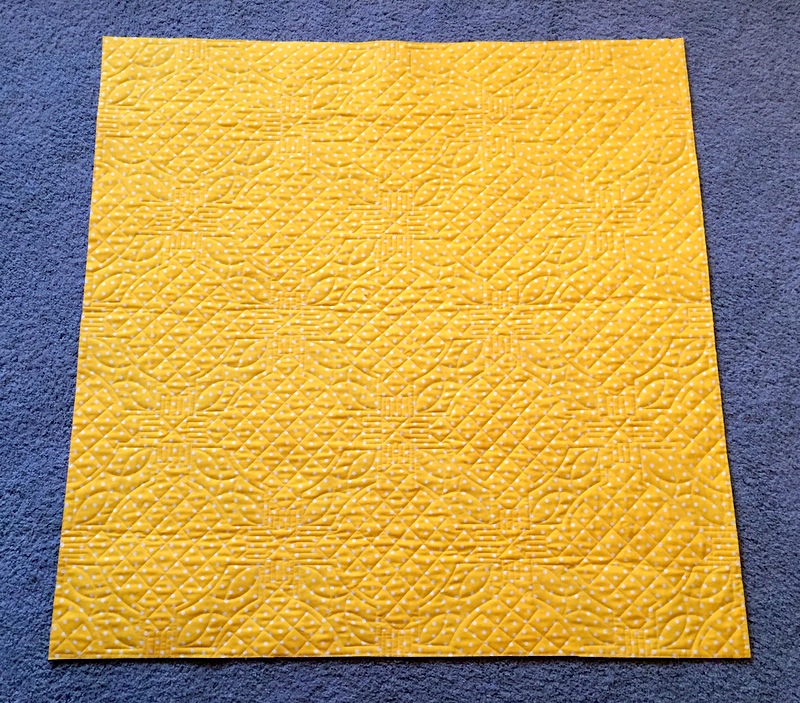
Here’s a look at the back:
Regular readers know that I almost always make pieced backs on my quilts using multiple fabrics. This quilt was so small that I opted to use one solid piece — a bright yellow with white dots. I love the wholecloth quilt effect.
Did you happen to notice the color of the carpet in the last two photos? It’s the same carpet. The photos were taken seconds apart from the same angle. I’m at a loss to describe the difference in color. Could the colors in the quilt cause the light to be reflected so differently?
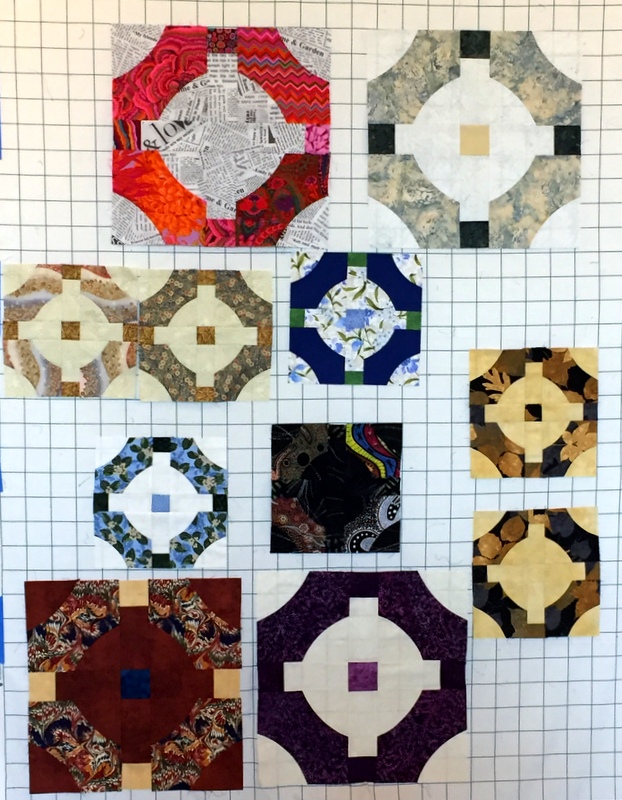
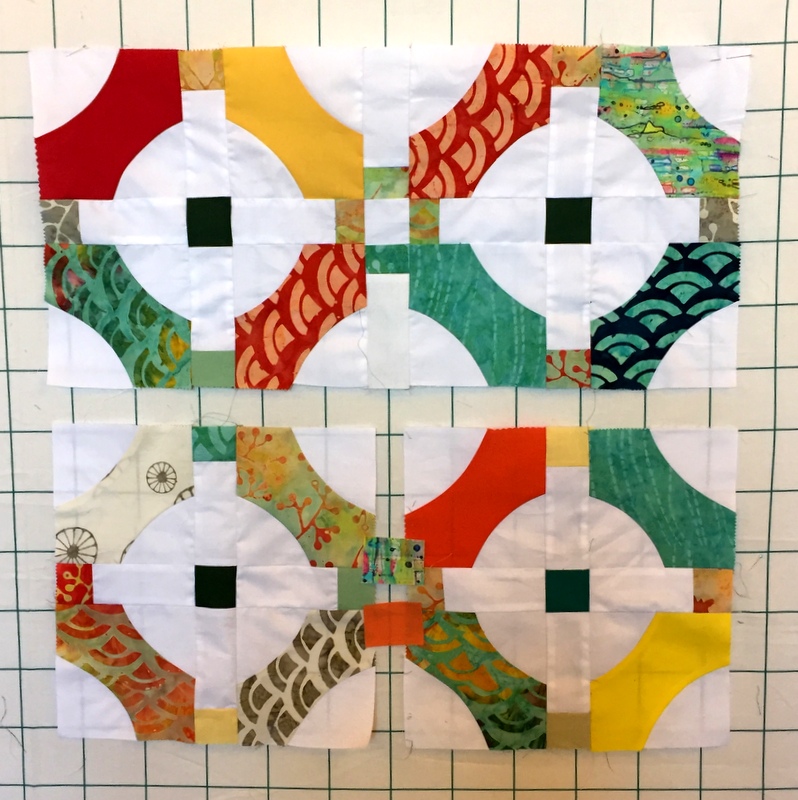
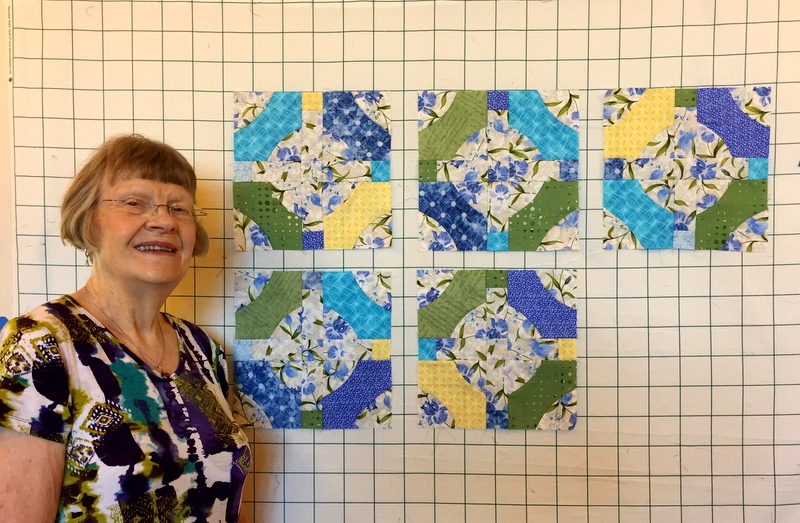
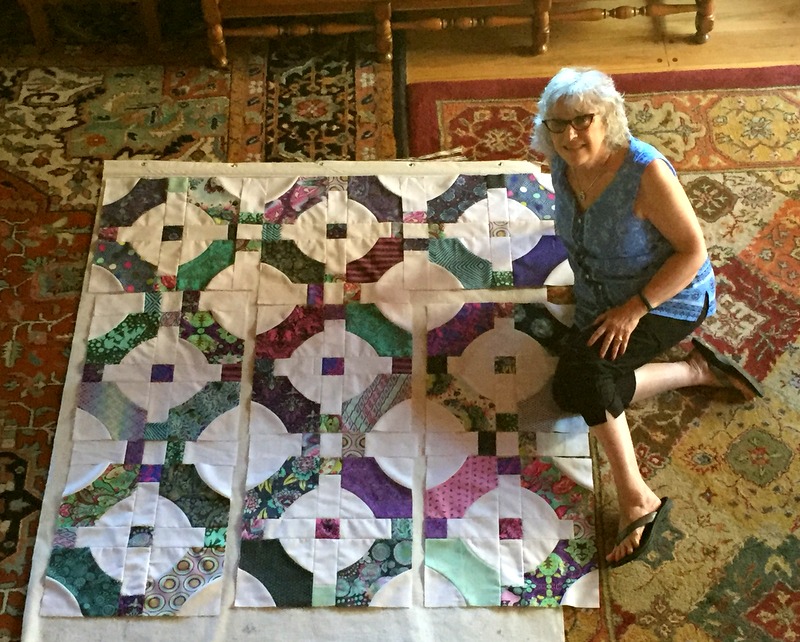
Aren’t these lovely? They are the first group of Mini Mod Tile blocks coming from the second group of quilters attending the Pine Needle Quilt Shop’s retreat in western Washington last month. (You can read all about the first group’s output in my preceding post.) The blocks you see above were made by Sandra and Dena (top row) and Linda and Barbara B. (second row).
Here are the second group of blocks:
These were made by Lorri and Barbara S. (first row) and Liz and Roxanne (second row).
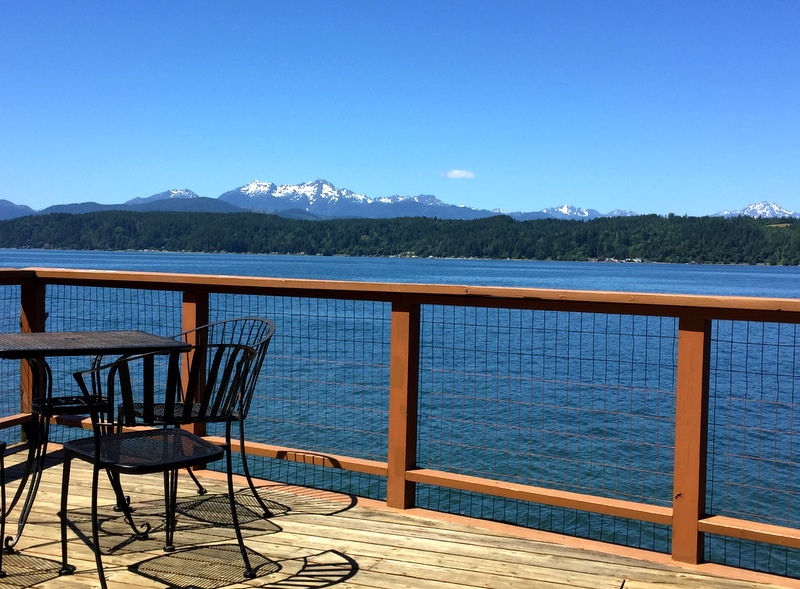
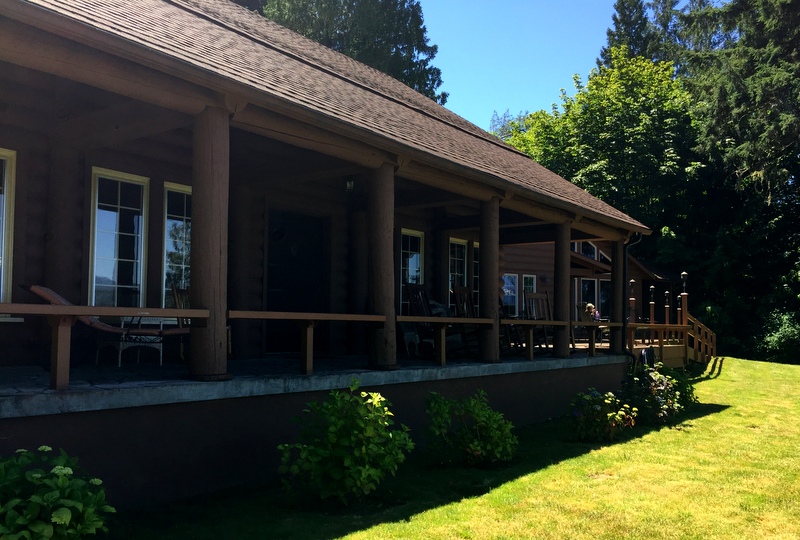
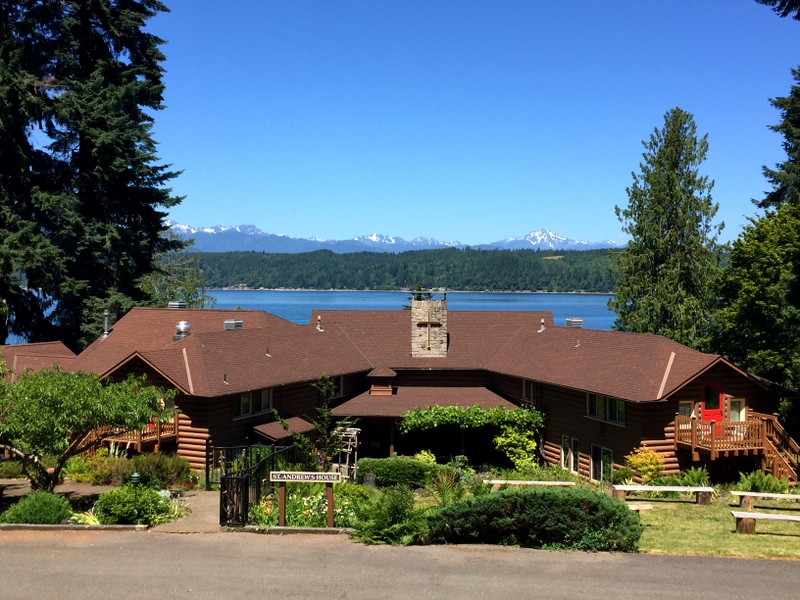
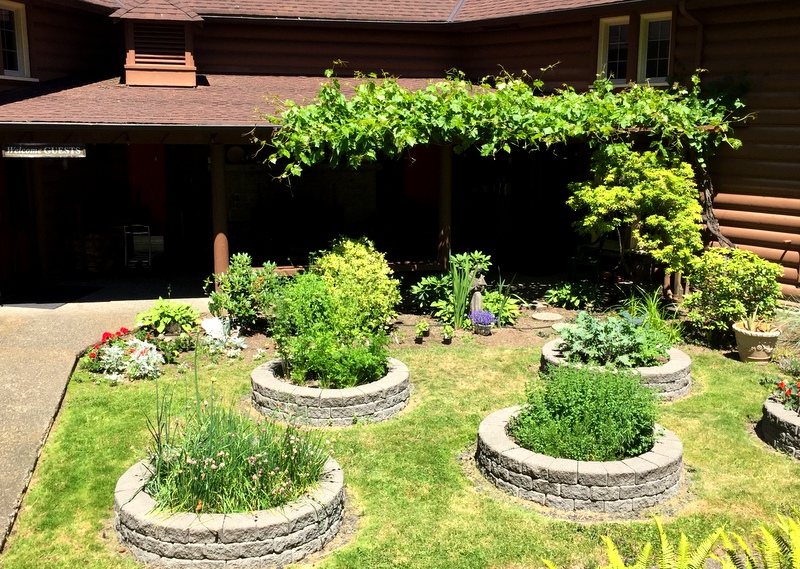
The venue for the retreat was St Andrews House on Hood Canal near Union, Washington. In my previous post I showed you the view of the Olympic Mountains from the long porch at St Andrews House. Here are some photos of the house itself starting with the porch, which runs along the back of the house:
The view from the parking lot:
The herb garden:
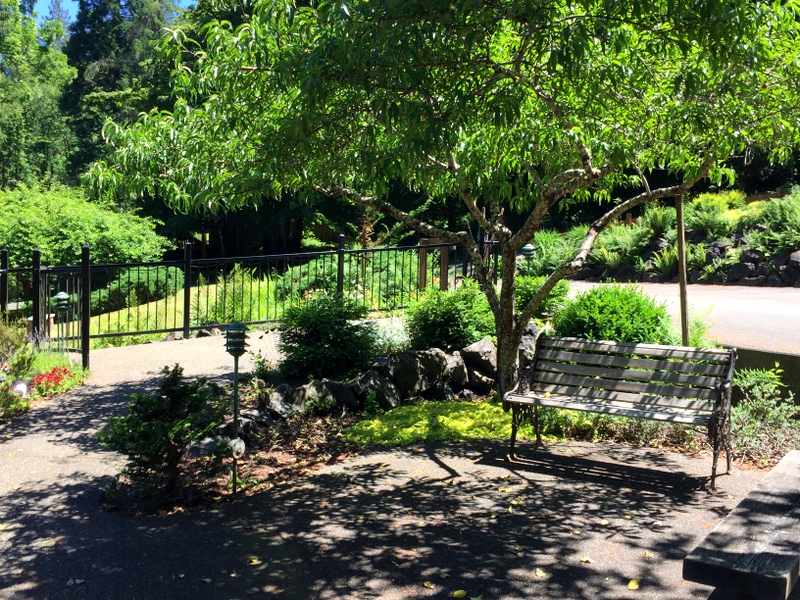
A pleasant shaded seating area:
Such a lovely retreat and conference center!
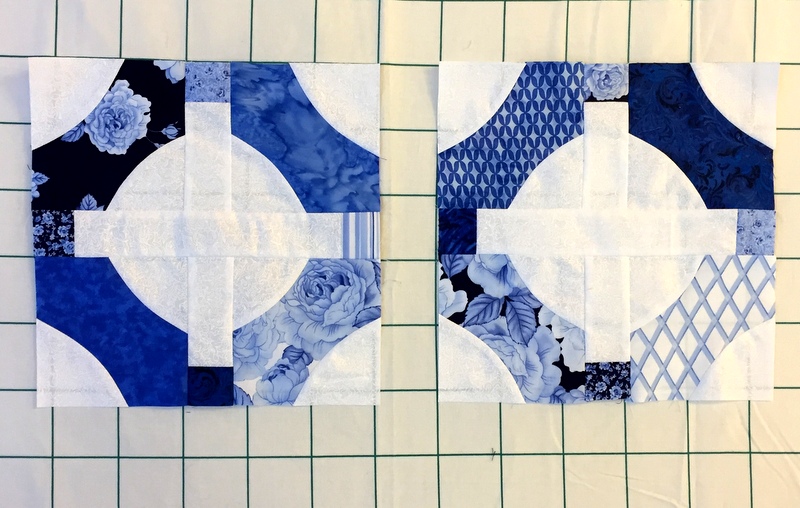
Now for more blocks. These blue and white blocks were made by Joyce . . .
. . . and these were made by Sue and Lisa:
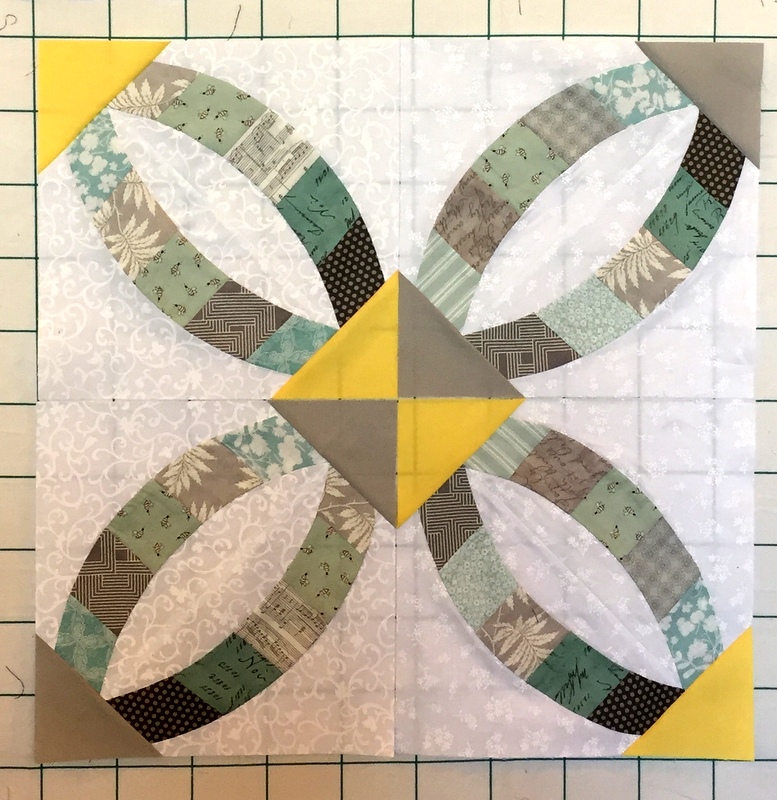
So far all the blocks you’ve seen measure 11″ unfinished and were made with the QCR Mini, the small version of the original Quick Curve Ruler by Sew Kind of Wonderful. Kay was one of those making my “supersized” version of Mini Mod Tiles in which the blocks measure 18″ unfinished:
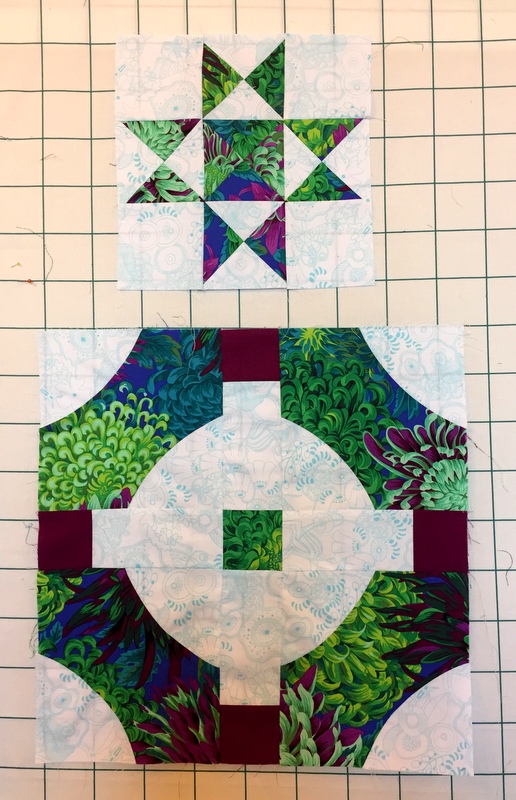
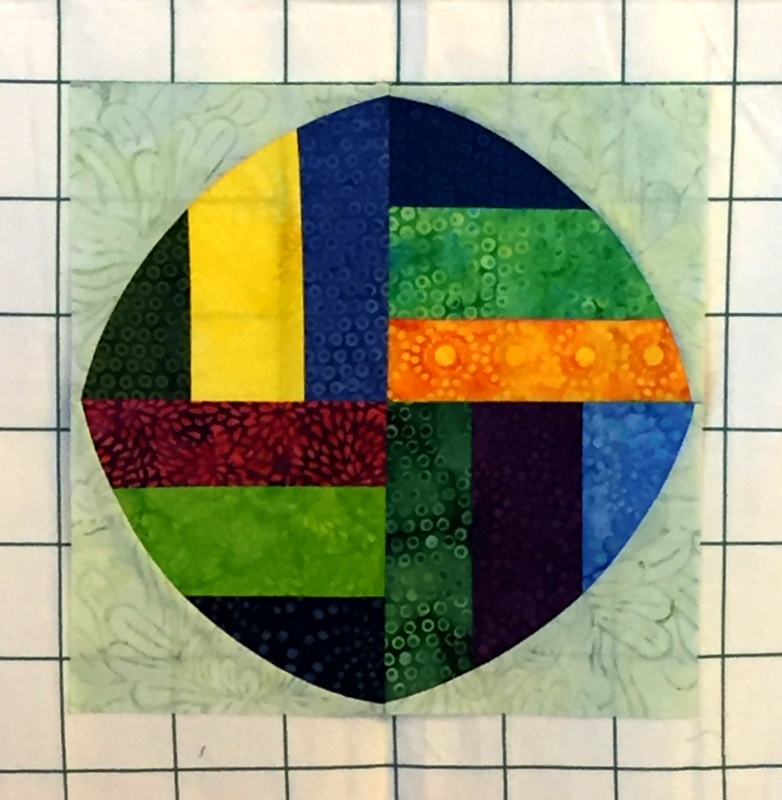
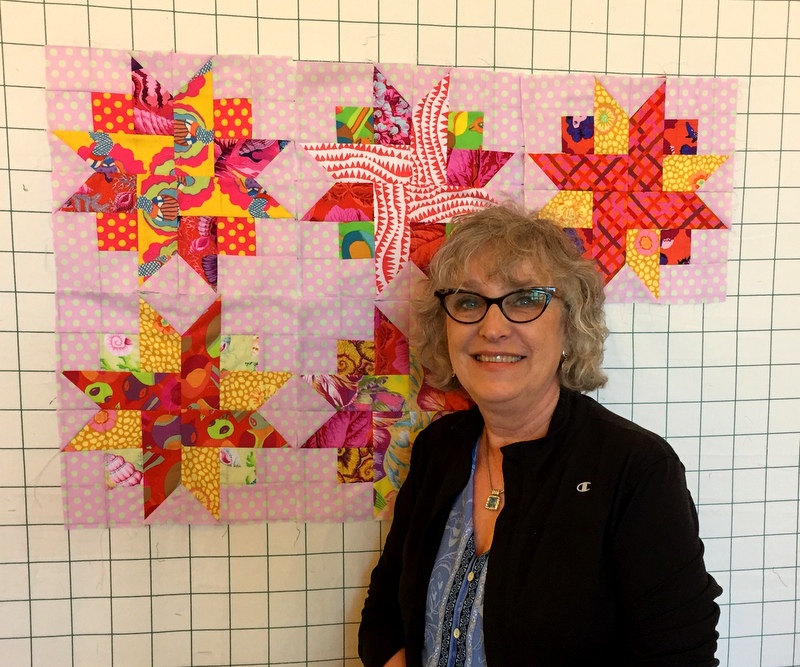
What about those three blocks on top? Kay was also working on a second project, making Ribbon Star blocks from the Missouri Star Quilt C0. It’s pretty clear Kay likes color!
Another quilter making colorful supersized blocks was Kristine:
Missy was making the mini version using a palette quite similar to Kristine’s:
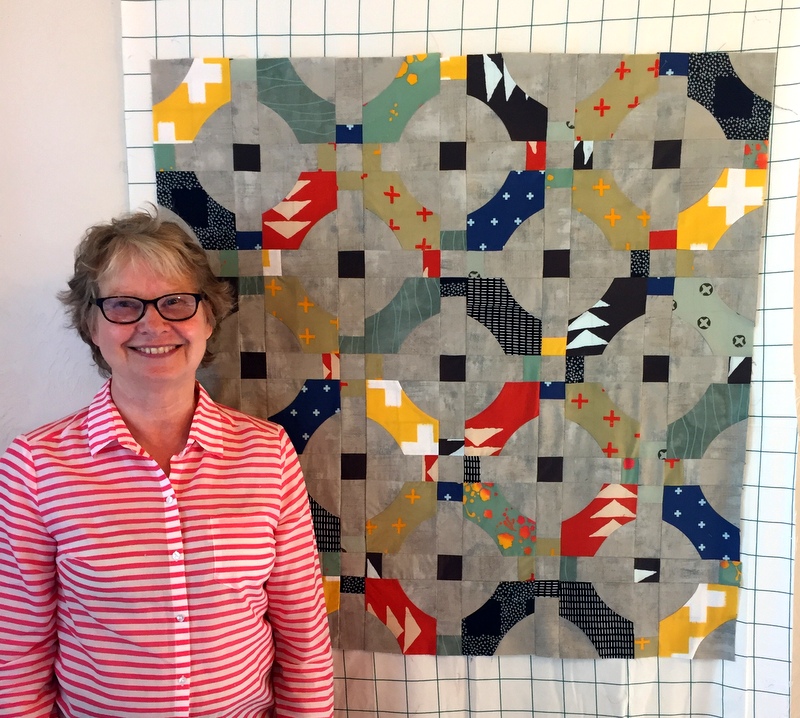
Three of my students were using the original Quick Curve Ruler to make different designs by Sew Kind of Wonderful. Janna started with the free pattern Spring Fling from SKW but departed from the design to do her own thing. Here’s her first block:
Katie fell in love with the pattern Dancing Churndash designed by SKW for Cut Loose Press. Here are her first two blocks:
Delia chose SKW’s Chic Diamonds design:
With the second group of students I was much better at getting pictures of them with their projects toward the end of our time together. Here is Rosalie with her five beautiful blocks:
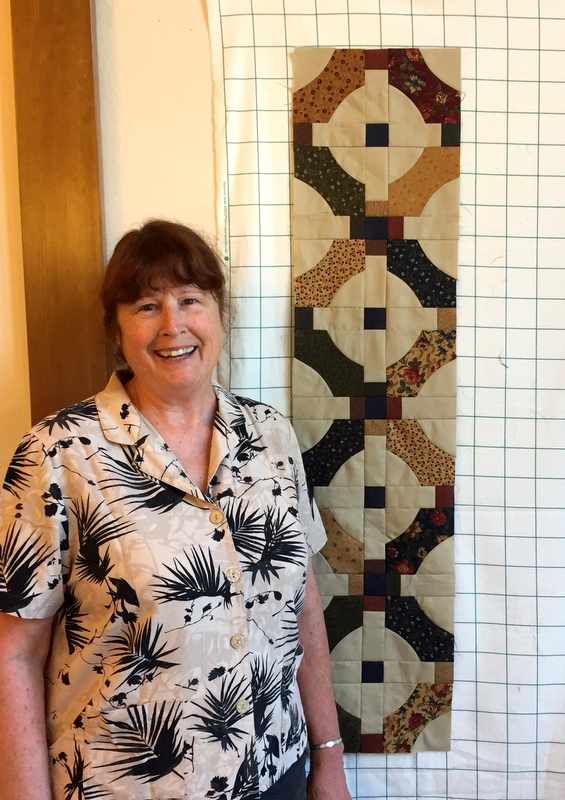
Barbara B. completed a runner . . .
. . . and had enough fabric left to make a mini Fun Poinsettia block:
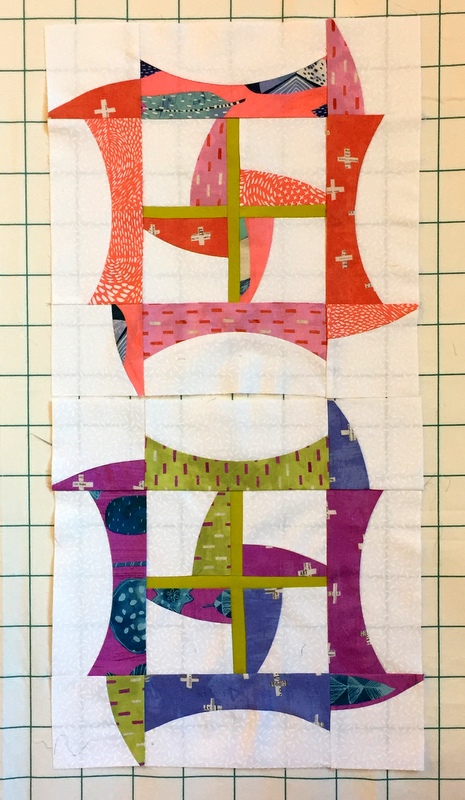
Here’s Missy with her four blocks sewn together:
Do you see how there’s a fifth block in the center that is made up of partial blocks from the four? This is an example of a secondary block design being the same as the primary.
In addition to their blocks (shown behind them), Dena and Kristine made self-binding baby blankets in soft flannels:
Dena showed several quilters how she mitered the corners on her baby quilt. Joyce practiced the technique, making a square with mitered corners in addition to her lovely runner:
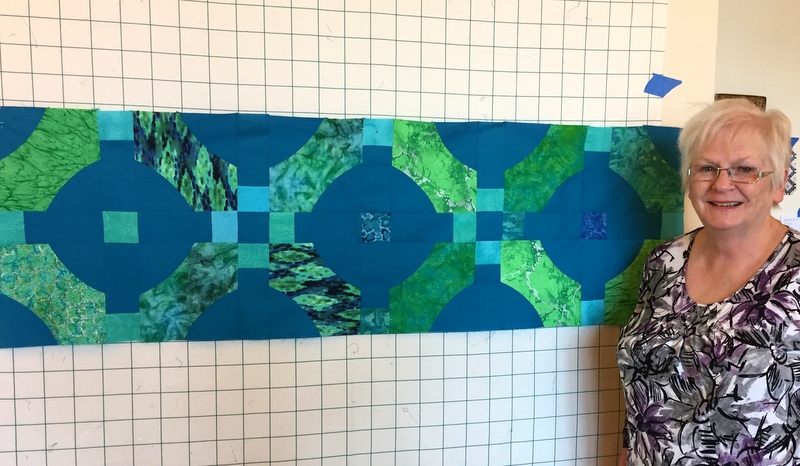
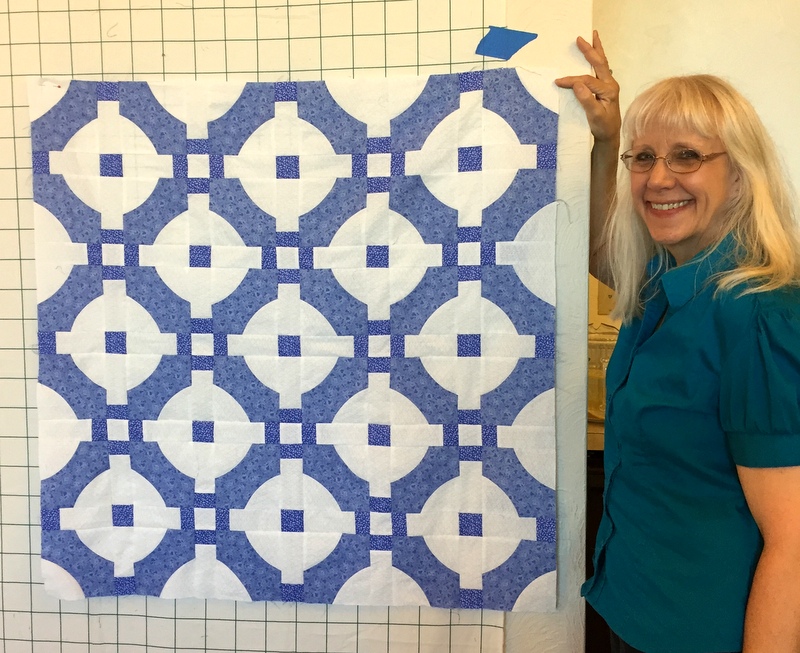
Another vision in blue and white is Roxanne’s quilt top:
Linda decided to change the 3 x 3 setting to 4 x 5 to make a bigger quilt. Here is half of her Mini Mod Tiles quilt sewn together:
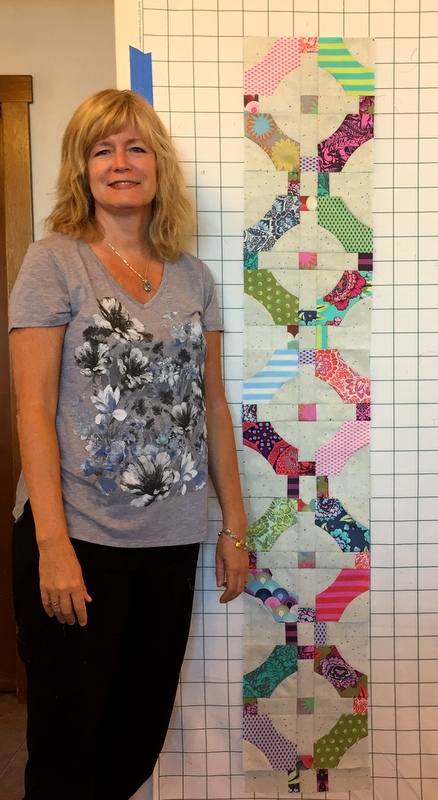
Mini Mod Tiles looks wonderful in both traditional and modern fabrics. Here is Sandra with her four-block runner in soothing muted colors. . .
. . . and Lorri with her five-block runner using bright Tula Pink prints:
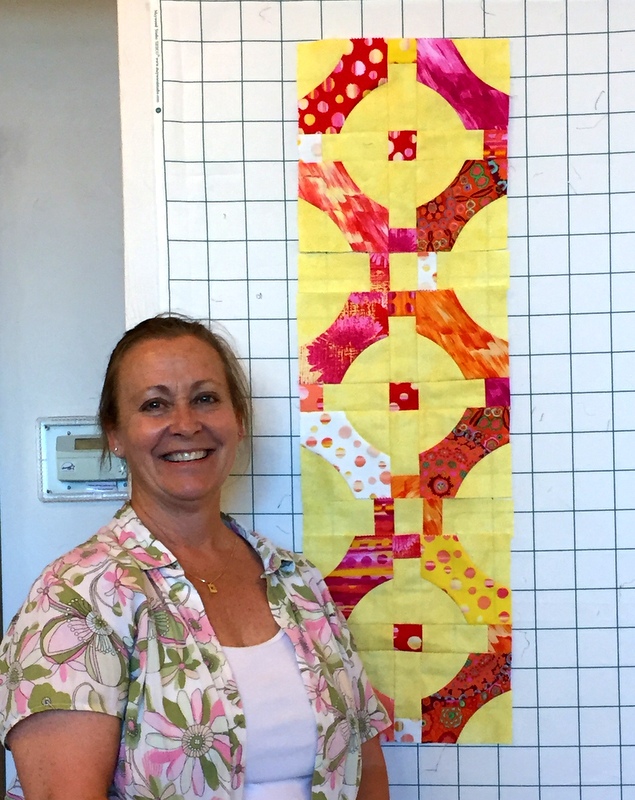
Lisa’s runner makes me think of pink lemonade:
Or maybe raspberry sorbet?
Liz completed her purple pansy runner and made a second one with a charming pinecone print:
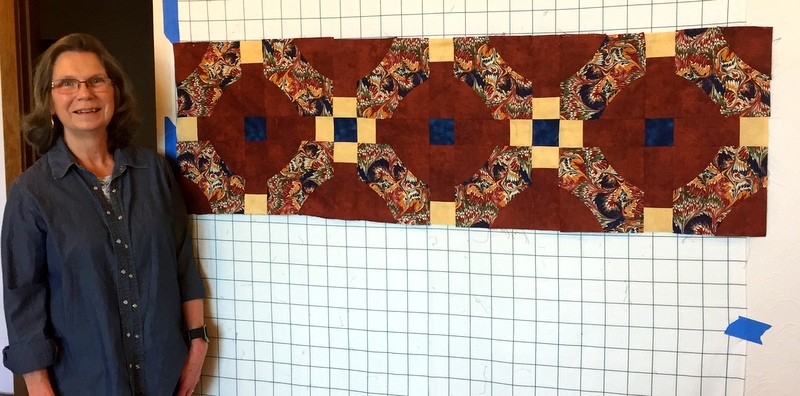
Sue departed from the original design by incorporating sashing strips inside some of her blocks:
Remember Janna’s bright batik block? Here is her quilt top complete with narrow and wide borders:
Here is Katie with her four Dancing Churndash blocks:
Can you believe Katie is working on her very first quilt? Amazing! She has a bright future as a quiltmaker.
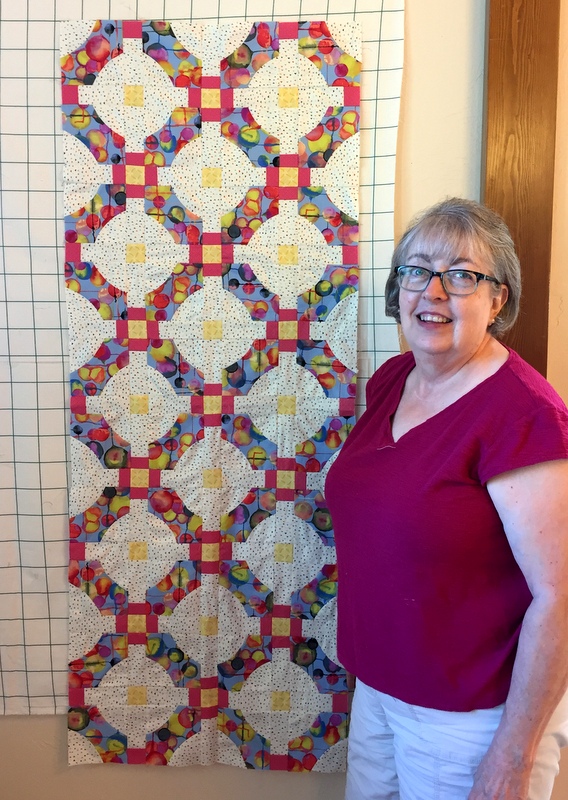
Katie’s sister Barbara S. was originally planning to make a runner but she liked her blocks so well she kept making them and wound up with a quilt top!
In this photo Kay has laid out her supersized blocks and is auditioning the scrappy connector strips between blocks:
Kay also made a few more fabulous Ribbon Star blocks:
During her time at the retreat Delia finished quilting a quilt begun in an improv class with Jean Wells:
The back is as interesting as the front:
It was all quilted on Delia’s domestic machine. She was on deadline: her quilt needed to be in the mail the following week to Sisters, Oregon where it will hang in the world’s largest outdoor quilt show on Saturday, July 7.
That’s the perfect segue to let you know I am in Sisters right now with my quilt group, the Quisters. We’ve taken classes this week put on by A Quilter’s Affair and we will all be at the quilt show tomorrow where a record 1,497 quilts will be hung for one day. Of course I will be keeping an eye out for Delia’s quilt.
I hope you have enjoyed seeing the beautiful blocks, runners, quilt tops, and other projects created by my students at the two Pine Needle retreats!
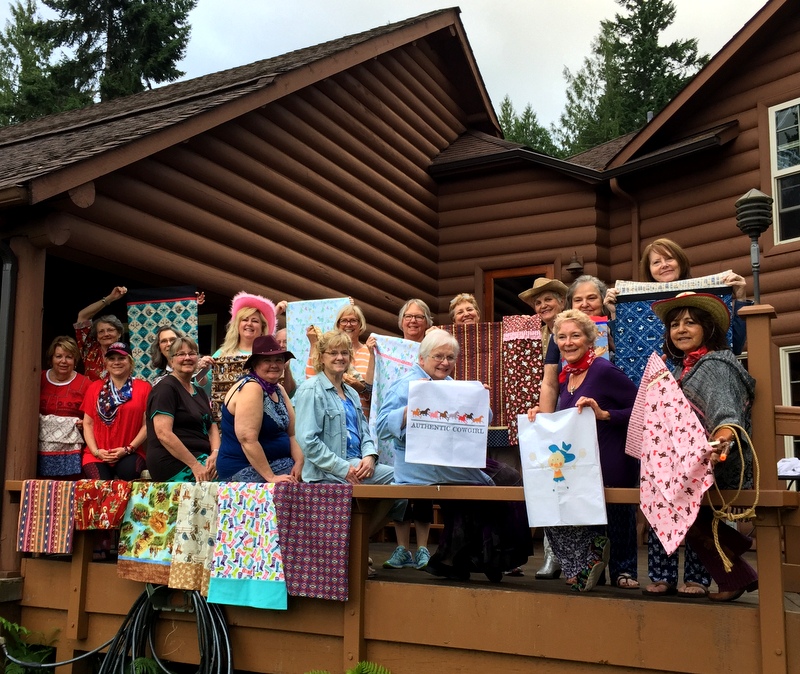
Don’t these quilters look happy? This photo was taken the first evening of the Pine Needle Quilt Shop‘s retreat last month in Union, Washington just after completing a pillowcase exchange. The retreat had a western theme, which is why you see cowboy hats, boots, and bandana prints on both people and pillowcases.
The retreat was held at St Andrews House, a retreat and conference center run by the Episcopal Church of Western Washington. I had the pleasure of teaching for the Pine Needle at St Andrews House last year and returned this year for two back-to-back retreats.
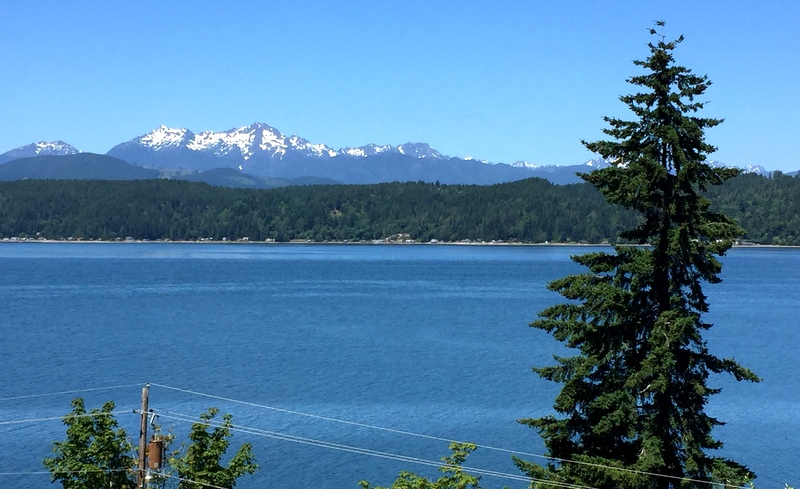
What a lovely spot for a sewing/quilting getaway! The house sits above Hood Canal and offers commanding views of the Olympic Mountains. This is what you see from the long porch that runs along one side of the main building:
I stayed with Geri, owner of the Pine Needle and organizer of the retreat, in Bayne Cottage, a little house below the retreat center also owned by the church. Every morning before walking up a short (but very steep) hill to the retreat center, I had coffee on the deck that sits right over the water when the tide is in. This was my view:
The design I chose for this year’s retreat was Mini Mod Tiles by Sew Kind of Wonderful:
This is the quilt that appears on the SKW website. It was made with the QCR Mini, the smaller of the two specialty curve rulers designed by Sew Kind of Wonderful. The block finishes at 10½” and the entire quilt finishes at 35″. Did you know the pattern is a free download? You can find it here.
I decided to “supersize” the block so that the quilt could also be made with the original Quick Curve Ruler. That way I could offer my retreat students two options. Here are my two test blocks, one finishing at 10½” and the other finishing at 18″:
In no time at all, my students were sewing curves the Sew Kind of Wonderful way: no pinning! The fabrics are cut slightly oversize and trimmed so that when the block components are sewn together, they fit the way they’re supposed to.
Here are the first three blocks:
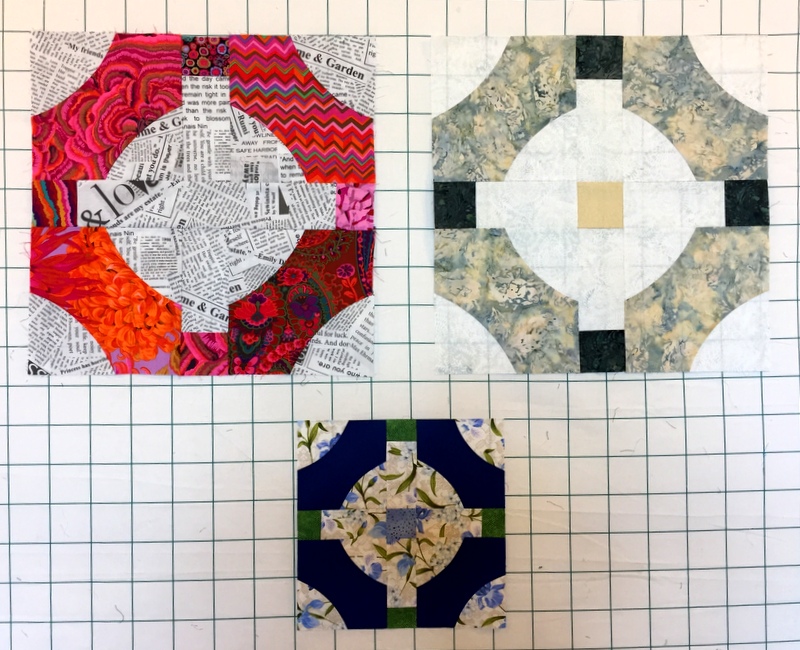
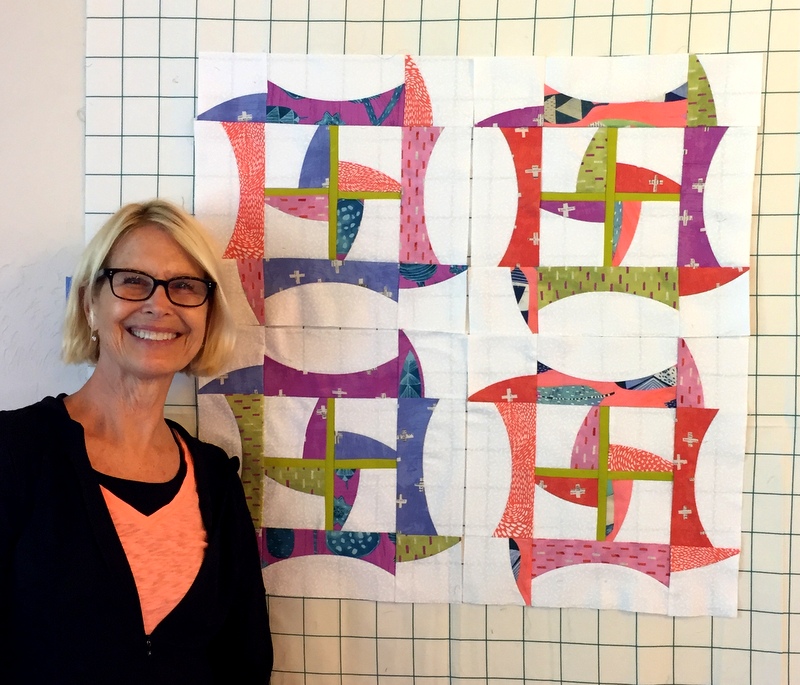
The blocks in the top row were made by Diane and Lynn. We were all dazzled by Diane’s choice of Kaffe Fassett prints combined with a bold text print for the background. Doesn’t Lynn’s block look like real tile? She chose the perfect batik for her focus fabric to get that effect. Lynn’s sister Karen made the block in the second row. She reversed the usual placement, using a lovely floral print for the background and a dark blue solid where a print would normally go.
As the first day progressed, the number of blocks on the wall quickly increased:
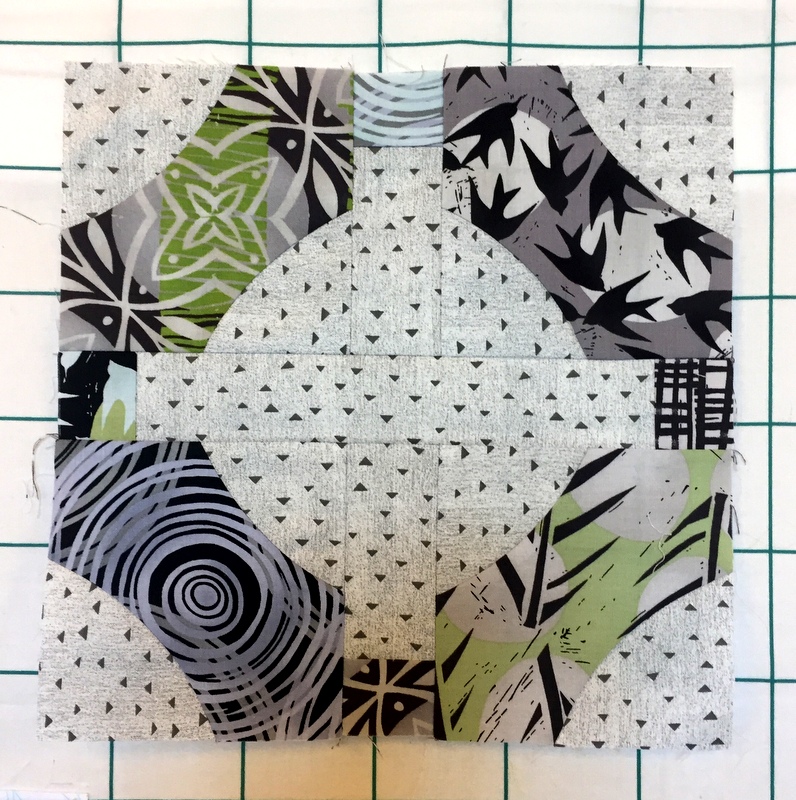
The new blocks were made by Denise (Asian fabrics in second row), Colleen (aboriginal fabrics in third row), Puff (autumn colors on the far right side of photo), Marti (marbled print with rust background in lower left), Tamara (rich purple batiks in bottom row), and me (blue and green holiday print in third row). As you can see with Puff’s two blocks on the right, one block was made with a contrasting center square and one without. Puff decided she liked the top version better.
I told the students, “Once you have your curves sewn and trimmed, I think you’ll be pleasantly surprised how quickly the quilt goes together.” When I came to the classroom on the morning of the second day, I was flabbergasted to see a finished quilt top. Kay had finished hers the evening before!
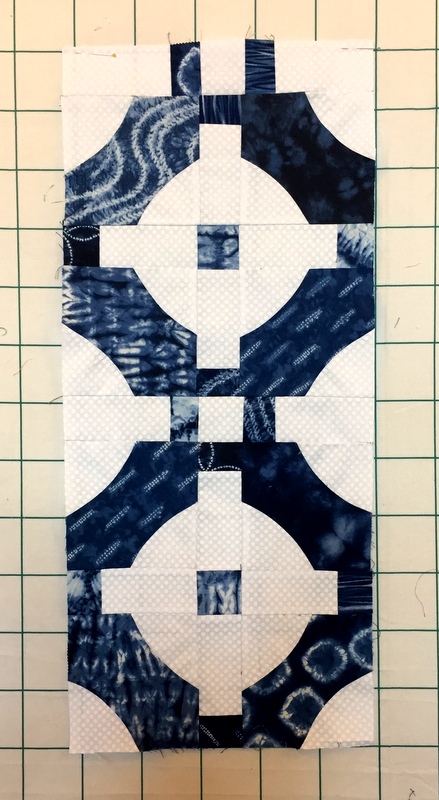
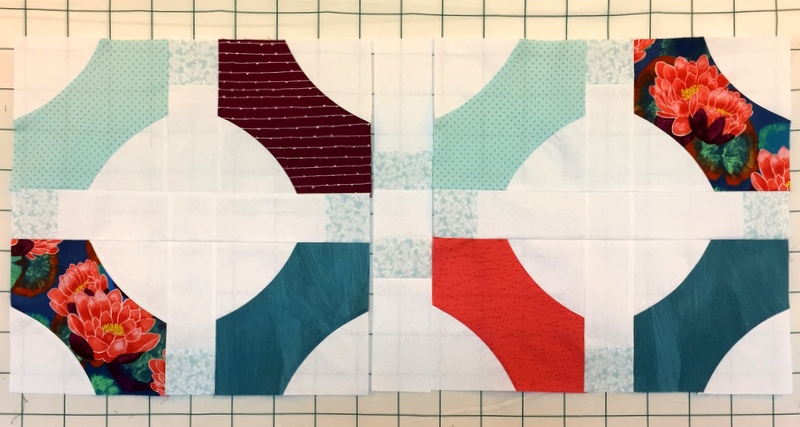
As always, it’s so fun to see the different fabrics that students choose. Candyce’s blue and white fabrics are Shibori prints:
Susie’s focus fabrics are from the Marks line by Valori and Jean Wells. She found the perfect background fabric from another line to go with them:
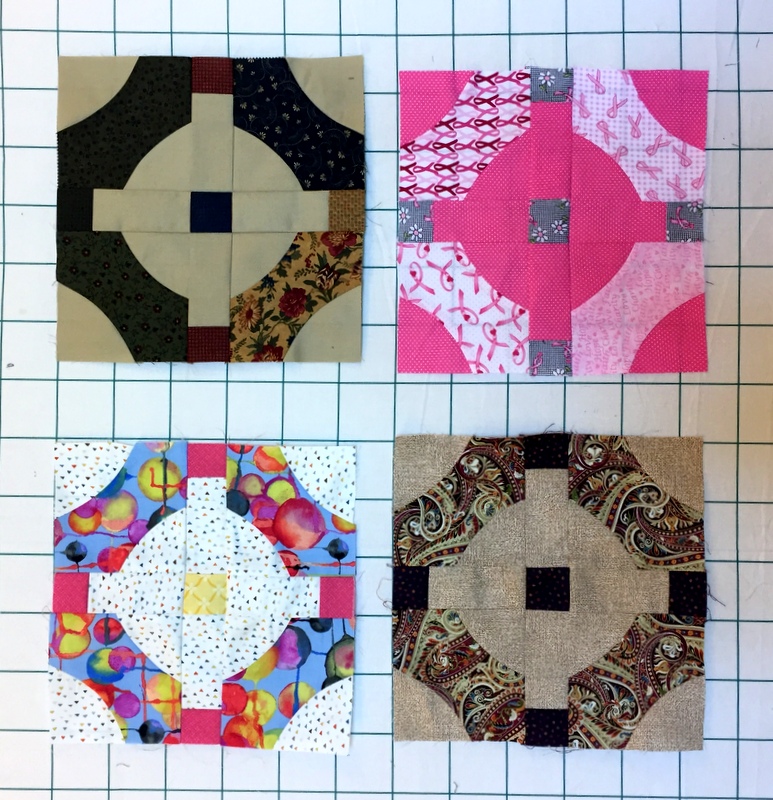
Best friends Martha and Sandy wanted to make a different Sew Kind of Wonderful pattern, Metro Rings. That was fine with me, as I’ve made Metro Rings myself and could offer them some special tips. This block represents a joint effort, as they are using the same fabrics. See how the big block is made of four smaller ones? Two of them were made by Martha and the other two by Sandy. The four blocks haven’t been sewn together but you can see that their points of the triangles in the center are going to come together perfectly:
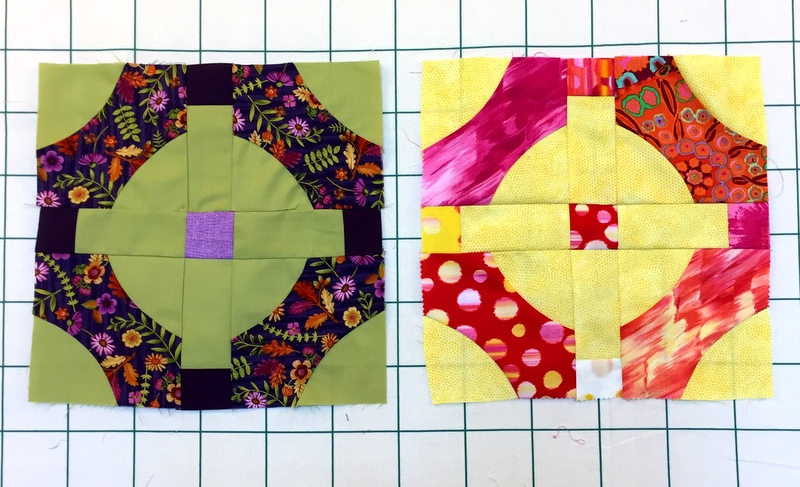
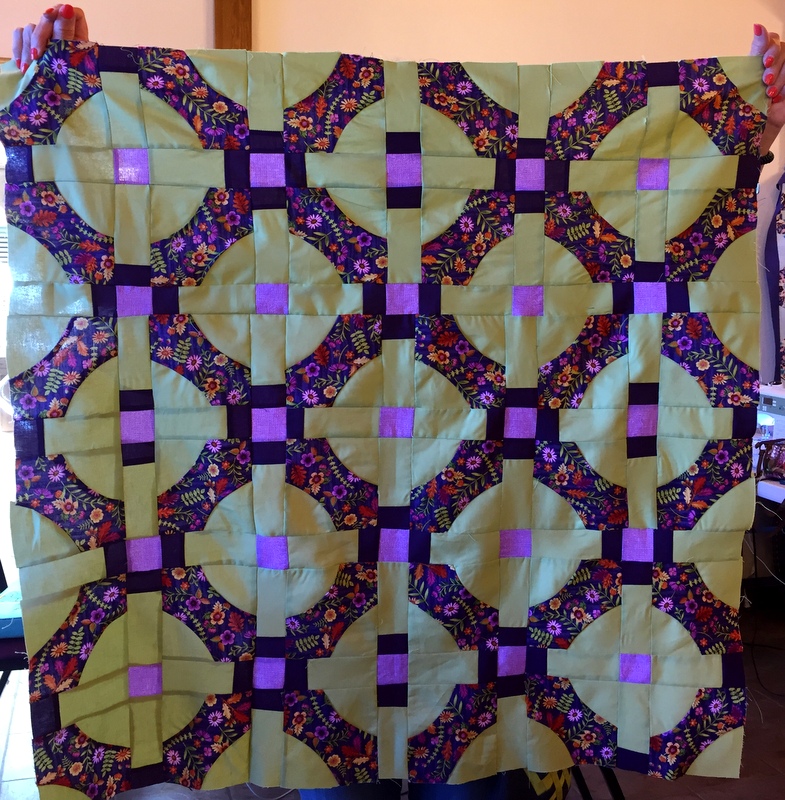
Here is Linda’s supersized version of Mini Mod Tiles, made in one of my favorite color combinations, green and purple:
I had suggested that students making the supersized version save their fabric scraps, as they’re large enough to be used in something else. Linda proved my point. She sewed four curvy scraps together and then trimmed them to make an hourglass block. Five hourglass blocks (see the center block?) then became part of a larger nine-patch star block:
Linda’s background fabric, from the Alison Glass Sun Print 2016 line, goes so well with her wild floral print.
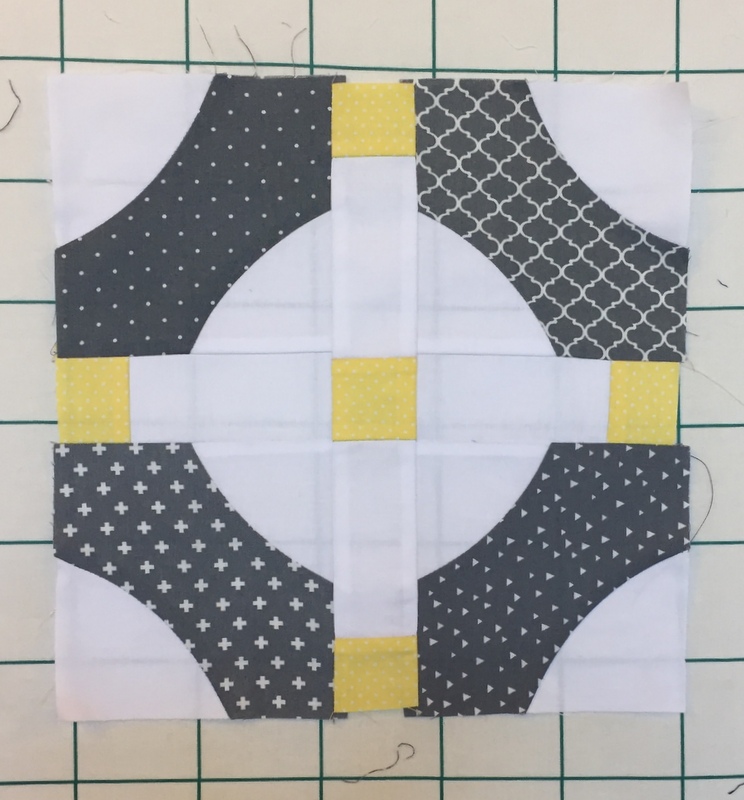
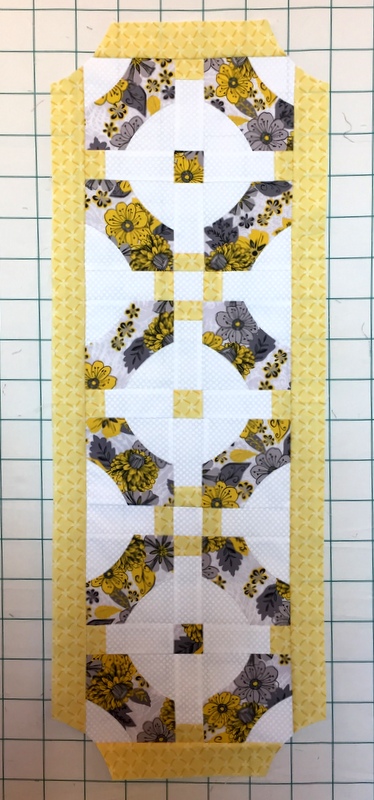
Jan had a charm pack of 5″ squares in grey and white prints, pairing them with white and yellow to great effect:
Kitty used that same fresh color combination in her runner:
She added a border of her yellow accent fabric. See how the edges of the runner have been cut to match the curve? That was an option I suggested to accentuate the curve within the block. Kitty will bind her runner in the focus print which will give her runner nice definition.
Here is Kitty’s sister Puff with her lovely runner:
She’s going to make a set of napkins from the print to go along with the table runner.
We had three sets of sisters at this retreat! Marti came all the way from New York to join her sister Vicki. Here are their bold and beautiful supersized blocks:
I also cut curves on the runner I made at the retreat:
When I bind this in the dark green, the curved ends will really stand out.
My plan was to snap pictures on the last day of all the quilters with their projects but alas, that didn’t happen. Still, I think you have an idea of the many wonderful ways in which Mini Mod Tiles can be interpreted. Sometime this fall the Pine Needle will have a reunion for retreat participants. Many of these projects will be completed by then and I promise to get some good pictures.
In my next post you’ll see more versions of Mini Mod Tiles, including some supersized ones, made by the second group of retreat participants. Do come back to see!
The first meaning: I am bound for a quilt retreat. Yes, tomorrow morning I head north to Hood Canal in Washington State to teach at a retreat center outside the tiny town of Union. I’ll be gone a week.
The second meaning: Terrazzo Tiles, my retreat quilt, is bound and (almost) ready to go with me. The (almost)? It’s still lacking a label, which may have to wait till I get home. I finished binding the quilt last night at midnight and took this photo at the Pine Needle this afternoon:
Terrazzo Tiles, 63″ Square (2017)
I’m calling it my retreat quilt because that’s the design I’m teaching there. The pattern is Mini Mod Tiles by Sew Kind of Wonderful. The original MMT quilt finishes at 35″ square; you can see my unquilted version here. The quilt you see above finishes at 63″ square after quilting because I “supersized” the block. My retreat students get to pick from two sizes, one made with the original Quick Curve Ruler and the other made with the QCR Mini.
The beautiful quilting you see was done by Karlee Sandell of sewinspired2day.com, and I couldn’t be happier with it. It may look like a digitized quilting motif but Karlee did every bit of it with a ruler. Isn’t that amazing? Every stitch was hand-guided on her longarm machine.
I took several pictures in natural light earlier this week but found the light too bright to put the quilting in strong relief. Still, these close-ups do show some detail:
I encourage you to visit Karlee’s blog to see her post on this quilt. In addition to more photos, she describes how she settled on the quilting design. Karlee has quilted several quilts for me and I trust her to take my general guidelines and come up with a great design.
Look for a post after I return from retreat but while there I’ll be posting on my Instagram account, dawn_at_first_light_designs. You can find me here.
Presenting . . . Mini Mod Tiles from Sew Kind of Wonderful:
Mini Mod Tiles, 35″ Square
The curves were cut with a specialty ruler called the QCR Mini — the smaller version of the Quick Curve Ruler from Sew Kind of Wonderful — and sewn with a pins-free technique. SKW has great patterns for sale on its website — and several free patterns, including Mod Mini Tiles. You can find all the free patterns here. The link to Mini Mod Tiles is here.
Using the original Quick Curve Ruler I made a “supersized” version of Mini Mod Tiles that I showed you in my last post. The quilt, named Terrazzo Tiles, is at the longarmer being quilted as I write this. Look for a reveal post in just a few days!
I’m teaching both sizes of this design at a quilt retreat coming up in a few days. A couple of my students are interested in making a wall hanging or table runner so I decided to play around with possible border treatments. Since a finished block of the original Mini Mod Tiles is 10½” wide, a border is clearly called for.
A plain border would certainly work but I thought it would be fun to incorporate the sashing design. This is a mock-up made by cutting up a photo of Terrazzo Tiles:
Mini Mod Tiles Border Test 1
I used a gluestick to add cornerstones in each corner.
Then I wondered how it would look without the periwinkle squares along the outer edges so I covered them up:
Mini Mod Tiles Border Test 2
Hmmm. That’s a little stark for my taste but the effect might be completely different if a lighter fabric were used where the black is used here.
Next I wondered how the edges would look if they were trimmed to match the curves in the focus fabric:
Mini Mod Tiles Border Test 3
I am loving this! I think I’m on to something here. . .
Since I covered up the periwinkle squares in the second test, I restored them (sort of) with colored pencils to get a fourth test version:
Mini Mod Tiles Border Test 4
Which do you like better, 3 or 4? Whether those border squares stay or go, the curved edges are definitely staying. A three-block runner like my mocked up version would finish at 13½” x 38″. A four-block version would finish at 13½” x 50 and a five-block at 13½” x 62″.
I’m eager to try this out with some holiday fabric that’s been in my stash for a few years. My Mini Mod Tiles mania continues!
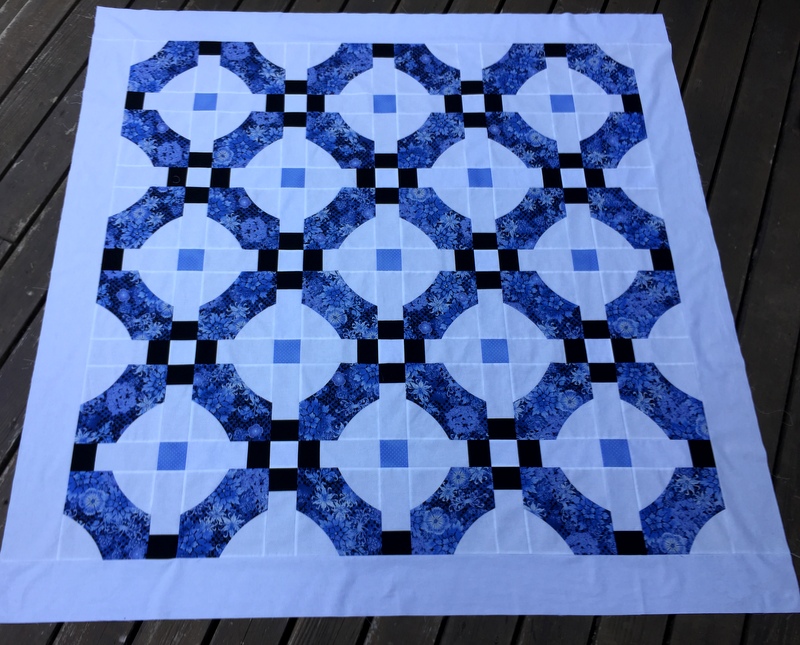
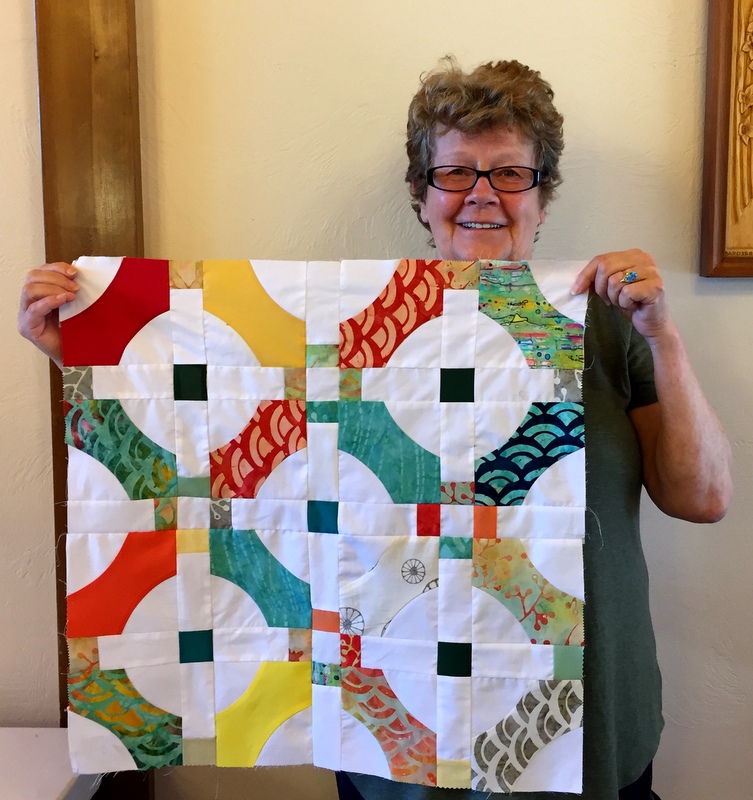
Ah, how satisfying it is to see about 300 pieces of neatly cut fabric transformed into a quilt top in just a few days. Here we are at the outset . . .
. . . and here we are with a finished quilt top:
This is my “supersized” version of Sew Kind of Wonderful‘s free quilt pattern Mini Mod Tiles. The original MMT block finishes at 10½” square whereas my supersized block finishes at 17½” square. Once my curves were sewn and trimmed, I was surprised at how quickly this quilt top went together.
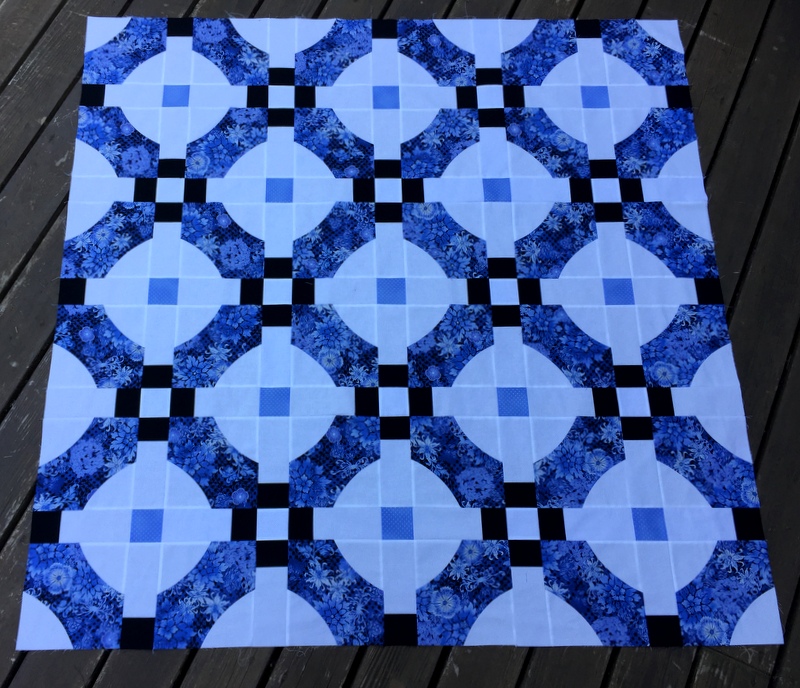
After the blocks were joined I took the top outside to photograph it:
The cornflower blue in the focus fabric is so much more vivid in natural light, isn’t it?
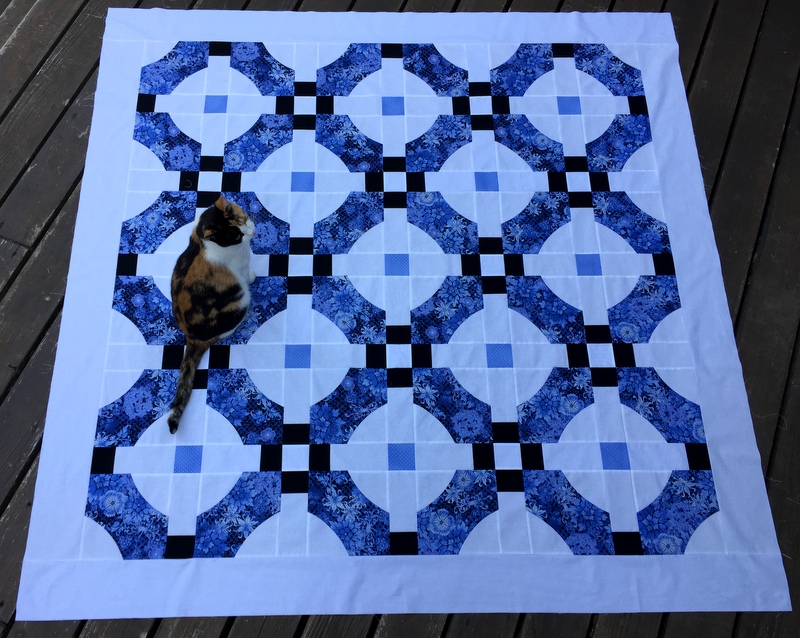
Looking at the quilt from above (I was standing on a chair), I decided I wanted to add a border to make those blocks float. I was back a few minutes later for another shot:
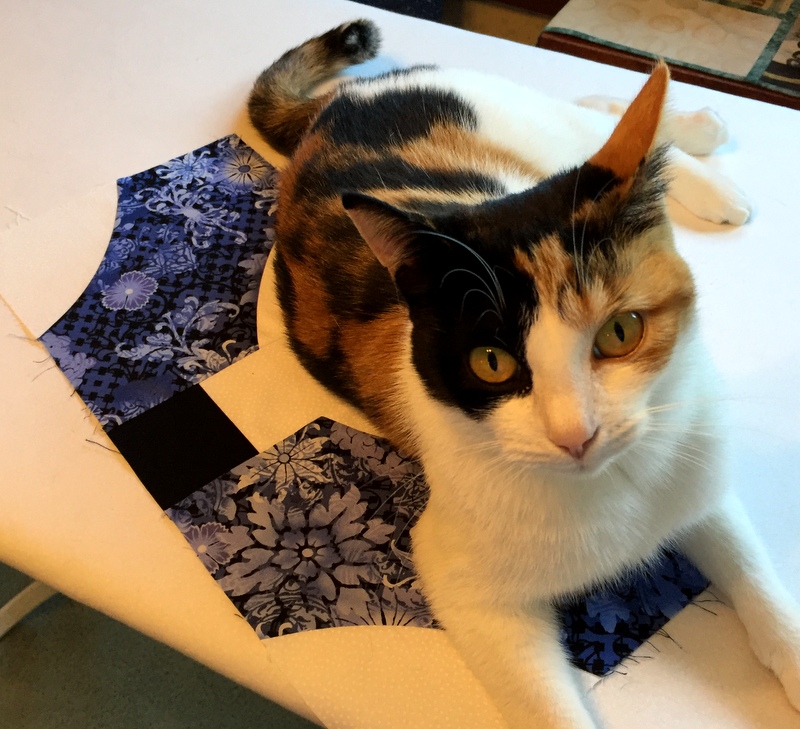
Yes, that’s much better. And there’s Coco, the feline photobomber, doing her thing:
Coco hung out in my sewing room while this quilt top was under construction . . .
. . . so it’s only fitting that she be around at the end.
I am going to call this quilt Terrazzo Tiles for its resemblance to Italian floor tile. Terrazzo is a composite material made by exposing marble chips on the surface of concrete and then polishing until smooth. I like to think that my focus fabric, from the Eclectic Garden line designed by Jason Yenter for In the Beginning Fabrics, gives that same impression. Besides, doesn’t everything sound better in Italian?


 Aren’t these lovely? They are the first group of Mini Mod Tile blocks coming from the second group of quilters attending the Pine Needle Quilt Shop’s retreat in western Washington last month. (You can read all about the first group’s output in my preceding post.) The blocks you see above were made by Sandra and Dena (top row) and Linda and Barbara B. (second row).
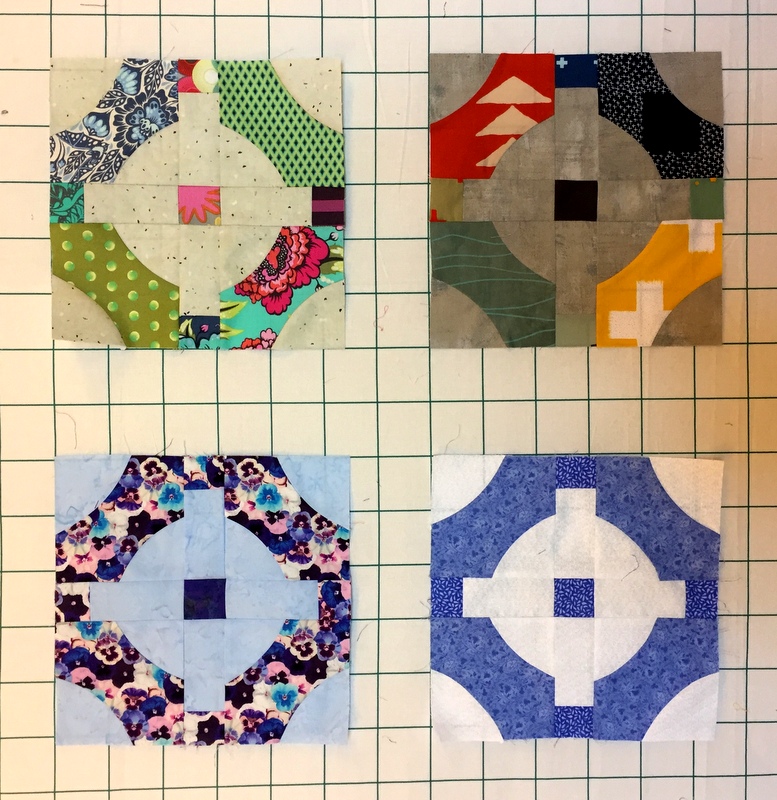

 Do you see how there’s a fifth block in the center that is made up of partial blocks from the four? This is an example of a secondary block design being the same as the primary.
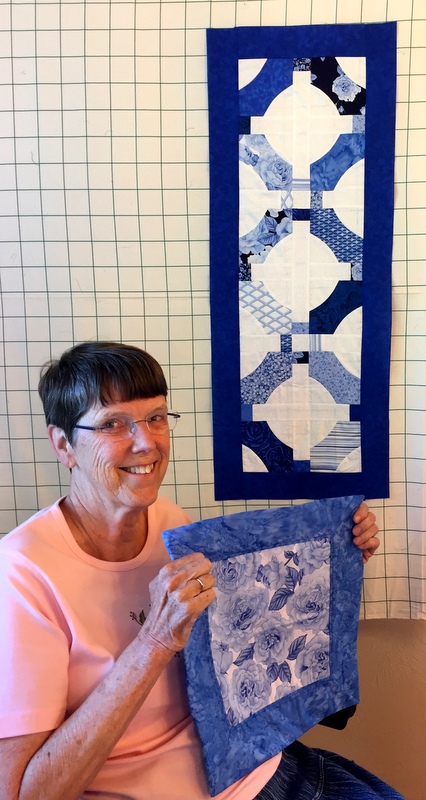
 Or maybe raspberry sorbet?
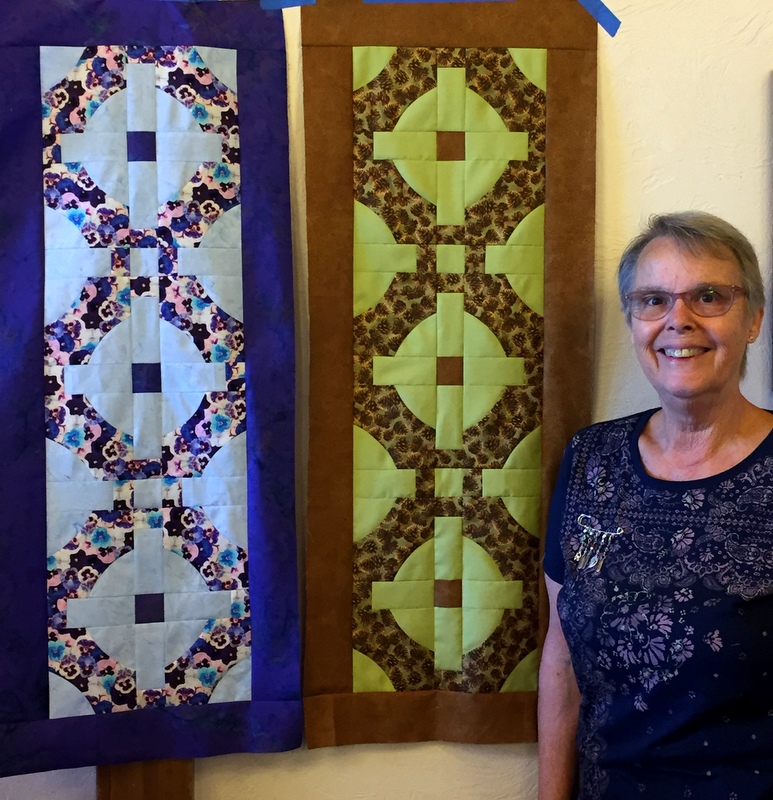
 Don’t these quilters look happy? This photo was taken the first evening of the