Category Archives: Winding Ways quilt block

Throwback Thursday: Dutch Treat (2017)

It’s Week 8 of Throwback Thursday. Over the last seven weeks I’ve shown you seven quilts, one for each year between 2010 and 2016. Today’s quilt is my first red and white quilt (though not my last, as you know from my most recent post). Here, representing Week 8, is Dutch Treat:

Dutch Treat, 48″ x 60″ (2017)

Made from the pattern A Mid-Winter’s Night by Cottage Rose, the quilt features a mix of reds and two light background fabrics, all from my stash. The quilting was done by longarm quilter Debbie Scroggy.

Dutch Treat gets its name from the windmill shaped blocks:

Eight weeks and eight quilts down, two to go! I hope you’ll join me next week for 2018’s pick.


Posted in Throwback Thursday, update, Winding Ways quilt block, windmill block | 6 Comments

It’s a Wrap: Dutch Treat

I finished binding and labeling Dutch Treat yesterday. The rain held off just long enough for a few shots taken in the back yard:

Red and green look so good together, don’t they?

Here you can see the entire quilt:

The windmill blocks measure 12″ square and the pinwheels in the center of each block measure 4″ square. The block is a variation of the classic Winding Ways quilt block usually made with curved seams. These seams are straight but the overall design of the quilt gives the illusion of overlapping circles.

On the back of the quilt I used leftover blocks:


I know what you’re thinking: “Wow, that’s a lot of leftover blocks.” You’re right — and I didn’t even use all of them. I confess: those extras resulted from a miscalculation on my part. At least I was able to put most of them to good use.

Here’s a close-up of the label:

I made the label round using a compact disc for a pattern (described in my tutorial) and then set the label inside a larger circle of red fabric so it would stand out against the backing fabric.


I’m so pleased with the quilting of longarmer Debbie Scroggy. You can see close-ups of Debbie’s quilting in this earlier post.

Dutch Treat (named for the windmill-shaped block)
48″ x 60″
Adapted from the pattern A Mid-Winter’s Night by Cottage Rose
Fabrics: a mix of reds and two light background prints, all from my stash
Quilted by Debbie Scroggy of All Quilted LLC

To read older posts about the making of Dutch Treat, click on the category “windmill block” at the bottom of this post.

Thanks for stopping by. It’s always fun to share a finish!


Posted in quilt labels, update, Winding Ways quilt block, windmill block | 12 Comments

What A Treat

My quilt Dutch Treat is back from the longarm quilter and trimmed, ready to be bound and labeled. I was going to wait till the quilt was completely done before posting pictures but then I decided I couldn’t wait to show it off. Debbie Scroggy of All Quilted LLC did a beautiful job.

I was considering custom quilting when I first met with Debbie but after some consultation we decided on this edge-to-edge design that made me think of crop circles. The swirling circular motion of the quilting motif achieves two things: it softens the angles of the quilt blocks and reinforces the illusion of overlapping circles.

Do you see the circles? Let your eyes travel around the outer edges of the photos below. You should be able to see a dark circle . . .


. . . and a light one:


Now go back to the very first photo of the entire quilt and see how they overlap.

Here’s a look across the surface of the quilt:

I used leftovers on the back: the leftover “V” blocks and the remainder of the two red-on-white prints from the front. You can really see the “crop circles” on the left side of the quilt back:

Measuring 48″ x 60″ after quilting, Dutch Treat will be bound in one of the reds, chosen because it was the only piece left among the ones I used that was large enough to cut the number of binding strips needed. I think it will frame the quilt nicely.

I’ll post more photos when I can officially declare Dutch Treat a “finish.”


Posted in update, Winding Ways quilt block, windmill block | 7 Comments

Getting Right to the Point . . .

. . . is not as easy as it looks.

I’m talking about the places on my red and white windmill quilt where the points of the windmills meet. Matching my points turned out to be much more challenging than I had anticipated.

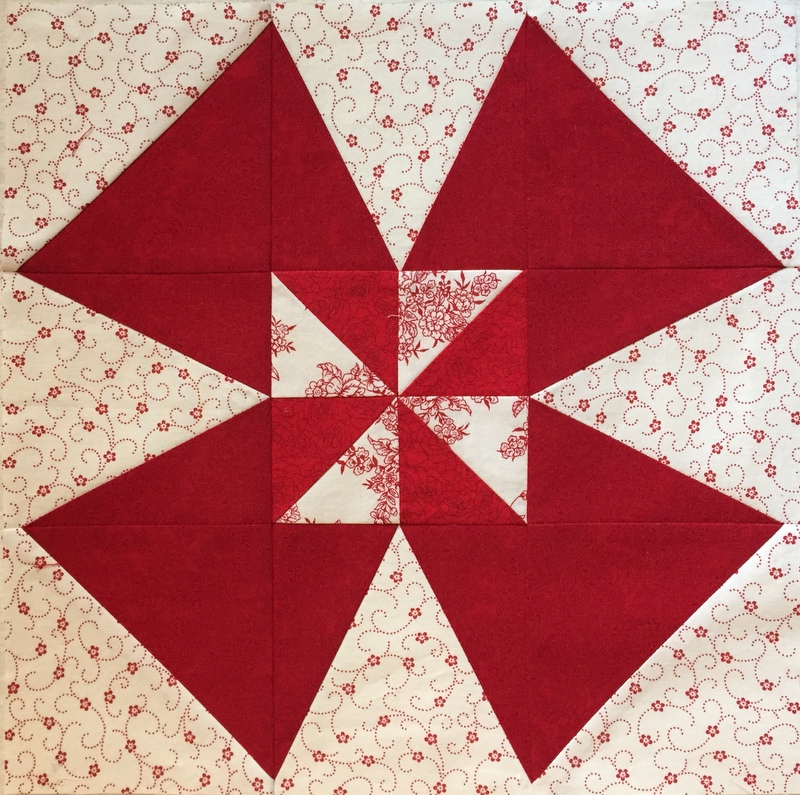
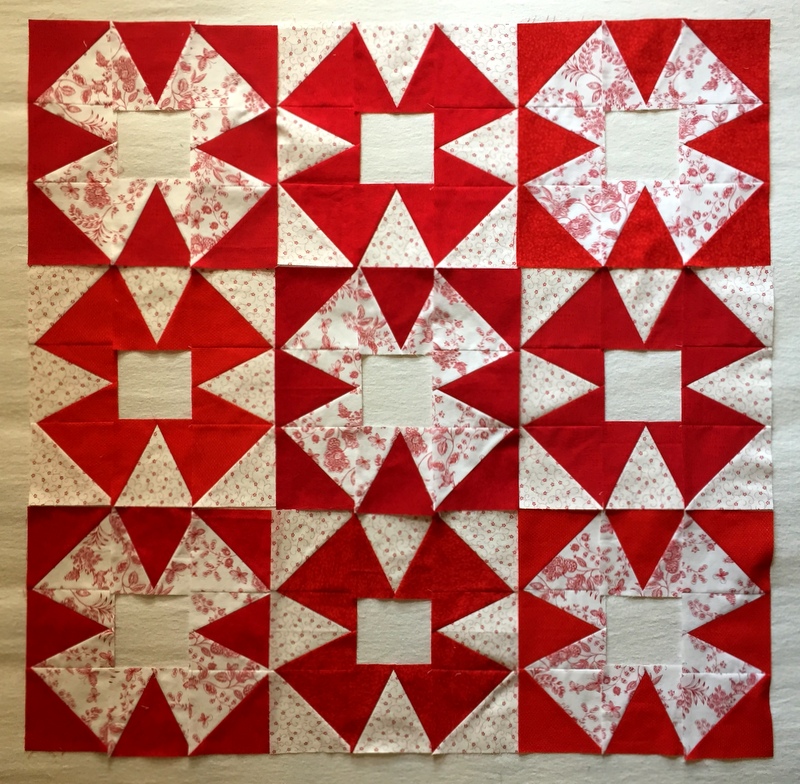
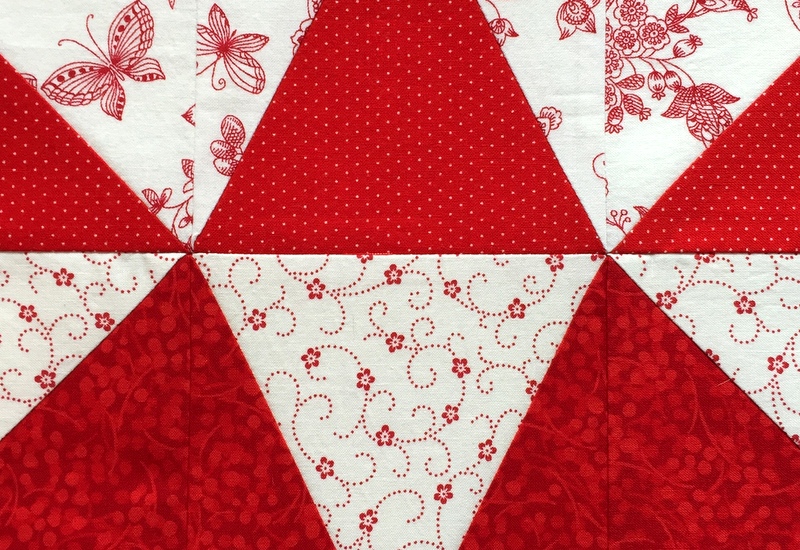
Here’s why. Take a look at a complete block:

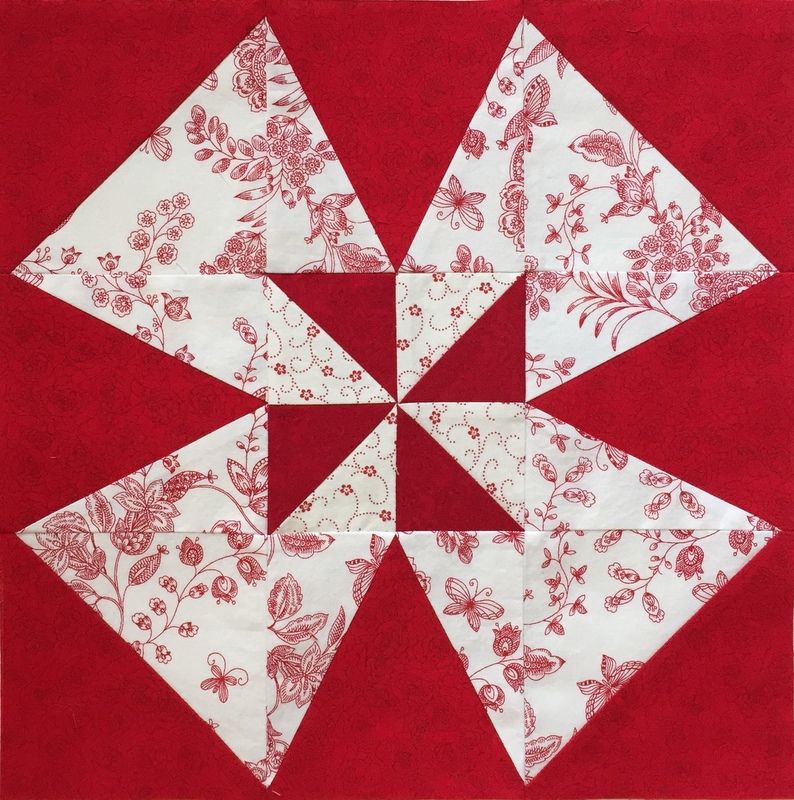
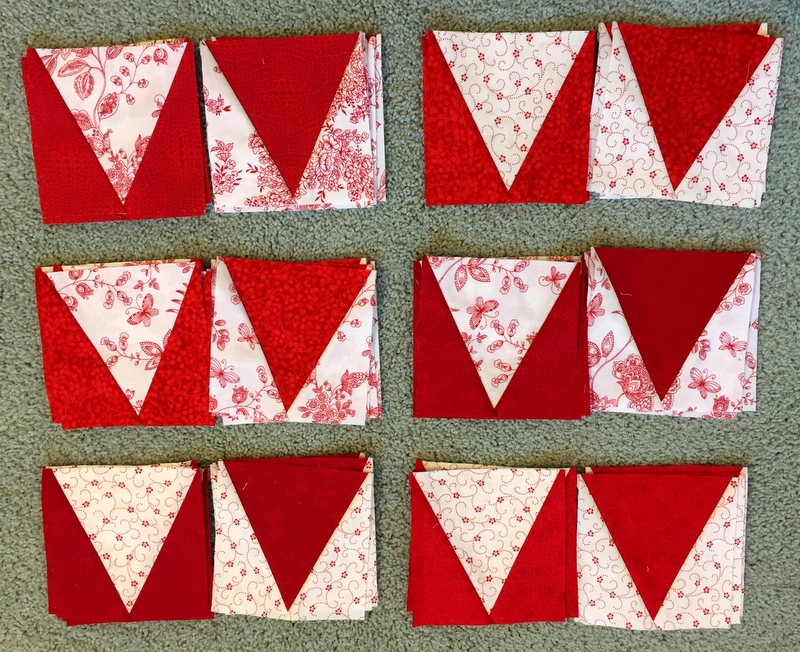
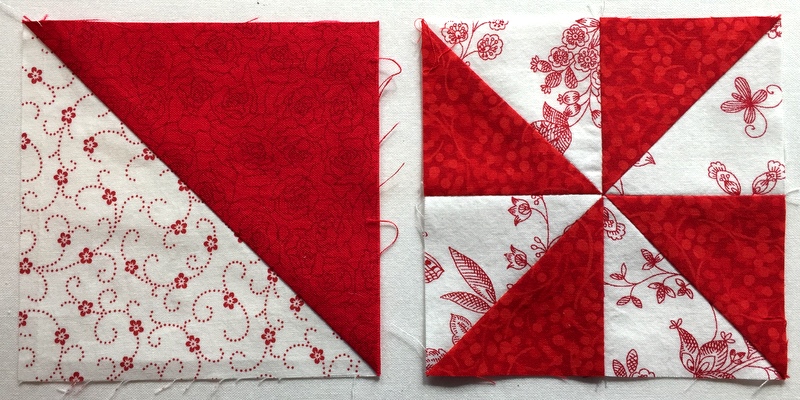
The seams in the Half Square Triangle (HST) corner blocks and in the center pinwheel are sewn at 45° angles . . .


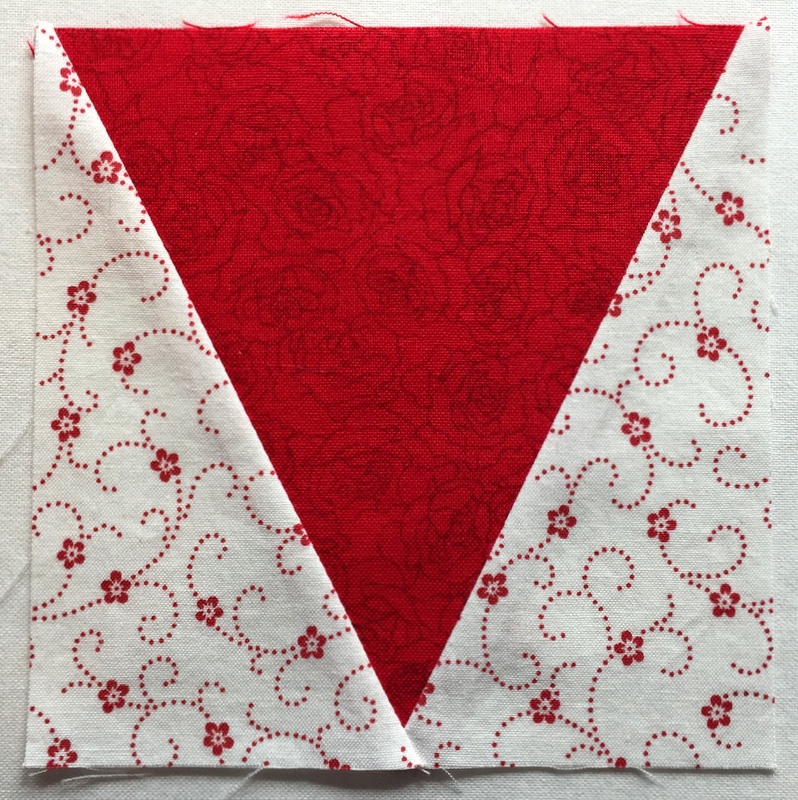
. . . whereas the seams in the V blocks are sewn at sewn at 60° angles:


When a V block is sewn to an HST or pinwheel block, the seams don’t naturally “nest,” even when the seams are pressed in opposite directions. Accuracy in pinning and sewing is essential.

My individual blocks went together nicely. Joining the blocks to form rows and then sewing the rows together was where I ran into problems. I’m a pretty precise piecer but I found that getting my points to line up properly was not just a matter of careful pinning and stitching.

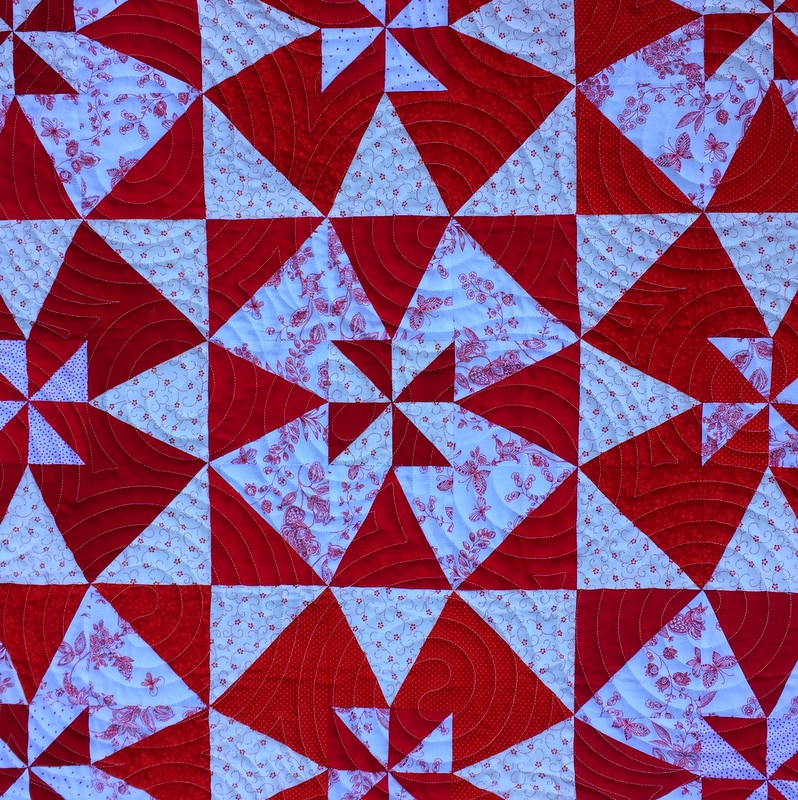
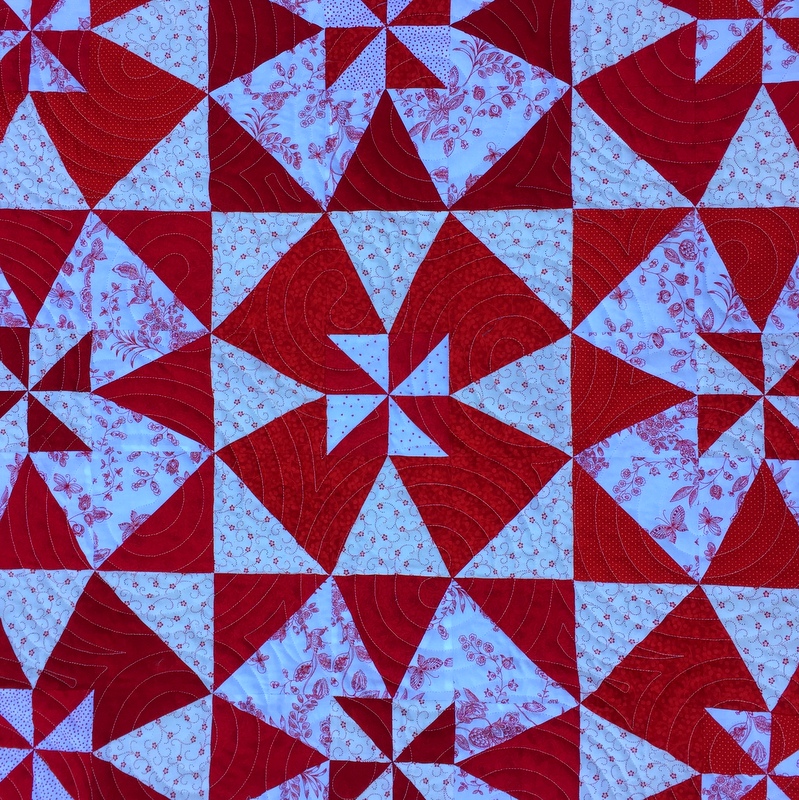
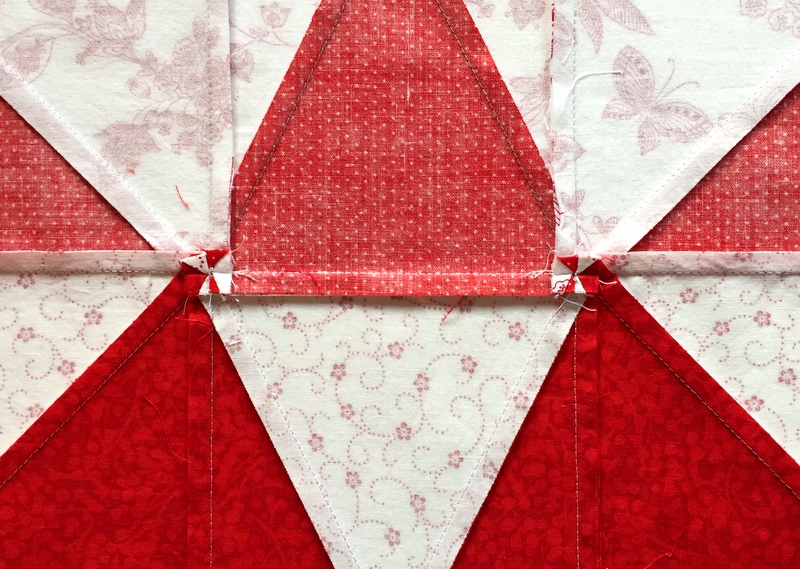
Eight seams come together where the outer points of the windmills meet in adjacent blocks. It’s very difficult to sew them together without some of the seams shifting ever so slightly. With the amount of contrast between light and dark fabrics, points and seams that are even a stitch or two out of alignment are going to stick out like sore thumbs.

The seam between Rows 1 and 2 gave me absolute fits. There was much ripping out and resewing of small sections, accompanied by much gnashing of teeth (and some unpardonable language). I finally resorted to pinning and basting two rows together, then going back to do corrective sewing on the problem points (ripping out, repinning, rebasting . . . multiple times) before sewing the entire seam with a shorter stitch length.

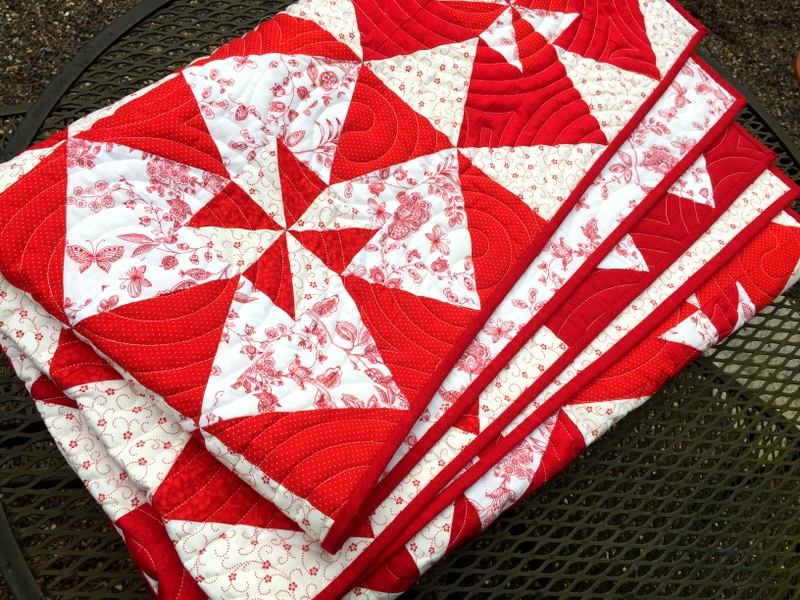
The horizontal seam in the center of the picture below shows two properly joined blocks:

On the back where the eight seams come together, the row seams were popped open to distribute the bulk, forming ½” square pinwheels:

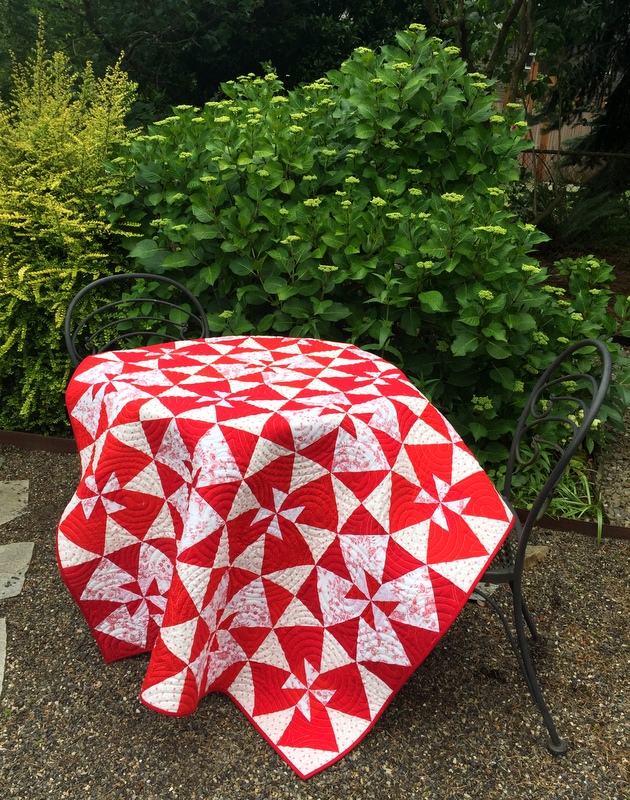
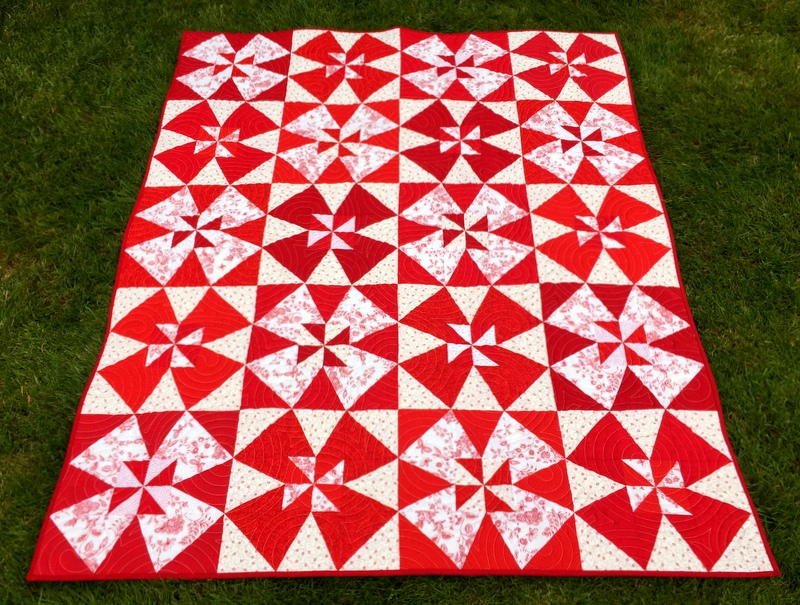
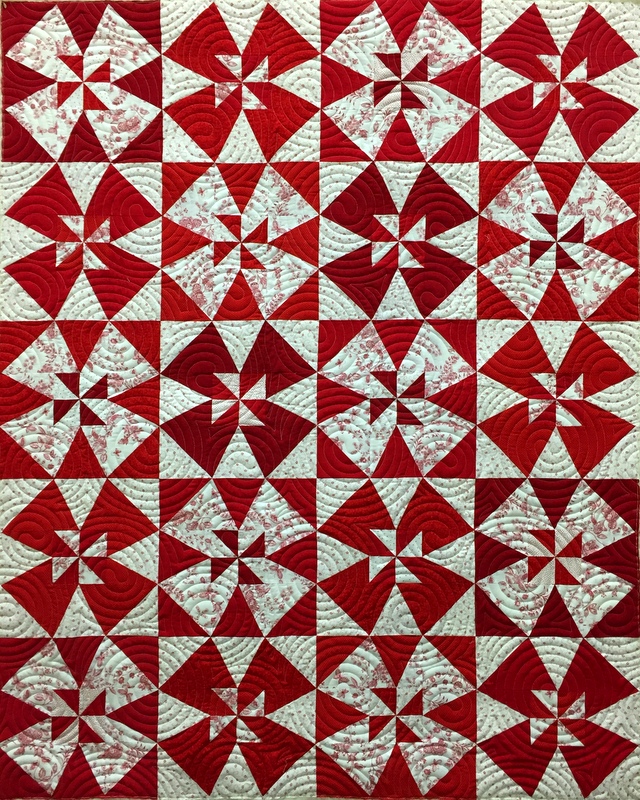
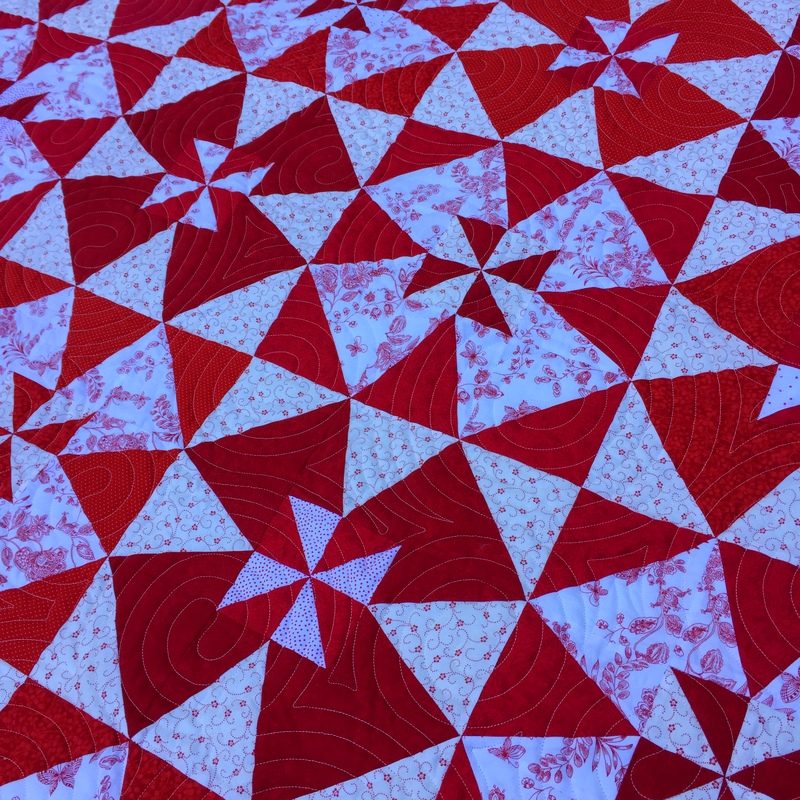
I can now happily report that all of the frustration was worth it. Take a look at my finished quilt top:

Now that all of the blocks are joined, can you see the overlapping circles? You should be able to see both light and dark circles. They are illusions, as there are no curved seams in this quilt top. The quilt block is a variation of the classic Winding Ways block, which employs curved seams to form overlapping circles.

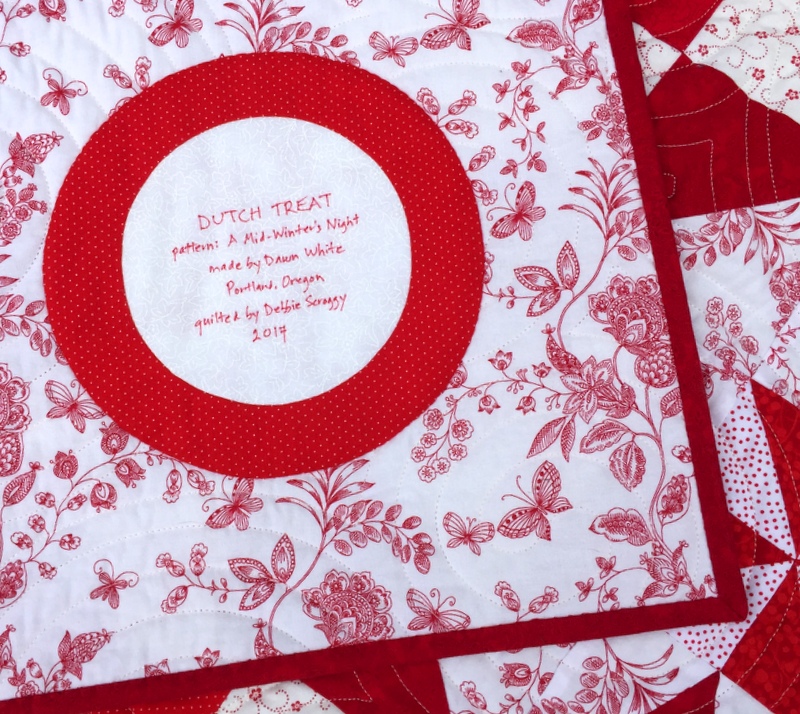
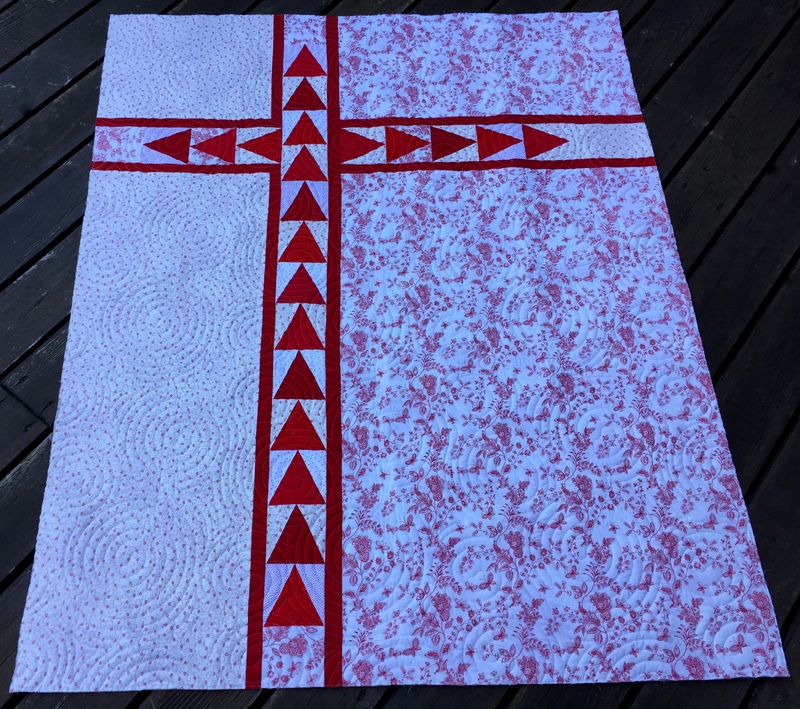
The pattern (A Midwinter’s Night by Cottage Rose) calls for borders with pieced cornerstones but I like the look of this without any borders at all. It measures 48½” x 60½”, a nice sized throw.

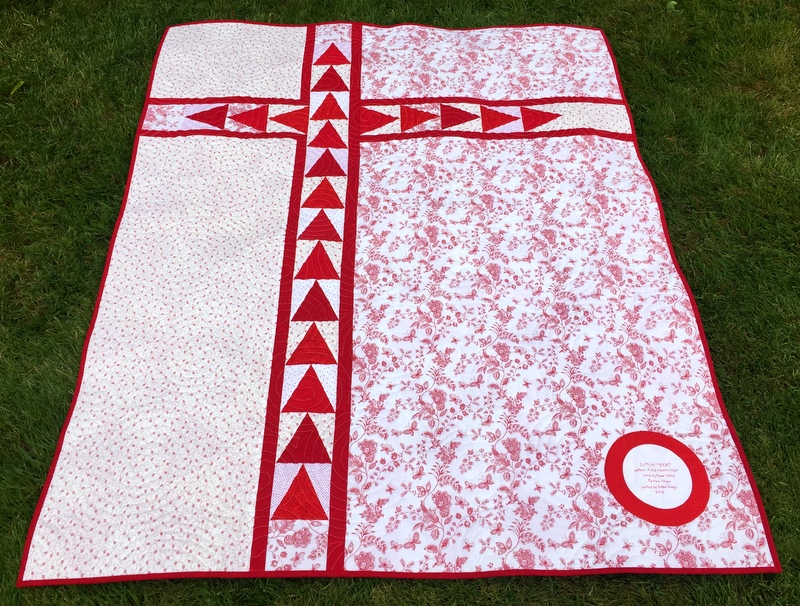
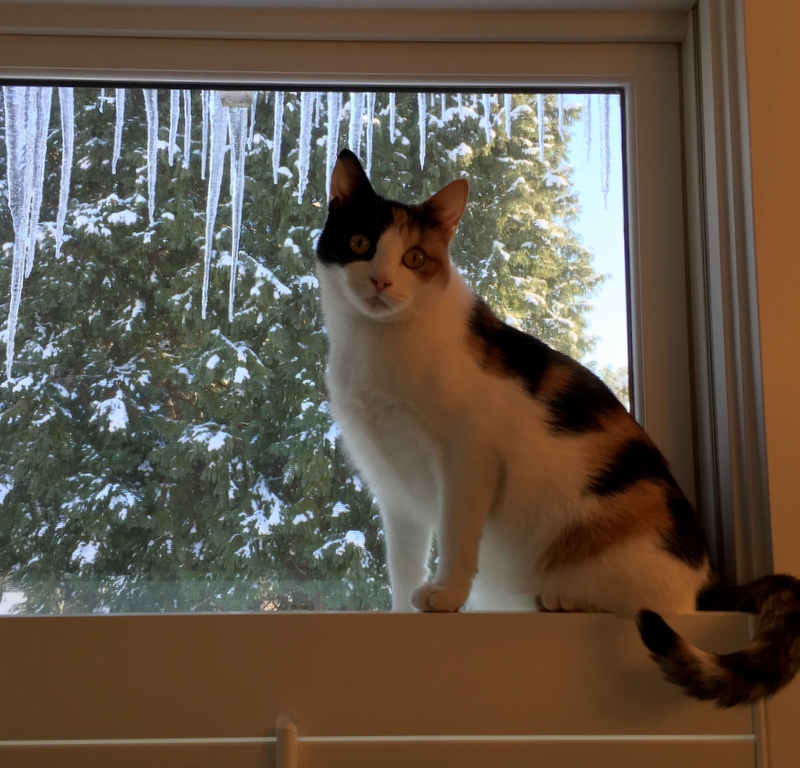
And I have a name for it. Because I think of the blocks as windmills, I’m going to call this quilt Dutch Treat. Some of my readers suggested I call it Coco’s Valentine, since my calico kitty seems to like it so much. Truth be told, Coco likes every quilt I make, never missing an opportunity to lounge on a quilt under construction or a finished one.

Linking up with Kelly of My Quilt Infatuation.


Posted in cats, update, Winding Ways quilt block, windmill block | 9 Comments

Too Clever by Half

Which is to say: not very clever at all.

I’ve been humming along on the blocks for my latest project, a variation of Winding Ways using red and white fabrics. As I showed you in my last post, I’m working from a stack of V blocks made up of four reds and a couple of light prints:

V blocks

I figured that pairing all of the reds with both of the lights would give me a lot of variety when it came time to arrange the blocks on my design wall. But a funny thing happened when I started playing with the blocks. I had a stack that didn’t work at all! How did that happen?

Had I really thought about it before running off in high spirits to my sewing machine, I would have figured it out.

Look at a dark block. You see that the toile print is in the star points of the V blocks and the red fabric is on the outside:

windmill block 1

Now look how a light block has the vine print in the V of the V blocks and all around the outside:

windmills block 2
When you put the blocks together in their proper order, with the light and dark blocks alternating, the vine and toile fabrics should alternate, too, like this:

Windmill blocks 3x3

In other words, the V in the light blocks should always be the vine print, never the toile. And the star points in the dark blocks should always be the toile print, never the vine. I made several blocks that were the exact opposite.

(Just to be on the safe side, I’m going to make the center pinwheel blocks last. They’re going to be a bit scrappy and I sure don’t want to wind up with identical pinwheels in adjacent blocks.)

You know that carpenter’s saying “measure twice, cut once”? My dear friend Colleen, also a quiltmaker, modified that saying to “think twice, measure twice, cut once.” I should have followed Colleen’s advice. Instead I have a set of blocks I can’t use in this quilt.

Although I will never get back the time spent cutting, sewing, and trimming those extra blocks, there is a bit of a silver lining: they can always be used in another quilt or perhaps a table runner. Or on the back of this quilt. One thing I can assure you: they will never wind up as orphan blocks. I’ve invested entirely too much time in them.


Posted in update, Winding Ways quilt block, windmill block | 6 Comments

Snowed In!

Local pundits are calling it “Snowpocalypse” — the epic snowfall on Wednesday that pretty much shut Portland down. We can go years in Portland without snow in winter but this season it has already snowed four times. The temperatures aren’t rising enough to melt the snow so we are stuck with it for a while.

What a great excuse to hunker down and get some sewing done! This is what I’ve been working on:

windmill block 1

windmills block 2
Aren’t those pretty blocks? They remind me of windmills. The pattern is A Mid-Winter’s Night by Deb Eggers of the Cottage Rose Quilt Shop:

a-mid-winters-night-quilt-pattern
The pattern is a reworking of the classic Winding Ways block with a pinwheel in the center. If you look carefully at the quilt pictured on the pattern cover you can see overlapping light and dark circles. The circles are illusions, as all of the cutting and stitching lines are straight. I believe the Winding Ways block is traditionally made with curves resulting in a four-patch block. The method I’m using here results in a nine-patch block.

Working strictly from my stash — I couldn’t have driven to a fabric store in this weather even if I’d wanted to! — I pulled out some red tone-on-tone prints that read as solid and a couple of white-on-red prints.

Now I’m making my way through my little piles of V blocks:

V blocks
The pattern calls for the Tri-Recs rulers, which I own, but I am getting great results from the V Block Trim Down Ruler by Deb Tucker. I resized the block from 9″ to 12″ so the units you see above measure 4½” square. With the V Block Ruler you can trim down blocks for 11 different sizes ranging from 1½” to 6½”.

I may add another red for more variety in my darks. With the exception of a few small pieces in my scrap bin, I’m limited to the vine and toile prints for the lights. I’ll save the smallest pieces for the center pinwheels.

While I am happily ensconced in my sewing room, Coco is keeping tabs on the weather from her perch above the plantation shutters in the master bath:

Coco Jan 2017

The icicles start to melt in the morning sun but refreeze when the sun moves out of sight.

This is our back yard as seen from the kitchen door:

Jan 2017 snow backyard

This is the view from the front porch:

Jan 2017 snow out front
You can see why I have no desire to drive anywhere. And freezing temperatures are expected for the next four days!


Posted in cats, update, Winding Ways quilt block, windmill block | 14 Comments