Category Archives: family

Diane’s Dream Kitchen

For the last 15 years (at least) my husband and I have traveled from our home in Portland, Oregon to Norcross, Georgia to spend Thanksgiving with my twin Diane and her husband Ed. It’s a tradition we treasure.

Every year Diane would comment on how much easier it would be to prepare Thanksgiving dinner if her kitchen had two ovens. The two-oven conversation often evolved into what other changes she would make in her kitchen and dining room. The other big ticket item on her wish list was a built-in buffet in the dining room to display the set of Spode china that Ed’s mother passed on to them many years ago. Ed and Diane wanted a buffet that evoked the one in Ed’s family home in Laurelhurst, a lovely old residential neighborhood in Portland.

As I write this post, Diane is in her newly renovated kitchen making pumpkin pies. I’ll be joining her in the kitchen shortly to help with other tasks in preparation for tomorrow’s Thanksgiving feast for a dozen.

As often happens, what started out as a simple remodeling project — in this case, creating space for a second oven and building a buffet — turned into a complete renovation. In the process, Diane gained a kitchen worthy of the pages of House Beautiful, a wet bar in the butler’s pantry, and a built-in buffet that beautifully showcases her Rosalie Spode.

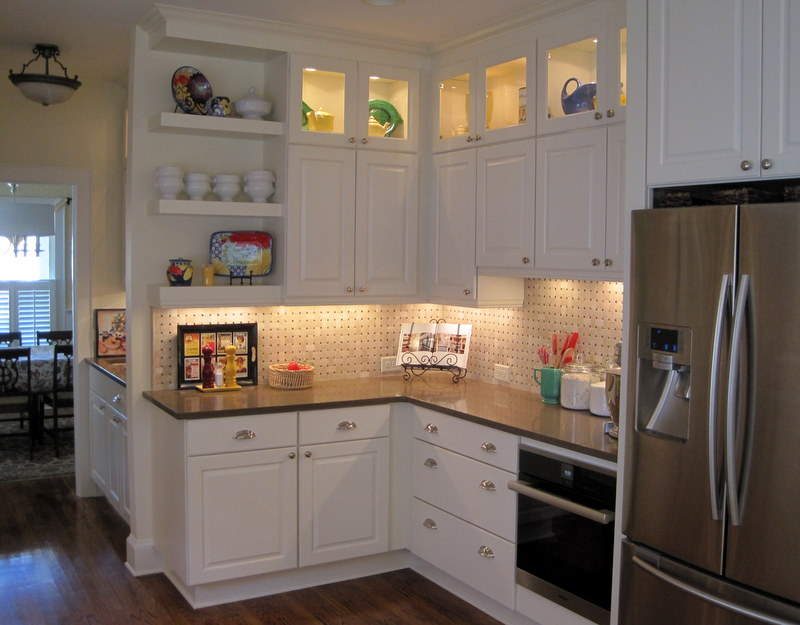
Let’s take a look at Diane’s new kitchen. First, the northwest corner:

nw corner 1
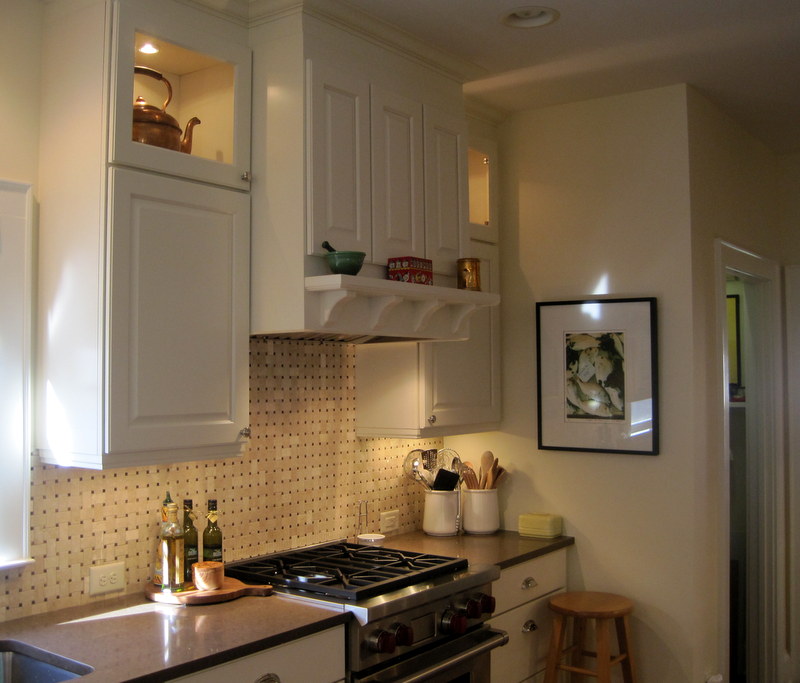
The southwest corner:

fish corner
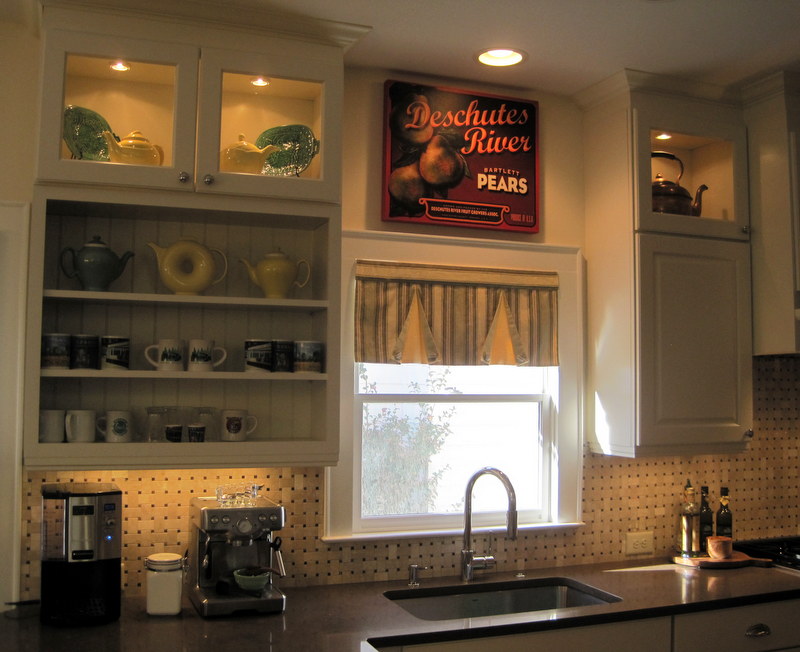
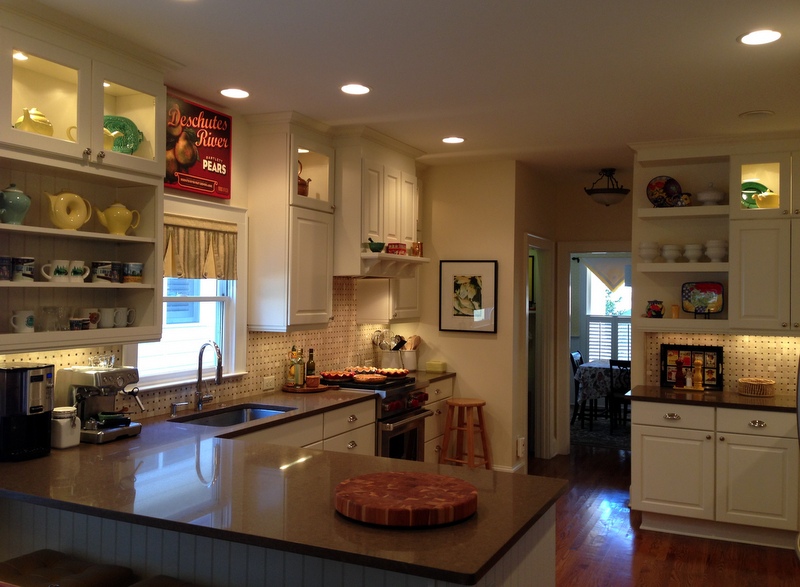
Looking south-southeast:

south
This view from the northeast corner takes in a good part of the kitchen:

looking from the living room-001

This is the time of year we tend to reflect on the things for which we are thankful. You can bet that Diane is thankful for her beautiful new kitchen!

In my next post I’ll show you the dining room buffet and the butler’s pantry. Diane did something very clever in the latter with a piece of home dec fabric. I hope you’ll come back in a few days for a look. In the meantime, I send my best wishes for a wonderful Thanksgiving! I hope you get to spend it with people you love.


Posted in family, home dec, update | 7 Comments

Pillowcases for Edward

My husband Charlie and I depart later this week for Atlanta for an extended visit over Thanksgiving with my twin sister Diane and her husband Ed. I usually make a pair of pillowcases as a hostess gift but this year, at Diane’s request, I made a pillowcase for her five-year-old grandson, Edward, a frequent overnight guest at his grandparents’ home.

Diane was captivated by the fabric I had used a few weeks ago on the back of Susan Elinor’s quilt. The fabric features vignettes of Dick and Jane and Spot, those charming characters from the early reader books I remember as a kid growing up in the 1950s. Now Edward is learning to read, and Diane loved the idea of the same fabric in a pillowcase he could sleep on at his grandma’s house.

Luckily, I had just enough fabric left to make one pillowcase. I paired it with a simple paisley print for the band:

Dick and Jane pillowcase for Edward
Fun with Dick and Jane (and Spot)

Diane knows about this pillowcase but she doesn’t know yet that I made Edward a second one:

robot pillowcase for Edward
Robot Love

What little boy doesn’t like robots? I adore these fabrics, part of the Mechanical Genius line by designer Mo Bedell that came out a couple years ago.

Now Edward has two new pillowcases to sleep on:

pcases for Edward
Pillowcases for Edward


Posted in family, roll-it-up pillowcases, update | 5 Comments

Susan Elinor’s Quilt

We did it! My neighbor Janice and I completed the alphabet quilt started by Janice’s good friend Susan, who did not live long enough to finish it herself. Susan was making this quilt for her baby granddaughter, also named Susan. She had all the letters of the alphabet appliquéd by hand onto 6″ squares of muslin but, sadly, died of ovarian cancer before she could sew the blocks together and finish the quilt. That labor of love fell to Janice, who enlisted my help.

Over the last couple of weeks Janice and I got together to determine a layout for the blocks and to choose sashing and binding fabrics. I wrote about the process in this post and this one.

Allow us to present Susan Elinor’s quilt:

Susan's quilt, front
Susan Elinor’s Quilt, 39″ x 50

Don’t you love how the red binding frames the quilt and draws your eye to the red letters?

In this close-up you can see the simple free-motion design quilted in the border:

Susan's quilt, detail
Quilting and Binding Detail


The back of the quilt features a print from the Dick and Jane early reader books — a playful nod to the alphabet letters on the front and very much in keeping with the vintage calicos Susan had chosen for her appliquéd blocks:

Susan's quilt,back
Back of Susan’s Quilt


The last step was sewing on the label:

Susan's quilt, label
The Label on Susan’s Quilt


Actually, there was one more step. Janice bought some little finger puppets and toys to put in the four blocks on the quilt containing pockets made from clothes Susan’s daughter Lea wore as a little girl. Look how cute these are!

Susan's quilt pockets filled
A Fun Surprise in Every Pocket

This is how the quilt looks with the pockets filled:

r
Susan Elinor’s Quilt is Extra Special


Susan Elinor is one year old. She will miss the joy of growing up knowing her grandmother but she will have the joy of wrapping herself in a quilt hand-stitched with love by her grandmother. This quilt will be presented tomorrow to Lea and little Susan at the memorial service celebrating Susan’s life.


Posted in baby quilt, family, update | 11 Comments

An Update on Susan’s Quilt

The baby quilt that my neighbor Janice and I are finishing on behalf of her late friend Susan is coming along nicely. The quilt will go to Susan’s granddaughter and namesake, Susan Elinor, who just turned one.

In my last post I showed you the blocks that Susan appliquéd by hand onto muslin squares. Here are those squares set off with simple muslin sashing:

Susan's quilt blocks with sashing
Susan’s blocks, sewn together

In addition to the 26 alphabet blocks, four blocks contain embroidered pockets made from clothing worn by Susan’s daughter Lea (baby Susan’s mother) when she was a little girl.

I pulled several pieces of fabric from my stash so that Janice and I could audition the border fabric together:

Susan's blocks with border possibilities
Auditioning the Border Fabric

We both liked the same fabric best — the aqua print on the middle left side (Sew Stitchy by Aneela Hoey for Moda Fabrics).

Here’s the quilt top with the border strips added in that fabric:

Susan's blocks with borders
The Winning Border Fabric


Next we looked at fabrics for the back. The print we chose is absolutely perfect for an alphabet quilt: it’s based on the Dick and Jane early reader books from the last century. It’s a directional design printed across the width of fabric so I inserted some strips of the aqua print border fabric to make the back long enough. Take a look:

Backing Fabric
Fun with Dick and Jane

Oh dear, that picture is not in focus. Here’s a better look at the fabrics:

close up of backing fabrics
Dick and Jane (and Spot!)

According to the selvage, the fabric above was released in 1999. It’s called “go! with dick and jane” by Nicole de Leon for Alexander Henry Fabrics. It’s obviously been in my stash for a while.

Next up: quilting. I’m going to stitch-in-the-ditch around the alphabet blocks and free-motion quilt a loop-de-loop design in the borders. Janice and I both like the idea of finishing the quilt with red binding. She is going to do the handwork on the quilt (binding and label), and our plan is to have our project completed by the end of the week.

I hope you’ll check back in a few days to see it!


Posted in baby quilt, family, update | 7 Comments

A Labor of Love

My neighbor Janice asked me to help her finish a quilt started by her dear friend Susan. Susan was working on an alphabet quilt for her baby granddaughter when she lost her battle with ovarian cancer last month. Knowing she wouldn’t be able to complete the quilt in the time she had left, Susan asked Janice to finish it.

Susan had hand-appliquéd the 26 letters of the alphabet onto 6″ squares of muslin. She had also appliquèed four pockets onto print squares; the pockets came from clothes that belonged to her daughter when she was a little girl.

The first thing Janice and I did was lay the blocks out in a 5 x 6 grid, with the four pocket blocks interspersed among the 26 alphabet blocks. We’re pretty sure that’s what Susan had in mind because she had already sewn the first row together:

Susan's blocks
Susan’s Blocks


The fabrics in the alphabet blocks are vintage calicos. The letters seem to have been randomly placed in the muslin squares, rather than centered, giving the blocks a delightfully whimsical appearance. Janice and I decided to separate the rows with sashing strips made from muslin, add muslin sashing strips all around the quilt, then finish it with a 3″ or 4″ border made from calico prints similar to the ones Susan used in her blocks. With a 4″ border, the quilt should finish at about 36″ x 51″.

A couple of the letters — j and m — were really too close to one edge of the squares they were attached to so I added strips of muslin and trimmed the blocks. Here is the m block, before and after:

Susan's m block, before and after
Repositioning the Letter


Susan had hand-stitched the first row together with ½” seams. Her stitches were so even I had to look closely to confirm that they were indeed done by hand! I opted to take the stitching out so that all the blocks can be sewn with ¼” seams. That will really help with the letters that are close to the edges of the muslin squares.

Here is the first row with its muslin sashing added:

Susan's quilt, first row
The First Row


This quilt will help tie three generations of women together. I feel honored that Janice has asked me to help her finish it.


Posted in baby quilt, family, update | 12 Comments

The Sewing Bs

My two youngest granddaughters, Bonnie (age 14) and Beatrice (age 11), are here for a 10-day visit. This is the third year they have flown to Portland from San Francisco to spend part of their summer vacation with their granny and grandpa, and we are savoring every moment. All too soon, I fear, summer jobs and other commitments will keep them from spending as much time with us.

One highlight of their visit so far was a dinner cruise on the Willamette River. The girls were invited into the wheelhouse and both of them steered the ship — and they have Honorary Captain’s Certificates of Outstanding Seamanship from the captain to prove it!

Each year the girls work on a sewing project while they are here. Two years ago they each made a pillowcase and last year they made four-patch coasters. This year they made banners — you know, the kind with triangular flags attached to a strip. (A shout out to my friend Vickie Rooks for the suggestion.)

Both girls wanted bright colors for their flags so we raided my stash for fabrics reading as solids and arranged them along the lines of the color wheel:

flag fabric choices

Here is Bea with her fabric choices . . .

Bee with fabric choices

. . . and her banner design:

Bea's design

Practically ROYGBIV: red, orange, yellow, green, blue, and violet, with pink next to red at the far left. For each flag Beatrice cut two 8½” squares of fabric and one square of double-stick fusible web. She fused the web between the squares (that’s a press cloth on top):

Bee fusing her squares

When all the layer were fused together, she cut triangle shapes using a rotary cutter with a pinking blade. Then she inserted the top of each flag between wide double-fold bias tape and stitched along the tape with a serpentine stitch:

Bea at the  machine

closeup of a flag

Here is Beatrice with her finished banner:

Bee with flags 1


Bonnie will be starting high school this fall at the School of the Arts (SOTA) in San Francisco so she opted for four larger flags that spell out SOTA. We sketched out her design and color choices, which included white on black for one flag:

Bonnie with fabric choices

Here’s a close-up of her design:

Bonnie's design

Bonnie started out with 11″ x 8½” rectangles. After fusing the letters to the flags, she trimmed the rectangles into triangles. You will see below that the capital A became a lower case a. That’s because the School of the Arts actually presents its logo as SOTa, not SOTA.

Bonnie at work on her flags . . .

Bonnie cutting letters

Bonnie fusing letters

. . . and with her finished banner:

Bonnie with flags 2


Great work, Sewing Bs!


Posted in family, update | 8 Comments

It Was a Very Good Year

partridge canstockphoto7458339As 2013 draws to a close, I am reminded how lucky I am to have my health, family and friends I treasure, a home that I love, and time to create lovely things with needle and thread. I am also grateful to you, my loyal readers, who keep me inspired to document my sewing and quilting life. Thank you for adding firstlightdesigns.com to your list of must read blogs!

I’ve been reviewing what I accomplished on the sewing/quilting front this year. Not as many quilts as I had hoped — nine, including baby quilts — but that’s because I was making other things: table runners, sewing machine dust covers, iPad mini cases, iron caddies, valances, pillowcases, little fabric boxes, and a partridge in a pear tree. Okay, just kidding about that last one.

If you’ve been reading my posts over the last year, you’ve probably seen most of the items mentioned above (except for the partridge in a pear tree). I’ve updated the sections of my Gallery to include photos of my 2013 projects.

Happy New Year, everyone! Please stop by in 2014.


Posted in family, update | 3 Comments

Lyra’s Quilt

Hydrangea Kaleidoscopes, 47" x 54"
Hydrangea Kaleido quilt top, 47″ x 54″

Remember this quilt? I was working on it back in February (you can read about it here) when I learned that my brother’s son and his wife were expecting their first child, due in August. They didn’t want to know the sex of the baby until it arrived. In the back of my mind I was thinking that if the baby were a girl, this might become her quilt.

At the end of August, their daughter was born. I was still considering this quilt for her but didn’t decide for sure until it came back from long-arm quilter Nancy Stovall of Just Quilting. Then I knew it would be perfect for a sweet little girl. Nancy quilted a sunburst motif in the center of each kaleidoscope block and a tessellating clamshell design in the background. Take a look:

2013-11, Lyra's quilt
44″ x 51″ After Quilting


On the back I put a big strip of the hydrangea focus fabric and converted a leftover kaleido block into a circle:

2013-11, Lyra's quilt, back
44″ x 51″ After Quilting


On this detail photo of the back you can get a better look at the quilted sunburst:

2013-11, Lyra's quilt, detail of quilting
Quilting Detail


The label was made using a compact disc (described in my tutorial here):

2013-11, Lyra's quilt label 1

The photo above, which gives you a better look at the tessellating clamshell motif, was taken after the quilt was washed, giving it that soft puckery look.

Lyra’s quilt — #7 in my series of kaleidoscope quilts — will soon be on its way to her. I hope she likes it!


Posted in baby quilt, family, kaleidoscope quilts, quilt labels, update | 4 Comments

Back Home Again

“Hey, it’s good to be Back Home Again.” Do you remember the song by John Denver? It came out in 1974, so you have to be Of a Certain Age to know it. We are indeed home after a delightful two-week stay in Atlanta with my sister Diane and her husband, made even more delightful by the arrival of our sister Reigh and her husband a couple days before Thanksgiving.

I managed to squeeze in a couple of little sewing projects for my sisters the last week I was there. Reigh said she would love to have a runner for the pub table in the dining area off her kitchen, and Diane said she would love a new set of pillowcases for the guest room on the main floor. My arm didn’t have to be twisted:  it meant a trip to a local quilt shop!

Off we went to InTown Quilters in Decatur, Georgia, where both Diane and Reigh selected batiks for their projects. Reigh has a lot of brown and blue in her kitchen and dining area, with touches of yellow and gold. The colors in this simple table runner should go very well with her décor:

Reigh's table runner and napkins

Reigh bought enough fabric for me to make two sets of napkins, four in each set.

Because the design of the runner is so simple — just a rectangle of fabric with four borders — I mitered the corners to give it a little something extra:

Reigh's table runner, detail

I used low-loft batting and did some very basic topstitching to finish it. Reigh has promised to send me a photo of the table runner when she gets back home so I can show you how it looks in its designated spot.

Here are the pillowcases I made for Diane’s guest room:

Diane's new pillowcases

Here’s another view that includes the pleated bedskirt I made last year during my annual Thanksgiving visit:

Diane's new pillowcases en suite

I love the way the gold fabric in the pillowcase picks up the gold in the bedskirt.

Reigh and Diane joke about shackling me to the sewing machine when we are all together but the truth is I am in my element when creating something with fabric.


Posted in bedskirt, family, home dec, mitered corners, roll-it-up pillowcases, table napkins, update | 6 Comments

Cover Story

When sister Diane and I visited sister Reigh in Idaho over Memorial Day weekend, we went to HomeFabrics and Rugs, a home decorating fabric store in Boise with an incredible selection of high quality fabrics and trims, matched by amazingly low prices. Diane found a beautiful piece of home dec fabric for a dollar a yard. Too good to be true? Well, there was a hitch: she had to buy what was on the bolt. As it happened, there were 10 yards of fabric on the bolt. There went 10 bucks. For another $10, Diane shipped the fabric home to Georgia. She had no idea what to do with it but just knew it would look good somewhere in her home.

She actually found two places to use the fabric. First, she had the two vintage slipper chairs in the downstairs guest room recovered. Here is a picture of one of the slipper chairs before . . .

2013-11, slipper chair before

. . . and after:

2013-11, slipper chair after

The slipper chairs were originally covered in a velvety green plush, with a gathered skirt that went to the floor. The newly recovered chairs are more tailored, with a shorter skirt that’s pleated rather than gathered. The fabric is a brushed cotton, in a medium-scale print that goes very well with the other furnishings in the room.

This picture of the second slipper chair gives you a good look at the front:

2013-11, second slipper chair

I think they are just charming! The best part is that there was enough fabric left over from having the chairs upholstered to recover the four chairs in Diane’s kitchen dining area. She waited till I arrived for my annual Thanksgiving visit so we could tackle that project together.

Here are two chairs, the one on the right newly recovered and the one on the left waiting its turn:

2013-11, kitchen nook chairs before and after

I’d say Diane’s $20 was money well spent, wouldn’t you?


Posted in family, home dec, update | 3 Comments