The result of a little Saturday sewing — a pair of pillowcases to remind me that two years ago this month I was in Paris, the City of Light:
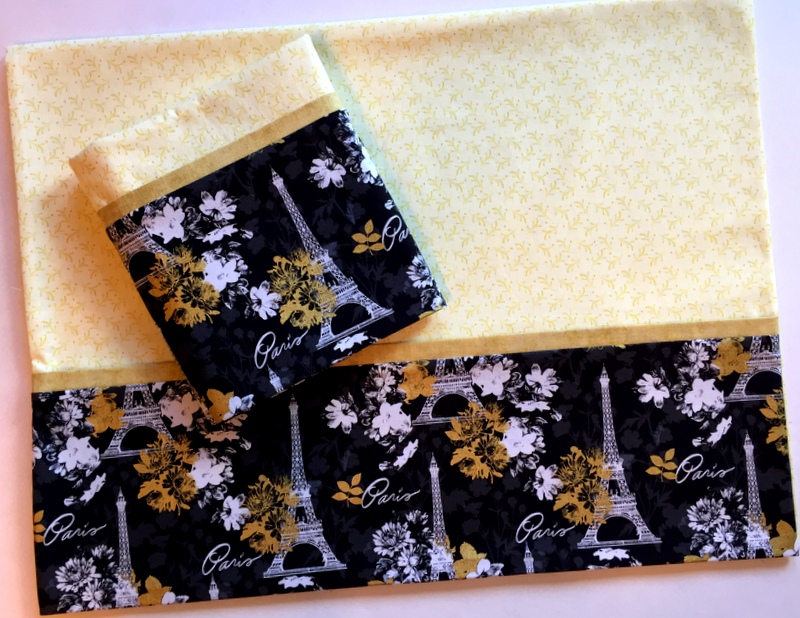
I predict my dreams will be sweet tonight!

The result of a little Saturday sewing — a pair of pillowcases to remind me that two years ago this month I was in Paris, the City of Light:
I predict my dreams will be sweet tonight!
Three weeks without a post! That’s the longest gap in the five years since I started this blog. What could possibly account for such a lapse? Two back-to-back trips followed by a fun-filled week of family visiting from out of town.
The first trip was to Paducah, Kentucky with my quilt group, the Quisters. Yes, Paducah — home of the National Quilt Museum and site of the American Quilter’s Society’s Quilt Week the last week of April. What a thrill! More on that in a future post.
Home for one day, then off to Central Oregon for a family reunion that my twin sister Diane and I were responsible for planning. It was a great success, with 83 family members coming from as far away as Texas, Virginia, and Florida. Most of the relatives are in Oregon, remaining in the state where our common ancestor settled after emigrating from Switzerland in the 1880s. This reunion has rekindled my interest in family geneaology, which I hope to pursue in between quilting projects. I could use a few more hours each day to accomplish that.
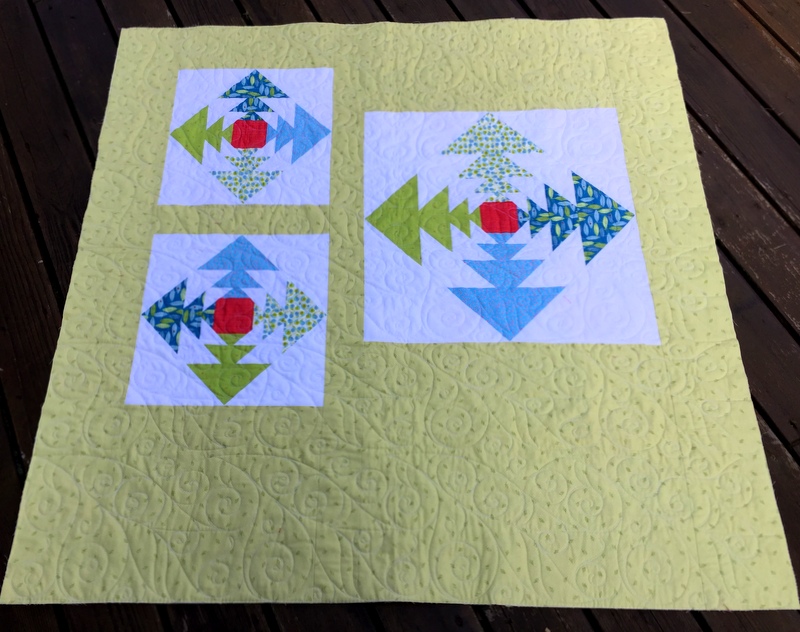
While my relatives were here last week, I squeezed in a bit of sewing time to make a sample block of the quilt design I have chosen for the Pine Needle Quilt Shop’s retreat on Hood Canal in June. I’m teaching two sessions back-to-back at a beautiful retreat center in Washington State.
As my regular readers know, I am a huge fan of the Quick Curve Ruler and the designs created by those talented sisters (Jenny, Helen, and Sherilyn) at Sew Kind of Wonderful. For the retreat I chose one of their free patterns that call for the QCR Mini Ruler. The pattern is called Mini Mod Tiles and looks like this:
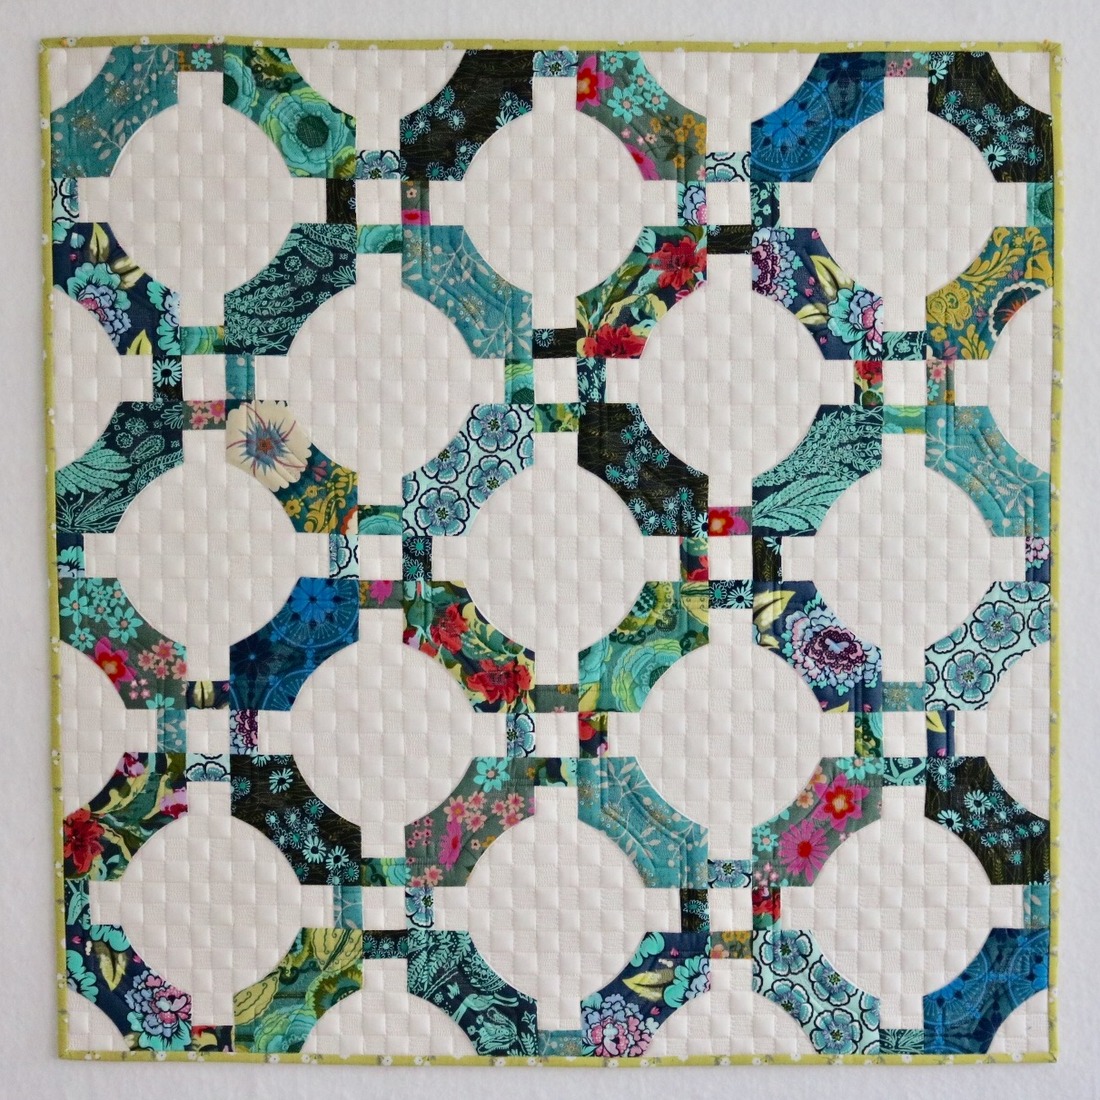
Isn’t that fabulous? This wonderfully scrappy quilt was made and quilted by Jenny Pedigo of Sew Kind of Wonderful, finishing at about 34″ square. (Photo used with permission.)
My sample block, finishing at 10½” square, is made from one focus fabric, a Dena Fishbein print from the Painted Garden line for Free Spirit:
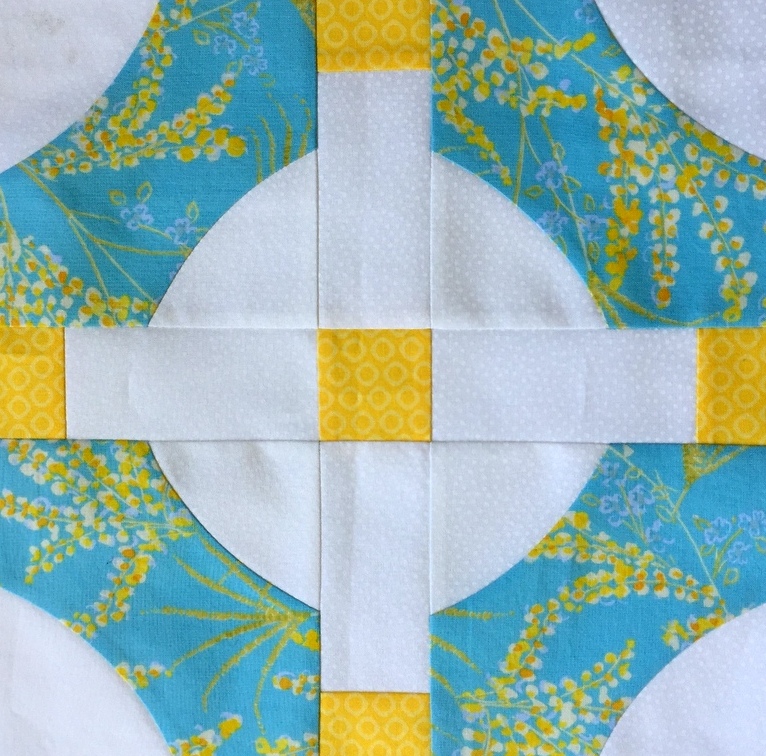
That fabric was in my stash just waiting to be picked for this project. I chose a vibrant yellow tone-on-tone print for the connector pieces and couldn’t resist the temptation to add a square of color in the center of the block. My background fabric is a white-on-white dot.
It’s good to be back in the saddle with blogging and sewing.
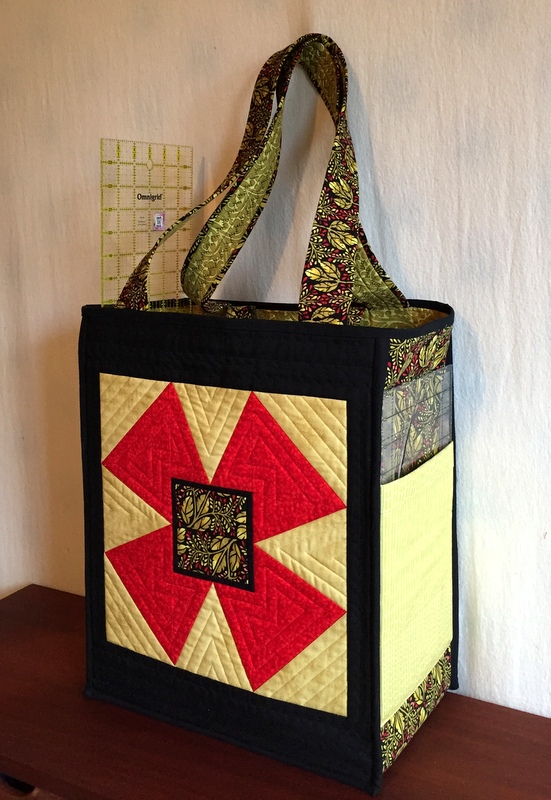
Ladies and gents, I have another finish to report: Here is my latest version of the quintessential quilter’s tote known as the Junior Billie Bag:
I just finished teaching a class at the Pine Needle on making a JBB. I started the class (and this bag) in January; you can read about my fabric choices here.
In the photo above, you see the longer of two sets of handles; these are worn over the shoulder. In the photo below you see the shorter set of handles, allowing the bag to be carried like a satchel:
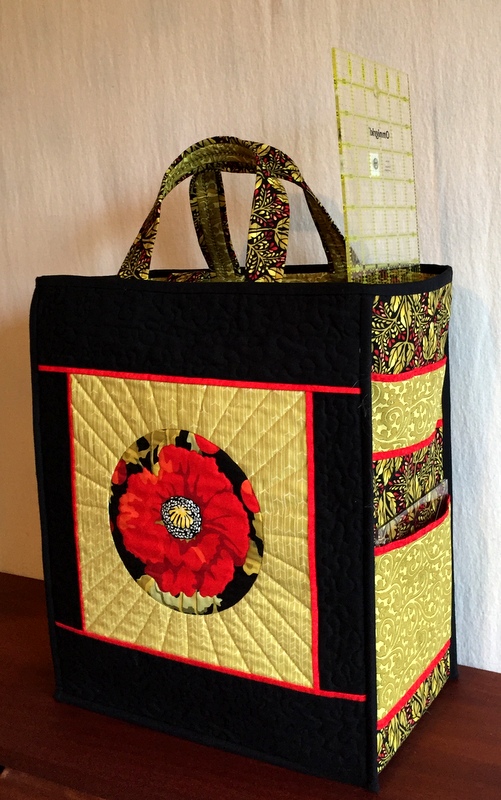
Notice the custom outside pockets in both photos.
Now look inside the Junior Billie Bag, where you’ll find many more pockets, all sized with specific items in mind:

After those pockets are filled, there’s still room to tuck in bundles of fabric or batting — or even a sack lunch. Now you know why I call the Junior Billie Bag “the quintessential quilter’s tote.”
The original Billie Bag was designed by Billie Mahorney and measured 21″ x 21″ x 7½”. This version is smaller, measuring 14″ x 17″ x 7½”. Billie never wanted to write a pattern, preferring to teach her design in a classroom setting. Now that she has retired from teaching, I have the pleasure of teaching the class. How glad I am! It’s been so much fun sharing her design with other quilters, and in the process I have made myself a JBB or two and given others as gifts.
When Coco saw me taking photos of the JBB this morning, she trotted right over to investigate. Before I knew it, she had crawled inside and made herself very much at home:
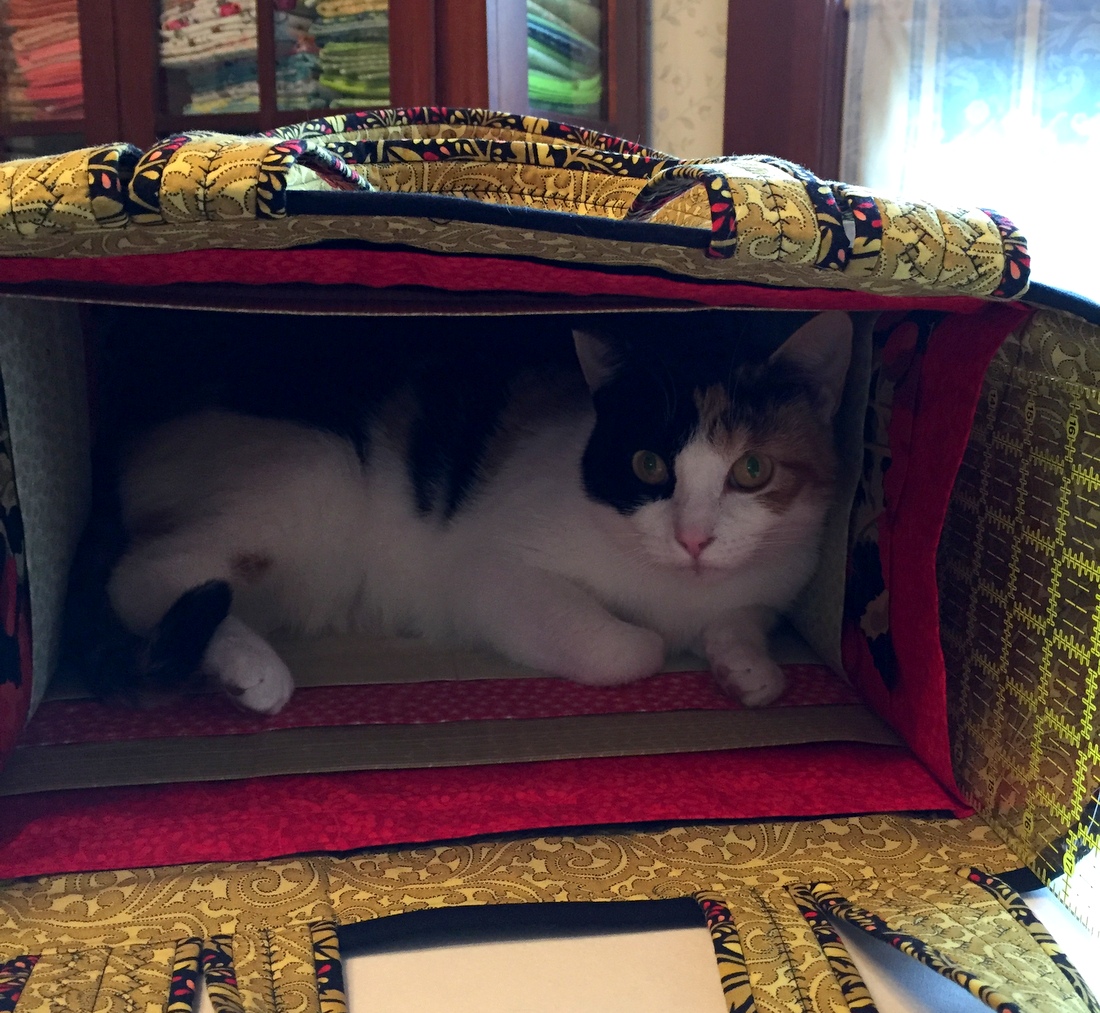
It seems the Junior Billie Bag is perfectly sized for a cat. Who knew?!
The year 2017 has gotten off to a slow start in terms of finished projects. I have several projects in the hopper and a few are close to being done; does that count?
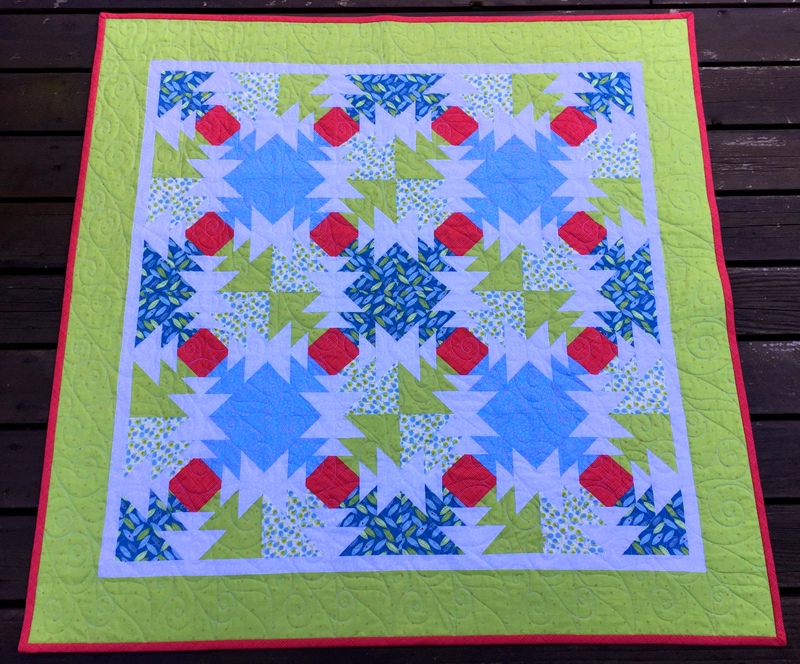
At least today I can claim a bona fide finish. Here is Baby Selene’s Pineapple Plus quilt, started in a class taught by Karin Hellaby:
Notice the binding? I made it to finish at ½” wide (rather than my usual ¼”) so it would provide a strong frame for the quilt and pick up the tiny bits of red found in three of the four prints used in the quilt:
The binding strips were cut on the bias so the cross-hatching would be oriented on the diagonal just like the centers of the blocks, which were cut on the bias because I liked the effect.
I had fun playing with leftover blocks for the back of the quilt, using two regular blocks and one larger one, all set on point to make them even bigger:
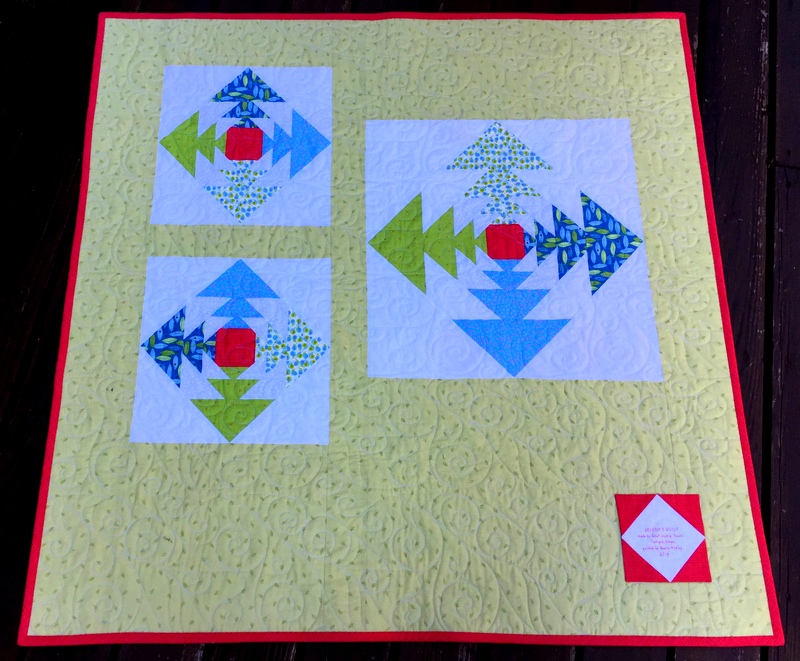
I love how the red binding pulls it all together.
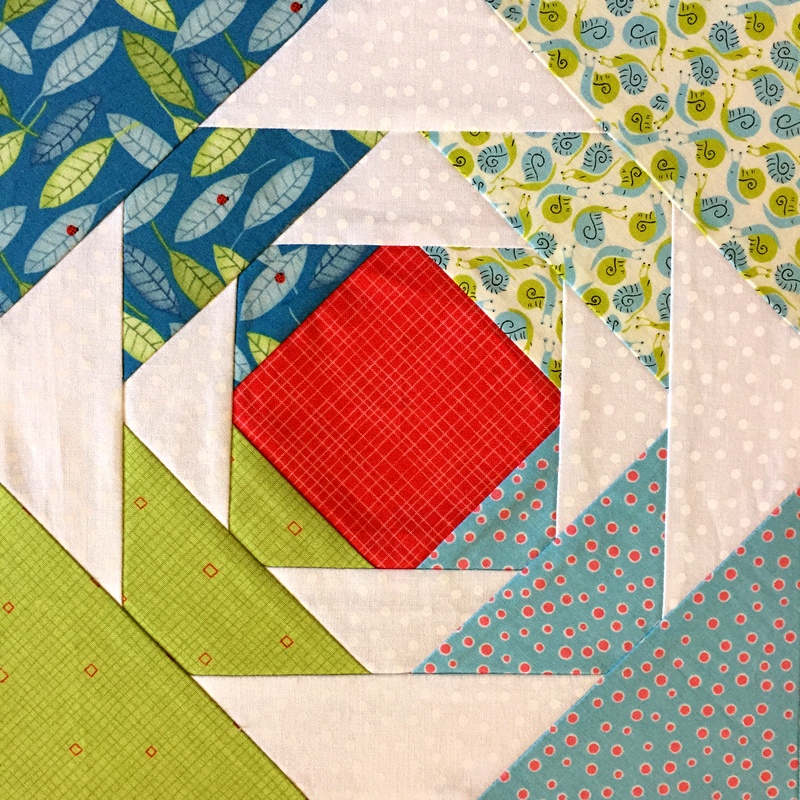
The label is a simple square-in-a-square block that echoes the larger on-point blocks:
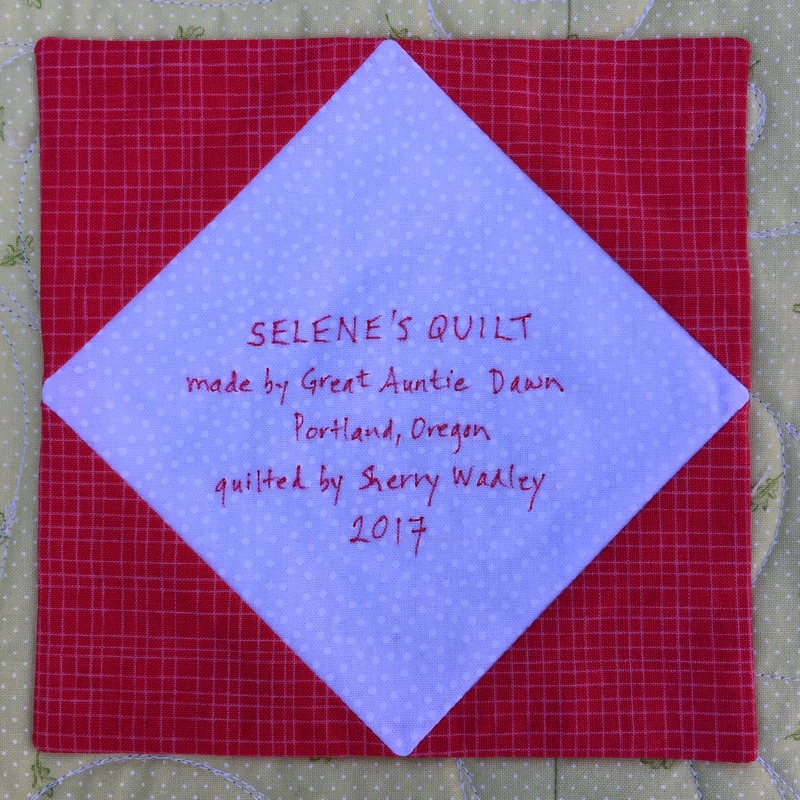
After the label was stitched in place by hand, I realized I had forgotten to put my last name on it. I’m sure Baby Selene won’t mind.
As usual, Coco insisted on claiming the quilt (temporarily, of course):
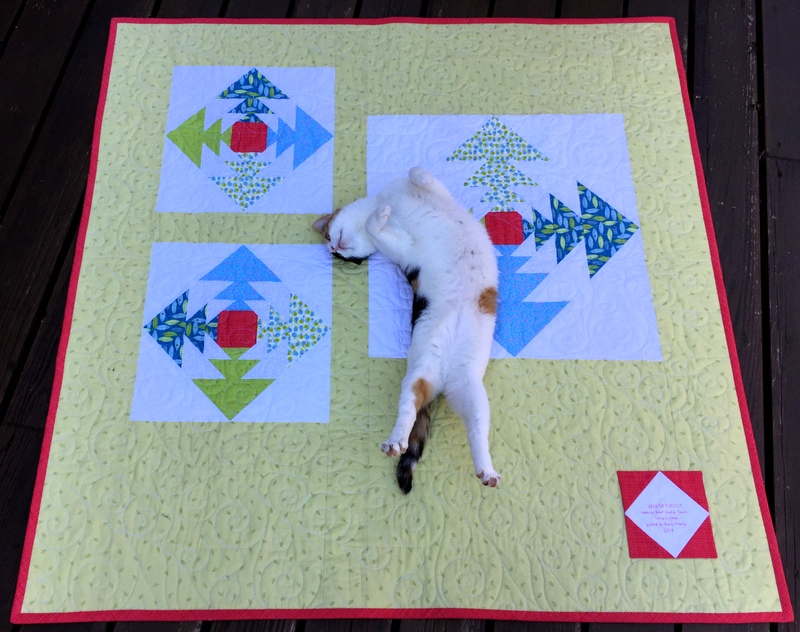
After these photos were taken, the quilt went into the washer and dryer. Here it is now in all its puckery charm:
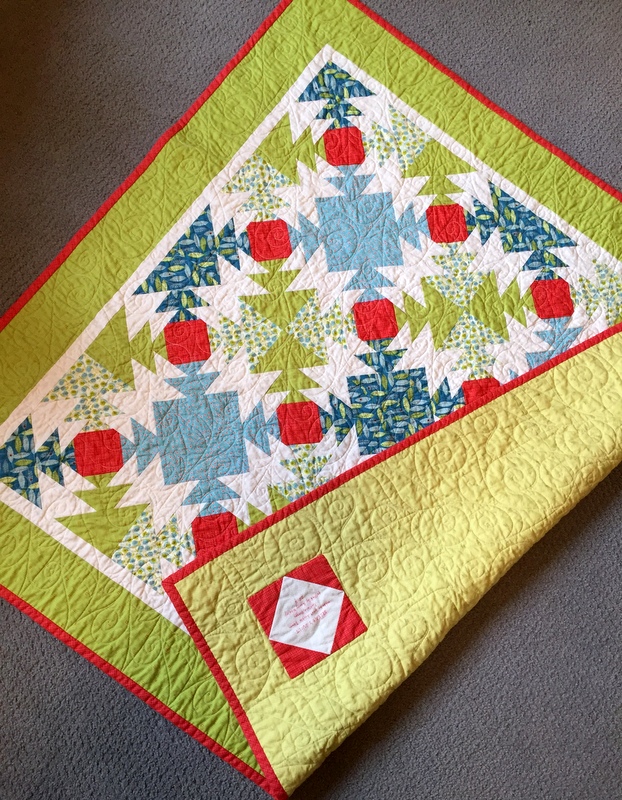
Selene will receive her quilt in person at a family reunion in Central Oregon coming up in a couple weeks. In the meantime, I get to enjoy it in its temporary location on my quilt wall:
Next month I start teaching a new class at the Pine Needle: Quiltmaking 101. I’m both excited and apprehensive!
On the one hand, teaching a beginning class has appealed to me since I started teaching in 2010 and discovered how much I love it. I remember how much I learned from taking Billie Mahorney’s beginning class at the Pine Needle more than a decade ago — and at the time I already knew how to sew and had even made some baby quilts. I love the idea of passing on skills, techniques, and good practices on to the next generation of quiltmakers.
On the other hand, it’s an awesome responsibility. It needs to be done well — and it needs to be fun. My goal is to teach the basic skills in a relaxed and supportive atmosphere and to nurture creative sparks in those students eager to push boundaries at the outset.
When Billie moved away from Oregon in 2009, she told me if I ever taught a beginning class I could use her syllabus. And Nancy McGuire, whose move away from Oregon created the teaching vacancy I am now filling at the Pine Needle, also told me I could borrow from her materials. I have incorporated elements from both of my predecessors in the syllabus I am in the midst of preparing. Thank you, Billie and Nancy!
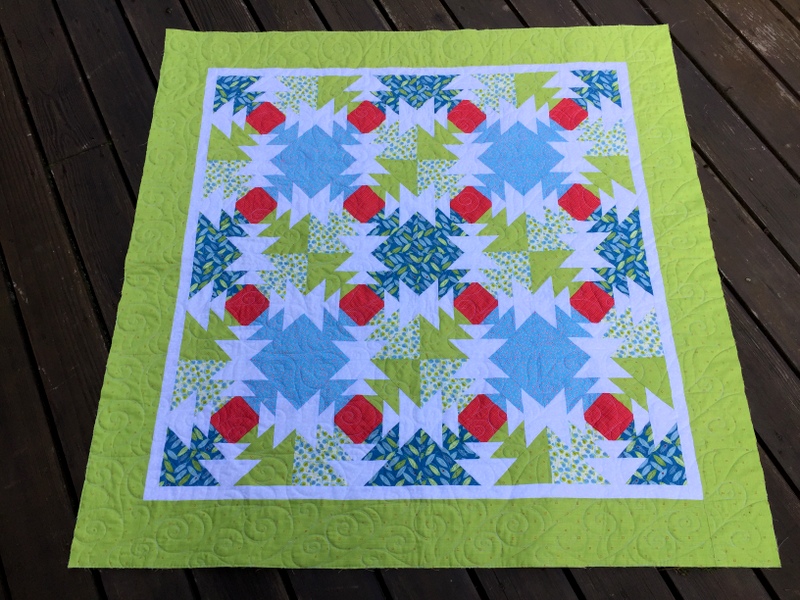
My students will have the option of making a 5 x 5 baby quilt or table topper or a 5 x 7 lap quilt. The basic blocks in both quilts will be the 9-Patch and Rail Fence, with options to add four other blocks to the mix. This is a sample top I made with the addition of a few Flying Geese blocks:
Notice that it contains only four fabrics. For me (and many of my quilting friends), the hardest part of making a quilt is deciding on the fabrics. I want my first group of beginning students to really enjoy this first step so I have deliberately limited the fabrics involved. I’ll suggest they start with a favorite border fabric and then pick the other three fabrics based on the border print.
I think I am on the right track!
The postman left a package on my front porch today:
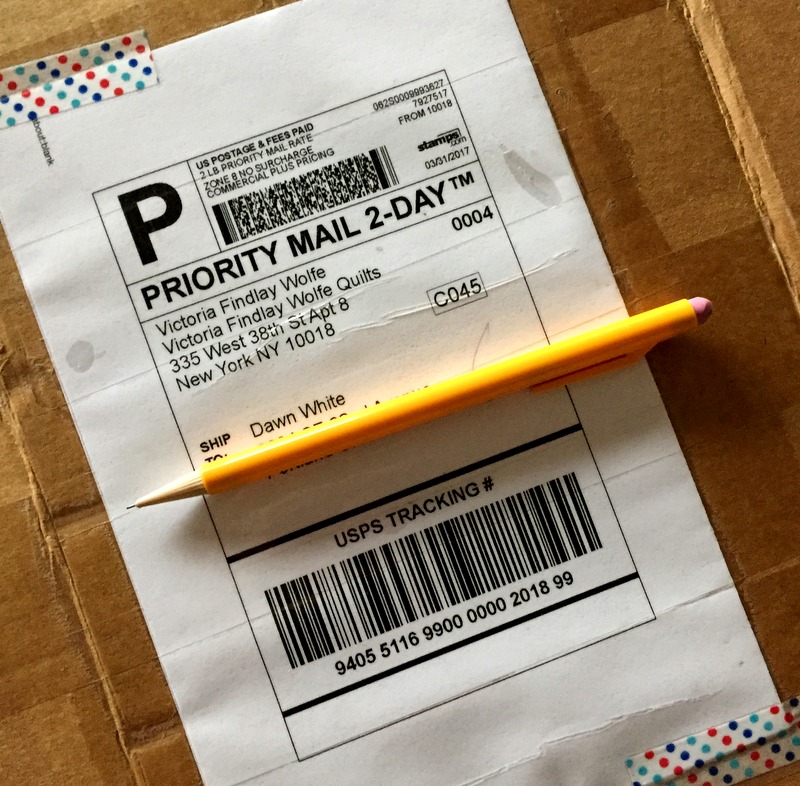
Oh Happy Day! It’s from Victoria Findlay Wolfe, containing a pattern and ruler I ordered just a few days ago.
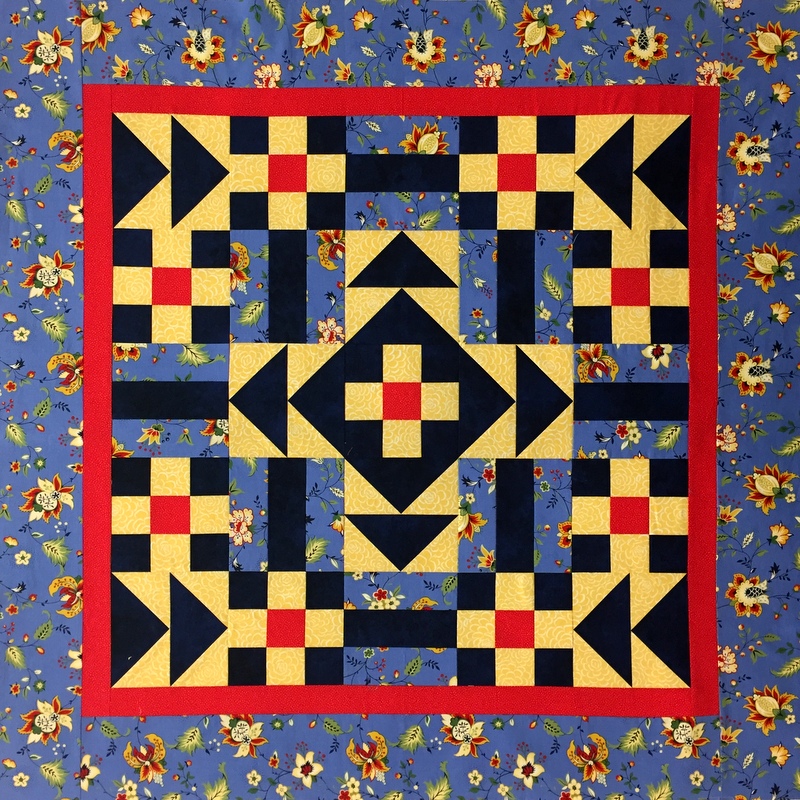
As a result of visiting Victoria’s shop on my recent trip to New York City (subject of my last post), I visited her website — and found something I really liked. Friends, there’s another kaleidoscope quilt in my future. It will be based on Victoria’s pattern Big Block Star:
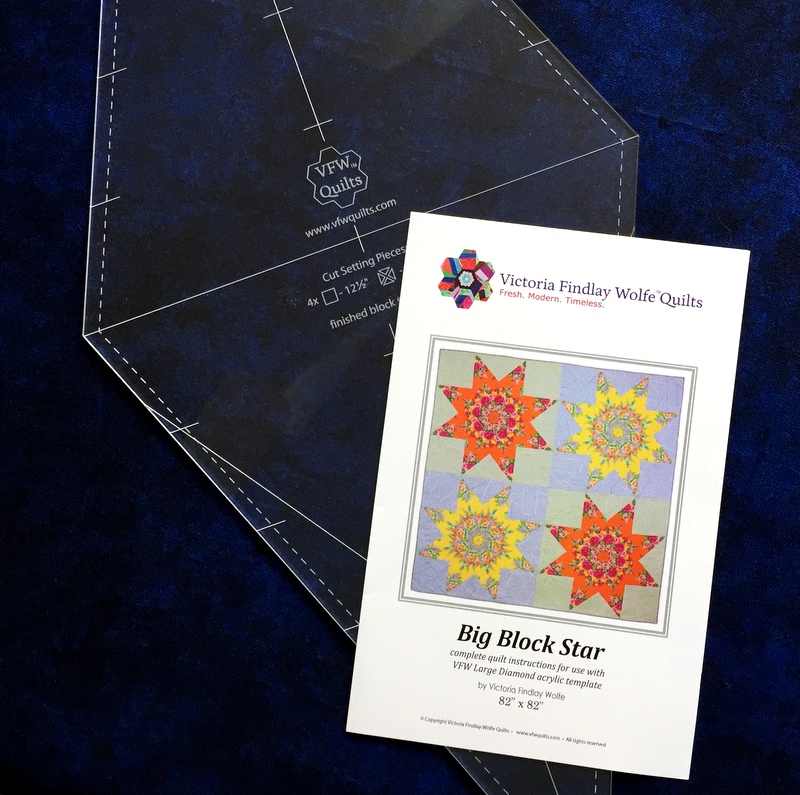
When she says “big block,” she really means it: those star blocks are 41″ square. They’re made with the help of Victoria’s acrylic template/ruler, cleverly marked to aid in fussycutting the diamond shapes to create a kaleidoscope effect.
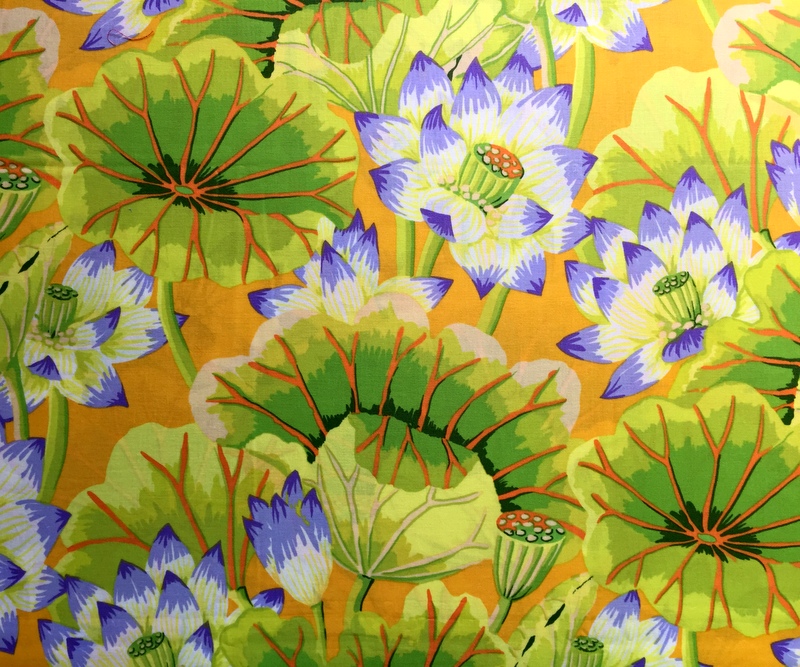
So. . . I have the pattern and I have the ruler. Guess what else I have? The fabric! I’ve been hanging on to this piece of Kaffe Fassett fabric for 10 years, just waiting for the right project to come along:
Ten years! How do I know that? Take a look at the selvage:
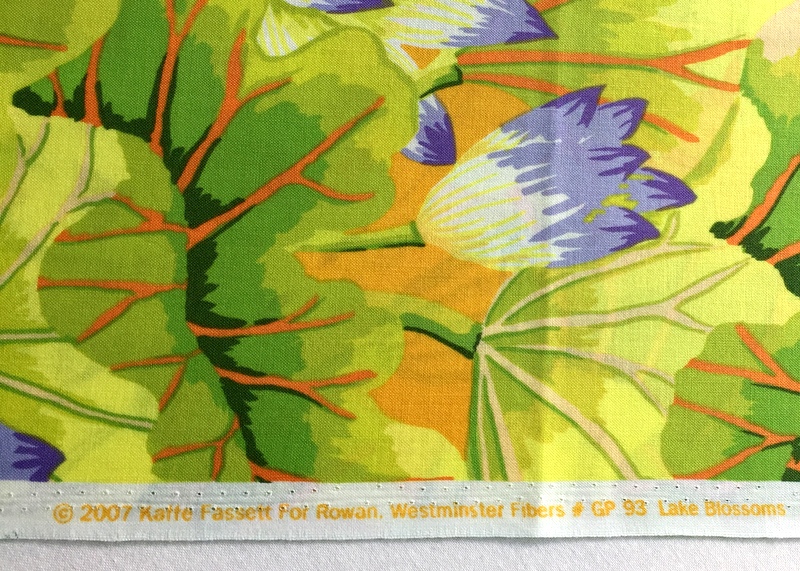
The design is called “Lake Blossoms.” There’s something about that particular combination of green, orange, and purple that calls to me.
I would love to jump right into Big Block Star but . . . duty calls. I’m prepping for a new class at the Pine Needle and have promised myself not to start anything new until preparations are completely wrapped up. Then there’s the matter of a few other Works-in-Progress that need some attention. I think I’ll set Victoria’s pattern out where I can see it every day to give myself a little extra incentive to finish those WIPs.
One week ago at this time I was in New York City at the beginning of a quick getaway with my twin sister, Diane. It was supposed to be the beginning of a three-week vacation with the Dear Husband — four nights in New York, two weeks traveling in Portugal and Spain, and four nights in New York on the way back. Alas, the trip had to be postponed because the DH needs a new hip.
We had planned to rendezvous with Diane in NYC at the beginning of our trip. She had already bought a ticket to NYC from her home in Georgia. Happily, my sweet husband was fine with the idea of me running off in high spirits and leaving him at home, so off I went.
Diane and I saw five plays in four days . . .

. . . a comedy, a tragedy, and three musicals — all terrific productions.
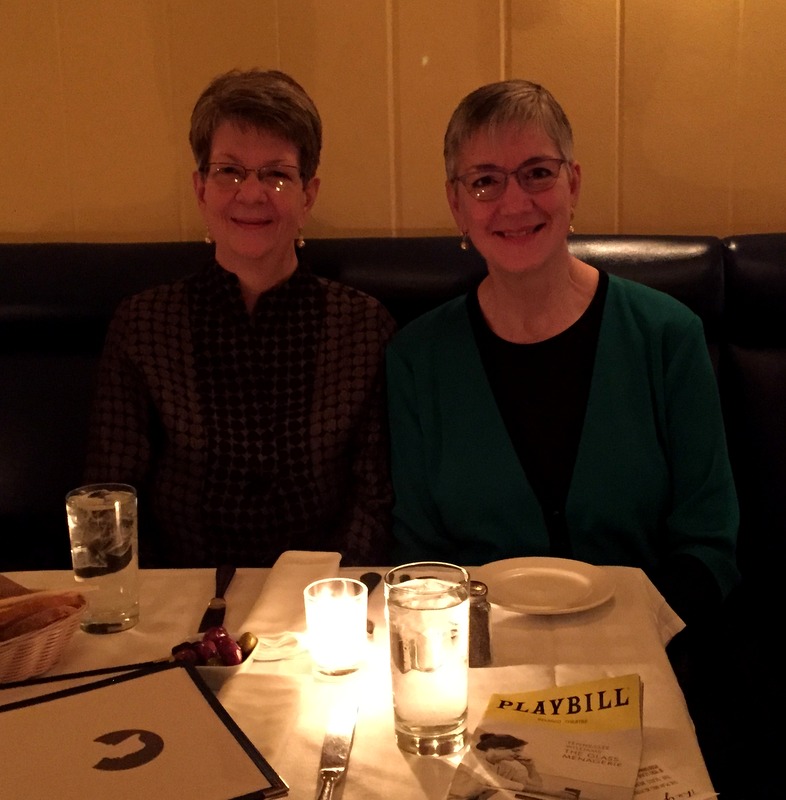
Here we are enjoying an after-theater dinner at Osteria al Doge, one of our favorite restaurants in the theater district:
We dined on prosciutto-wrapped shrimp served on a bed of soft polenta garnished with watercress:
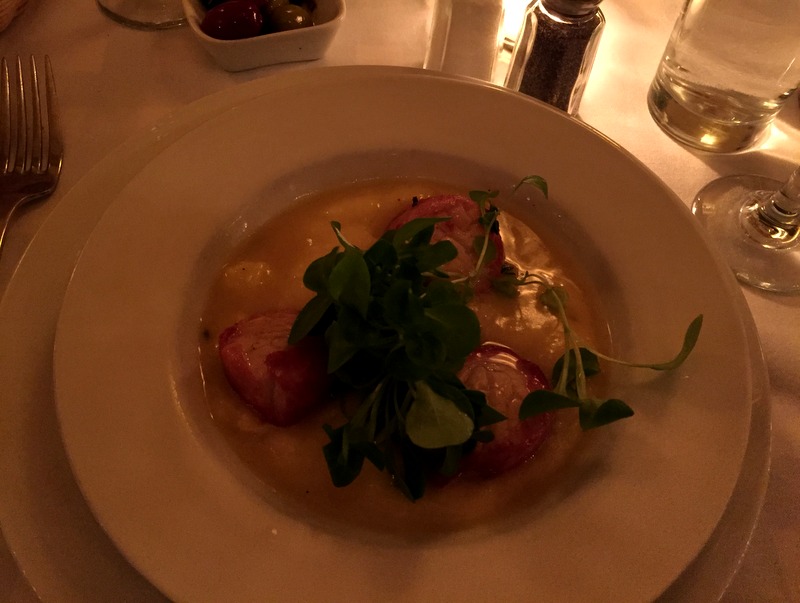
Yes, it was delizioso!
We saw some excellent exhibits, including two at the Museum at FIT (Fashion Institute of Technology) and one on Venice at the New York Public Library (NYPL):

We also saw a fabulous exhibit on 40 years of musical theater in London and New York, shown at the NYPL for the Performing Arts at Lincoln Center. For lovers of musical theater like Diane and me, this was a little bit of heaven.
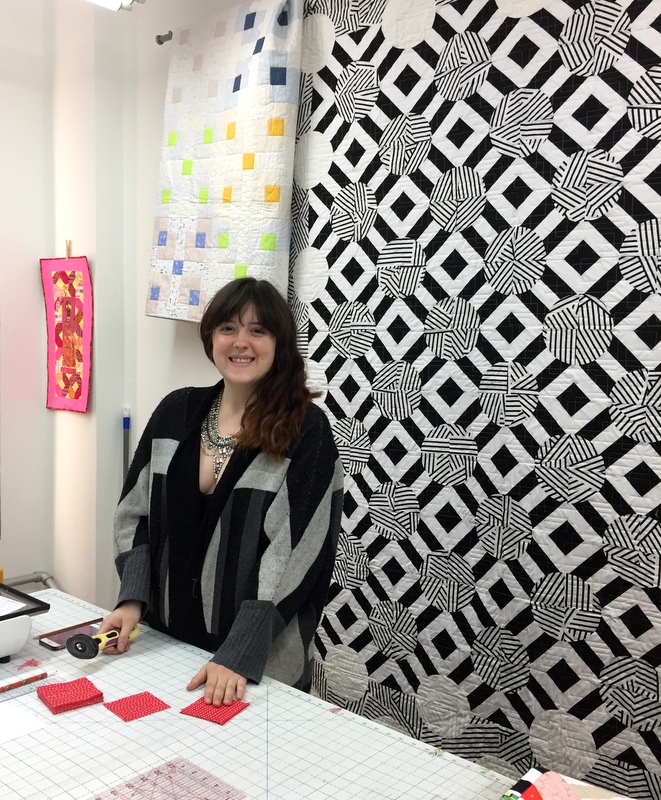
I also went to New York on a quilt-related mission: to visit the shop of Victoria Findlay Wolfe. Another bit of heaven! We were greeted warmly at the shop by Lindsey, who gave me permission to take photos:
Barbara B., a student in one of my “Sew with Dawn” classes at the Pine Needle, bought Victoria’s new pattern Star Storm recently:
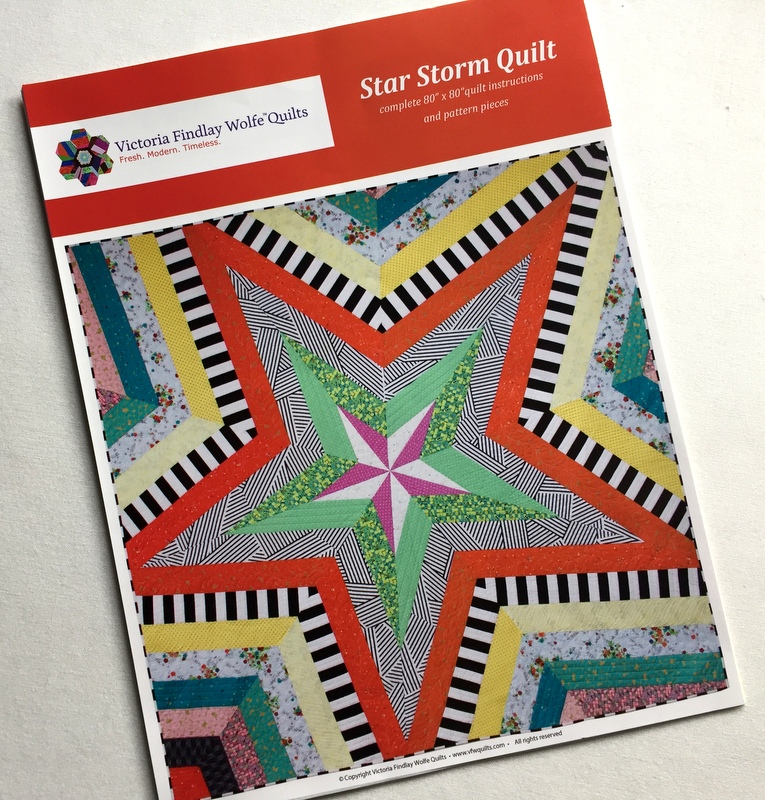
Barbara asked for my help in enlarging this 80″ square quilt to fit a queen-size bed. I wanted to discuss my ideas with Victoria or a member of her staff. Victoria was vacationing with her family in Japan last week so I met with Kim, who was extraordinarily kind and helpful. She gave me a great idea that I can’t wait to share with Barbara.
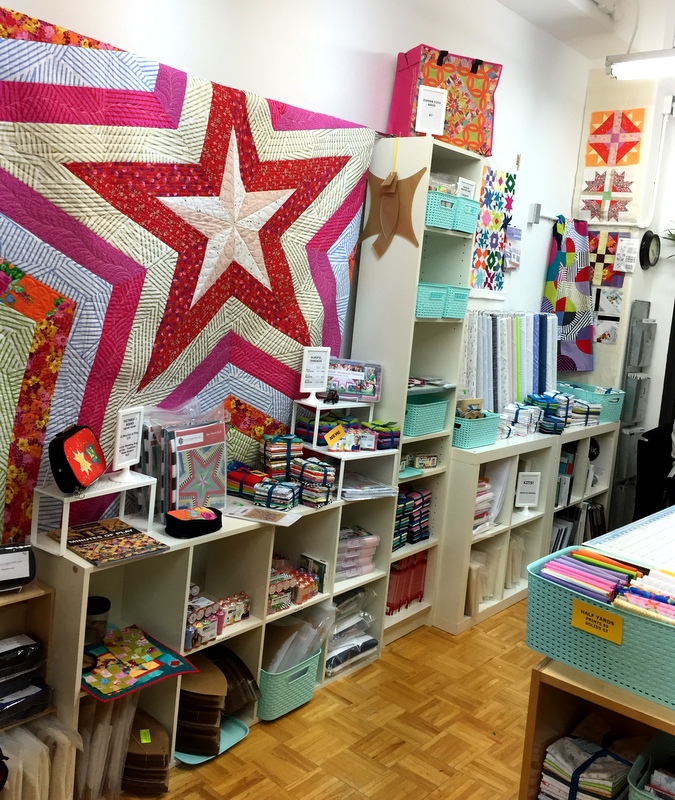
Even without an agenda, the trip to the shop would have been worth it. So much color, whimsy, and quilting loveliness packed into a relatively small space!
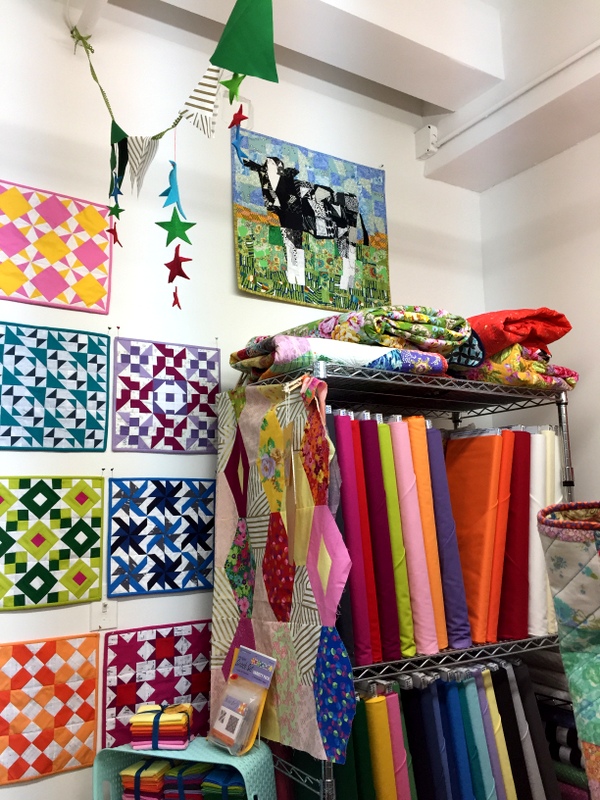
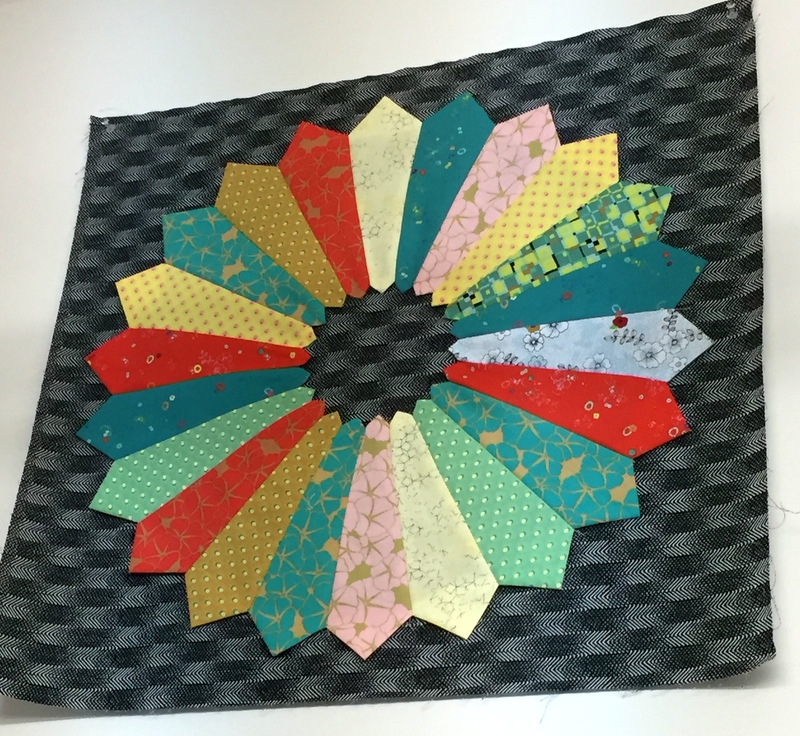
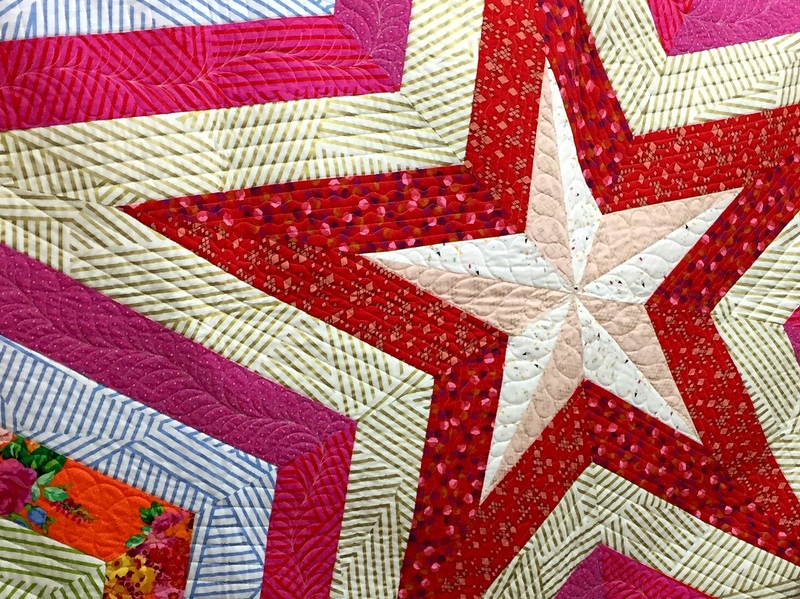
Here is Victoria’s Victory Block quilt and a Dresden Plate block featuring some of her new fabrics:
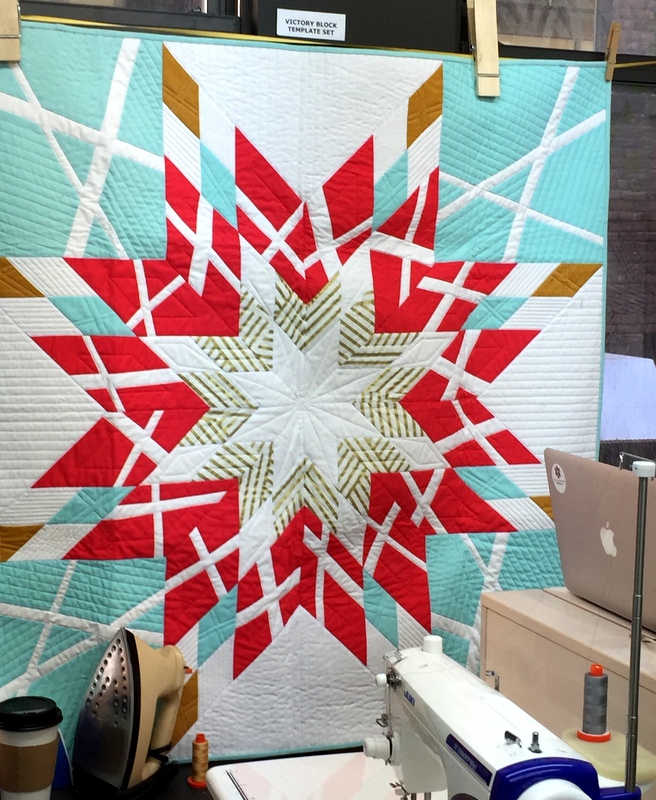
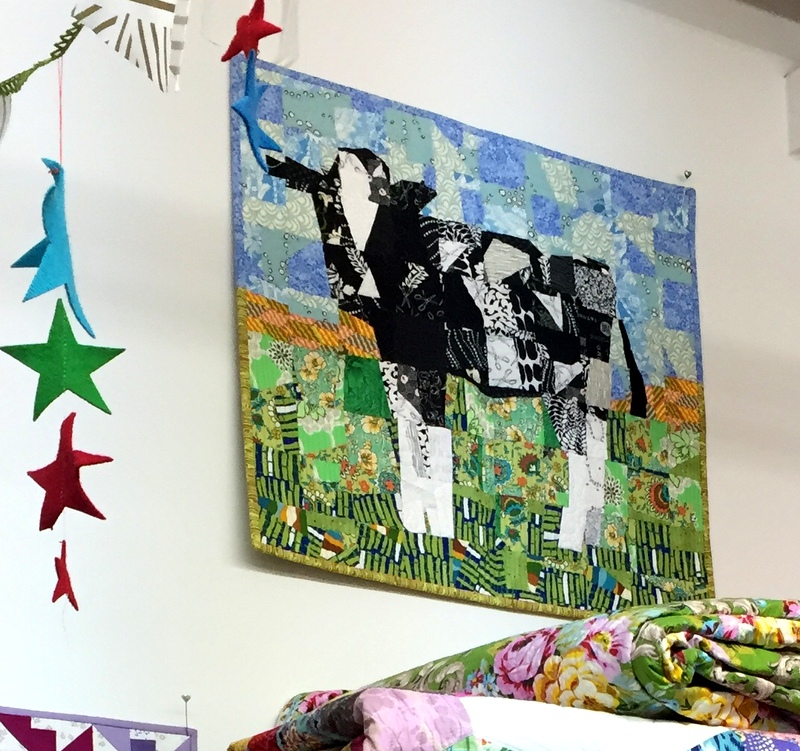
I was excited to see a different version of Star Storm on display:
Here’s a close-up of the quilting:
I find the combination of straight lines (both horizontal and vertical) and feathers very pleasing.
You can bet that Victoria Findlay Wolfe’s shop will be on my list of places to visit on future trips to New York City.
Just so you know: the DH did just fine without me, though he is happy to have me home. He’s scheduled for hip replacement surgery April 11, which happens to be our 36th wedding anniversary.
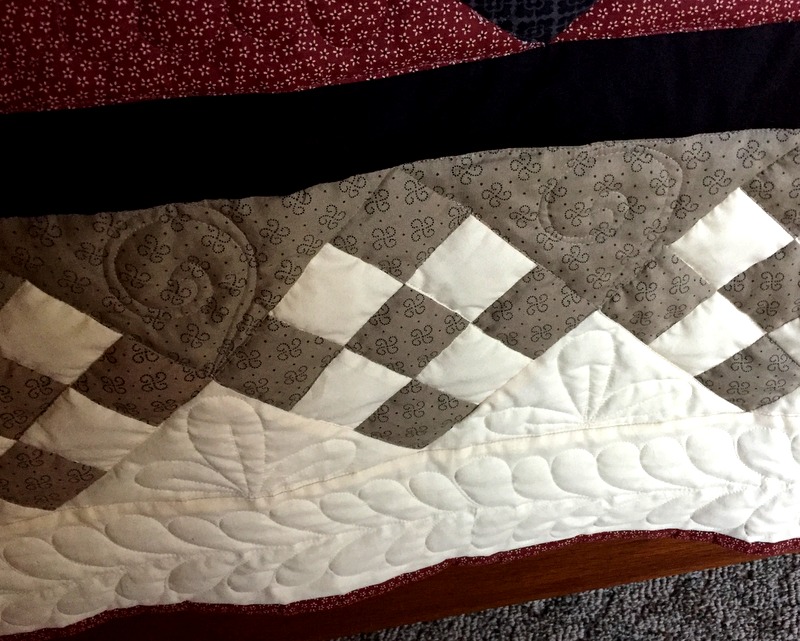
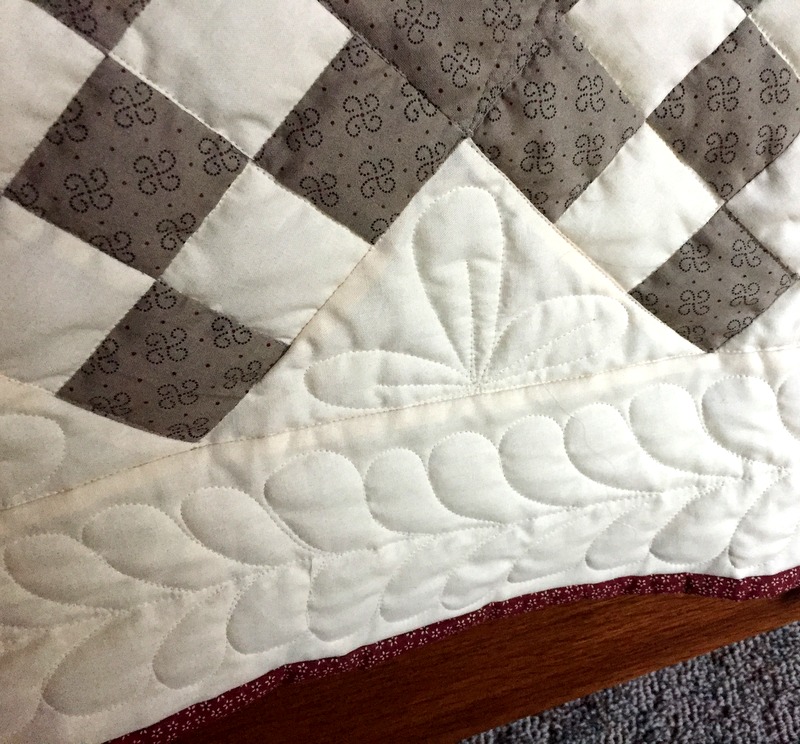
Baby Selene’s quilt is back from longarmer Sherry Wadley, who did a wonderful job, and I can’t wait to show you how it turned out. Here it is, trimmed and ready to be bound:
Take a closer look:
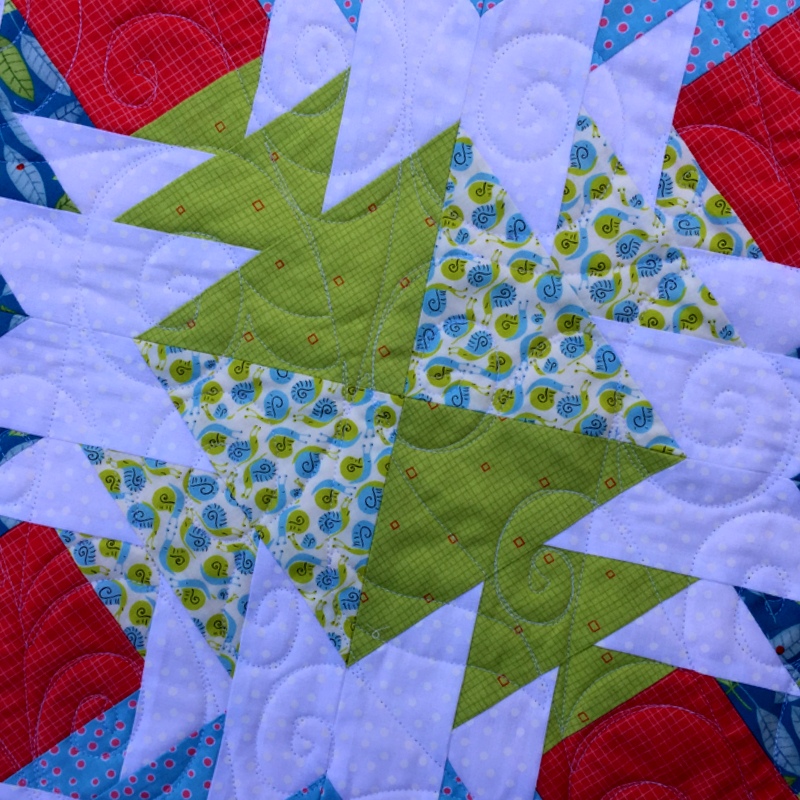
First notice the loops and swirls in the quilting motif. Then focus on the aqua and green print in the center of the photo. Those are tiny snails. (The print is from the Far Far Away collection designed by Heather Ross for Windham Fabrics.)
When I was auditioning quilting motifs with Sherry, I was waffling between three designs. My friend Colleen was with me at the time and pointed out that one of the designs was reminiscent of snails. She was absolutely right, and my decision was made at that instant. The quilting motif is called Sashay.
The loops and swirls in the quilting really show up on the back:
As mentioned in an earlier post, I’m going to bind this in the red cross-hatch fabric. I normally finish my quilts with a narrow ¼” binding but this quilt seems to call for a slightly wider binding — I’m thinking ½” — to highlight the red in the center of the pineapple blocks and the tiny red ladybugs in one of the other prints.
Selene’s quilt, based on Karin Hellaby’s Pineapple Plus design, will finish at about 49″ square. That’s a good size for a baby who is now officially a toddler.
![]()
Did you know that March is National Craft Month? Not only that, March 18 is National Quilting Day.
 But wait — there’s more!
March 18 is also Worldwide Quilting Day — a day to celebrate the art and craft of quilting with like-minded friends around the globe:
![]()
I follow quite a few quilters in other countries through Instagram (are you on Instagram too? You can find me here) so I am delighted to know quilters around the world are celebrating the same day we are.
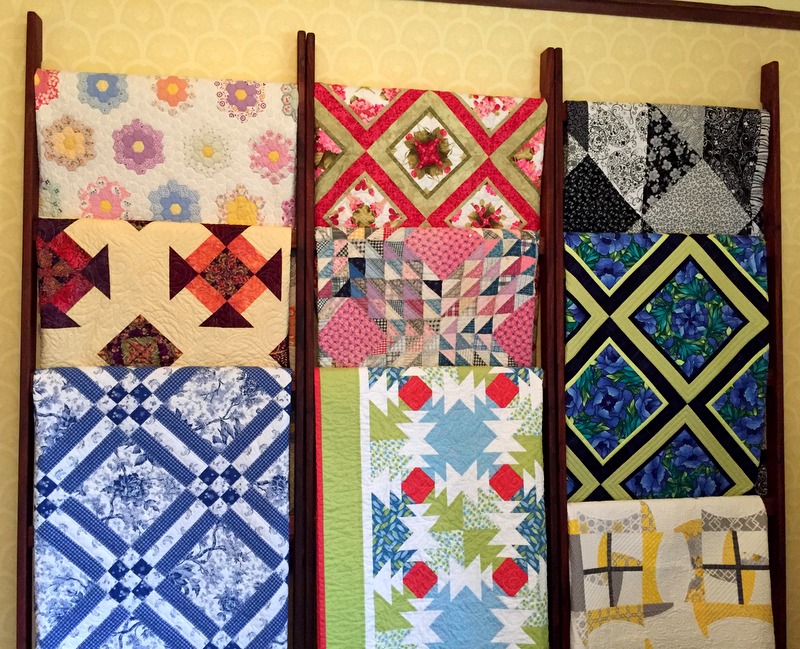
National Quilting Day is always celebrated on the third Saturday of March, coinciding this year with two quilt shows in the Portland, Oregon metropolitan area.
The 23rd annual “Airing of the Quilts” is this Friday and Saturday, March 17-18, at the Milwaukie Center, 5440 SE Kellogg Creek Drive in Milwaukie, Oregon. It’s a non-juried community quilt show exhibiting old and new quilts, traditional and non-traditional. Show hours are 9:00 am to 4:00 pm both days. For more information, visit www.MilwaukieCenterQuiltShow.org.
“Every Quilt Tells a Story” is the theme of the Metropolitan Patchwork Society’s one-day show Saturday, March 18, at the Beaverton Public Library, 12375 SW Fifth St., Beaverton, Oregon. Hours of the show are 11:00 am to 4:00 pm. This show is also non-juried and features quilts made primarily by MPS members.
I’m a member and have submitted two quilts I completed last year: Stella by Starlight . . .
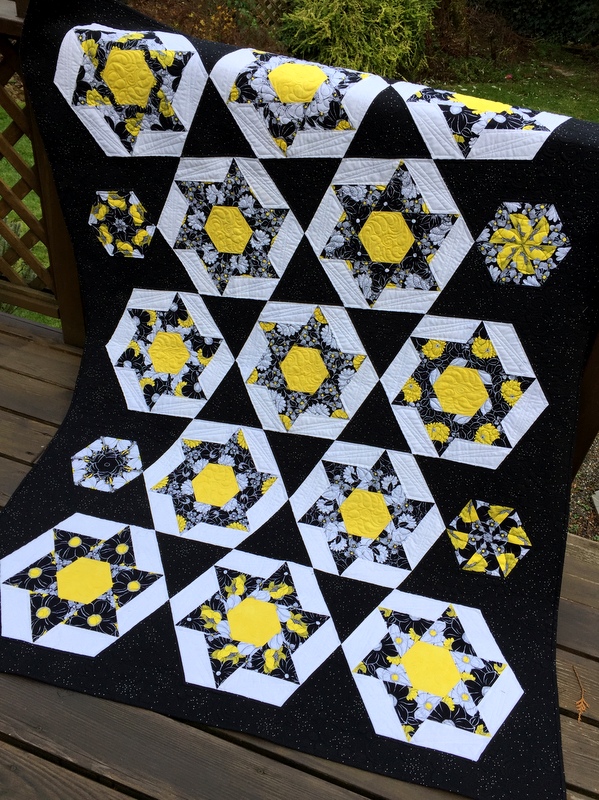
. . . and Ring Toss:
If you’re in the area, I hope you’ll visit one or both of these quilt shows.
Quiltmakers are always being exhorted to support their local quilt shops. In the spirit of National Quilting Day and Worldwide Quilting Day, consider this a call to support your local quilt guilds as well.
See you at the show!
It started with this, back in July 2015:
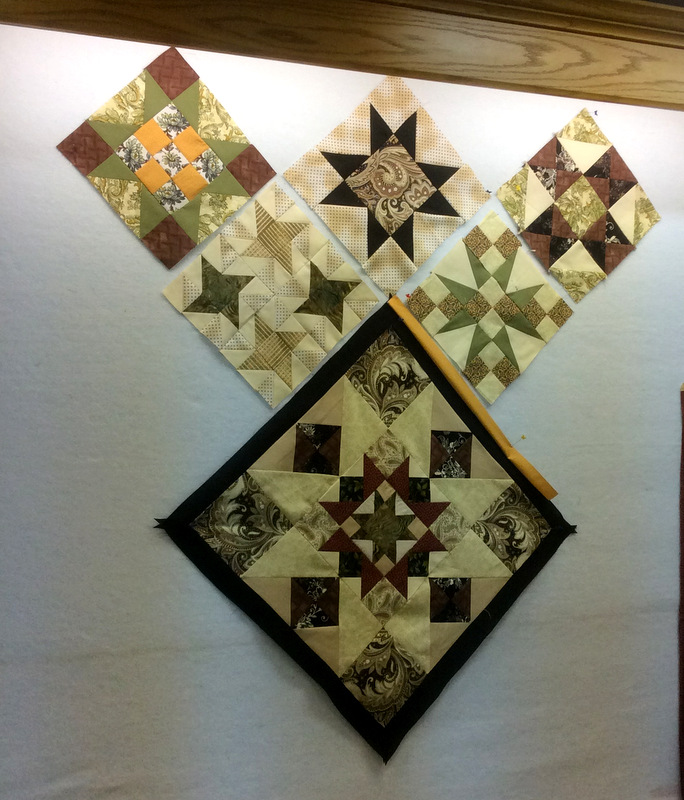 You’re looking at the center medallion and first five blocks of Annette Holder’s Reach for the Stars quilt. Annette lives in Jonesboro, Arkansas. We met online as part of a community of quilters making the dazzling sampler quilt designed by Terri Krysan that was featured as a series quilt in Quilter’s Newsletter magazine during 2013 and 2014.
By June of last year Annette had completed her quilt top:

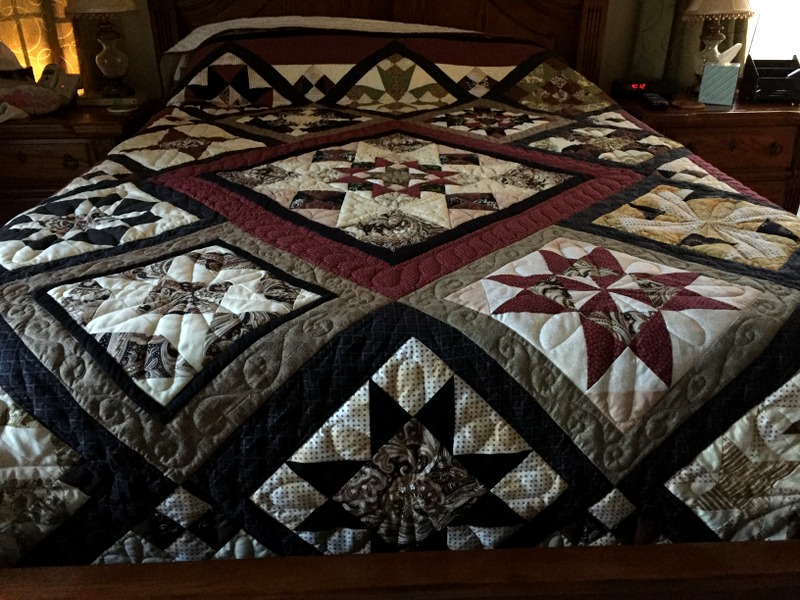
A few weeks ago she sent me pictures of her completed quilt and I am delighted to share them with you. Look what she has the pleasure of sleeping under:
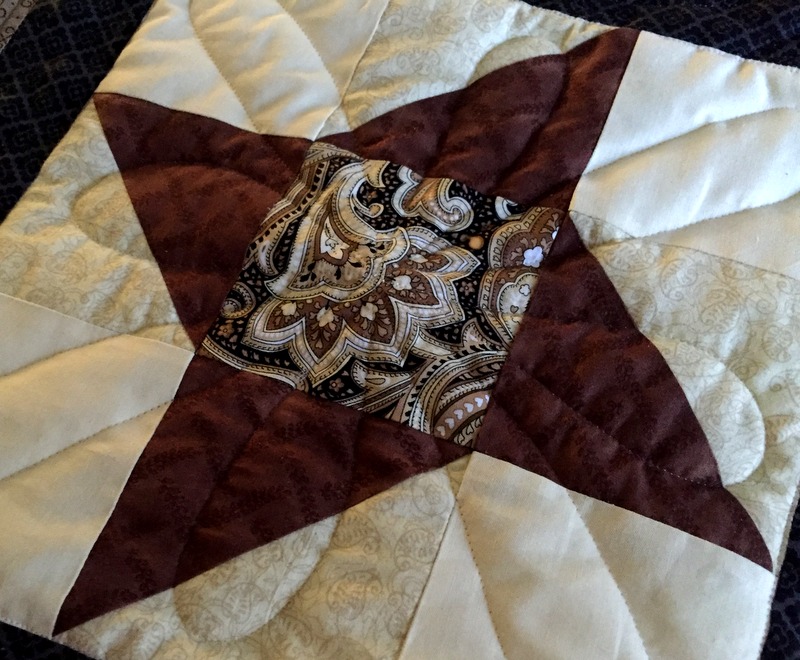
Like many of us who started with Terri Krysan’s sampler quilt design, Annette made some design modifications. She replaced one of the original blocks with this friendship star, whose center square shows off her beautiful paisley focus fabric:
Annette credits “Jana and her elves” at Jana’s Quilting in Jonesboro, Arkansas with the longarm quilting. Here are a few close-ups:

I spy a lot of stitching in the ditch to outline the blocks and give dimension to the quilt:
Annette named her quilt Oh My Stars.
If you’d like to see other versions of this stunning quilt design, take a look at my Reach for the Stars page on Pinterest. If you’ve made your own version, I would love to hear from you! You can email me at dawn (at) firstlightdesigns (dot) com.