Category Archives: Billie Bag

A New Coat for my Rotary Cutter


I’m heading off shortly to Hood Canal in Washington State for a quilt retreat organized by the Pine Needle, the quilt shop where I teach. On one evening I’m going to show my students how to make a rotary cutter coat based on my free pattern (tutorial here).

As I was gathering my materials yesterday, I realized I didn’t have a rotary cutter coat of my own. All the ones I have made weregiven away.

I fixed that in short order. Here is my (new) rotary cutter coat:

A pattern of green and yellow colors with white background

The fabric? Two prints from theParadise line designed by Alisse Courter for Camelot Cottons. I bought a lot of this line when it came out last year. You may recognize it, because it goes with the Junior Billie Bag I made a few months ago. These are the front and back panels of my bag:

A pattern of green and yellow colors with white background

Now my Billie Bag is packed for the retreat, including my new rotary cutter coat:

A pattern of green and yellow colors with white background
I’m good to go!


Posted in Billie Bag, Junior Billie Bag, rotary cutter case, update | 5 Comments

Presenting: Deborah’s Junior Billie Bag


The Junior Billie Bag I made for my friend Deborah is finished. Today’s late afternoon sun and shade seemed just right for a miniphoto shoot on my back deck.

Here’sone side of the bag, with the longer of two sets of handlesdraped over a 24″ tall ruler, conveniently tucked into one of the side pockets:

A pattern of green and yellow colors with white background
Here’s theother side,showing the shorter set of handles:

A pattern of green and yellow colors with white background
Just look at all these pockets, waiting to be filled!

A pattern of green and yellow colors with white background
In case you didn’t notice, the side panels on the outside of the bag have pockets, too.

You can read earlier postsabout the making of Deborah’s Junior Billie Bag here:

April 21: Pockets A-Plenty: Deborah’s Junior Billie Bag
March 28: In the Works: A New Junior Billie Bag

The Junior Billie Bag, measuring 14″ x 17″ x 7½”,is a downsized version of the quilter’s totedesigned several years ago by Billie Mahorney, a popularlocal quilt teacher and designer. (I made one for myself a few months ago,which you can see here.)

Billienever wrote a pattern for her bag but taught classes for many years at the Pine Needle in Lake Oswegoand elsewhere in Oregon. She is nowretired from teaching and has passed the mantle on to me to teach her wonderful design.

Earlier this week I finished teaching the second of two classes on the Junior Billie Bag and will most likely be teaching more classes in the fall. Two of my students have already completed their bags, with three more close behind. When all 10 bags are finished, we’ll have a virtual Junior Billie Bag parade. You’re invited!

Linking up with Kelly of My Quilt Infatuation on NTT (Needle and Thread Thursday).


Posted in Billie Bag, Junior Billie Bag, tote bags, update | 6 Comments

Pockets A-Plenty: Deborah’s Junior Billie Bag


Time for a progress report on thequilter’s totethat I’m making for my friend Deborah’s birthday. Known as the Junior Billie Bag, it’sa scaled down version of the tote designed several years agoby my teacher and mentor Billie Mahorney.I’m making Deborah’s bag alongside the students in my twoJunior Billie Bag classes at the Pine Needle Quilt Shop. It really helps to have the individualcomponents on handso I can show mystudentsexactly how abag goes together. It will measure14″ x 17″ x 7½”when finished.

The pockets on the inside and outside of the bag arecustomized to fit aquiltermaker’s favorite rulers and tools.I’m hoping that the pocket sizes I chose for Deborah’s bag will be a good fit for her. Here’s a look at theinside pockets on theside panels . . .

A pattern of green and yellow colors with white background

and theoutside pockets on theside panels:

A pattern of green and yellow colors with white background

Bothoutside pockets are trimmed with the solid red French General fabricloved by so many quiltmakers.

Now have a look at the inside of the bag with the side panels pinned to one of the front/back panels:

A pattern of green and yellow colors with white background

All told, this baghas 20 pockets. That’s a lot of pockets!

When I first wrote about Deborah’s Junior Billie Bag (you can read that posthere),I hadn’t yet quilted the second front/back panel. The original plan was to do some free motion quilting but I opted instead for a modified chevron that extends the lines of the star points:

A pattern of green and yellow colors with white background

It’s a nice counterpoint to the serpentine stitching on the first front/back panel:

A pattern of green and yellow colors with white background

I’m having a lot of fun working on this bag and am happy to report that I am entering the home stretch. Deborah won’t have to wait too much longer to claim her birthday present!

Linking up with Kelly of My Quilt Infatuation on Needle and Thread Thursday (NTT).


Posted in Billie Bag, Junior Billie Bag, Quisters (Quilt Sisters), tote bags, update | 6 Comments

In the Works: A New Junior Billie Bag


And here’s a look at it:

A pattern of green and yellow colors with white background

This quilter’s tote,a slightly smaller version of the onedesigned by Billie Mahorney close to 20 years ago,is a birthday present for my friend and fellow Quister (Quilt Sister) Deborah, who recentlyreached one of those milestone birthdays ending in zero.When Deborahopened her birthday present last week, it was in piecesbut she was stillhappybecause she’s seen mine andknows what hers isgoing to look like when it’s done.

I’m teaching two classes at the Pine Needle right now on how to make a Junior Billie Bag, and I’m using Deborah’s bag to show my students the steps in construction. That’s why her bag wasn’t completed before herbig day.All the individual components have been made: front and back panels, side and bottom panels, pockets, long and short straps, and binding.My students can see exactly how it comes together before they take the same steps on their bags. And they can choose whatever designs they want for the front and back panels so each bag is truly unique.

The panel on the right in the photo above is readyfor some free motion quilting in the outerstrips of solid red. As you can see, the panel on the left was quilted with a simple serpentine stitch in the red fabric around the Churn Dash block. The red fabric, by the way, is some French General by Moda that’s been in my stash for a few years just waiting for the right project. I did use some of it a couple of years ago, along with some of the same fabrics you see above, when I made this sewing machine dust cover for Deborah:

A pattern of green and yellow colors with white background

At the time I had no idea I would be making her acoordinating Junior Billie Bag down the road. I’m so glad I had plenty of fabric left over from that first project.

If you’d like to see what aJunior Billie Baglooks like completed, click on this link to see the one I finished in January.Deborah’s Junior Billie Bag, whichwill measure 14″ x 17″ x 7½” when finished,should be in her hands by this time next month.


Posted in Billie Bag, Junior Billie Bag, Quisters (Quilt Sisters), tote bags, update | 2 Comments

My New Junior Billie Bag


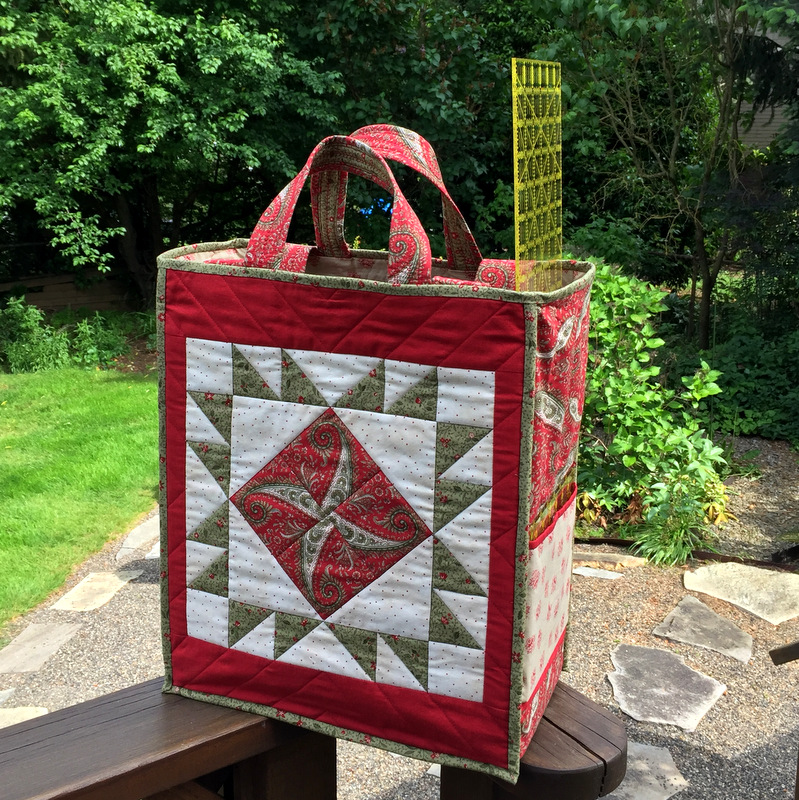
Yes, it’s done! My Junior Billie Bag, thequilter’s tote I’ve been working onthese last few weeks,is nowready to travel. It’s full of my favorite quilter’s tools and supplies –and there’s room to spare.

Let me show you a few pictures, beginning with the front and back. Actually, the front and back are interchangeable; I think of them as the pink side and the orange side.

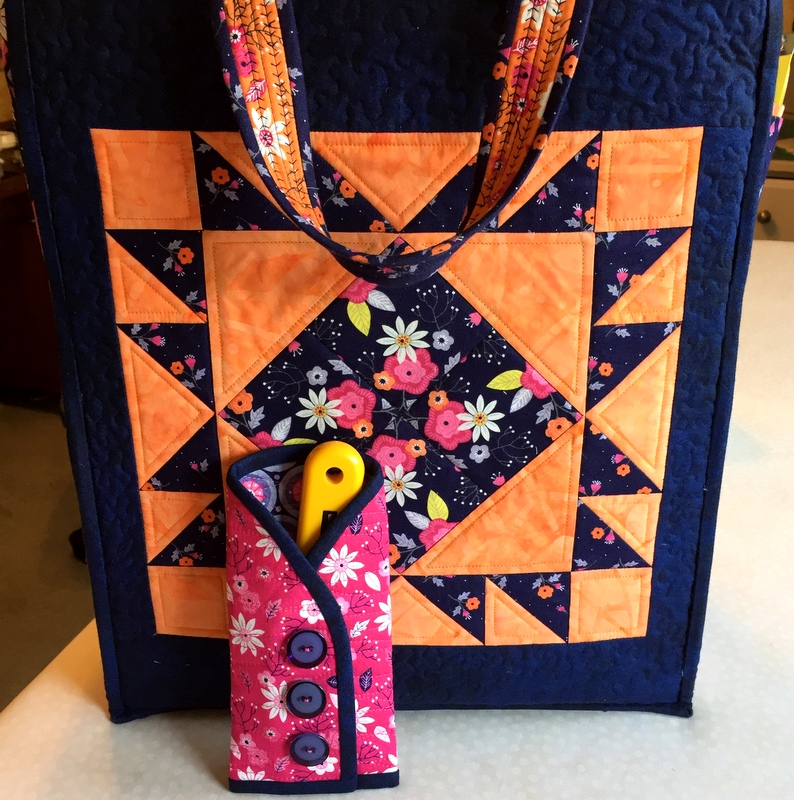
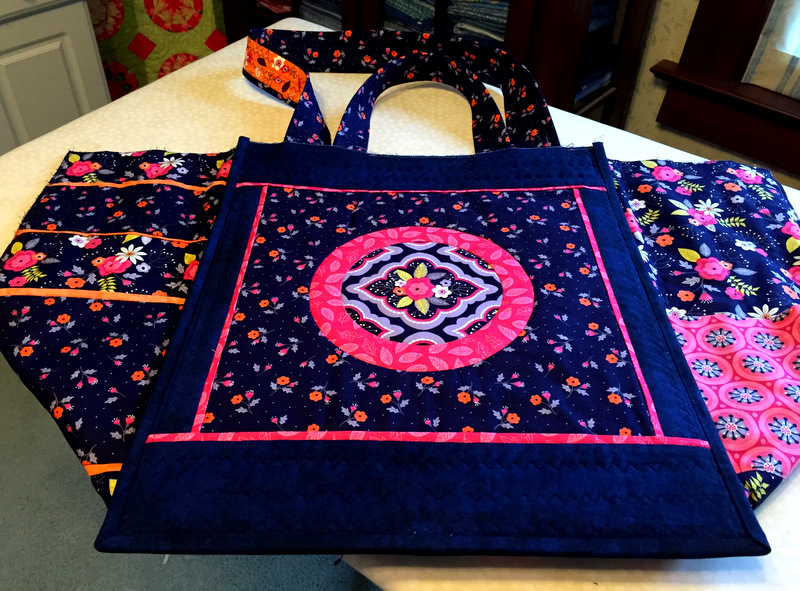
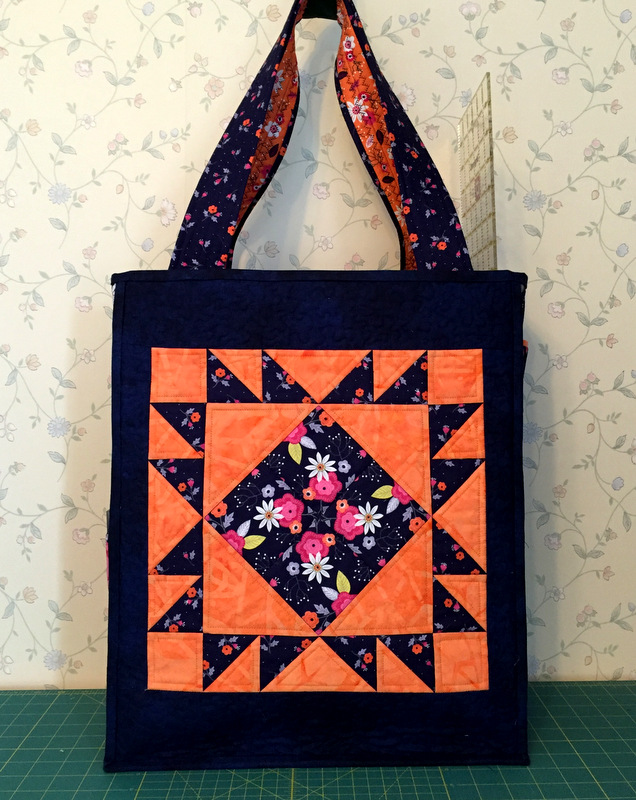
Let’s start with the orange side, with the long handles showing:

A pattern of green and yellow colors with white background

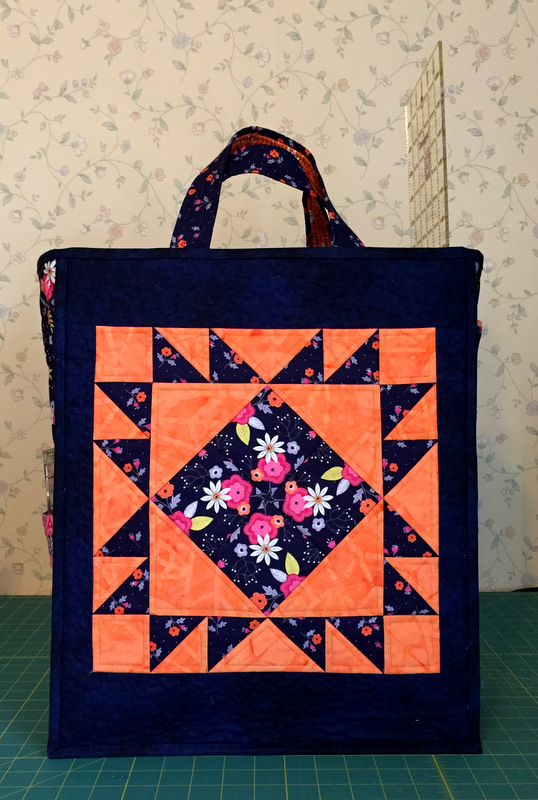
Here’s another look at the orange side, this time showing the shorter handles:

A pattern of green and yellow colors with white background

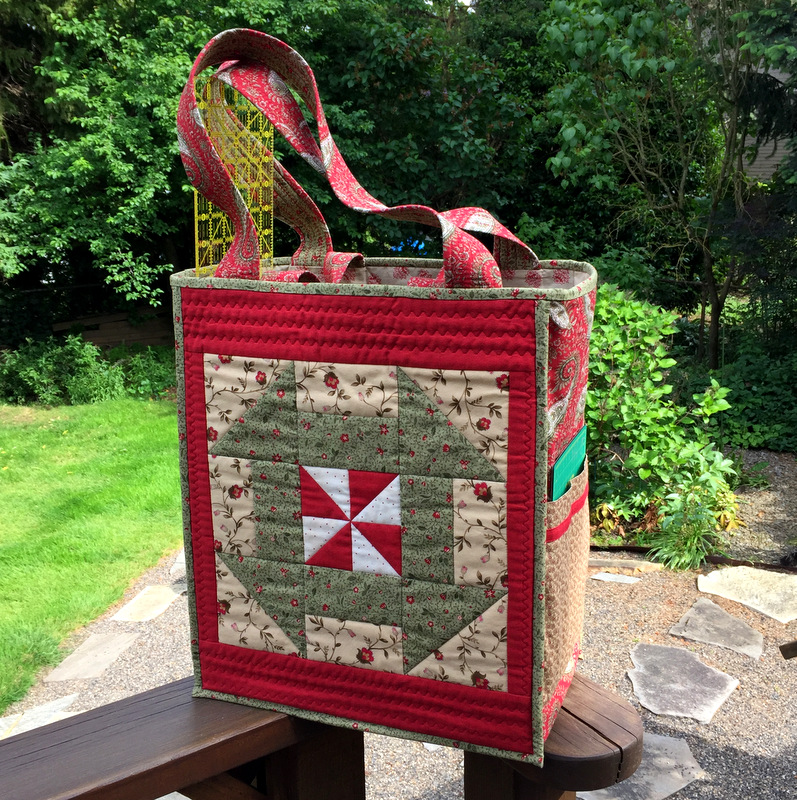
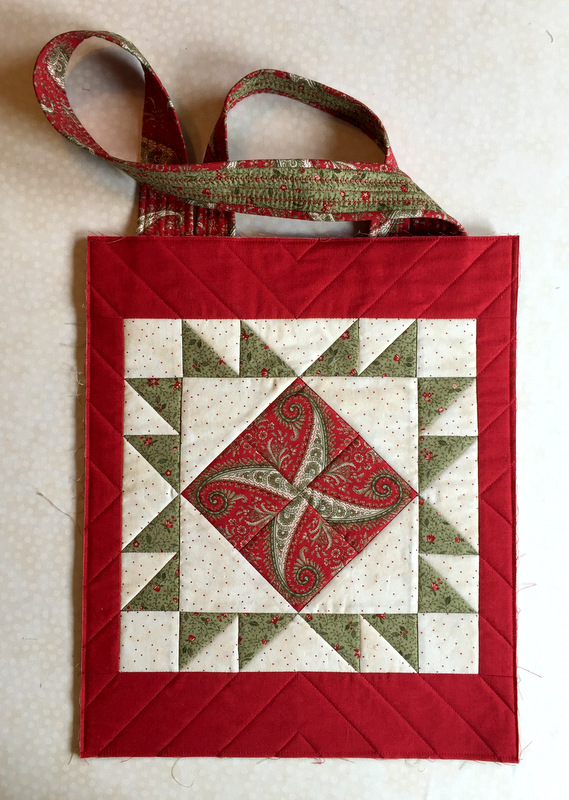
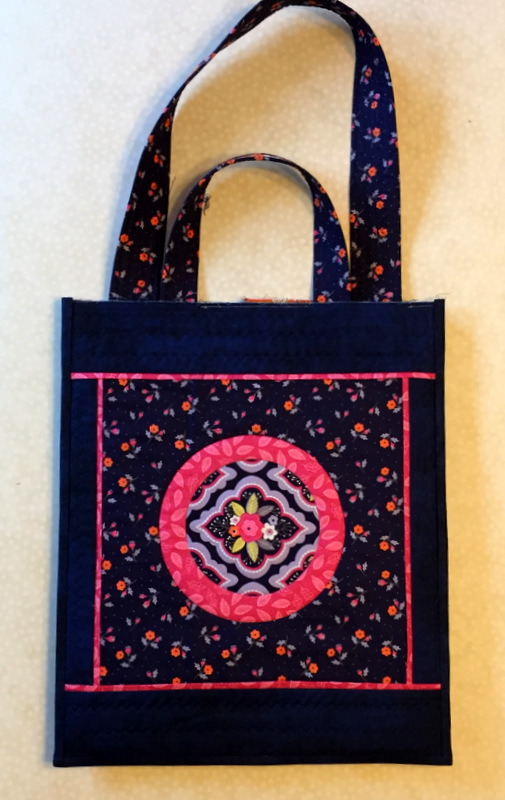
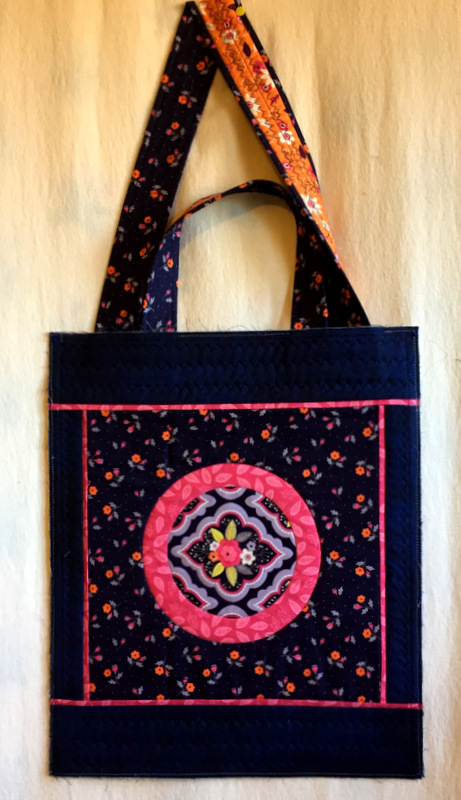
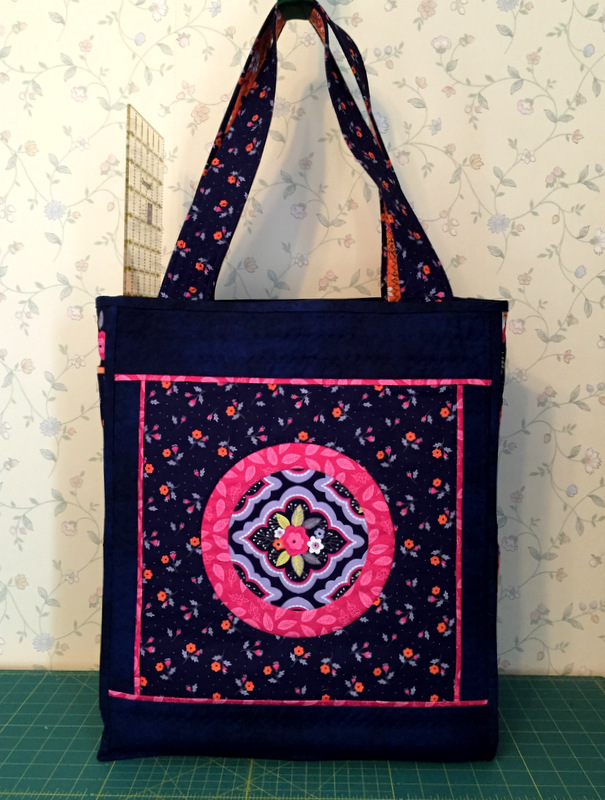
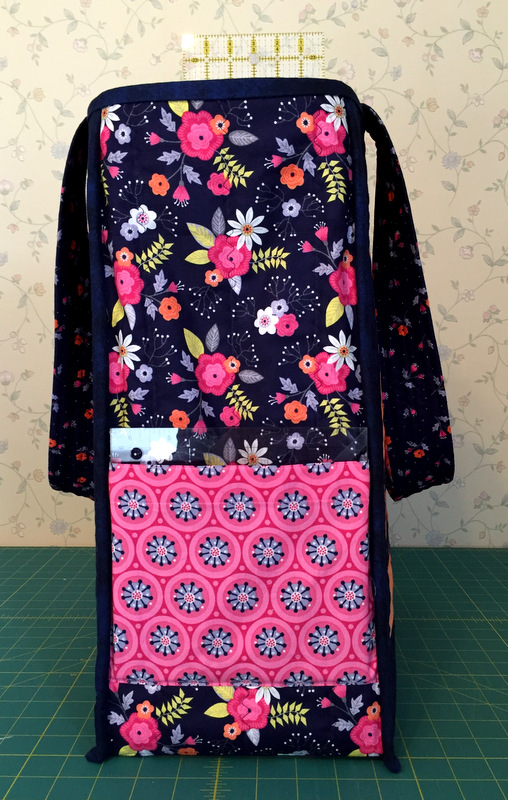
And now the pink side with long handles . . .

A pattern of green and yellow colors with white background

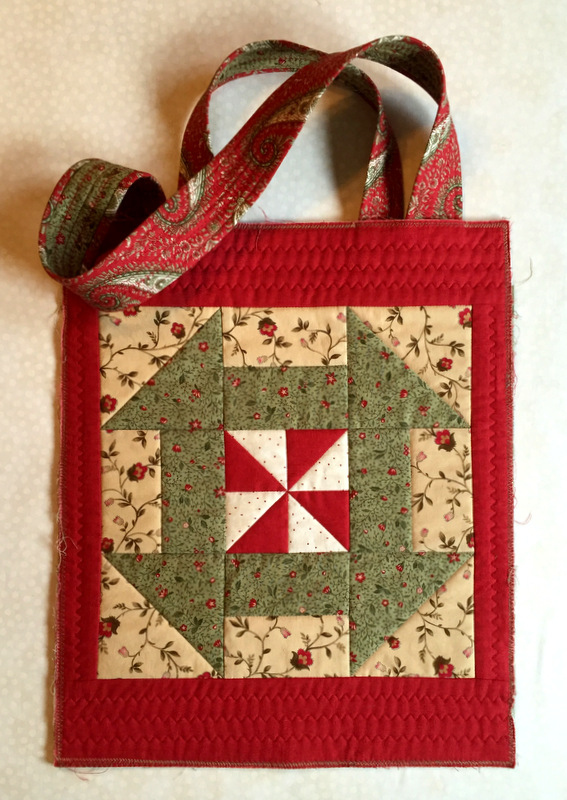
. . . and the short handles:

A pattern of green and yellow colors with white background

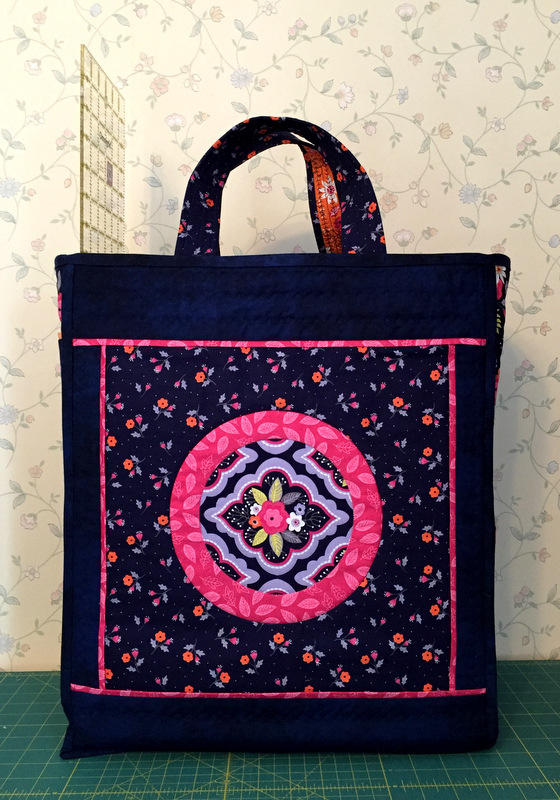
Having two sets of handles gives you choices in how to carry the bag — over yourshoulder or in yourhand.

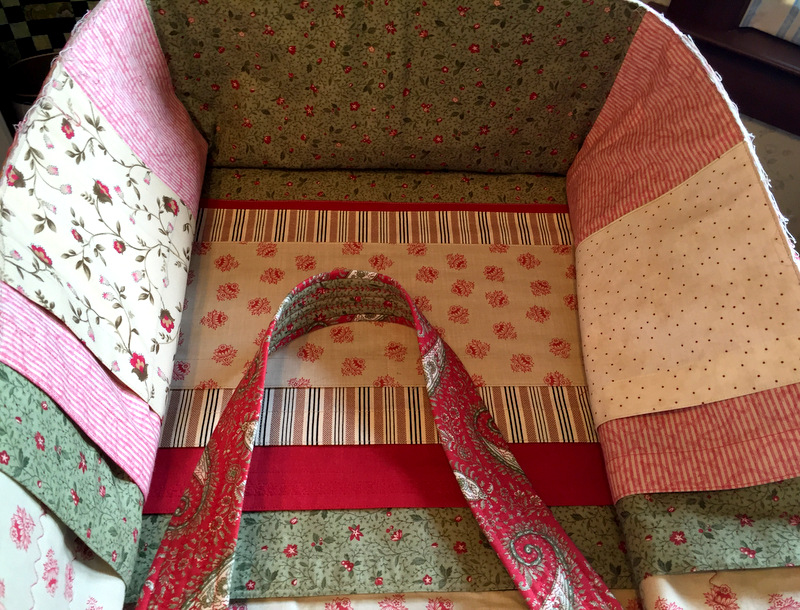
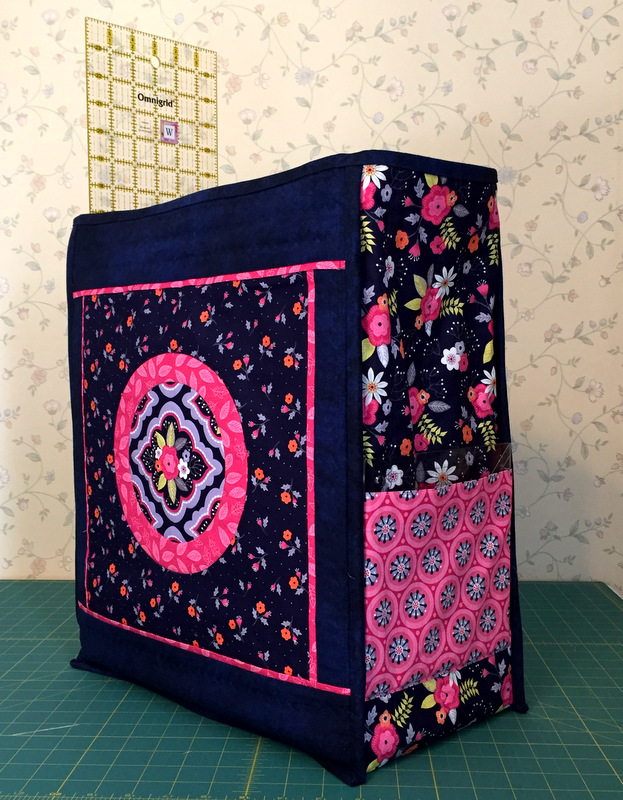
Here’s a shot of one of the side panels, the one with a single pocket:

A pattern of green and yellow colors with white background

(That reflection you see is from a specialty ruler.)

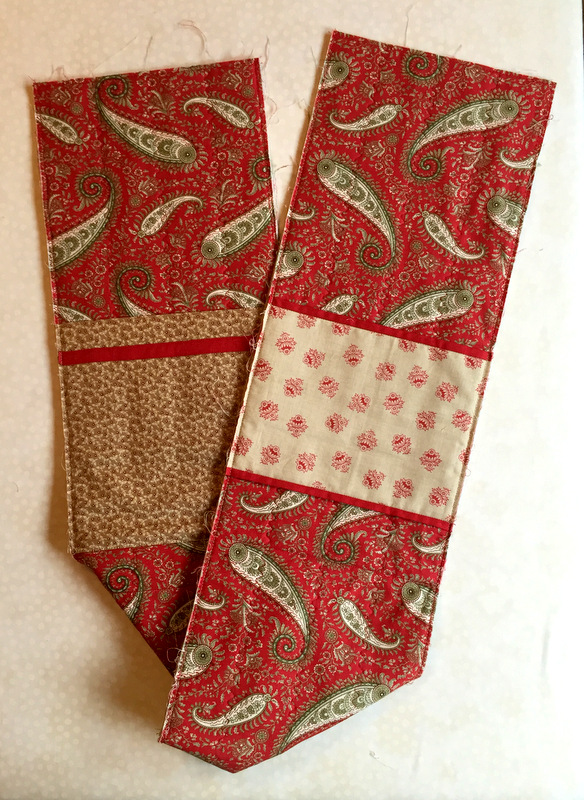
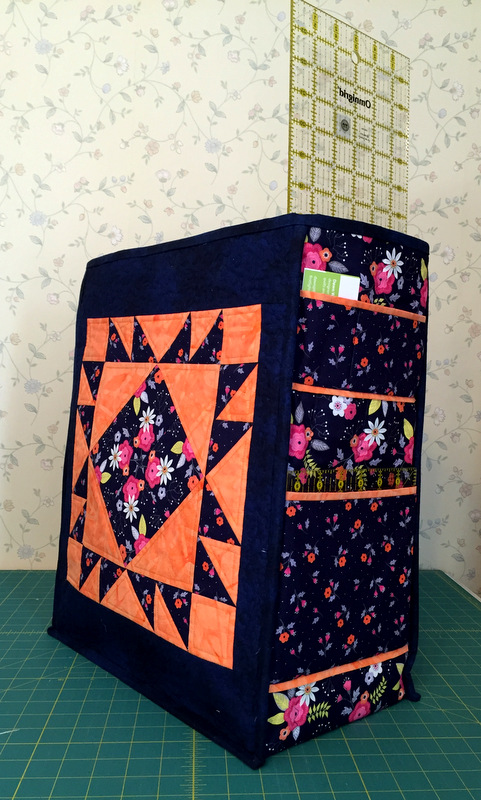
Now have a look at the other side panel. Just for fun I added contrasting bands of color at the top and bottom of thetwo pockets on this side:

A pattern of green and yellow colors with white background

The small pocket was sized to hold my business cards on one side and a name badge on the other. That’s one of the great features of this bag:you can customize the pockets for whatever you want to put in them.
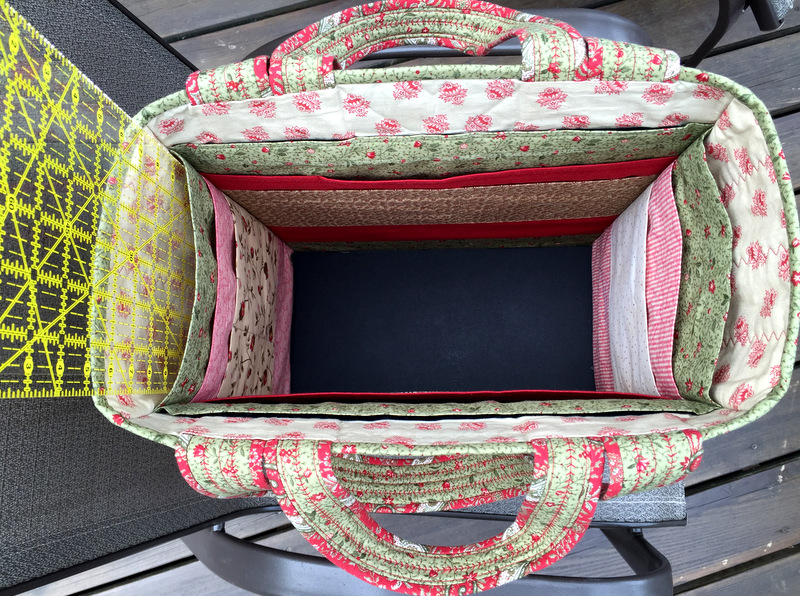
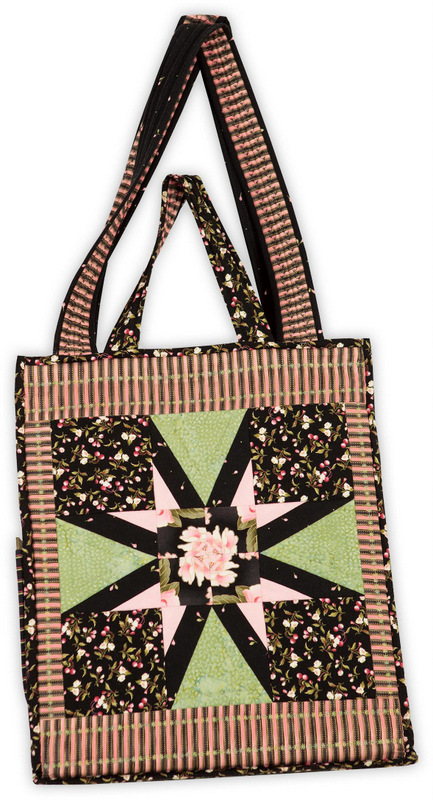
In thesethree-quarter angle shots,both sets of straps are tucked inside the bag:

A pattern of green and yellow colors with white background

A pattern of green and yellow colors with white background
Which side do you like better, the orange or the pink?

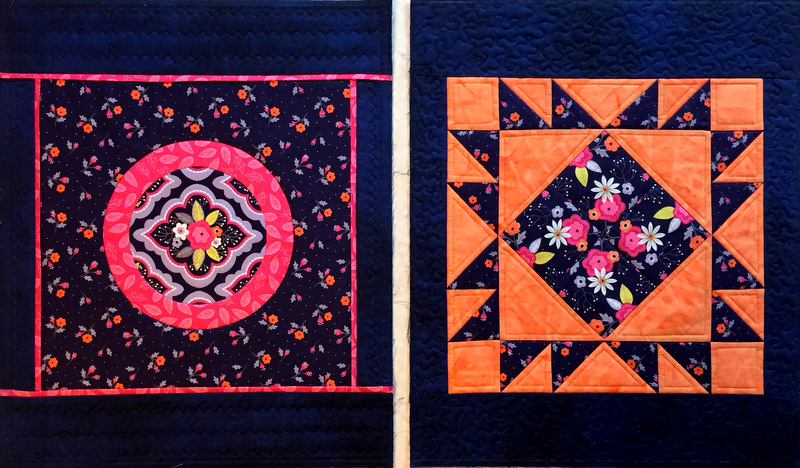
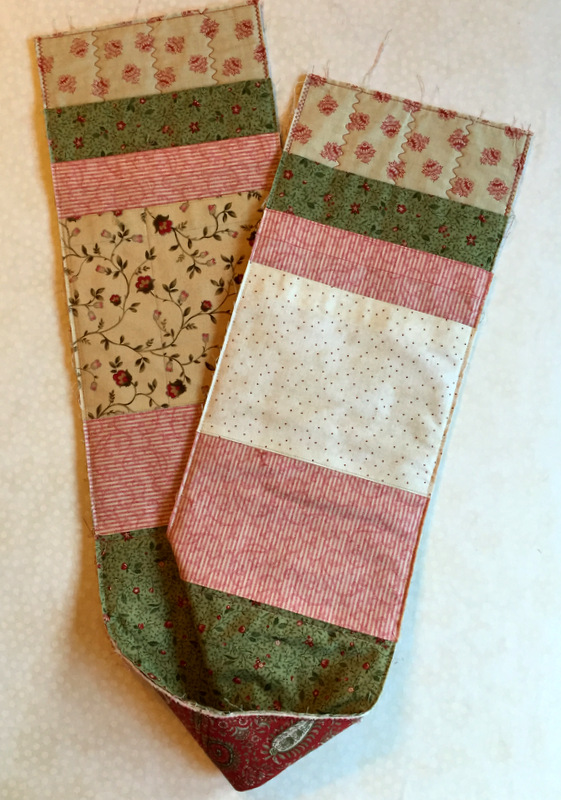
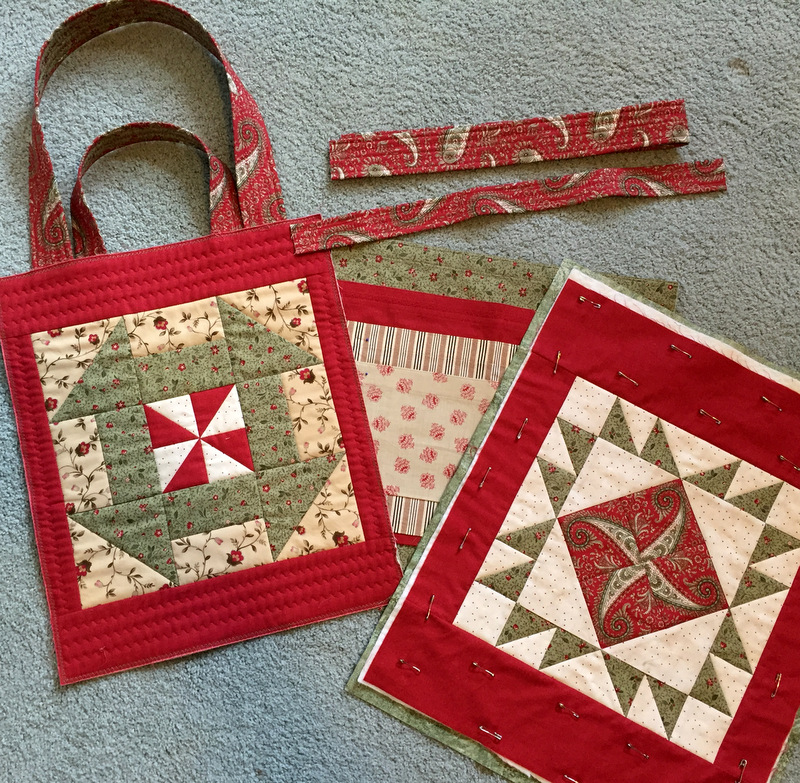
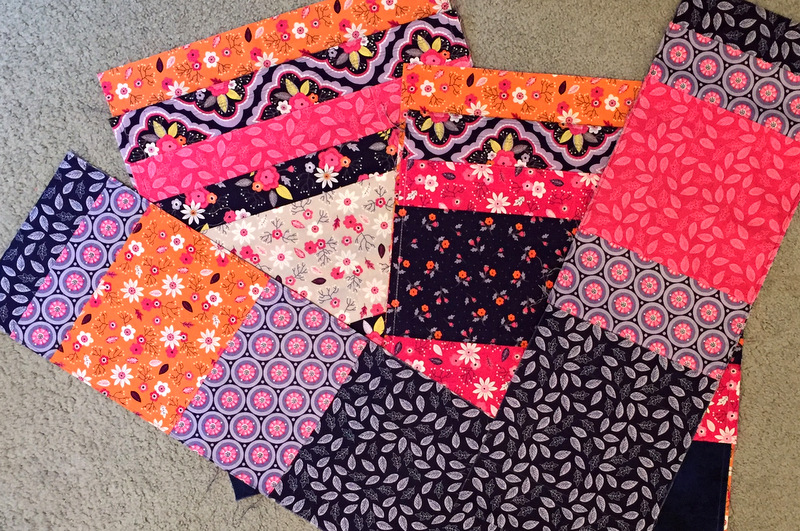
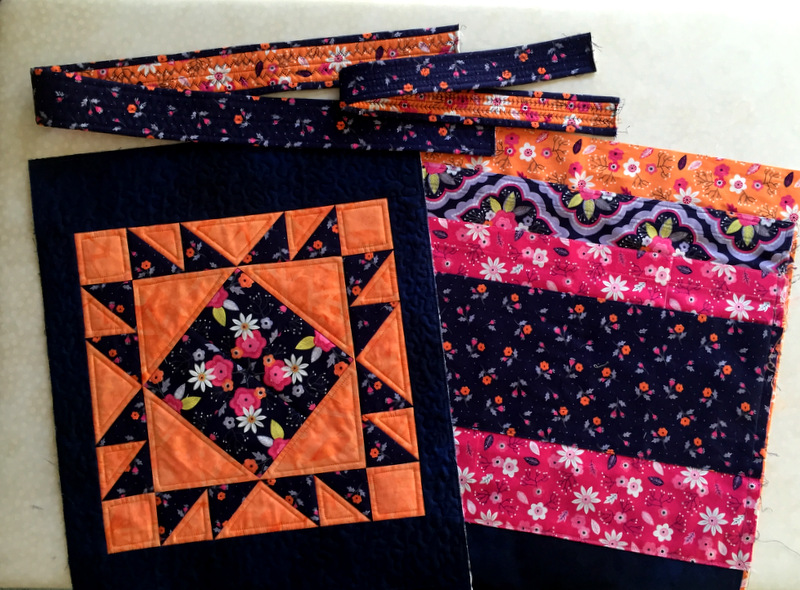
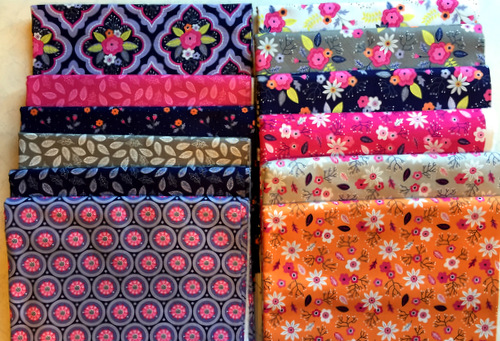
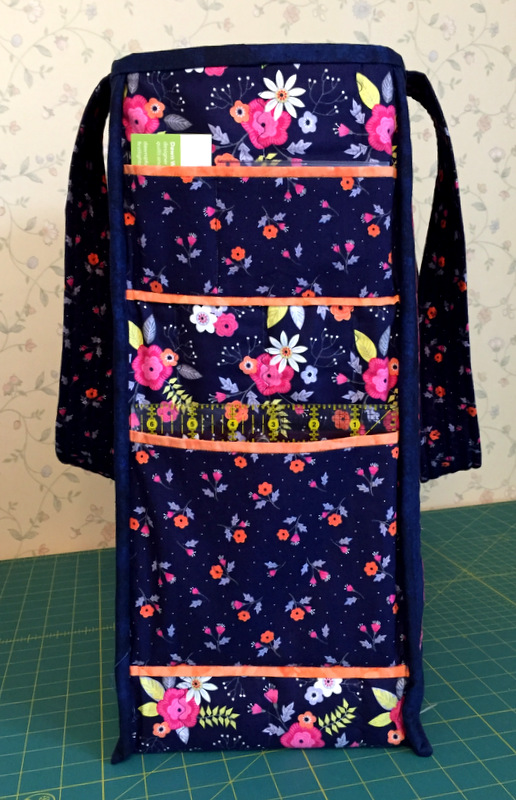
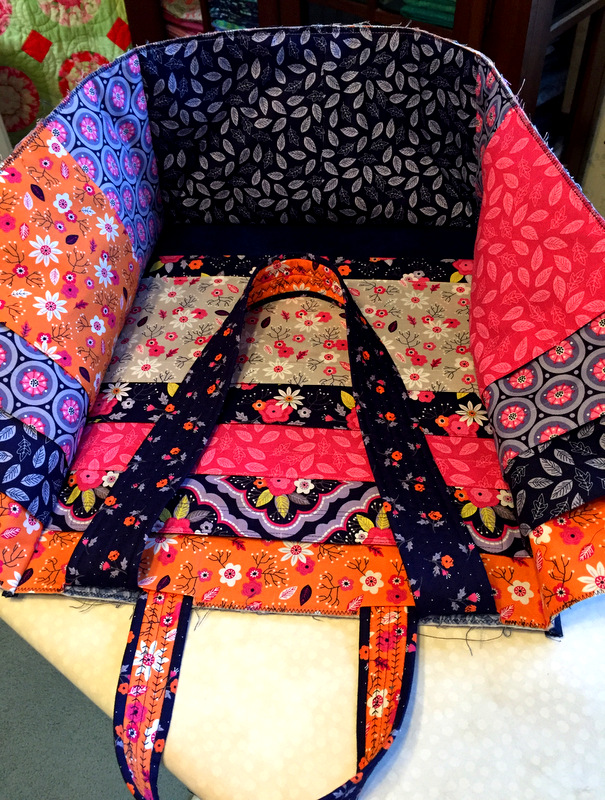
Except for the orange batik and navy Maywood Shadowplay fabric used on the front and back of my Junior Billie Bag, all of the fabrics are from the Paradise line designed by Alisse Courter for Camelot Cottons.Several more Paradise prints are inside the bag in multiple pockets. It’s hard to get a good shot of the pockets now that the bag is done; this photo shows thepockets before the bag was completely sewn together:

A pattern of green and yellow colors with white background

(I went wild for these fabrics and bought almost the entire line,so you will be seeing more of them in future projects.)

Measuring 14″ in width,17″ in length, and 7½” in depth,myJunior Billie Bag is a slightly downsized version of the original bag designed at least a decade agoby Billie Mahorney, a popular quilt teacher in the Pacific Northwest, now retired.You can read more about Billie and my earlier progress on thebag in these previous posts:

Dec. 29, 2015: Billie’s Blessing
Dec. 31, 2015: Update: Junior Billie Bag
Jan. 4, 2016: The Third Dimension

It feels good to report a finish on this, the sixthday of the New Year.

Linking up with Kelly of My Quilt Infatuation on the eve of NTT (Needle and Thread Thursday).


Posted in Billie Bag, Junior Billie Bag, tote bags, update | 5 Comments

The Third Dimension


It’s official: my Junior Billie Baghas reached the 3D stage.

If you’ve been following me at First Light Designs,you know I’m working on a Junior Billie Bag, thequintessential quilter’s tote designed by Billie Mahorney. A smaller scale version of Billie’s original bag, the Junior measures 14″ x 17″ x 7½” –the perfect size for toting a large(but manageable)amount of quilting supplies.

One of the panels(front or back? I haven’t decided yet) has beenattached to the side panels and bottom, and the binding has been sewn on. This is what the baglooks like from the outside . . .

A pattern of green and yellow colors with white background
. . . and this is what it looks like from the inside:

A pattern of green and yellow colors with white background
To paraphrase Jerry Lee Lewis, there’s a whole lot of pockets going on!

With thebinding applied along this panel, my Junior Billie Bagislooking more finished. Now you can easily see how the two sets of handles come into play (although you see only half of them here):

A pattern of green and yellow colors with white background

The longer straps go over the shoulder; the smaller straps make it easy to carry the bag like a satchel. The best of both worlds.

When you see this bag next, it will be completed! Before the first week of 2016is over, I expect to havemy first finish to report.

I’d say the New Yearis off to a very good start.


Posted in Billie Bag, Junior Billie Bag, tote bags, update | 4 Comments

Update: Junior Billie Bag


In my last post I showed you the front and back panels of my Junior Billie Bag, the quintessential quilter’s totedesigned several years ago by my teacher and mentorBillie Mahorney. I also showed you thearray of fabrics byCamelot CottonsthatI’m using inthe interior of the bag.Here are several of those cheerful prints made into pockets for my Billie Bag:

A pattern of green and yellow colors with white background

A lot of pockets. A plethora of pockets! At last count: 17. And that doesn’t includethe pocketsthat are going onthe outside of the bag.

With the pockets and handles attached toonepanel, it’s really starting to look like a Billie Bag:

A pattern of green and yellow colors with white background

The two sets of handles make it possible to carry the bag over the shoulder or by hand, like a satchel. It’s so nice to have both options in a tote that holds a lot of supplies.

Now it’s time to sew straps and pockets to the other panel:

A pattern of green and yellow colors with white background

On this last day of 2015 — a cold,sunny day in Portland, Oregon — I am enjoyingspending timein my sewing room working on my Junior Billie Bag. Later on,since the Dear Husband and Iprefer to stay home on New Year’s Eve, I’ll make an extra special dinner andwe’ll spend a quiet evening playing Scrabble, watching TV, and toastingthe New Year withchampagne.

Wishing you all a Happy New Year.Here’s to a great 2016!


Posted in Billie Bag, family, Junior Billie Bag, tote bags, update | 7 Comments

Billie’s Blessing


A pattern of green and yellow colors with white background
Dawn’s Junior Billie Bag, made in 2011

Back in 2009, when my favorite quilt teacher Billie Mahorney moved from Oregon to Idaho,she suggested I take over the teaching of her popular quilter’s tote. Billie, who taughtat the Pine Needle Quilt Shop in Lake Oswego, namedher tote”The Take It All With You Bag” but over the years it has becomeknown amonglocal quilters as the “Billie Bag.”

Each Billie Bagis unique because the maker can put whatever design she wants on the front and back of the bag, and the inside pockets are customized to hold themaker’s favoritequilt supplies. The bag holds an amazing amount,including a 6″ x 24″ acrylic ruler, thanks to the 7½” width of the side panels.

I had made the bag once in a class with Billie several years ago. While I loved the finished product,Ifound the processvery challenging.Not onlydid I not relish the idea of making another bag, I couldn’t even imagineteaching others how.After all, I had nevertaught a quilt class before.

In 2011,Billie returned to the Pine Needle as a visiting instructor and offered the class again. I was so delighted shewas teaching again that I signed up for herclass, conveniently forgetting I had sworn never to make another Billie Bag. Good thing, too, because I thoroughly enjoyed the class and was delighted with mynewBillie Bag, shown above, a slightly smaller version of the original.

By the time I made thissecond Billie Bag,I was teaching at the Pine Needle myself. Still, it took another four years before I felt I was ready to takeon the challenge of teaching Billie’s design.I talked to Billie a few weeks agoto see where she stood on the issue.Happily, she still thinks it’s a fine idea andhas givenmeher blessing to carry on with the teaching.

The Pine Needlescheduled a classin March and April 2016, which filled almost immediately when word got out. That’s how popular BillieBags are! What else could the Pine Needledo but add a second class? (You can find more information on theupcoming classes here.)

With classes now scheduled,I am in the process of makinganother bagtorefresh my memory on the process.Billie’s original bag measures 21″ x 21″ x 7½”. I’m teaching the smaller size: 14″ x 17″ x 7½”. It’s been dubbed the “Junior Billie Bag,” and I’m making my new versionfrom fabrics in theParadise line designed byAlisse Courter for Camelot Fabrics. You may remember from this post lastsummerthat I fell in love with this line of fabrics and went on a bit of a shopping spree at Hawthorne Threads:

A pattern of green and yellow colors with white background
Here are myfront and back panelspieced andquilted:

A pattern of green and yellow colors with white background
The panel on the left featurestwo inset circles, made using my favorite freezer paper method, and narrow flanges framingthe 12″ block. The panel on the right contains a 4-Patch Wonder block (my name for a four-patch kaleidoscope) in the center. I used an orange batik in my stash to set off the floral fabrics.

More of the Paradise prints are being used on the inside pockets.Lots of prints; lots of pockets.

I’ll be posting pictures as my Junior Billie Bag comes together.I hope you’ll come back to see my progress!


Posted in 4-Patch Wonder, Billie Bag, Junior Billie Bag, tote bags, update | 7 Comments

Sewing Machine Cover . . . Done!


My trusty Janome 6500has a new coat for fall:

A pattern of green and yellow colors with white background
Sewing Machine Cover


Designed by Monique Dillard of Open Gate Quilts, the pattern is from the Aug 2012 issue of American Patchwork and Quilting magazine:

A pattern of green and yellow colors with white background
Monique Dillard’s design


Thelma at CupcakesnDaisies and I both put this project on our summer “to do” list, with the goal of finishing it by Labor Day. I made it, and I think Thelma will,too, though I know she has been distracted by the siren call of wool applique.

I started working on my sewing machine cover in July while I was inSisters, Oregonwith my quilt group. I got as far as the block on the front (which is a little different from the pattern):

A pattern of green and yellow colors with white background
Center Block


Weeks passed. By the time I got back to this project near the end of August, I had decided not to make a duplicate block for the other side, as called for in the pattern,but to put a pocket across the back instead. Here is mywork-in-progress with the front and back attached to the middle panel:

A pattern of green and yellow colors with white background
In Progress


When I pinned the sides and draped the cover over my machine, I realized it was going to be way too big, so I took it apart and cut it down to size. (If you are making this pattern, I recommend that you check the size after pinning but before sewing.I think the instructions are much too generous in determining the finished size of thecover in relation to the measurements of thesewing machine.)

Since I had to take the back off, Iadded a row of decorative stitching across the pocket, which you can see in the picture below. The binding has already been added to the bottom edges:

A pattern of green and yellow colors with white background
Downsized and partially bound


You may have noticed that I added an opening in the center striped panel to accommodate the handle on my sewing machine. I made a simple facing; this iswhat it looks like on the inside:

A pattern of green and yellow colors with white background
Facing of Handle Opening


Here is another view of my new sewing machine cover from the front . . .

A pattern of green and yellow colors with white background
another view, Sewing Machine Cover

. . . and from the back:

A pattern of green and yellow colors with white background
Back View


And here it is with its companion, the Billie Bag I made last year(you can read more about the Billie Bagin my Gallery under Small Pieces):

A pattern of green and yellow colors with white background
All Dressed Up with Somewhere To Go


As you can see, the sewing machine cover was made with fabric left over from my Billie Bag. On the front and back panels of my sewing machine cover, I quilted a stipple design with the occasional leaf thrown in, duplicating the quiltingon my Billie Bag. For the middle striped panel I simply used three rows of decorative machine stitching perpendicular to the stripes.

Instead of finishingthe binding by hand, I used ¼”-inch wide Steam-a-Seam 2, a double stick fusible web, which proved to be a hugetime-saver. I wouldn’t recommend using Steam-a-Seam for bindinga quilt that’s going to get washed a lot but it’s perfect for a project like this. I used it on my Billie Bag, too.

So . . . my sewing machine cover project has gone from a “to do” to a “ta-da!” And there’s a bonus involved. For some time I’ve been collecting pictures and jotting down ideas for a quilt made of house blocks. Whiletaking pictures of thesewing machine cover bothon and off the machine, I took this shot:

A pattern of green and yellow colors with white background
Do You See What I See?


Wouldn’t that make a great house block?!


Posted in Billie Bag, sewing machine cover, update | 10 Comments