Category Archives: update

Throwback Thursday: Dianthus (2010)

First things first:  Happy New Year!! Can you believe it’s 2020?

I’m taking a look back at some of the quilts I’ve made over the last 10 years, starting in 2010. (I got the idea from Thelma at Cupcakes’n’Daisies who posted on Instagram yesterday with photos of 10 gorgeous quilts she made between 2010 and 2019. Check out her beauties at instagram.com/thelmacupcake.

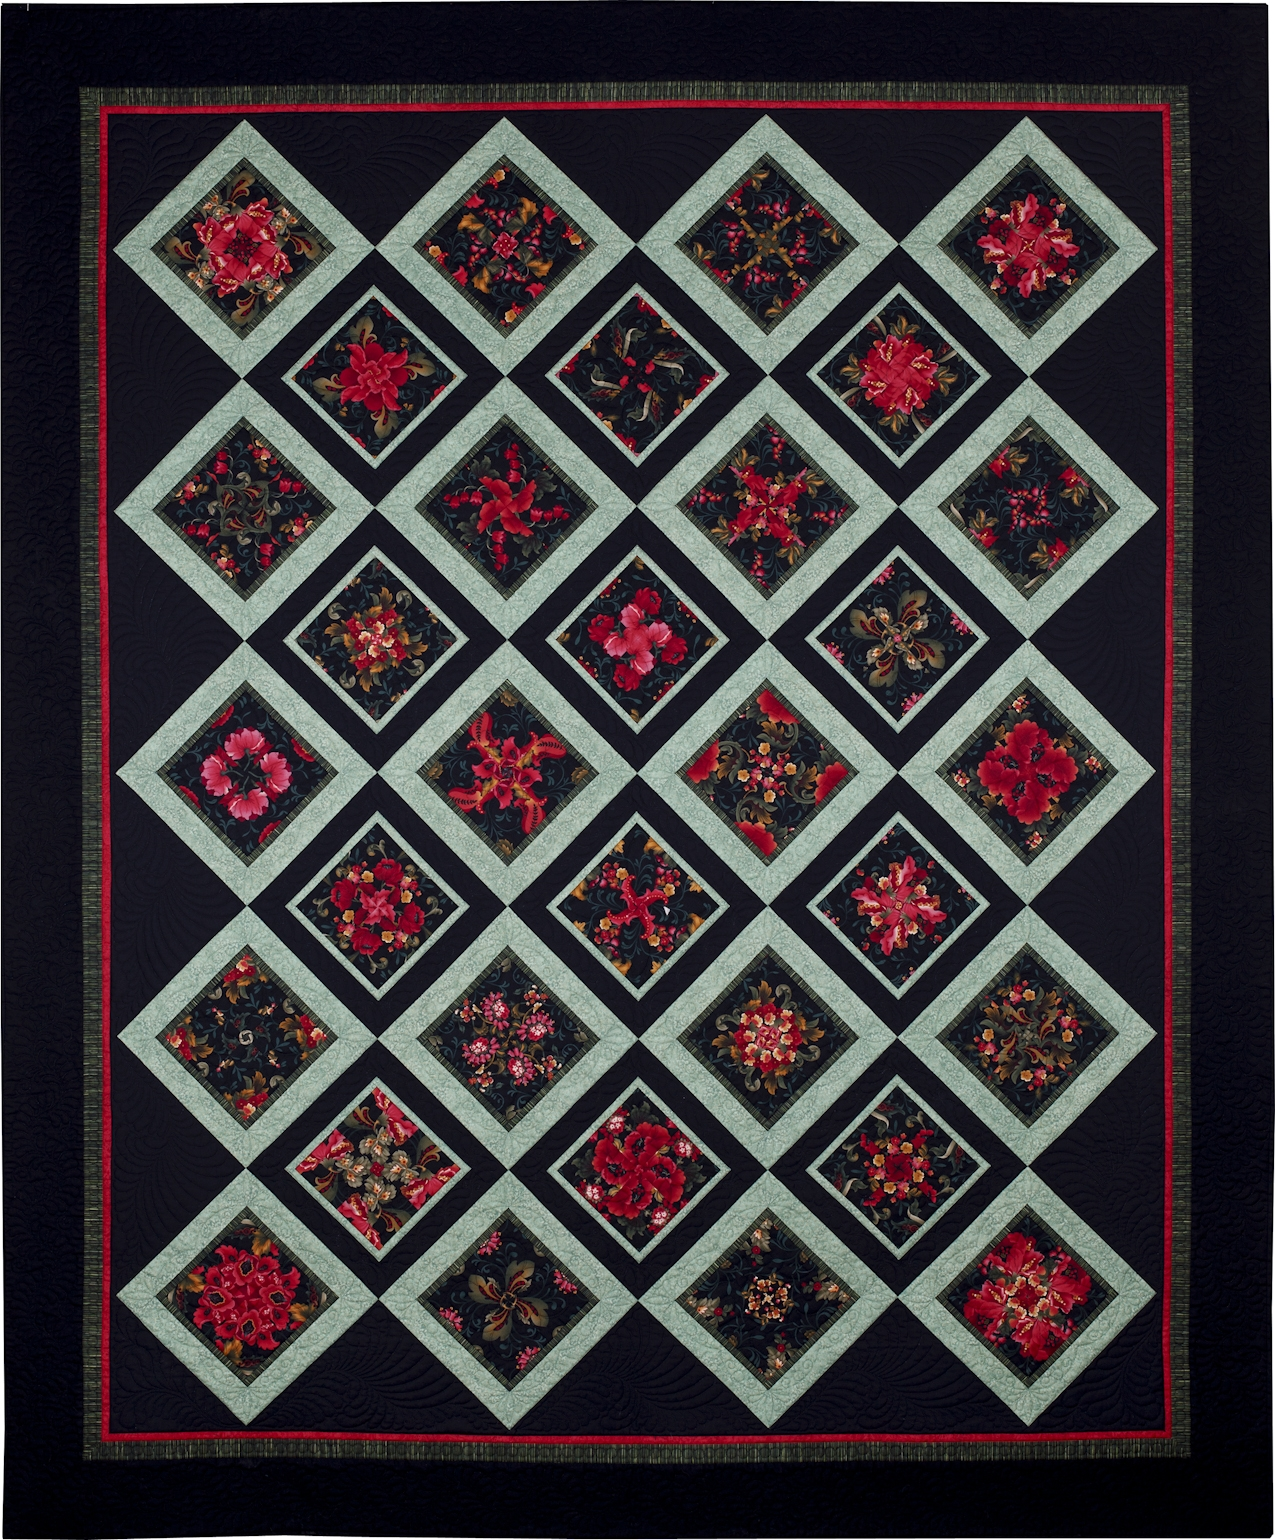
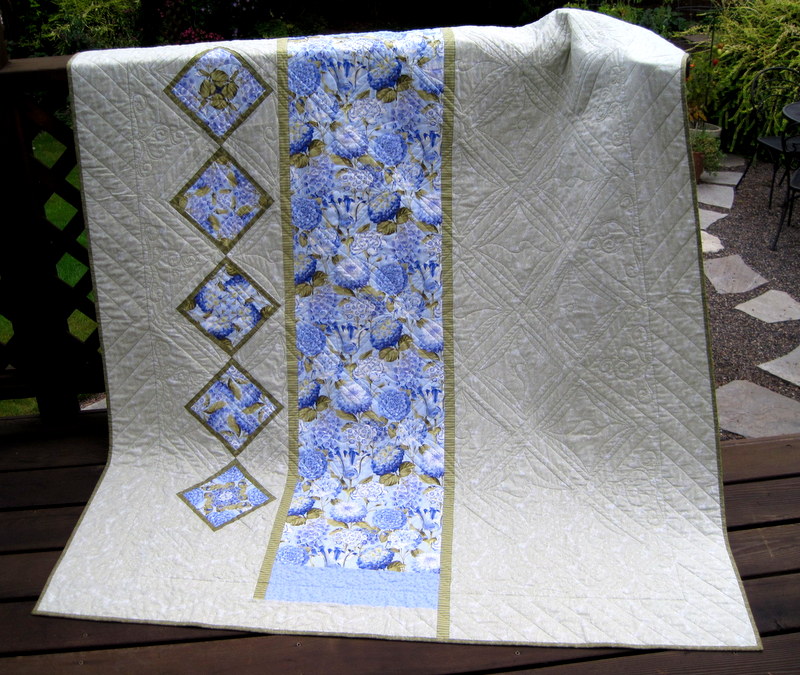
For 2010 I chose this quilt, Dianthus:

Dianthus, 57″ x 67″ (2010)

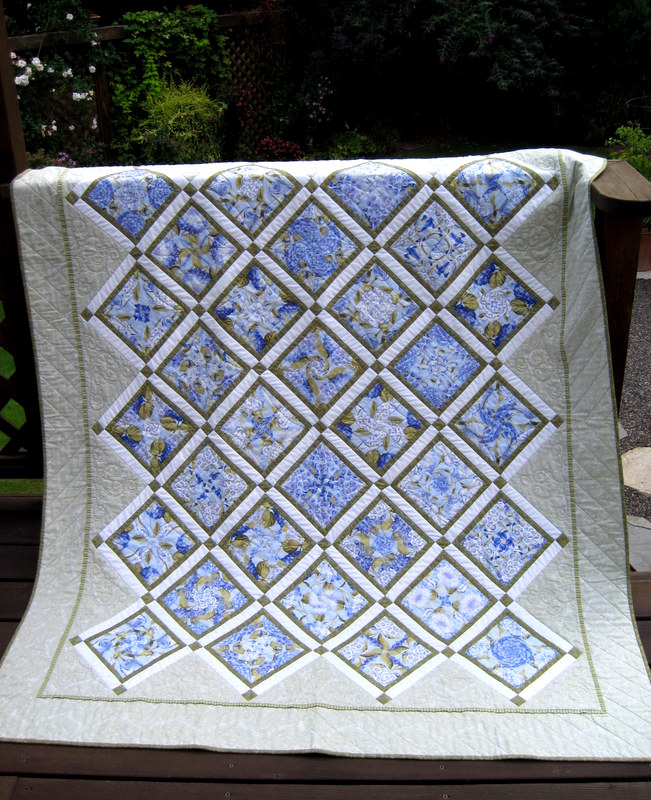
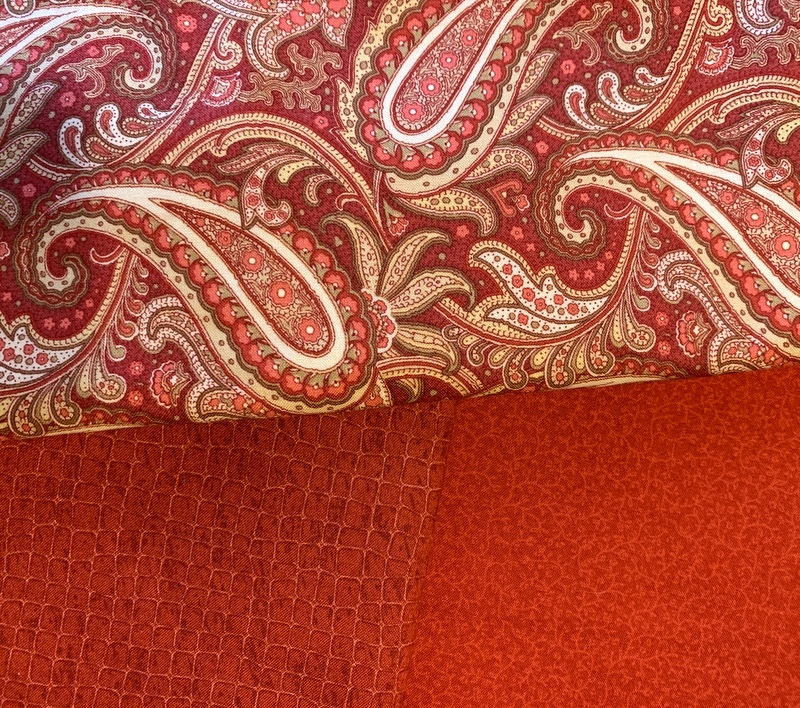
The pattern is 4-Patch Stacked Posies by HD Designs. I had recently discovered the four-patch kaleidoscope block and was having great fun investigating the possibilities with other fabrics and other settings. Here you see a large strip of the focus fabric as well as the blocks that didn’t make the cut for the front of the quilt:

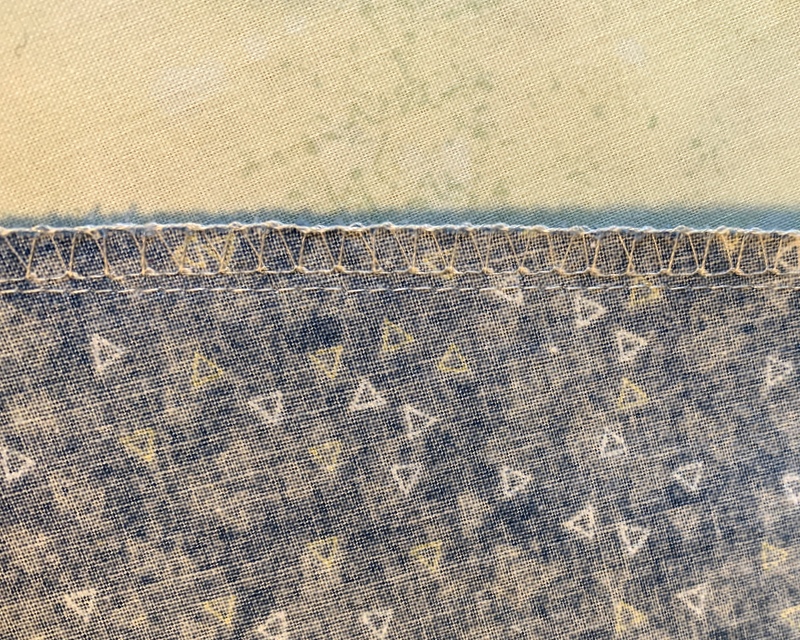
I quilted this one myself and I don’t mind telling you I was a bundle of nerves during the process. Here are a couple of close-ups:

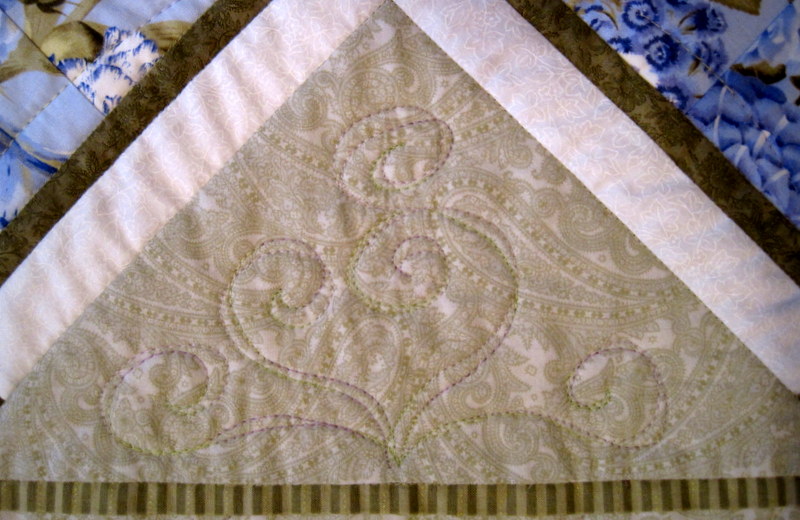
I used a variegated thread of green and lavender. The color variation is very subtle, which is just what I wanted.

Why the name Dianthus? The fabric is a gorgeous melange of blossoms including tulips, hydrangeas, and carnations. Dianthus is the Latin word for carnation. The quilt wound up at the home of my twin sister, Diane. ‘Nuff said.

When Diane’s grandson Edward was a baby, the quilt was used in his bedroom at her home:


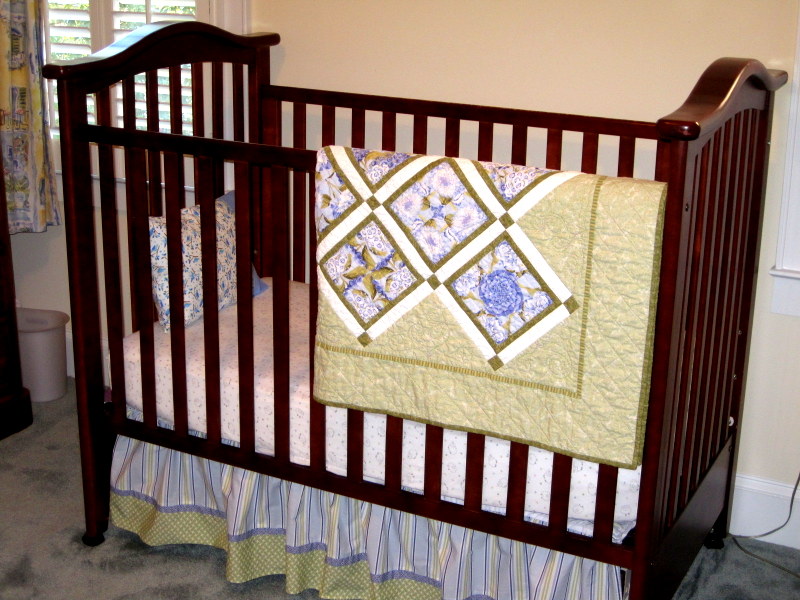
Edward is now 10 years old. (How did that happen?) He’s still a frequent overnight visitor but as you might imagine his room looks very different today. The crib has been replaced with a trundle bed, for one thing.

And the quilt? Nowadays it’s folded at the bottom of the bed in the first floor guest room and is often pulled into service for a lap quilt while watching TV. The 57″ x 67″ size makes it a good candidate for that.

Thanks for stopping by on this second day of the New Year. Do come back for next week’s Throwback Thursday to see a quilt I made in 2011.


Posted in 4-Patch Wonder, baby quilt, family, faux-kaleido quilts, free motion quilting, home dec, kaleidoscope quilts, Throwback Thursday, update | 4 Comments

Christmas Pillowcases All Year ‘Round

Now that Christmas is over, I can show you the pillowcases I made for my twin sister Diane and her husband Ed:


The cases are made for a king size bed so they measure a generous 20″ x 33″. I am so in love with that floral fabric; it’s from a 2010 line for Henry Glass Fabrics called “At Home for Christmas” designed by Heather Mulder Peterson of Anka’s Treasures. It’s been in my stash for years. Knowing I would be using most of it, I scoured the Internet looking for more and even contacted Heather to see if she still had some in her shop; alas, it is gone.

I confess it was really hard to cut into that fabric but I knew that pillowcases made from it would look wonderful in Diane and Ed’s master bedroom:

The colors are Christmas-y but the prints are not, making the pillowcases appropriate for use all year round.

I had one other thing in mind when I chose the fabric. In the picture below you can just get a glimpse of a quilt on the wall:


It’s Midnight in the Garden, one of my very favorite quilts, made from my pattern 4-Patch Wonder:

I gave the quilt to Diane for her 60th birthday a few years ago and I get to see it whenever I travel to Georgia to visit her. I figured the pillowcases would complement her quilt very nicely. And they do, don’t they?!


Posted in 4-Patch Wonder, family, faux-kaleido quilts, home dec, kaleidoscope quilts, roll-it-up pillowcases, tutorial, update, wall hanging | 10 Comments

A Bathrobe for the DH

My sweet husband has a new bathrobe:

Just in time for Christmas, though it’s not a Christmas present. The one I made him several years ago was completely worn out. I’m chagrined he had to wait so long for a new one.

Somehow I wound up with three bathrobe patterns. The one I ended up using was the Palmer/Pletsch one (lower right), with a few modifications:

And I didn’t pull my serger out of the closet after all. I decided to try finishing the seams with the overlock foot on my Janome, a foot I had actually never used before. The results were just fine:

It did take longer to finish the seams this way. And this frequent visitor to my sewing room caused additional delays in the construction process:


Posted in cats, family, garment sewing, update | 6 Comments

More Simple Sewing

It’s been almost two weeks since the Dear Husband and I returned from our annual Thanksgiving trip to Georgia. I’m afraid I don’t have much to show for it in terms of sewing. Quite ironic, as the few things I have worked on fall squarely in the “simple sewing” camp.

I converted a one-pocket long-sleeved shirt for the DH into a two-pocket short-sleeved shirt. The pockets were made from the bottom part of the sleeves:

I hope you can see the pocket! I matched the plaid pretty carefully.

New napkins for the Portland White House (we don’t use paper napkins):

Pillowcases for the Portland White House featuring the same toile fabric I used in the pillowcases made when I was in Georgia (which I wrote about here):

These are ready to go in my linen closet. Judging by the look on Coco’s face, I may not get them away from her:

That simple paisley table topper I made for sister Diane over Thanksgiving is getting a re-do. It was just two pieces of fabric sewn right sides together, turned, and topstitched around the edges. Trouble was, the two layers of fabric didn’t lie completely flat. I convinced Diane I had to take the table topper home and remake it, this time stitching the layers together and adding a simple binding.

Here’s the paisley fabric with two choices for binding pulled from my stash:

We’re going with the one on the bottom left. Diane and I both like the way the linear squares play off the paisley, and it’s a better color match. I think the binding will look even better cut on the bias.

Once I’m done with that, I absolutely must make the DH a new bathrobe. The one I made him several years ago is practically in tatters. I picked up a cotton print a few months ago with his bathrobe in mind. I’ll trim it with a navy blue blender from Maywood:

It’s been a while since I made a garment. I’ll be pulling my serger out of the sewing room closet and refreshing my memory on how it works. Wish me luck!


Posted in family, garment sewing, home dec, mitered corners, roll-it-up pillowcases, table napkins, table topper, update | 4 Comments

Simple Sewing

My sister Diane has a new table topper and four generously sized napkins made from the same paisley fabric I used last year to update the window treatment in her dining room:

(I wrote about the window treatments in this post from a year ago.)

Simple sewing. Even so, I found it necessary to revisit my own tutorial on mitering the corners of the napkins.

Diane just happened to have some enameled napkin rings shaped like umbrellas that go perfectly with the napkins:

Aren’t those fun? They add just the right amount of whimsy, don’t you think?


Posted in family, home dec, mitered corners, table napkins, table topper, update | 6 Comments

Giving Thanks

Greetings from Norcross, Georgia, the Atlanta suburb where my twin sister Diane and her husband Ed live. My husband and I are here for our annual Thanksgiving visit spanning two weeks. We’ve already been here a week. The time is going by way too fast!

Before we left Portland, Diane asked if I would bring fabric to make a pair of what she calls “Dawn pillowcases” as a thank you gift for a friend of hers. These are pillowcases made in such a way that all seams are enclosed. You may know them as burrito or roll-it-up pillowcases (see my tutorial here.) I love to have a sewing project to work on while I am here so of course I said yes.

Diane figured I would have something appropriate in my stash. (How well she knows me!) I texted her photos of possible fabrics and she quickly zeroed in on this lovely sage and cream toile from Timeless Treasures that I’ve had for a few years:

I brought several other fabrics as candidates for contrast strips, flanges, and bottom bands. Diane chose a narrow stripe for the flange and a small leaf print for the band, deciding against a third fabric for a contrast strip between the flange and the body of the pillowcase. This is the result:

The pillowcases are pictured on the bed in the main floor guest room, whose bedspread and quilt (the latter made by moi several years ago) match the cases perfectly.

As it happened, I didn’t have quite enough of the leaf fabric to make two bands without having to piece them. I used strips of the toile to do that. Take a peek inside a pillowcase:

Here’s a close-up of the inside:

I stitched the seam allowances down so they will stay flat when the pillowcases are washed.

Diane arranged the cases in a lovely gift box:

They’ll be in the mail tomorrow.

I had five yards of that toile; perhaps I was thinking of it as a potential quilt backing. There’s enough left to make two more sets of pillowcases — one for Diane’s guest room (since we know how well the pillowcases go with the furnishings) and one for the Portland White House. I’m thankful for that!


Posted in family, home dec, roll-it-up pillowcases, tutorial, update | 7 Comments

Suite Stuff

With a new Junior Billie Bag in my sewing room and a coordinating tool caddy, it was just a matter of time before I gave into the temptation to complete the suite of accessories. Pictured with the tool caddy below are a scissors case, a rotary cutter coat, and a fabric box:


I love these fabrics and colors so much!

You can find picture-heavy tutorials for the scissors case and rotary cutter coat under the Tutorials link at the top of my home page . . . or you can just click on this link.

Speaking of Junior Billie Bag accessories, I forgot to show you the tool caddy I made recently to go with the JBB completed last spring for a class I was teaching:

My friend Cheryl S. was the surprise recipient of this JBB and tool caddy when we were together at Quilt Camp earlier this month.

I’m so ready to shift gears! There’s a new-ish project I’m eager to get back to as soon as I finish up a couple of ongoing projects. And as my twin sister Diane keeps reminding me, the newly remodeled kitchen won’t be complete until I make those valances . . .


Posted in Billie Bag, Churning Stars quilt block, Junior Billie Bag, sewing tool caddy, tote bags, tutorial, update | 3 Comments

Finally a Finish! Here’s Junior Billie Bag #10

I put the finishing touches on my latest Junior Billie Bag yesterday. Take a look at #10:


I can’t decide which view I like better! The block on the left is a Sawtooth Star with a Churn Dash in the center. The block on the right features an inset circle set off by a narrow flange. It’s hard to see from the photo that I used a variegated thread of blues and greens to quilt lines radiating from the circle.

I’ve used both block designs before in other projects (including other Junior Billie Bags) because I really like to make them.

Coco the Cat Inspector approves:

She found it so comfortable that she actually took a little catnap, which is why I don’t have a picture of the inside pockets to show you just now.

This JBB is one that I’m keeping for myself. It’s already loaded with my favorite rulers and other essential tools, as is the coordinating tool caddy I made from the Travel Case pattern from p3designs.com:

I made a few modifications, including the addition of a fourth pocket.

This is what it looks like closed:

I keep it in a plastic brochure rack so that it is always upright, with my smaller tools right at hand.

Still to come: the other accessories I like to make with each Junior Billie Bag, including a rotary cutter coat, a scissors case, and a 4″ square fabric box used as a thread catcher.


Posted in Billie Bag, cats, Churning Stars quilt block, Junior Billie Bag, update | 3 Comments

JBB 3-D

A rather cryptic title for a blog post, I know, but regular readers know what it means. My latest Junior Billie Bag in-the-making has gone three-dimensional:

As I’ve mentioned before, this is my favorite part of the process, when a series of flat panels like this . . .

. . . and this . . .

. . . and this . . .

. . . are transformed into the quintessential quilter’s tote known as the Junior Billie Bag.

Junior Billie Bags (JBBs for short) have been a frequent topic on my blog since I started teaching Billie Mahorney’s design three years ago. I have been asked many times about a pattern for this tote but Billie, who owns the copyright on the design, never wanted to create a pattern.

Teaching her design in a hands-on class is by far the best way to go because I can share tips and techniques that have come to me through experience and also troubleshoot problems my students may encounter, just as Billie did when she was teaching. I’m so sorry that quilters across the country and beyond who have seen pictures of various JBBs on my blog don’t have the opportunity to create one of their own.

As I was snapping photos for this post, a little white paw made its way into the frame:


Uh-oh. It can only be Coco the Photobomb!


Posted in Billie Bag, cats, Churning Stars quilt block, free motion quilting, Junior Billie Bag, tote bags, update | 5 Comments

Egg-ceptionally Creative Crafting

Meet the newest resident of my sewing room:

This Scotch lassie is only 3½” tall and less than 2″ wide. Isn’t she adorable? She was made from an egg — an egg! — by my husband’s daughter Barbie when she was a young girl.

The Scotch lass joins two other little egg dolls, also made by Barbie, that have been gracing my sewing room for several years:


When Barbie’s mother died in 2008, these little treasures were found tucked away in a box in her home. Happily for me, Barbie brought them to the Portland White House where they have been lovingly displayed on a shelf in my sewing room. The latest addition turned up recently in a box at the home of my husband’s son Mike, no doubt brought there after his mother’s passing.

(I should note that Mike and Barbie are just a few years younger than I am. I married their father when I was 30 and they were in their 20s. That was almost 40 years ago. . .)

I asked Barbie how she learned to make these dolls and how old she was when she made them. It turns out Barbie and her best friend Bonnie — namesake of Barbie’s older daughter, now 19 — made dozens of these around the time they were in 7th to 9th grades. This was in the mid to late 1960s, which means these dolls are around 50 years old.

“Bonnie and I always enjoyed doing crafty things,” recalled Barbie. ‘We used to make little one-inch dolls out of felt for our bigger dolls. These tiny dolls were stuffed and had embroidered eyes or eyes made from beads. We used ‘weaving loom loops’ made for kids and shaped them for hair.” Barbie noted that the flowers on the hat of the doll above right were made from weaving loom loops.

(Weaving loom loops. That rang a bell. I remember making a potholder for my grandmother with one of those weaving loom kits when I was a kid. It was red and grey, a color combo I love to this day.)

I am amazed at the artistry and creativity behind these egg dolls. How did they do it? “No one helped us,” said Barbie. “All logistical problems we solved ourselves. I think Grace may have shown us how to puncture and blow out the raw eggs. But that was it.”

The detail on these dolls is amazing. Look at their hair, their clothing, their hats. “Bonnie’s mom Grace sewed so there were always plenty of fabric scraps around,” said Barbie. The girls drew the faces on with watercolors although Barbie thinks they may have also used crayons and felt tip markers.

The care with which Bonnie and Barbie created their egg dolls extends 360 degrees. Look at the backs of the dolls:


As I examined these egg dolls again today, I realized that the shoulders of the dolls are made from egg cartons.

“That’s right,” said Barbie. “Cut and upside down, with felt cut and glued on the bottom. We may have added something for weight on the inside.”

These three dolls are all that remain of the dozens that Bonnie and Barbie crafted together. It’s pretty miraculous that they have survived half a century. I love having them on display in my sewing room but I know they are not mine to keep. As I reminded Barbie today, “You know these belong to you. I consider myself a lucky temporary custodian!”


Posted in family, update | 9 Comments