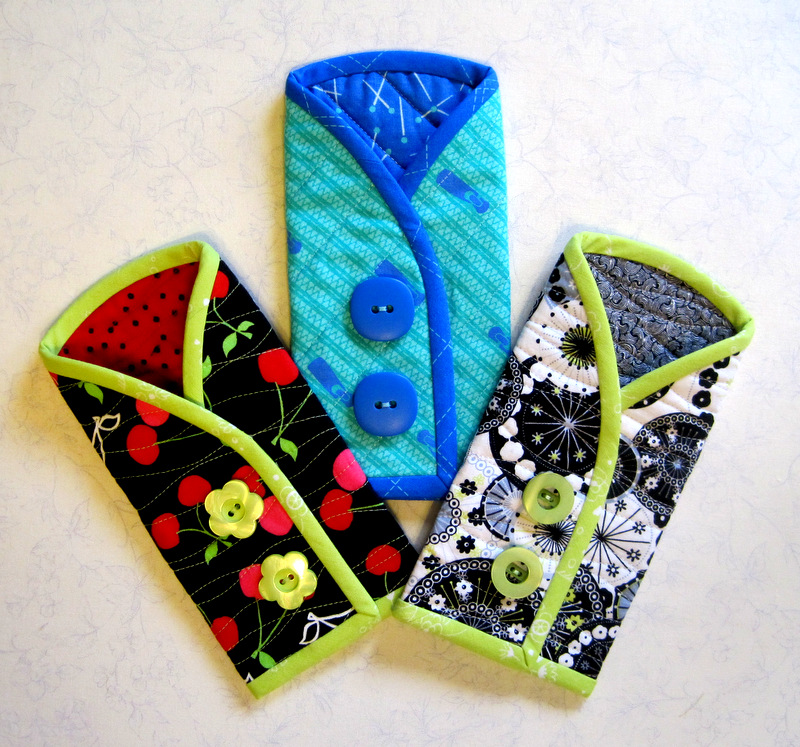
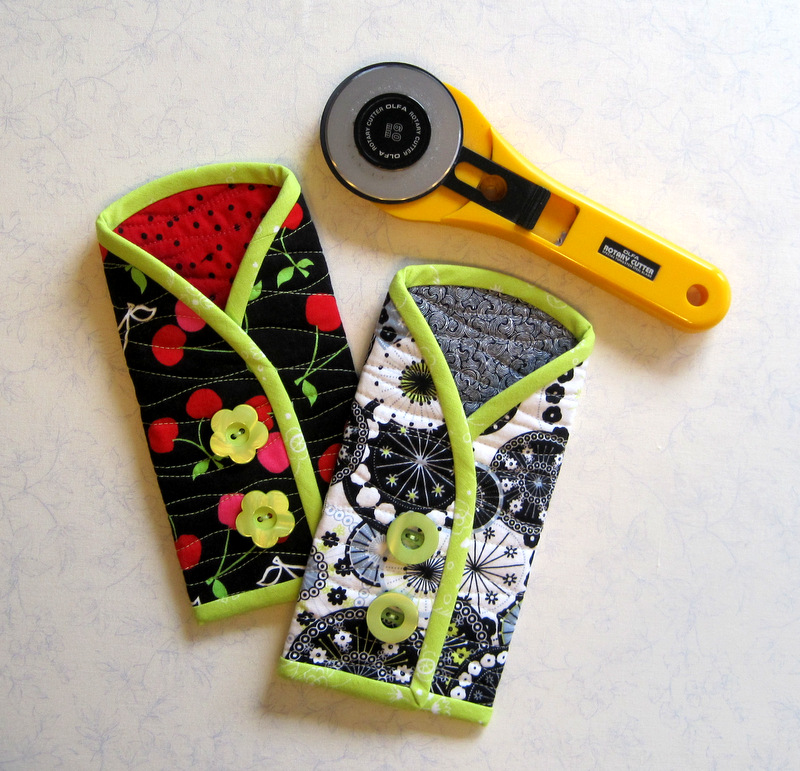
Would you like to win one of these rotary cutter coats? I’m hosting a Giveaway and will send one of these cases to three lucky winners. To enter all you need to do is add a comment at the bottom of this post answering one of two questions:
1) which case do you like the best and why (fabric? buttons? color combo? something else)?
or
2) how did you find out about my website/blog?
The Giveaway will remain open through this week. I’ll draw three names using a random number generator and announce the winners early next week. I will mail anywhere in the world so international readers are welcome to enter.
A tutorial for making one of these rotary cutter coats can be found here.
Good luck, everyone, and thank you so much for visiting First Light Designs!
Today’s my day to post in the “Around the World Blog Hop.” It’s like a chain letter passed from one blogger to another. What a fun way to meet new quilters and discover new quilting blogs! My assignment is to respond to four questions and then tag another quilter who will post on the same questions a week later.
I was tagged by Debbie Scroggy of All Quilted, LLC. Debbie is a local award-winning professional longarm quilter whose clients keep coming back because she does beautiful work. She takes care to bring out the best in every quilter’s project. I know this because she has quilted two quilts for me — and they will certainly not be the last. I’ve seen examples of quilting Debbie has done for other people as well as quilts she has made herself. You’ll see for yourself when you click on the link above. And when you do, you’ll find a link to the blogger who tagged her. This blog hop takes you backward as well as forward.
Moving forward, you will hop from Oregon halfway across the North American continent to visit Jennifer Gwyn of Seams Crazy. Jennifer lives in Houston, Texas with her husband and two young children. Despite the demands of working and raising a family, she still manages to get a lot of quilting done. Jennifer’s fabric choices are always pleasing to the eye. I especially admire her ability to go scrappy when the quilt calls for it. I have Jennifer to thank for the project you see below. She wrote about it on her blog late last year and got me hooked.
On to the assignment at hand.
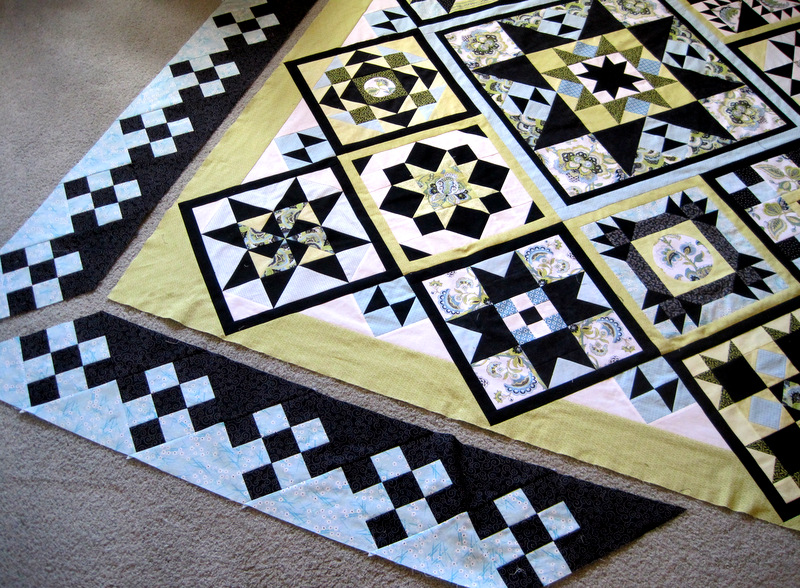
1. What am I working on? Ah, the easy question first. I always have several projects underway. One is my series sampler quilt, Reach for the Stars:
Reach for the Stars Border Puzzle
I’ve been working on this quilt since the beginning of the year, and the end is tantalizingly in sight. At the moment I’m trying to solve the puzzle of how to make the borders match in all four corners, something the original design does not do. The math doesn’t work out, and I’m trying to figure out a creative way to make it work.
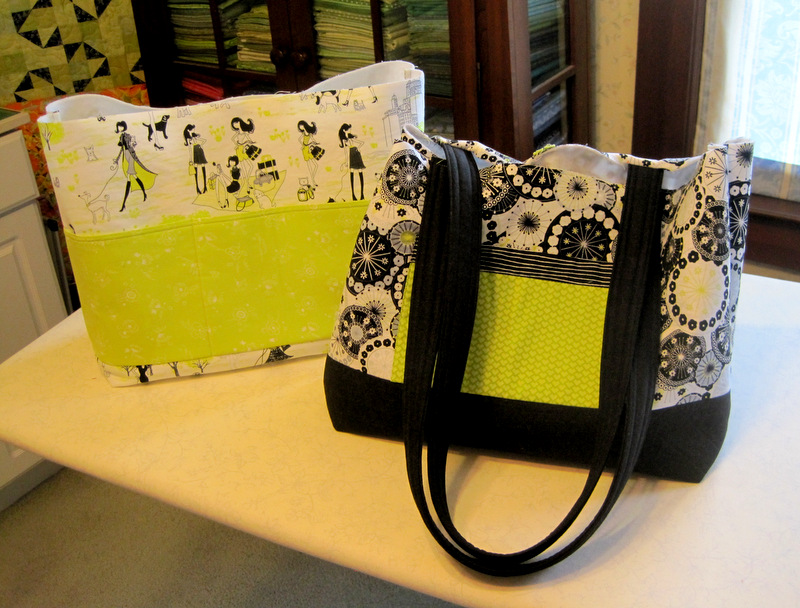
Another work-in-progress is this Bow Tucks Tote, designed by Penny Sturges of quiltsillustrated.com:
Tote Bag in Progress
I’m currently teaching a class on this bag at the Pine Needle and need to make a tote along with my students to demonstrate the steps. In the photo above, that’s the lining you see on the left. The green strip turns into pockets that go around the entire inside of the bag. Clever!
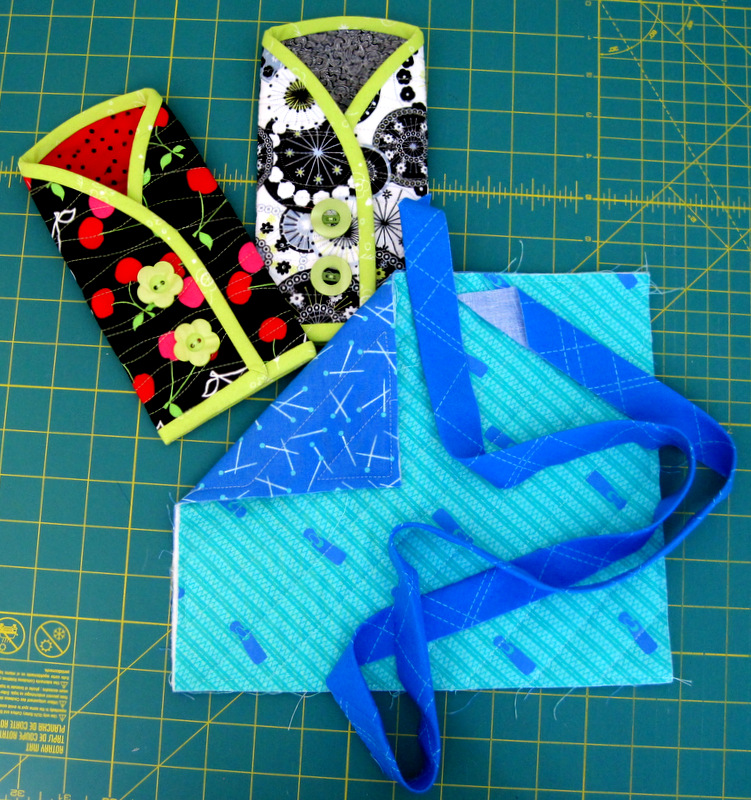
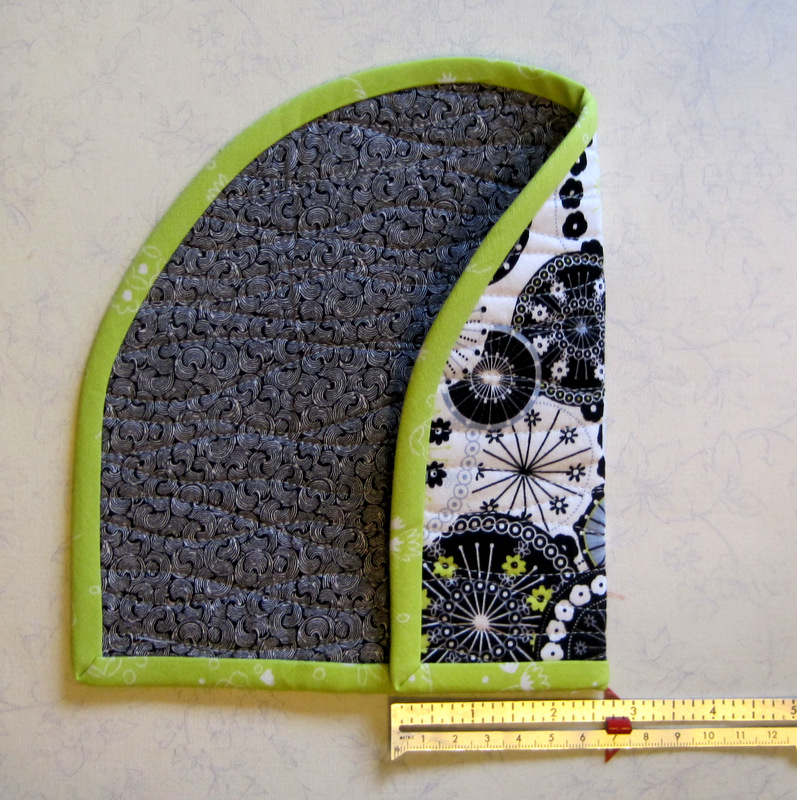
Yet another project is this Rotary Cutter Coat, one of my own designs:
Rotary Cutter Coat in the Works
Look closely at the fabrics in the unfinished project above: those are zipper pulls and zipper teeth on the front and straight pins on the back. So cute! (I posted a tutorial a few days ago that includes a link to the free pattern; perhaps you’d like to make a rotary cutter coat yourself.) As soon as the zipper pull coat above is finished, I’m going to give all three away. I hope you’ll come back later this week for my Giveaway.
2. How does my work differ from others of its genre? I would be hard pressed even to identify what genre my work fits in. I’m all over the map in terms of the kinds of quilts I like — and the kinds of quilts I like to make. Am I a traditional quilter? Absolutely. Non-traditional quilter? Yes. Modern quilter? Yes. Art quilter? That too. I tend to make what pleases me, and most of the time my work pleases others. That’s satisfying on both fronts.
3. Why do I create what I do? It’s all about the fabric. I love fabric! I love to make things with it. My mother taught me to sew when I was 12 years old, and I honestly can’t remember a time I didn’t have some kind of sewing project underway. I made all of my own clothes well into the 1980s (past the time when it was cheaper to make clothing than to buy it), along with pillows and curtains and other “soft furnishings.” By then I had also discovered quilting, which became a creative outlet and antidote to an intense work schedule. When I retired six years ago, quilting — and then teaching quilting — took over my life. Oh, and sewing for my sisters, who think I’m the Home Dec Queen.
4. How does my creative process work? Often an element in a quilt — a block, perhaps, or a border — will catch my eye, and I will think about how I might incorporate it into a quilt of my own. Or I will look at a traditional block and ponder how it might be jazzed up a bit. I will look at a design element and think, “What if I did this or that to it?” Some of my best ideas have come from asking myself, “What if . . .?”
Some of my work is frankly derivative. Case in point: the rotary cutter coats pictured above. A couple of years ago I saw a pattern in a magazine for a quilted eyeglasses case. I was instantly transported back to the age of four, when I got my first pair of glasses. I came home from the optician with glasses on my nose and a faux-leather case to store them in when I wasn’t wearing them. The case was cut along the same lines as the one in the magazine. I examined the eyeglasses case in the photo and said to myself, “What if . . .?” The result was a case (or coat, as I like to call it) designed specifically for a rotary cutter, though it could certainly double as a case for a pair of large eyeglasses.
I find inspiration everywhere: not just in books and magazines but also in nature, the work of other quilters and crafters, designs in fabric, a sidewalk, a coffee cup. I study quilts I like — and quilts I don’t much care for — to understand what appeals to me and why. Straying from the familiar path and trying something new are parts of the creative process, so I take classes whenever I can.
***
Jennifer’s “Blog Hop Around the World” post is due Oct. 20, one week from today. But you don’t have to wait till then to visit her blog. Go there now and see what she’s working on. Not only will you get a glimpse of her Reach for the Stars fabrics, you’ll be able to check out the size of her stash. Oh my!
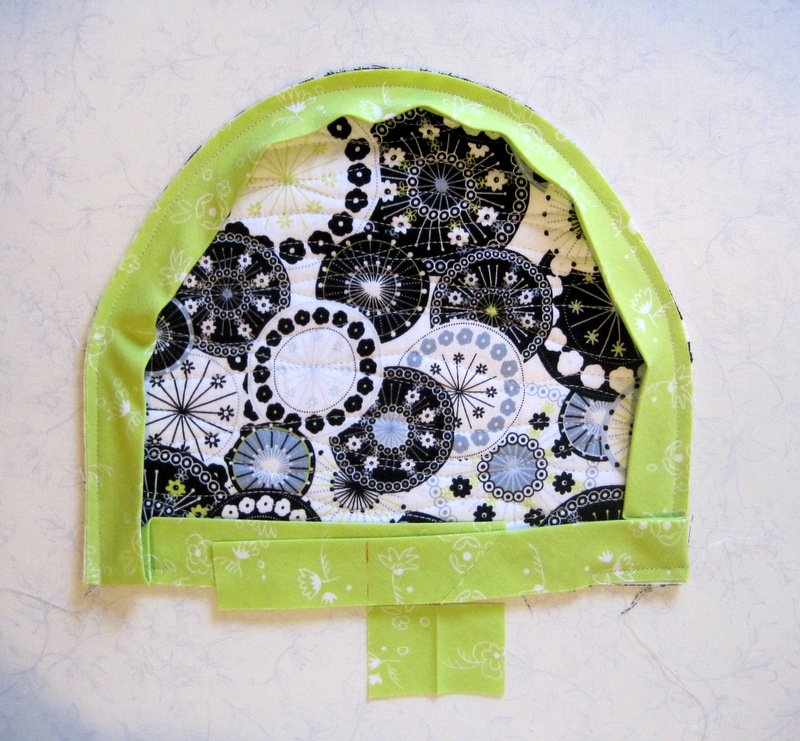
What quilter wouldn’t love one of these quilted cases to hold her rotary cutter? The buttons and contrast trim make the cases look like little coats — so that is what I am calling them. A finished coat measures about 3¾” x 8″.
This tutorial guides you step by step. You can also download a one-page handout.
Fabric and notions One piece of fabric 9″ x 10½” for outside of coat
One piece of fabric 9″ x 10½” for inside (lining)
One piece of fabric 18″ square for bias binding
One piece of lightweight batting trimmed to 9″ x 10½”
One piece of freezer paper about 10″ x 11″
¼”-wide Steam-a-Seam 2 (double stick fusible web)
Two buttons 7/8″ – 1¼” in diameter
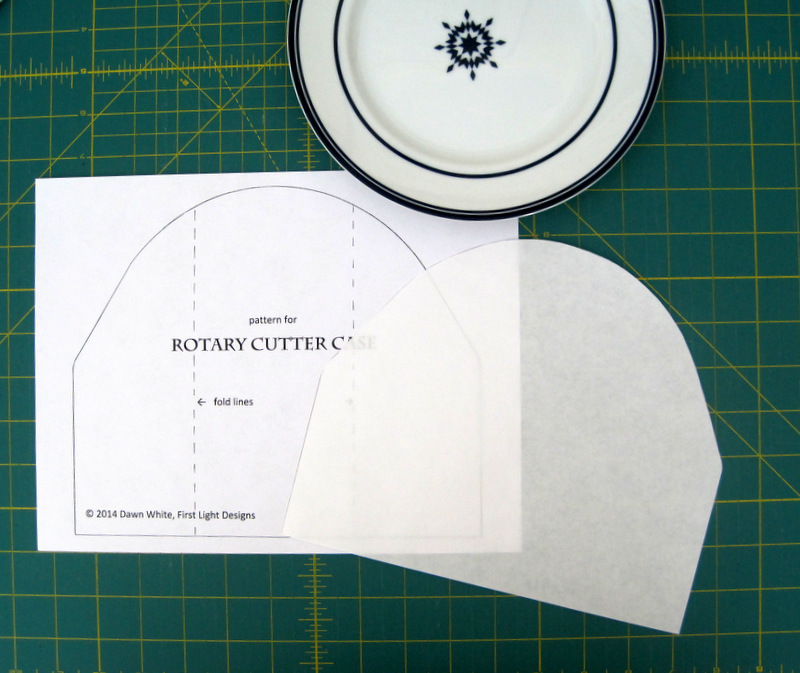
1. Download and print the pattern. The bottom edge of the pattern should measure 9½”. If the measurement is less than that, enlarge the pattern slightly. (If the bottom edge measures 9¼”, the pattern will still work just fine. All you need to do is alter the flap measurement in Step 10 to 2-5/8″.)
2. Trace the pattern onto the flat (not shiny) side of the freezer paper. Cut around the outside edges of the pattern. Set pattern aside.
Paper Pattern at Left, Freezer Paper Pattern at Right
Are you wondering what that blue and white plate is doing in the picture above? I thought it would amuse you to know that’s what gave me the shape for the rounded part of the pattern.
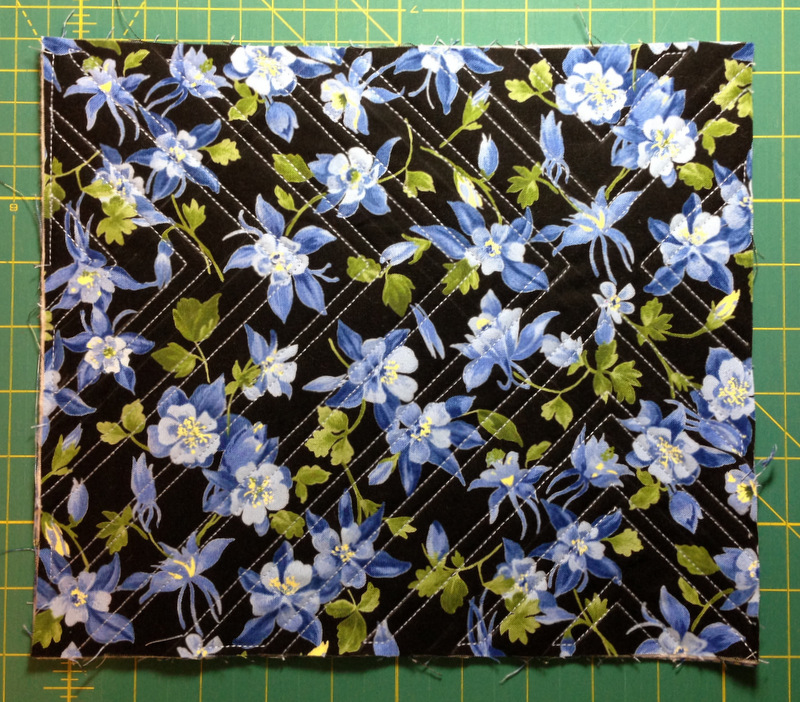
3. Lay the lining fabric wrong side up on a flat surface. Lay the batting fabric on top. Lay the outside fabric right side up on top of the batting. You now have a quilt sandwich. Baste and quilt as desired.
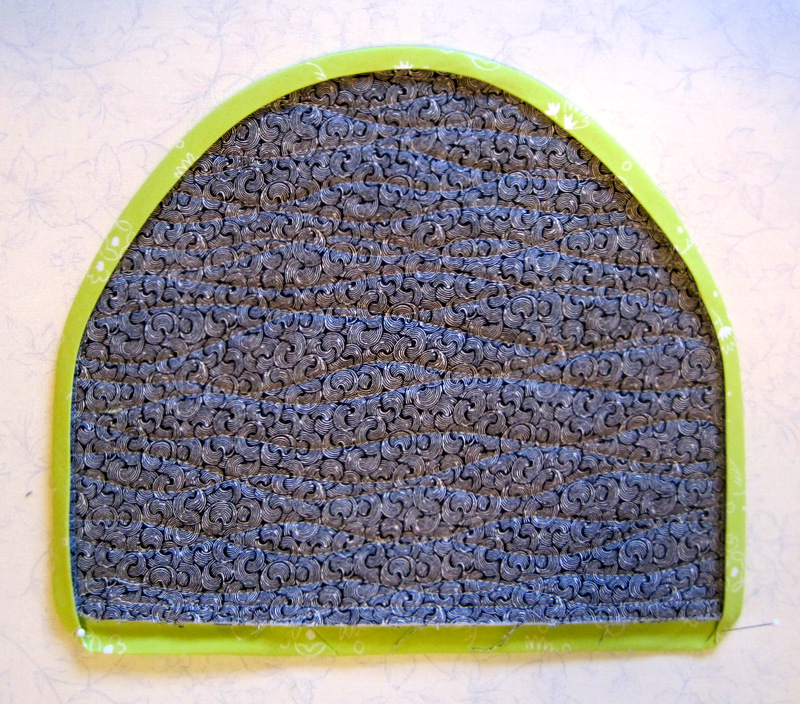
You can quilt any motif you desire. Free-motion quilting is an option but I usually take the easy route and quilt straight lines or random curved lines using my walking foot. With straight lines I often stitch on the diagonal about 1″ apart. In the example below I used straight lines at right angles to form a chevron design:
Straight Line Quilting (on the Diagonal)
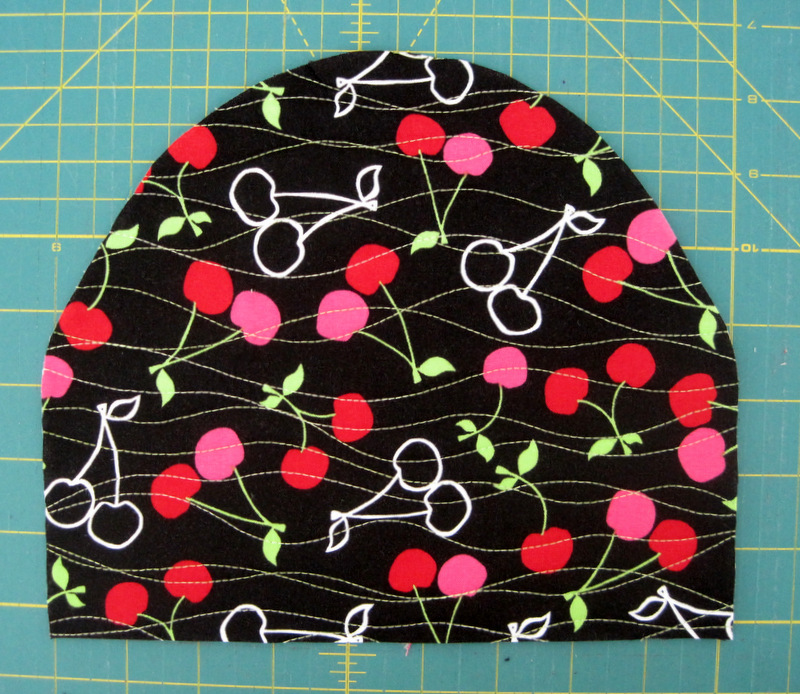
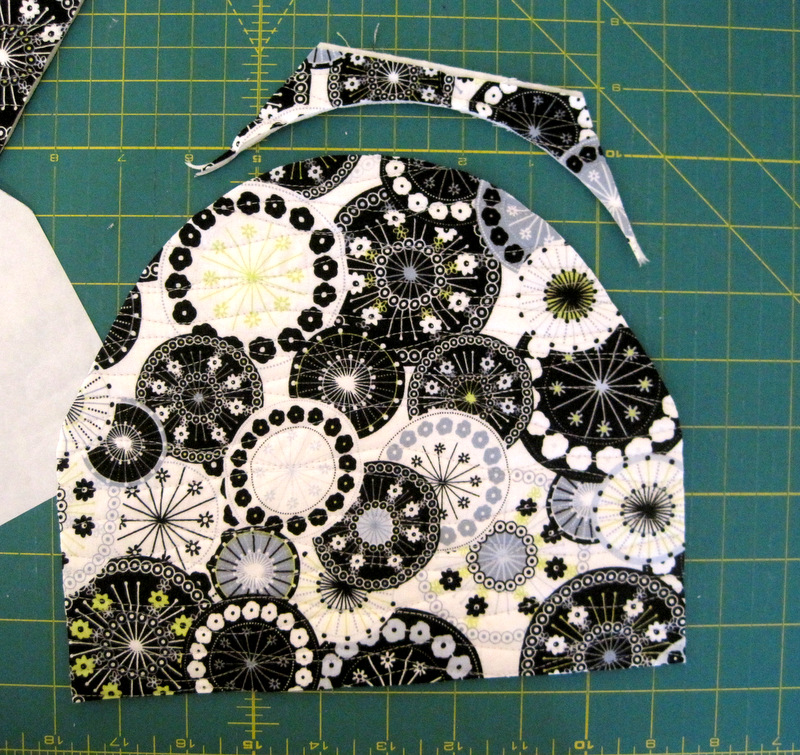
In the two rotary cutter coats pictured at the top of my post, I quilted random wavy lines horizontally in both, although vertical lines would look good too. In the one with the black background I used a 40-wt thread in a contrasting color. Here’s a close-up of that one (after I had cut the pattern out):
Random Wavy Quilted Lines
In the other one (pictured in the rest of this post), I wanted the thread to blend so I used a 50-wt thread in pale grey.
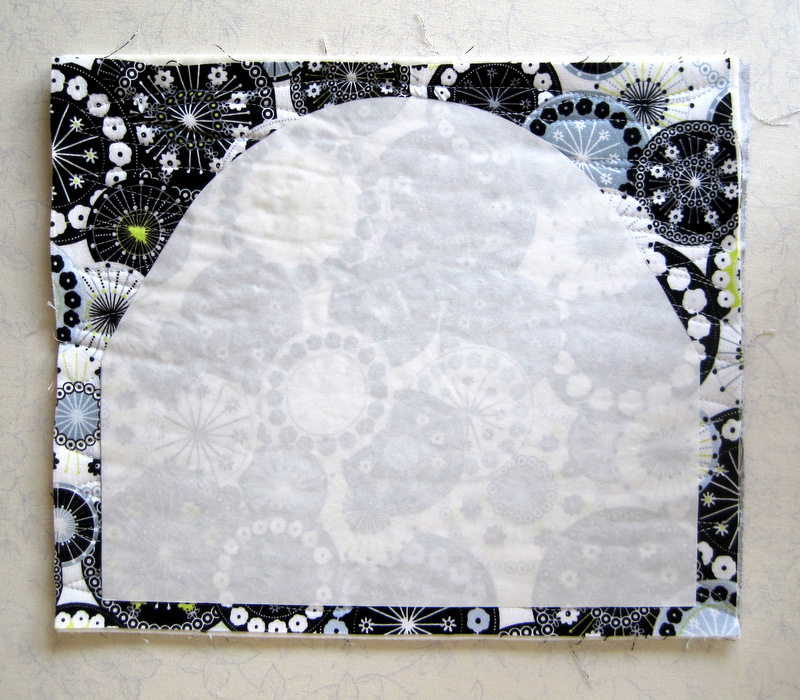
4. Center the freezer paper pattern (shiny side down) on the right side of the quilt sandwich and press with a dry iron:
Pattern Ironed to Quilt Sandwich
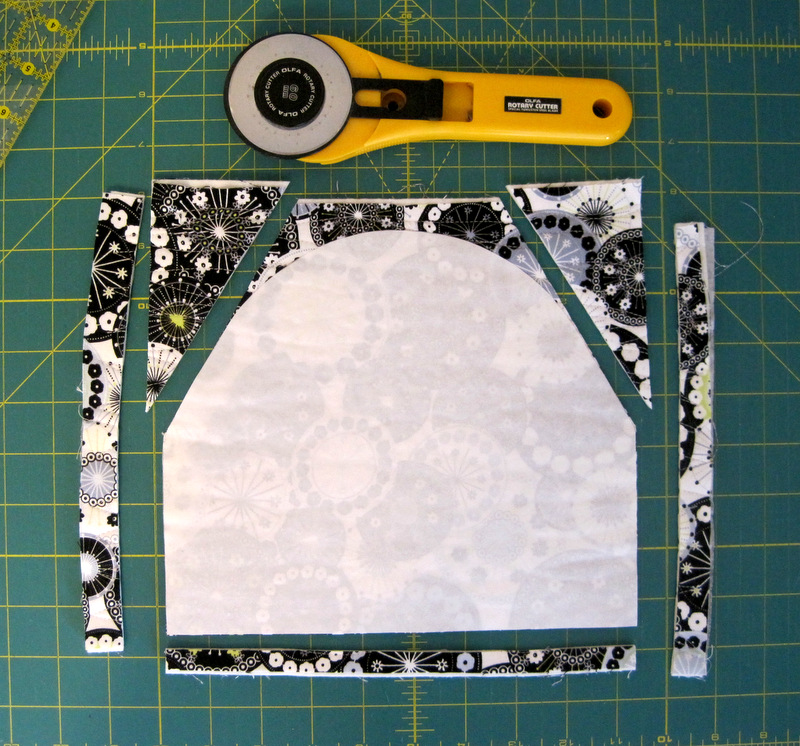
5. You could cut the pattern out with scissors but using your rotary cutter is faster and more accurate. Align the rotary cutter and ruler along the bottom and sides of the pattern and cut. Use the rotary cutter and ruler to cut the beginning of the curves as shown below:
Five Straight Cuts with the Rotary Cutter
Use scissors to cut the rest of the curve:
Remainder of Curve Cut and Sides Rounded Off with Scissors
Peel off freezer paper pattern for repeated use. Use scissors to round off the side edges on the quilt sandwich.
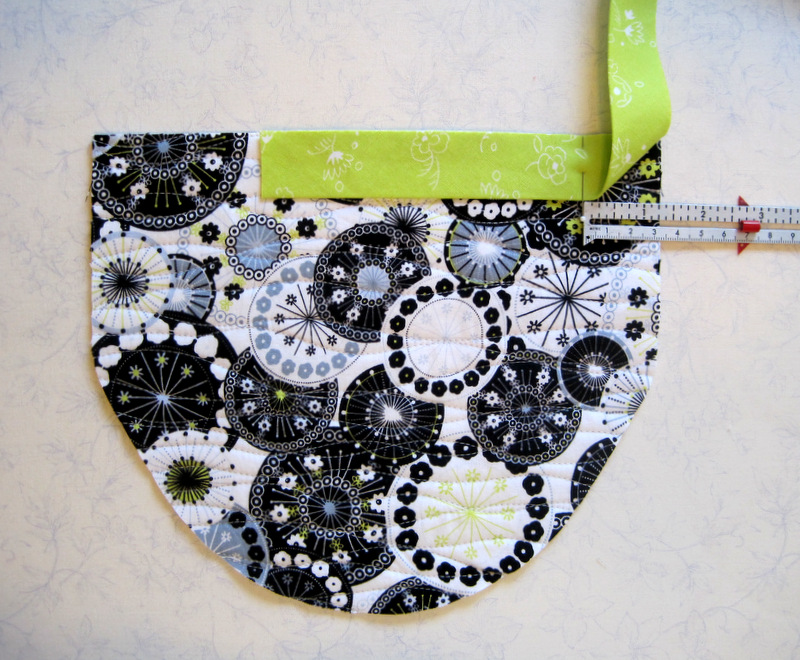
6. Cut 18″ square of binding fabric corner to corner on the diagonal. From each piece cut a strip 2-1/8″ wide along the bias edge. Sew strips together using an angled seam. You need a length about 34″ long. Fold strip in half lengthwise and press.
7. With the walking foot still on your machine, attach binding to the right side of the case as you would for a quilt, starting and ending along the bottom edge. Leave a tail 5-6″ long and begin stitching 1-1/4″ away from the first corner:
Binding Has Begun!
Gently guide the bias binding around the curve of the quilt sandwich, stitching a scant 1/4″ seam. When you get to the other side of the bottom, end your stitching 1″ in from the edge.
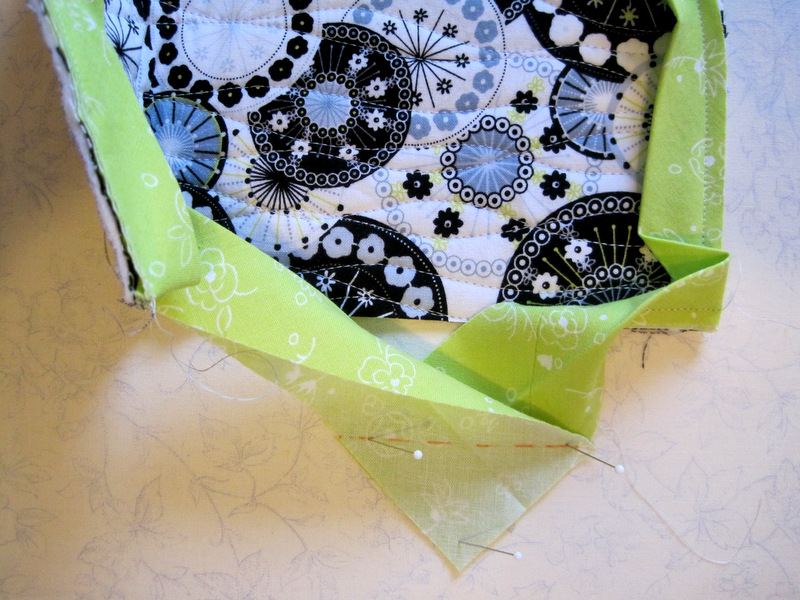
8. Use your favorite method of joining the ends of the binding. This is the method I use:
Joining the Ends of the Binding Strip
See the red vertical line marked on the binding strip? When I trim the strip there, the two edges of the binding will overlap 2-1/8″, the exact measurement of the binding strip width. (That’s a scrap of the binding fabric at the bottom of the photo, placed there to show you that it’s the same width as the overlap of the two strips.)
Open up the binding strips and join them right sides together at a 90 ° angle, being careful not to twist the strips. See the red line? That’s my stitching line. I’ve got the ends pinned to the ironing board to give you a good look:
Joining the Binding Strips
Stitch the binding seam, trim to 1/4″, press open, and finish stitching the seam along the bottom edge, beginning and ending a few stitches beyond the original stitching lines:
Binding is Stitched in Place
9. Turn the binding toward the inside (lining) of the case — it will cup nicely around the curve — and press in place. If the folded edge of the binding doesn’t completely cover the stitching line, trim the seam a bit. I find I usually have to do this around the curved edge.
The Bottom Edge Awaits Pressing
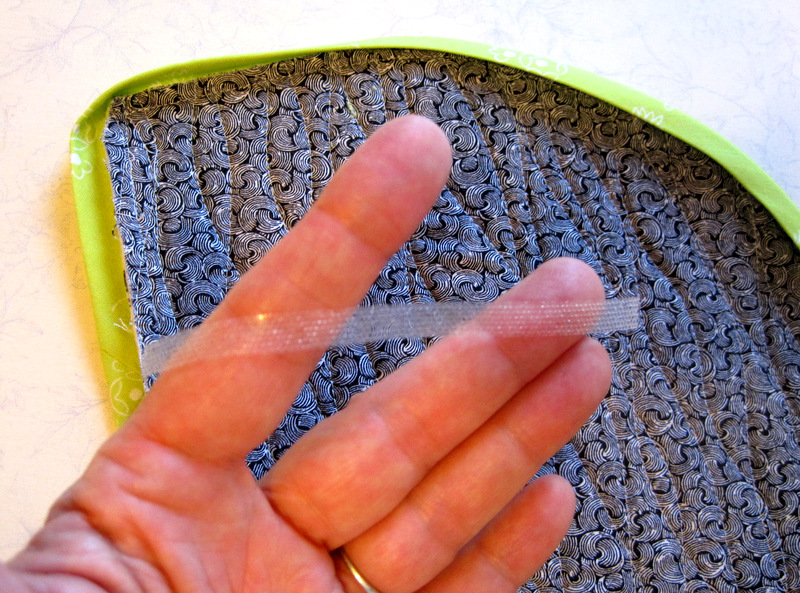
At this point you could stitch the binding down by hand — but if you can find Steam-a-Seam 2, why not give it a try? It’s a double-stick fusible webbing product made by the Warm Company that makes fast work of finishing a binding. It’s sold by the yard but also comes in rolls ¼” and ½” wide. If you can’t find it on a roll, buy about a half yard and simply cut off ¼” strips as needed.
Using the ¼” wide roll, cut off a strip about 4″ long and peel off the release paper:
Steam-a-Seam 2, Up Close and Personal
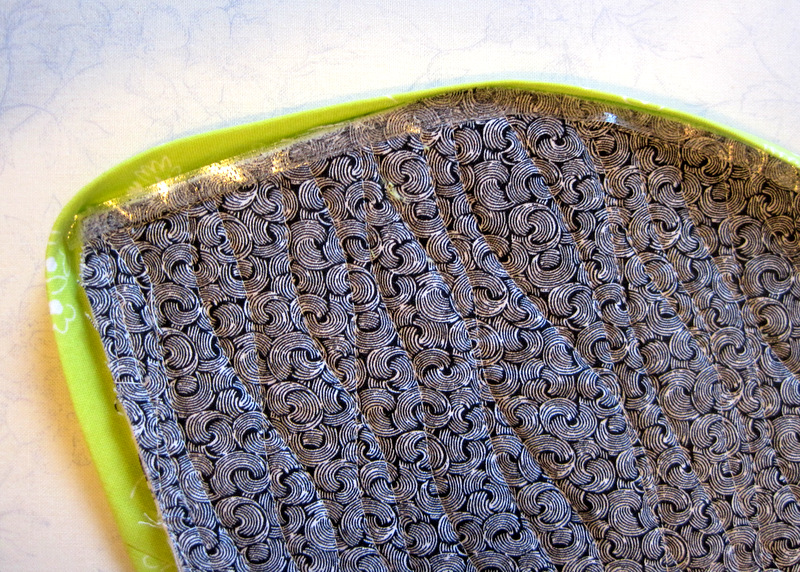
The Steam-a-Seam 2 is sticky on both sides but not so sticky that you can’t manipulate it. It goes around curved seams beautifully. Lay the strip of Steam-a-Seam 2 along the seam line, with the edge right next to the stitching:
Putting the Fusible Webbing in Place
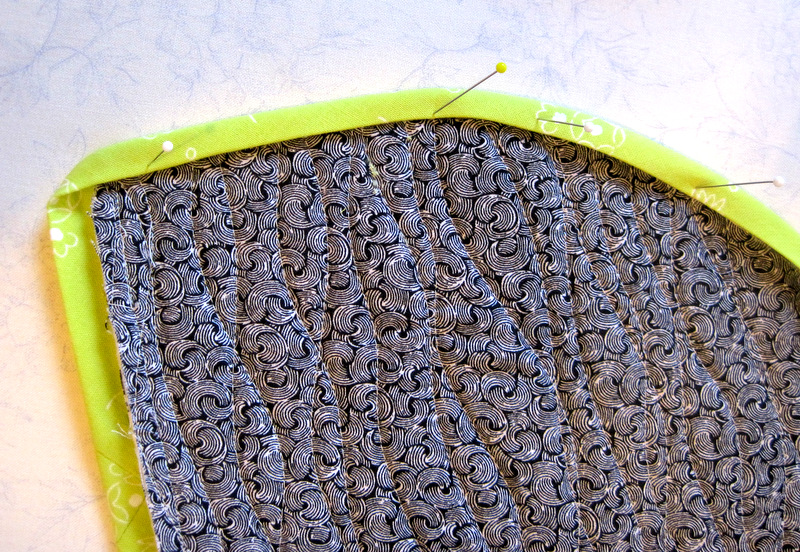
Draw the binding over the seam allowance so that the folded edge just covers the webbing. Hold in place on the ironing board with pins:
Pinning Webbing in Place Before Steam Basting
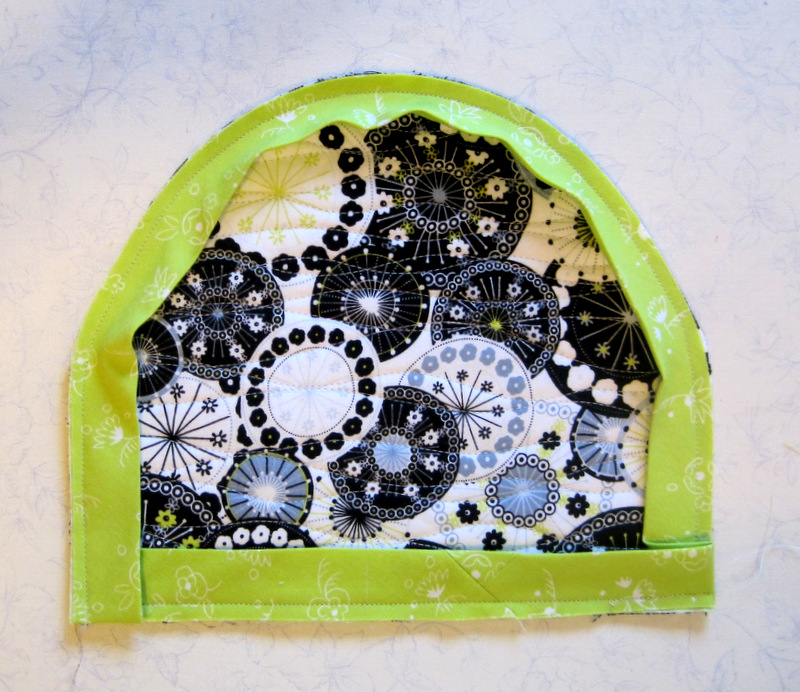
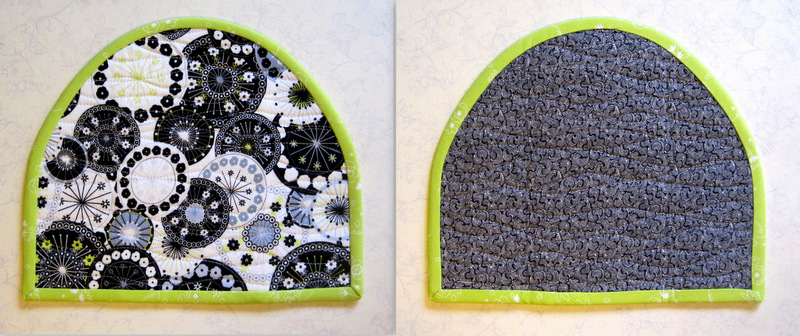
After you have two or three lengths of webbing in place, press the binding briefly to baste the webbing to the fabrics. Leave about an inch of webbing unpressed so that you can lift up the binding and see where the next strip needs to go. When you have worked all the way around, sandwich the rotary cutter coat between a press cloth and steam fully, following the directions on the package of Steam-a-Seam 2. In a very few minutes, your rotary cutter coat will look like this from the front and back:
Front and Back, Binding Done
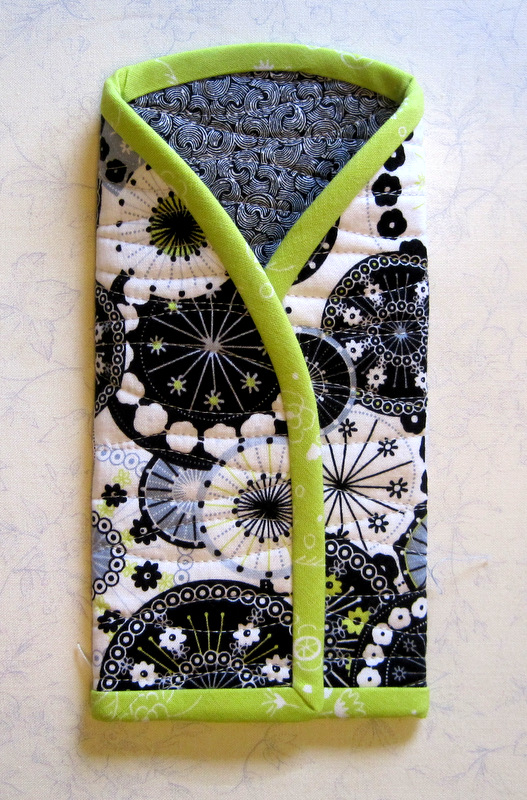
10. Fold case along fold lines, lapping one side over the other in front. (It doesn’t matter which side you lap first.) Both flaps should measure 2¾” from fold to outside edges of binding. Adjust this measurement slightly if necessary so that the finished case measures 3¾” wide. Cut a strip of Steam-a-Seam 2 the same measurement and insert it along the inside bottom edge. Fuse flap in place.
First Flap, Ready to Fuse
Fold second flap in place, making sure it also measures 2¾” from the fold to the outside edge:
Second Flap, Ready to Fuse
Use another strip of Steam-a-Seam 2 to fuse the bottom of the case completely closed (or whipstitch securely by hand).
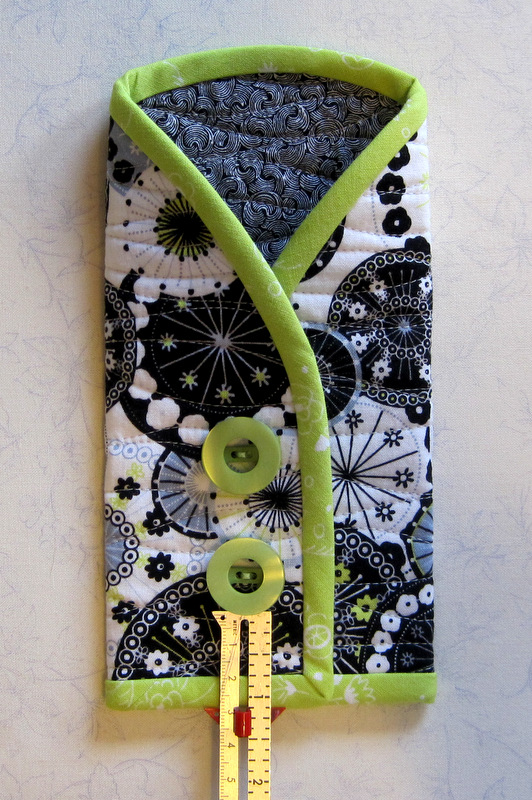
11. Now it’s time to sew on the buttons, which serve no function other than to look beautiful. And they are what makes this little rotary case a coat, so do add them. Sew them in place on the outer flap; no need to sew through both layers.
The bottom of the lower button should be 1-1/8″ or so from the bottom of the case:
Buttoning Up Your Overcoat
Let your eye and the size of the buttons guide you.
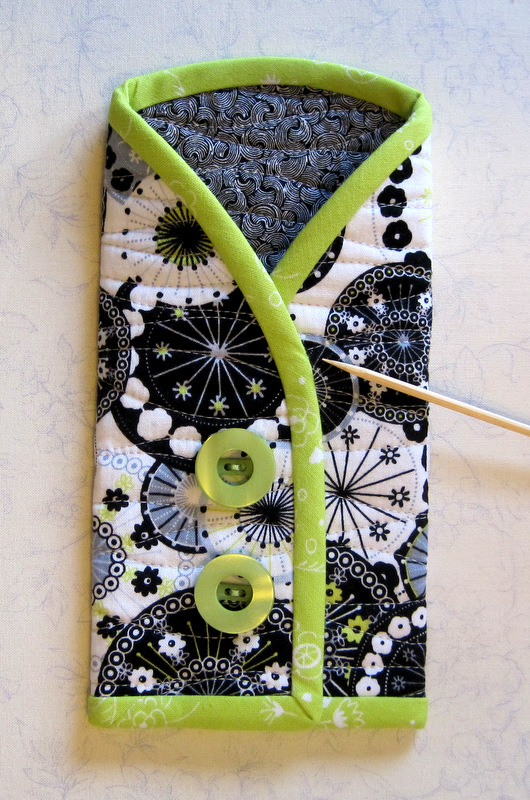
The last step: tacking the binding in place about 1″ down from the point where the bound edges meet:
Tacking Binding in Place Near the Top
Now tuck your rotary cutter into its elegant new coat:
What the Well Dressed Rotary Cutter Wears
Have fun with this tutorial! If you have any questions or run into a problem, let me know, and I’ll do my best to help you out.
Edit added Nov. 13, 2024:
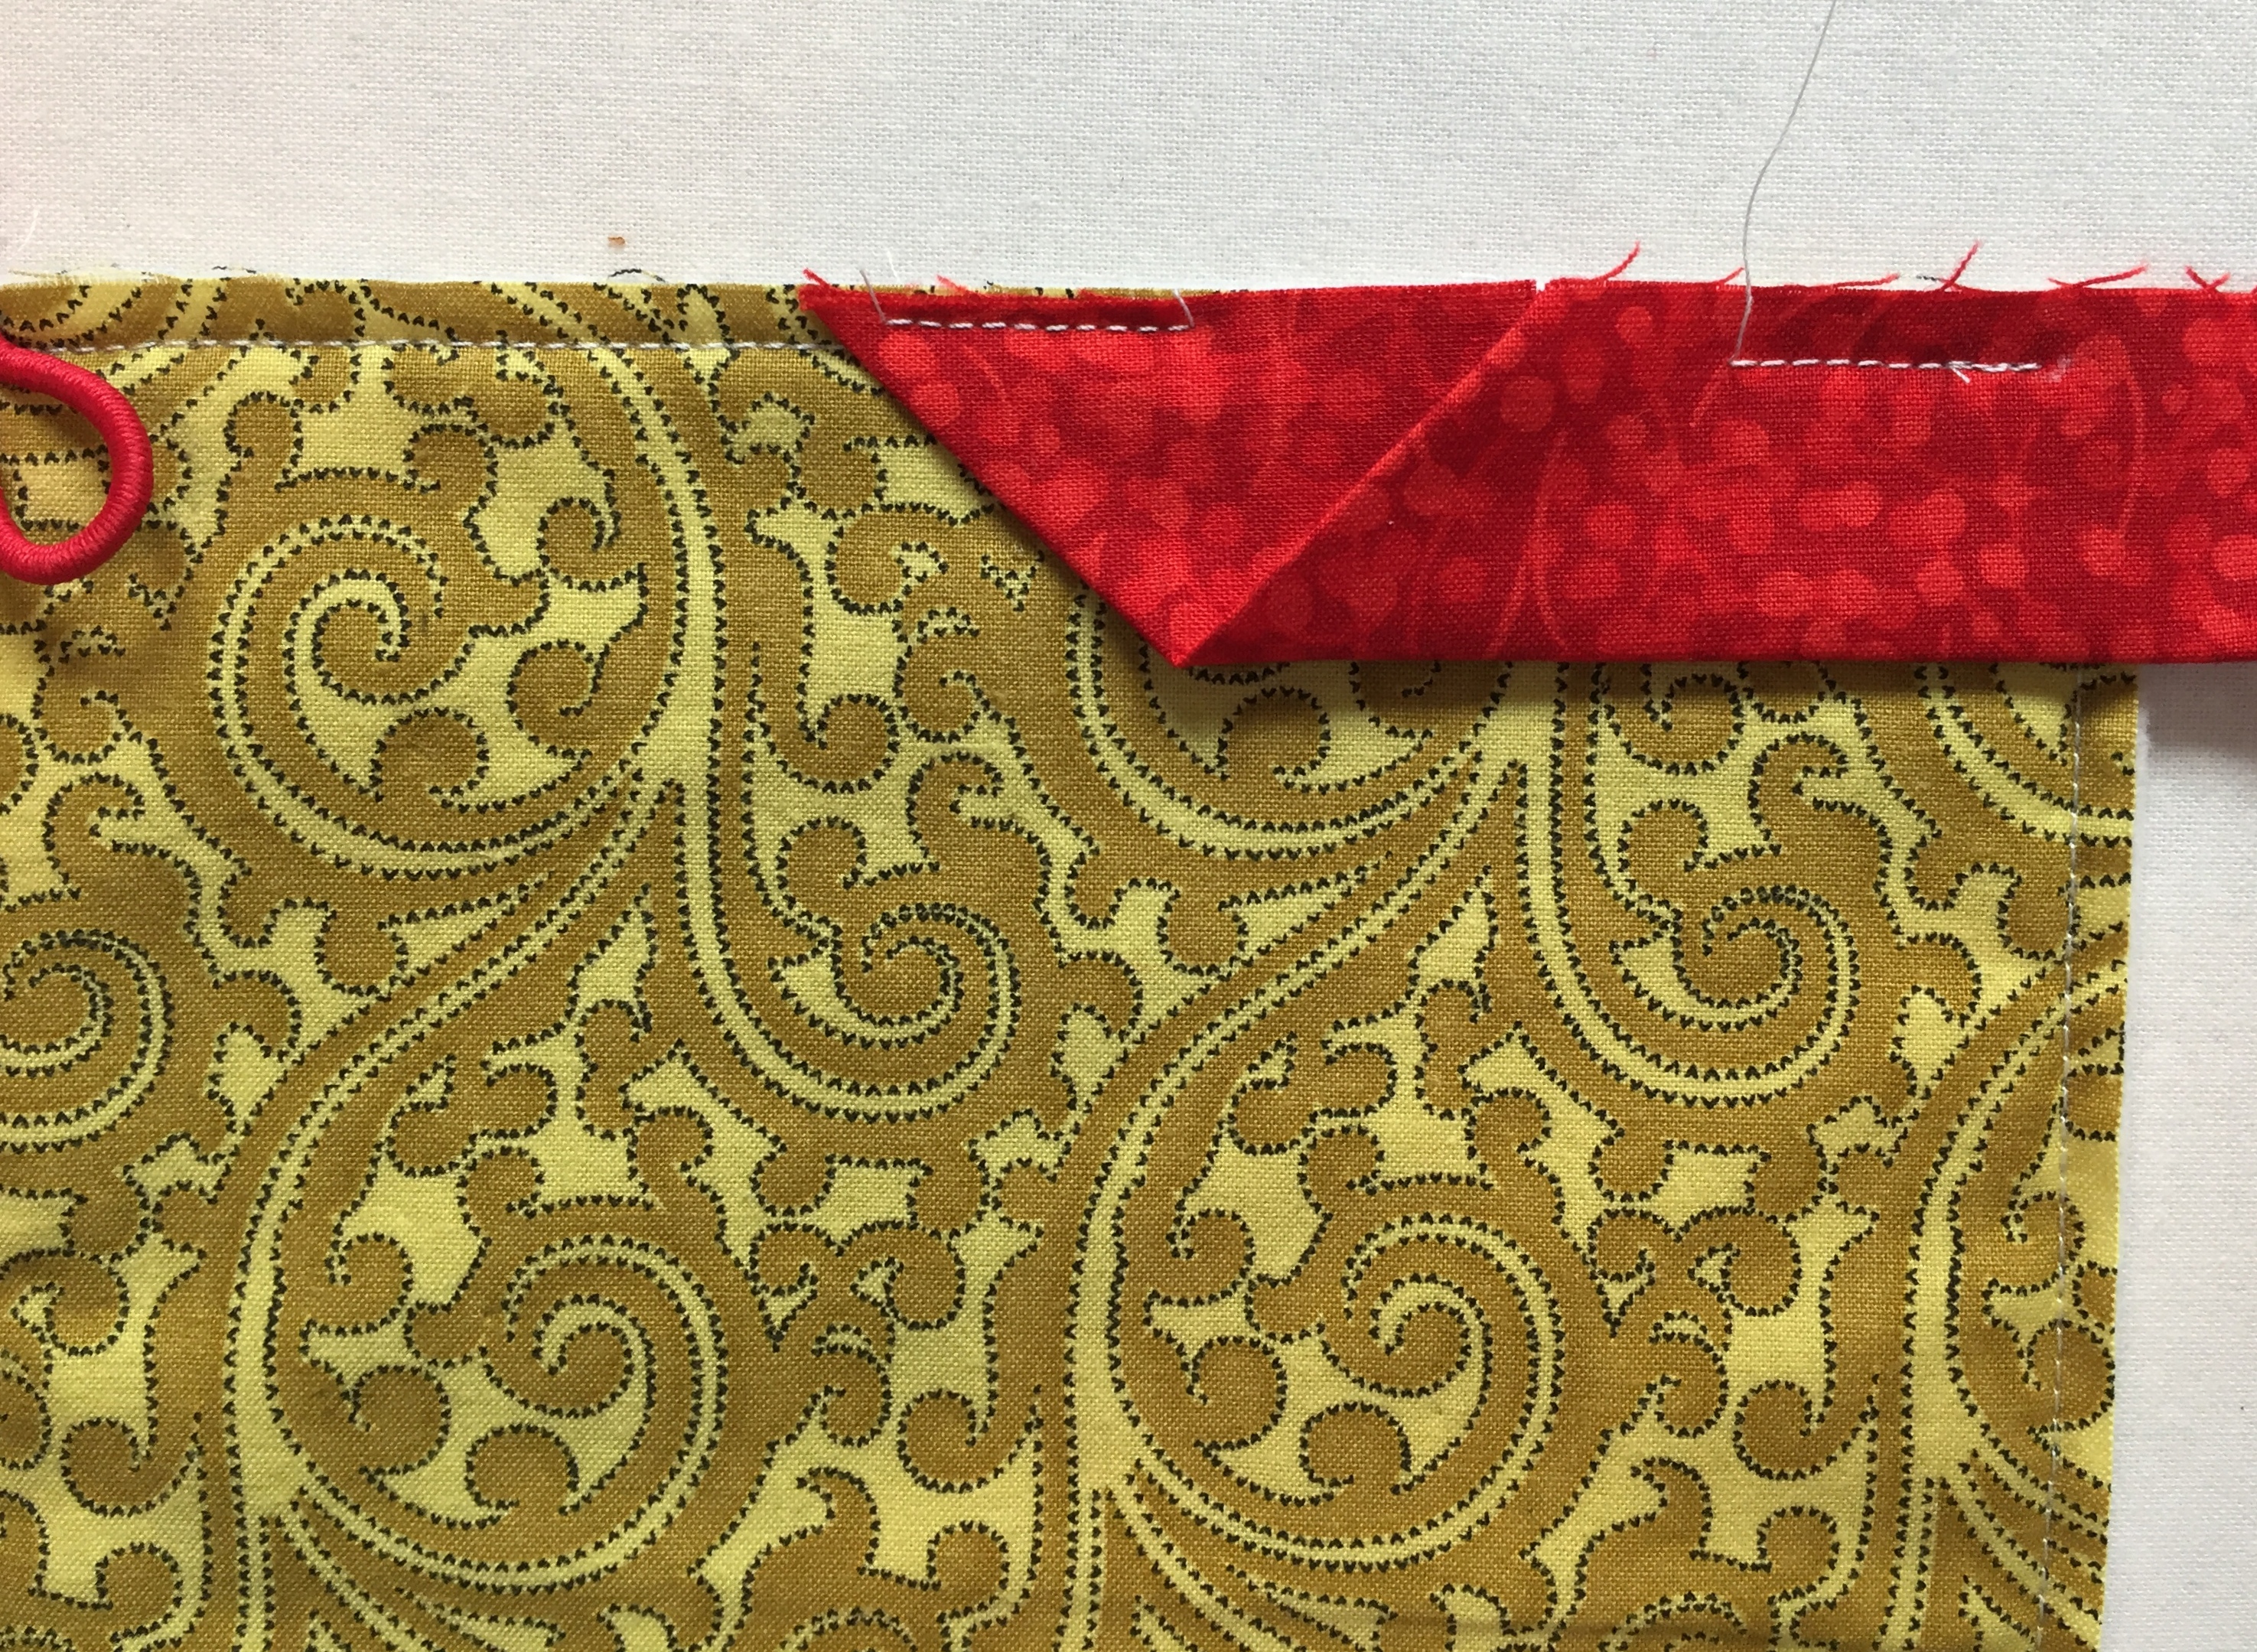
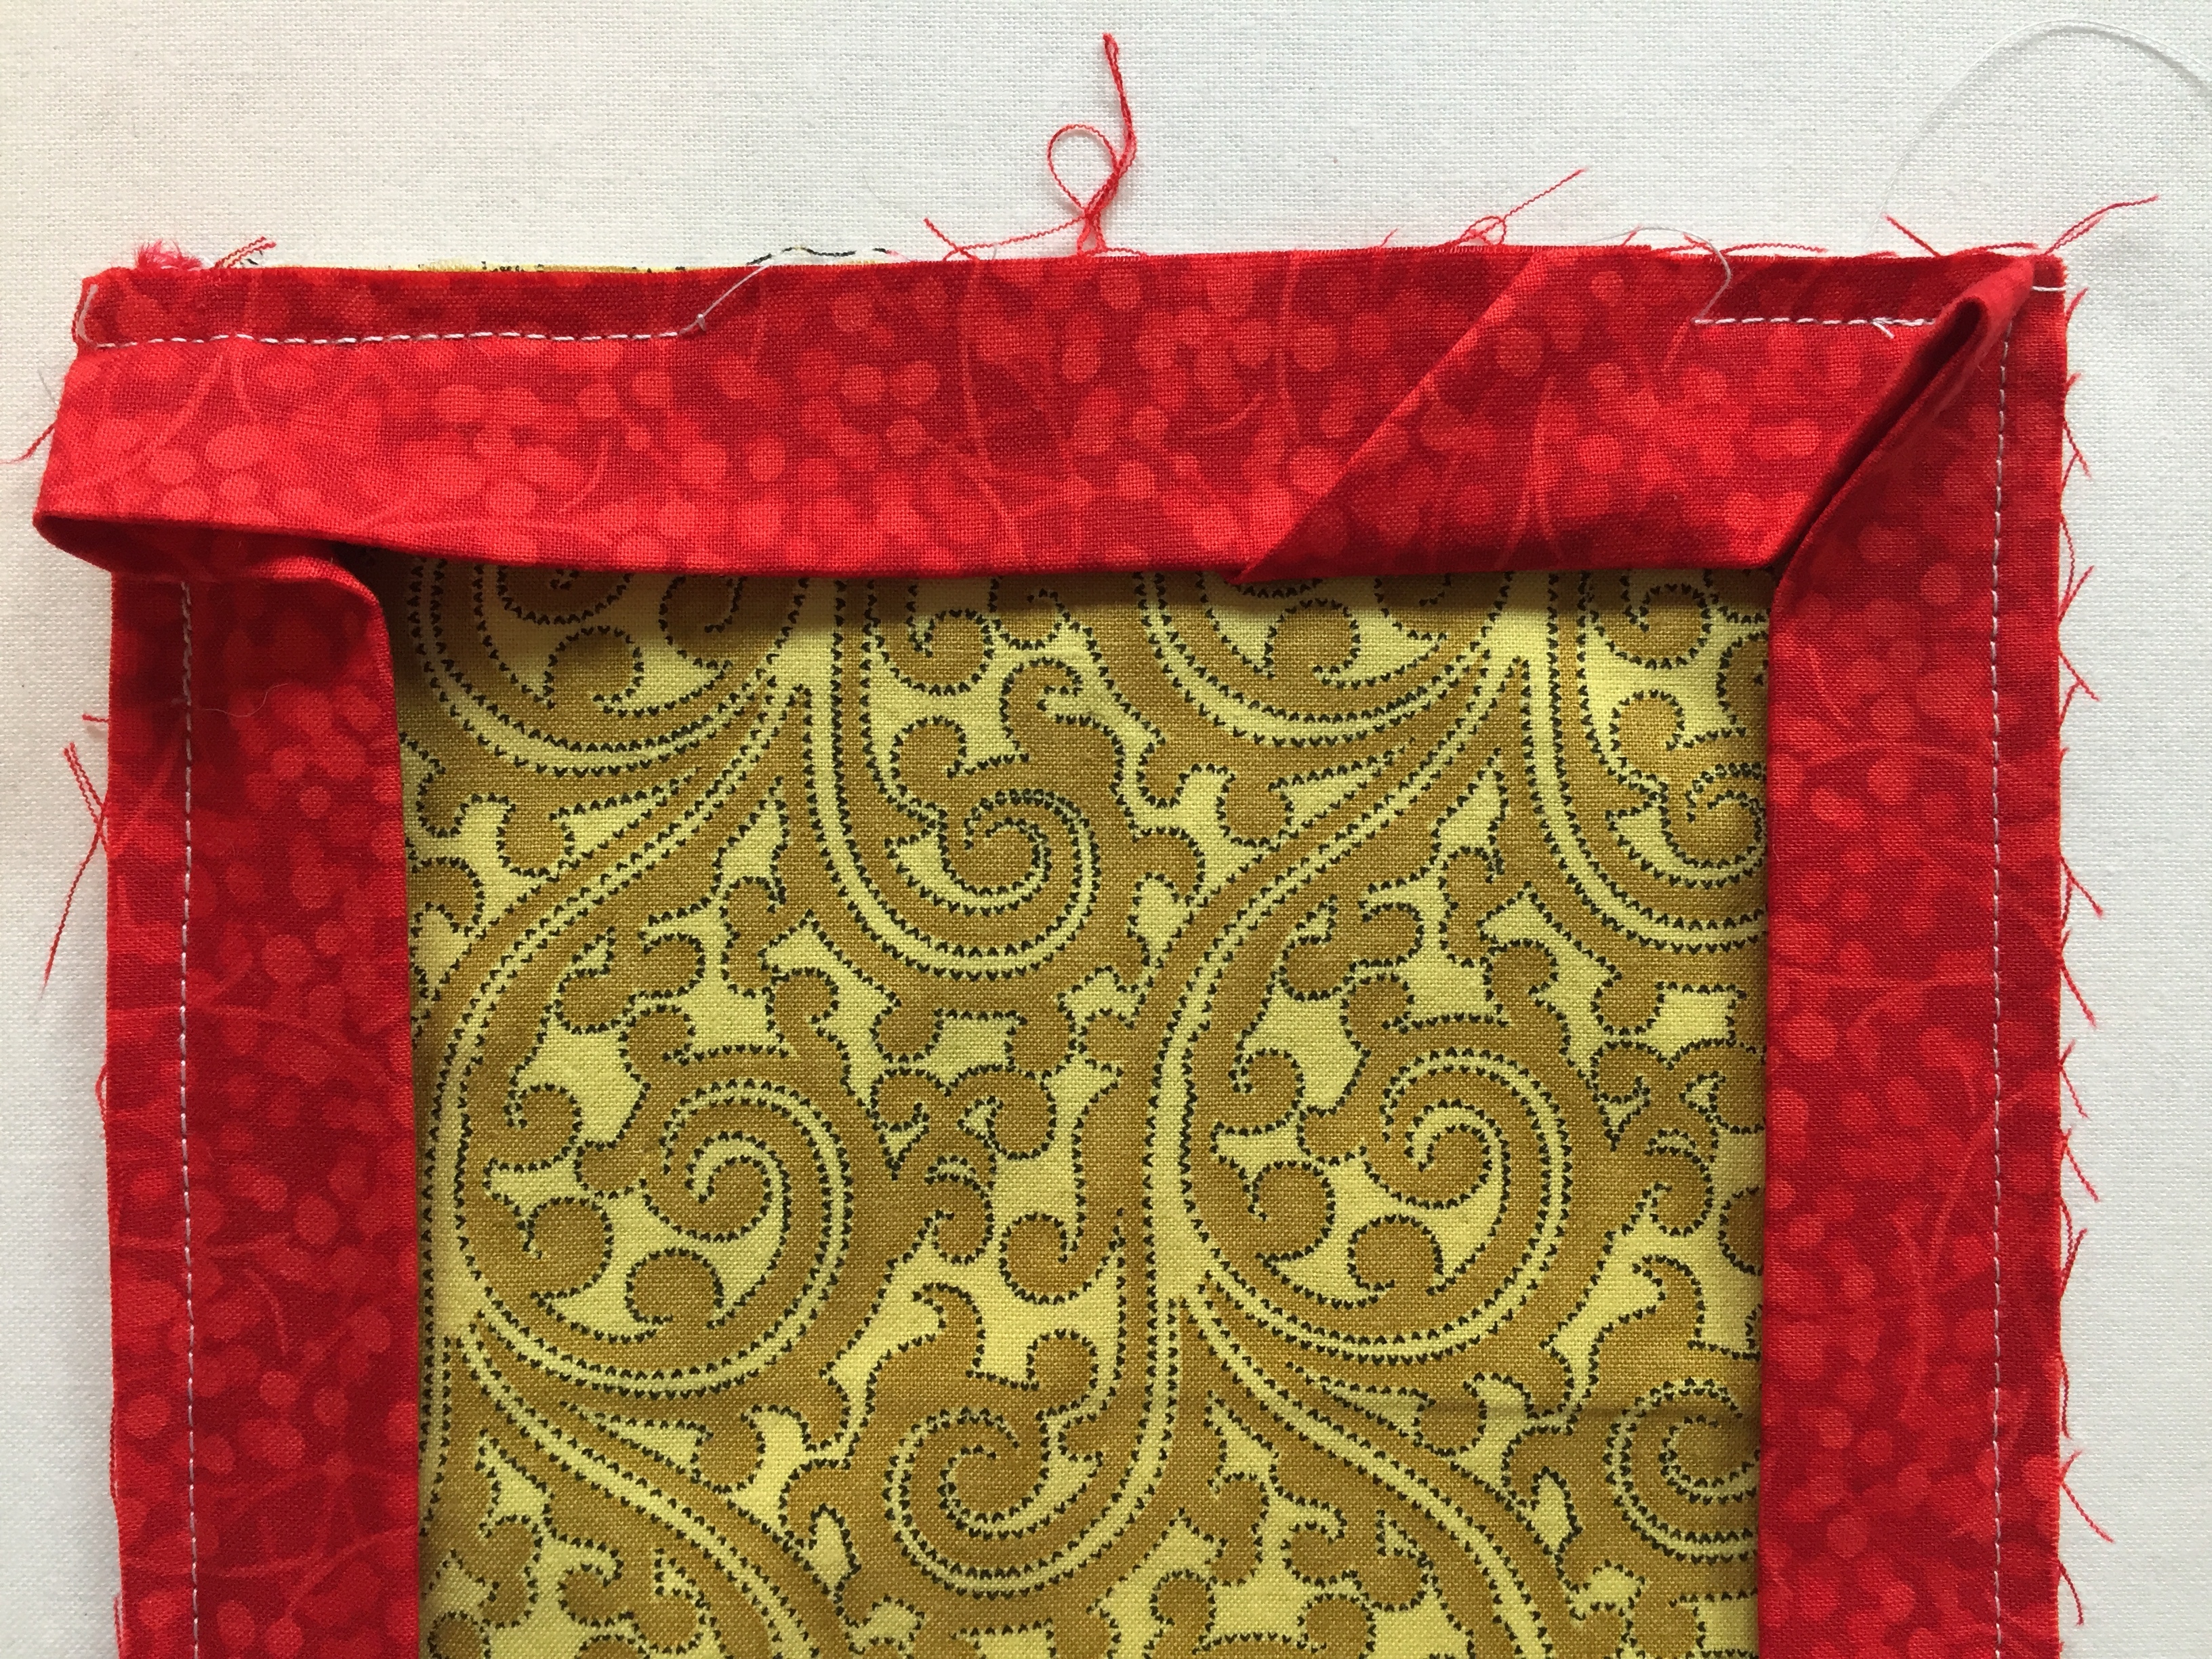
A faster and less fussy way to join the binding strips is to fold the end of the right tail at a right angle as shown in the photo below (from another project) and take a few stitches very close to the top edge to secure it:
Leaving enough room to tuck the other binding tail into the fold, begin stitching the binding with a scant ¼” seam, stopping ¼” from the end in order to miter the corner:
Coming around the fourth side, tuck the left tail into the fold of the right tail . . .
. . . and finish stitching the seam, starting and ending a few stitches beyond the original stitching.
These photos are from my Scissors Case Tutorial. A scissors case would make a nice companion to the Rotary Cutter Coat!
You can see many more examples of Rotary Cutter Coats I have made in the Small Pieces section of my Gallery.
A couple weeks ago the Pine Needle Quilt Shop, where I teach, held its annual fall Open House. I was on hand to promote my upcoming classes and share a sewing project or two. It’s always fun to talk to customers, fondle the newest fabrics in the shop, and visit with the other teachers. Local luminaries Violet Craft, Christina Cameli, and Rachel Kerley are joining the ranks of Pine Needle teachers this fall. I’m in good company!
One of the sewing projects I showed off at Open House was a rotary cutter case I designed a couple of years ago. I made up a few samples, which we gave away as door prizes:
These cases are also good for eyeglasses but I prefer them for rotary cutters. Don’t they look like little coats?
They make great gifts. And the holiday season is fast approaching. Hmmm . . . I’m thinking a tutorial is in order (and maybe even a giveaway!). What do you think, readers? Would you like to know how to make an eyeglasses case or rotary cutter coat?
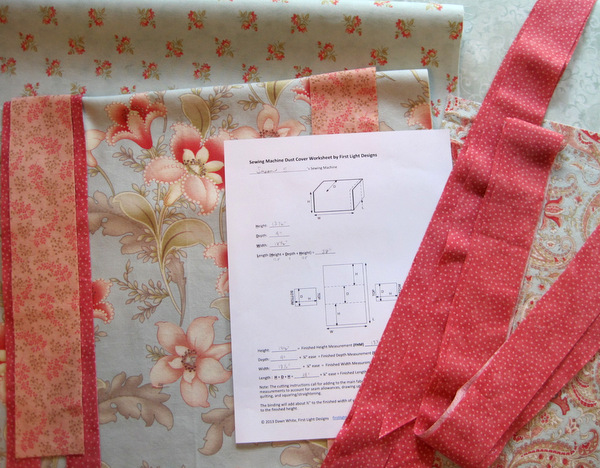
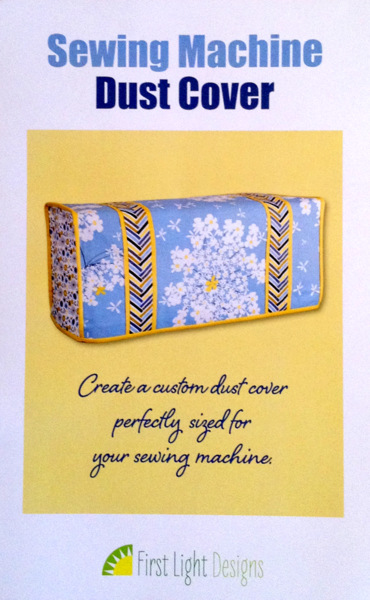
One of the first things I noticed when I started reading quilt blogs was that many quilting bloggers (blogging quilters?) offer giveaways. It seems like such a nice way to thank the people who visit blogs regularly and offer supportive comments. So after releasing my Sewing Machine Dust Cover pattern in late June, I launched my first Giveaway, offering a half dozen patterns plus a custom made cover for one winner. That winner turned out to be Susan S. of Milledgeville, Georgia.
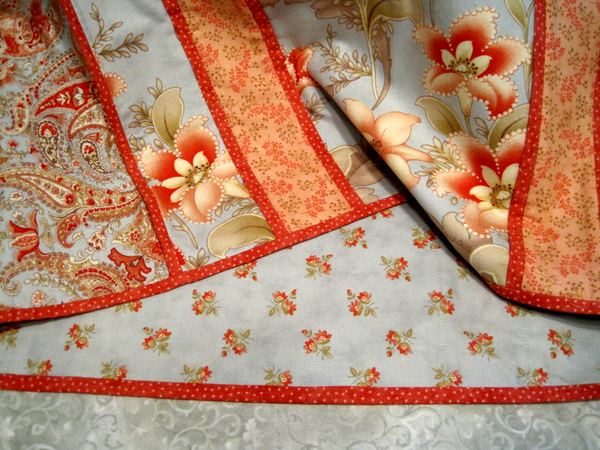
Susan emailed me the dimensions of her Janome embroidery machine and I emailed her photos of four different combinations of fabrics from my stash to choose from. I would have enjoyed making her a cover from any of the four combinations, but she happened to choose one I especially liked: a peach, coral, and aqua combo featuring prints from the Martinique line by 3 Sisters for Moda:
How I love Moda fabrics! A couple of other fabrics in my stash were chosen to complement the 3 Sisters prints.
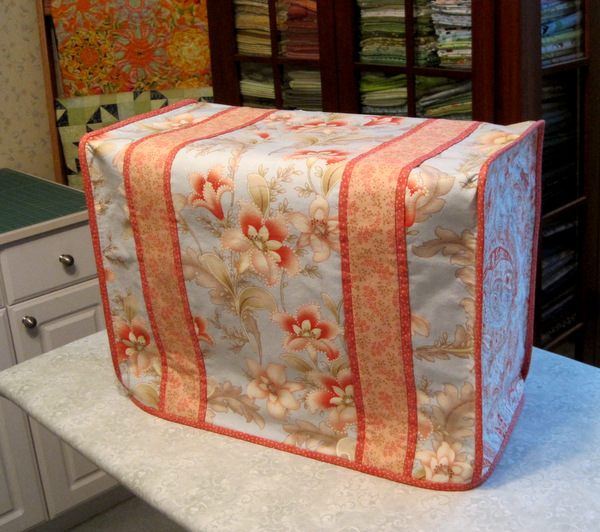
I finished Susan’s sewing machine dust cover last week and took a few photos before popping it in the mail on Monday:
In the photo below you can see the fabric on the inside of the dust cover:
Susan’s sewing machine dust cover arrived at its destination today, and she sent me the nicest message:
“GUESS WHAT I GOT IN THE MAIL TODAY??!!!!!! A beautiful sewing machine dust cover that fits my machine perfectly!! I love the gorgeous fabrics you used and it is constructed so very nicely. It really brightens up my sewing room . . . I’m loving it!! Thank you so very much — Susan”
You are welcome, Susan! It was a pleasure to make it for you.
Would you like to have a pattern? I’m hosting a Giveaway this coming week — my very first! You have six chances to win. I’m giving away five copies of my pattern, and the sixth winner is going to get a pattern and a custom sewing machine dust cover made by me. It might be you!
To enter, simply leave a comment at the bottom of this post telling me what you hope to accomplish this summer on the sewing/quilting front. Multiple projects? One big finish? It’s always fun to know what’s going on in sewing rooms around the world.
I’ll keep the Giveaway open through Saturday, July 6 and announce the winners the following week. Be sure your contact info is included in your comments. For the winner of the sewing machine dust cover, I’ll be in touch to give you some fabric and color options.