You’re looking at the intersection of four pineapple blocks in my granddaughter Bethany’s quilt top. I just had to fussycut a little birdie from the focus fabric (“Birdie” by Pam Kitty Morning) in each of the four interior cornerstones.
Little birdies are in the center of every block:
Here’s a look at the finished quilt top, which measures about 62″ square:
This is the supersized version of the baby quilt I made a few months ago using Karin Hellaby’s Pineapple Plus design from her book of the same name. She has a clever method of constructing the pineapple blocks that leaves the outer edges of the colored blocks on the bias.To supersize the blocks (from 10½” to 14½” unfinished) I added two additional rounds, cutting the outer triangles so the two short edges would be on the straight of grain. A couple of those triangles were deliberately cut with the short edges on the bias to preserve the directional design on the fabric.
I guess I went a little overboard cutting triangles for the first quilt because I still have a lot left over, even after making a second quilt. Some of those triangles will wind up on the pieced backing, my project du jour.
Today happens to be a rare day with no appointments or errands to run so I’m treating it like a snow day. I’m spending the entire day in my sewing room, except for the time taken to write this post. On my agenda: working on a lap quilt for Granddaughter #4 (in birth order).
I have six granddaughters. When I took up quilting seriously a decade or so ago, my oldest granddaughters were already having babies so I started making quilts for the great grandchildren. The pineapple quilt I finished in October for Baby Alira was the twelfth one made for a great grandchild:
Baby Alira’s Quilt, 44″ Square (2017)
Now it’s time to make quilts for my granddaughters. I’m starting with #4, Bethany, for the simple reason that she told me how much she loved the fabrics I was using in Baby Alira’s quilt.Since I had plenty of fabric left over and shapes already cut, I decided to make a larger version of the same quilt for Bethany.
The pineapple blocks in Baby Alira’s quilt finish at 10″ square. By adding two more rounds, I wound up with blocks for Bethany’s quilt that will finish at 14″ square. Here are those blocks up on my design wall:
Bethany’s Blocks
Now it’s time to add the sashing and cornerstones, to be followed by borders. Do come back soon to check on my progress!
Isn’t that a gorgeous array of fabric? The prints are all from Jill Finley’s new line called “This and That” for Penny Rose Fabrics, a division of Riley Blake Designs.
I’ve been keeping my eyes out for this fabric since Jill introduced it on her blog, Jillily Studio, a few weeks ago. Not finding it at a local quilt shop, I ordered directly from her website last week. I bought almost every print in the line, that’s how much I love it.
And I have a project in mind already:
I’ve been wanting to make the quilt on the cover ever since spotting this book in Sisters, Oregon in July of 2016. Hazel’s Diary Quilt was designed, pieced, hand appliqued, and machine quilted by Shelly Pagliai of prairiemoonquilts.com.
The book contains lovely photos of this quilt (along with several other quilts and projects designed by Shelly) but guess what? I have seen the real thing!In April of this year I was lucky enough to be in Paducah, Kentucky with my quilt group, the Quisters, attending AQS QuiltWeek, the huge quilt show and vendor mall put on by the American Quilter’s Society. I turned a corner in one of the quilt display areas and this is what I saw:
I like the idea of starting this project at the beginning of the year and letting it take me all the way to the end. But as usual, I’m getting ahead of myself. We still have a couple weeks left of 2017, and I have a couple of projects to finish up in the time remaining.
Before I totally commit to a new quilt project, I almost always make a test block to confirm that I like both the design and the fabrics I have chosen. More than once I have shifted gears, changing either my fabric selections or tweaking the pattern.
No test block this time. I’m about to embark on a big quilting project that is requiring a huge leap of faith on my part. And I’m unbelievably excited about it.
The project is in Victoria Findlay Wolfe‘s new book, Modern Quilt Magic, published by C&T Publishing:
Back in August, when Victoria was promoting her book on social media, I fell in love with one of the designs in it,Cascade,made with a curved braid strip ruler. I ordered book and ruler on the spot:
Notice how the quilt gradates from dark to light and back to dark again? The gradation is a function of both color and value. After studying Victoria’s version, which is very colorful and scrappy, I decided to go with a restricted palette of black, grey, gold, and white. I rarely work with all neutrals in a quilt so this is quite a departure for me. Despite the restricted palette, this quilt is going to be very scrappy, also a departure for me.
I started collecting fat quarters and quarter-yard cuts — yet another departure, as I am usually incapable of buying cuts of fabric smaller than a yard. In this case, I kept finding fabrics in my color range that seemed like good candidates.
As I looked over the instructions, I realized that I was going to have to cut lots and lots of curved braid strips from lots and lots of fabrics before sewing a single seam. That’s because of the way color and value gradate in the quilt: it’s essential to lay out the curves on a design wall and determine the final placement before sewing any of the curved braid strips together.
So I started gathering fabrics and cutting curves:
That’s a lot of curves, isn’t it? You’re looking at about 250 of them — roughly half the number needed for a twin size quilt. No going back now!
Every day I try to cut out a few more curves. By the time I finish my current project, a quilt for one of my granddaughters, I hope to start working on this new one.
I’m stepping far outside my comfort zone in every way with this quilt. Could that be why I find it so exciting?
When my husband and I fly from Oregon to Georgia for our annual two-week Thanksgiving visit with my twin sister and her husband, I almost always make something for their home. It’s a small way to thank Diane and Ed for the generous hospitality they show Charlie and me on these visits, and it satisfies my urge to make something when I’m away from my sewing room for an extended time. You know how it is: a maker’s gotta make.
I knew ages ago what this year’s project would be. That’s because Frugal Fabrics,a home dec fabric store in the Atlanta suburb where my sister lives, announced at the beginning of the year that it was closing. Diane and I have found beautiful fabrics there in past years that have made their way into home dec projects in her house.
Before the shop closed its doors for the last time, Diane bought a gorgeous piece of fabric called “Brandywine Paisley” by Duralee Fabrics. She bought what was left on the bolt – about 6½ yards – without any idea what she would do with it. (At $2 a yard, I would have done the same thing. I have a thing for paisley prints.) We consulted via text messaging and concluded the fabric would be perfect as new pillow shams in her master bedroom.
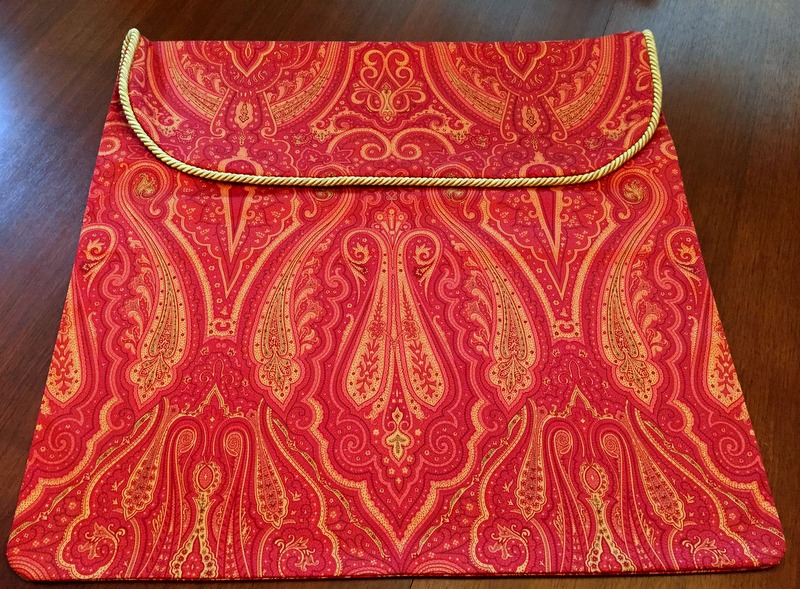
Fast forward to my arrival in November. After Thanksgiving was over, Diane and I designed the shams, starting with the notion of a simple envelope with braided trim on the “flap” of the envelope on the front. She likes her shams up against the headboard with sleeping pillows arranged in front so it was important that the flaps be short enough for the braided trim to show.
If Diane were a quilter, she would have freezer paper in her house. She’s not and she doesn’t, so I made a pattern for the flap out of two sheets of parchment paper:
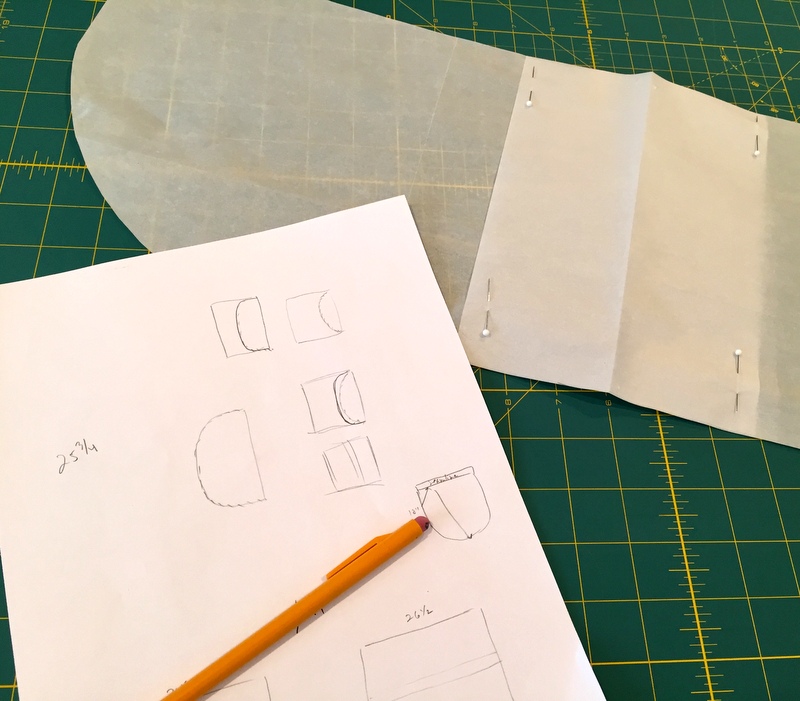
I had to pin the two sheets together because scotch tape doesn’t stick to parchment paper!
Being somewhat obsessive-compulsive, I wanted the design on the fabric to match where the flap meets the sham. That meant the flap needed to be a separate piece that could be attached to the back of the sham in just the right place for the design to match up on front after the pillow form was inserted.All of thiscalled for some careful fussy cutting – in triplicate, because there are three shams.It took me the better part of one afternoon just to cut the fabric.
What you see below is one sham in two pieces. The body of the sham is essentially a square with rounded edges and a lapped opening on the back where the pillow form is inserted:
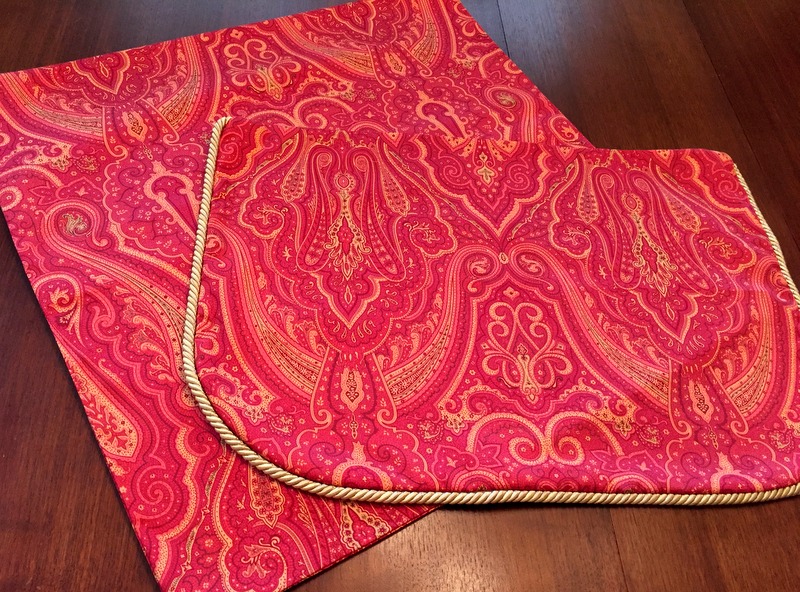
This is what the sham looks like flat:
While I was working on the shams, Diane was auditioning pillowcases I’ve made for her over the years (all made from this tutorial). She found three pair that looked especially good against the shams:
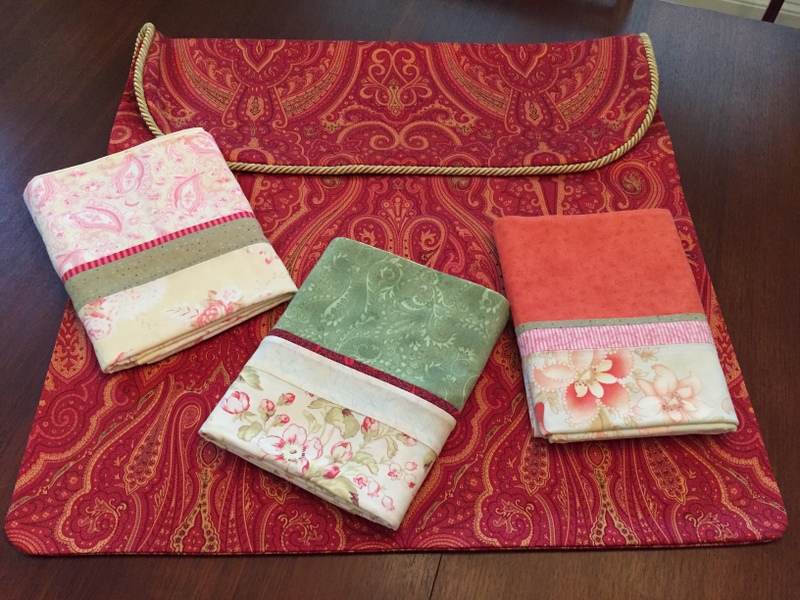
She decided to use the pair in the middle first because the reds and greens in the fabrics are right in keeping with the Christmas decorations that started coming out that week.
Here’s a look at the shams in place in the master bedroom:
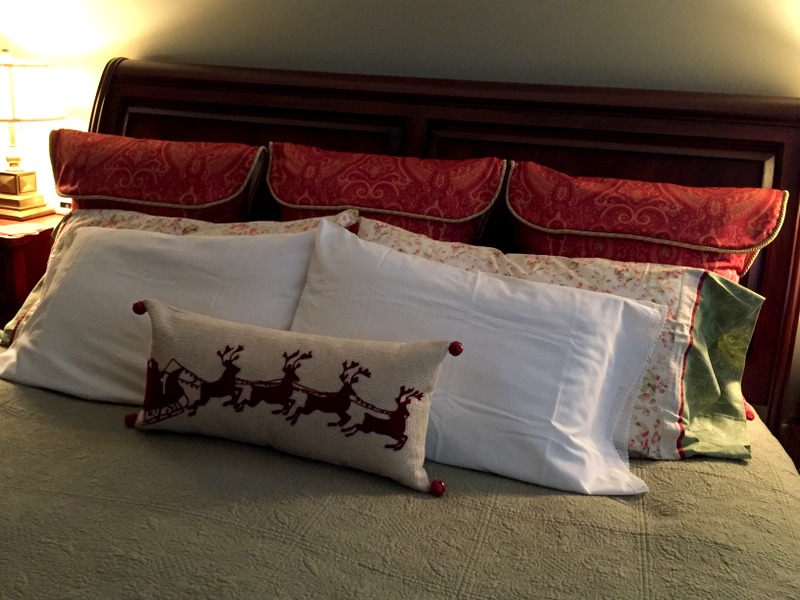
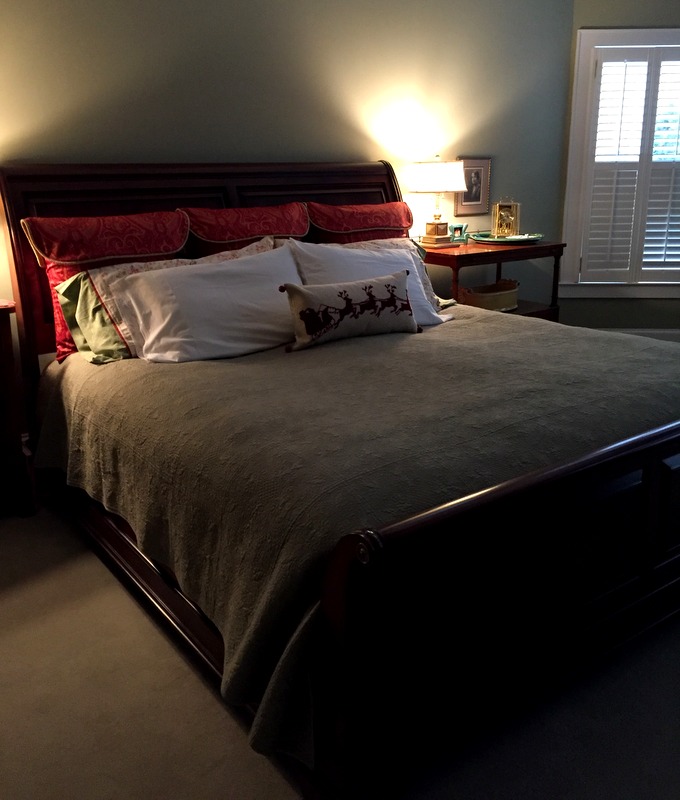
Don’t they look nice? I love the addition of the Christmas pillow.Here’s a view from across the room:
I’m back home in Portland now, ready to get back to work on a couple of projects I want to finish before the end of the year. And the end of the year is only 27 days away!
You may recognize the fabrics in this sewing tool caddy, which I made last month at Quilt Camp:
They’re the same fabrics used in the Junior Billie Bag I made earlier this year.
The pattern for the tool caddy isTravel Caseby Pearl Pereira of p3designs.com. I’ve made it several times, modifying it the last few times by adding an extra pocket. I keep my tool caddy in an acrylic brochure holder one of my students gave me:
With the flap turned back, all of my smaller tools are right at my fingertips. At the end of a sewing session the tools go back in the caddy. It really does help me keep my sewing room organized.
Having made the caddy, I couldn’t help but make a coordinating rotary cutter coat:
I finished a UFO at Quilt Camp last week. It was the table runner I started as an experiment when I was teaching at the Pine Needle‘s quilt retreat in June. Remember this?
It’s a bit difficult to see from the photo but the outer edges of the runner were cut to match the curves inside. I wanted the binding on the quilt to echo the design, which you may recognize as Mini Mod Tiles, that marvelous free pattern from Sew Kind of Wonderful that has been the subject of several posts over the last few months.
I had just enough of the dark green batik fabric for the binding:
Didn’t that turn out nicely? I machine quilted it very simply with my walking foot, stitching in the ditch and adding a simple starburst in the center of the curved shapes featuring the focus fabric:
There wasn’t enough of the wintry blue print to cover the entire back so I inserted a strip of the blue polka dot:
I used light blue thread on the back to blend in so the runner is essentially reversible. The label can go in the very center, to be covered by a candle or bowl.
Binding the curved edges presented quite a challenge, as the angle is greater than 90 degrees plus you have the curve to deal with. Fortunately, Heather Peterson of Anka’s Treasures has a wonderful tutorial on her website that shows how to bind an outside edge greater than 90 degrees. Following her excellent instructions, I was able to bind those corners. Here’s a look at the pinning technique:
I don’t think I would ever have figured that out on my own. Thanks, Heather!
The runner measures 13″ x 38½”, a nice size for the center of a table or dresser.I’m giving it to my twin sister in Atlanta this weekend as a birthday/hostess gift; my husband and I are headed there later this week for our annual extended visit over Thanksgiving.
I’m very pleased with this variation on the Mini Mod Tiles design. And, having made two quilts (a mini and a supersized version) from the pattern, I am finally ready to put MMTbehind me. Just in time, too! The Sew Kind of Wonderful team has come out with some marvelous new patterns. I have no doubt there is another Quick Curve Ruler quilt in my future.
I just got back from a fun-filled three days at Quilt Camp. Hanging out with a dozen wonderful quilting friends and working on whatever my mood dictated was a terrific way to spend 72 hours. I’ve been going to Quilt Camp for the last 10 years or so and gee, it’s great. No cooking, no cleaning, no laundry. No idling away the hours playing Scrabble online. Okay, I did play my turns in a few ongoing games but for the most part managed to stay away from electronics (except for my sewing machine).
I decided to start with a quick and easy project, thisRising Star quilt designed by Lauren Palmer that appeared in the Sept. 2017 issue of American Quilter magazine, the publication of the American Quilter’s Society:
Lauren’s quilt, made of all solids, finishes at 40″ square. It was constructed of 4″ squares and 4″ Half-Square Triangles (HSTs) plus 4″ strips for the border. I resized the blocks to 5″ to make a slightly larger quilt (50″ square) and chose pink and orange floral prints from the 2014 “Paradise” line from Camelot Cottons to go with a white-on-white background fabric and a navy blender. I switched the placement of pink and orange, using pink for the smaller star in the middle of my quilt and orange for the larger star.
After studying the design and the directions, I decided to incorporate Flying Geese and Split Cat’s Cradle blocks in my quilt to minimize the number of seams.If you’ve never heard of a Split Cat’s Cradle block, this is what it looks like:
This block could have been made of four smaller blocks — one square and three HSTs — but I didn’t want to interrupt the flow of the printed fabric with seam lines. I also didn’t want to fuss with cutting and sewing triangles so I turned to theCat’s Cradle Ruler designed by Deb Heatherly for Creative Grids. With the ruler you start with squares and rectangles and wind up with two blocks at a time. The finished squares range in size from 1½” – 4″ square. My block finished at 10″ square so I had to do some figuring to determine what sizes my squares and rectangles should be.
I doubted one of those calculations, which was a mistake. It led me to sew eight seams using squares of fabric that were a quarter inch too small. I had to take out the stitching, cut new squares, and resew. I think I spent as much time making those Split Cat’s Cradle blocks as I did the rest of the quilt. This was strictly operator error. The ruler and directions are excellent and I will use them many times in the future.
The pink star in the center of my quilt was made with 10″ x 5″ Flying Geese blocks instead of Half Square Triangles, which also involved some quilt math.
After my quilt top was done (before borders) I put it up on the design wall and took a picture:
Oops. Do you see what I see? One of my corner hourglass blocks is turned the wrong way. I didn’t noticeit until after I looked at this photo and then it jumped right out at me.
Ah, this is better:
I didn’t have enough white background fabric with me at Camp to add the border strips. I can do thatnow that I’m homebut there are other options. I could make the quilt even bigger by adding an additional pieced border. Or I could it declare it done and move on. Right now it measures 40½” square, a good size for a baby quilt. Any recommendations?
In my next post I’ll show you what else I worked on at Quilt Camp.
Last spring the talented sisters at Sew Kind of Wonderful released a free pattern called Mini Mod Tiles:
Mini Mod Tiles, about 34″ Square, made by Sew Kind of Wonderful (2017). Photo used with permission.
I was instantly enchanted. I downloaded the directions from Sew Kind of Wonderful’s website and made my own version using just three fabrics:
Piccolo Terrazzo Tiles, 34½” Square. Made by Dawn White, Quilted by Karlee Sandell.
I knew this was the design I wanted to teach at a quilt retreat in June. But I wanted to give my students the option of making a larger quilt. Sure, they could have added more blocks to increase the size of their quilt — but I was thinking of a bigger block.Thus was the “supersized” version of Mini Mod Tiles born:
Terrazzo Tiles, 63″ Square (2017). Made by Dawn White, Quilted by Karlee Sandell.
The supersized version was made with the original Quick Curve Ruler whereas the original Mini Mod Tileswas made with the QCR Mini. Here are both quilts to give you an idea of the relative sizes:
Two Versions of Mini Mod Tiles: Original and Supersized!
The SKW sisters graciously gave me permission to show how I supersized their pattern, hence this tutorial. My directions will be easier to follow if you have already made a quilt using the original Mini Mod Tiles pattern.
This tutorial has two parts. Part 1 is a two-page handout showing fabric requirements and advance cutting for both a scrappy version using multiple prints like the original SKW version and the more controlled version I made with just four fabrics. Download Part 1:Fabric Requirements and Advance Cutting.
Part 2: Sewing Directions for Mini Mod Tiles “Supersized”
Required: Quick Curve Ruler by Sew Kind of Wonderful (available at many local quilt stores and at Sew Kind of Wonderful’s website).
Required: free pattern Mini Mod Tiles, downloaded from the SKW website.
Download the three-page pattern by going to theFree Patterns linkon SKW’s website and double clicking on the photo ofMini Mod Tiles— the same photo you see at the top of this tutorial. Click on the print icon on the upper right side. Print in color:
Free download: Mini Mod Tiles pattern by Sew Kind of Wonderful
Study the directions carefully. The cutting, sewing, and squaring up instructions are almost the sameas for the mini. The main differences are the cut sizes of fabric and the fact that you are using the original Quick Curve Ruler.
Here are my cut pieces, neatly stacked and ready for sewing:
Ready, Set, Sew!
Cutting with the Quick Curve Ruler (QCR) (Page 1) Refer to the illustrations on the pattern marked Sample 1, Sample 2, etc.
“A” shapes, cut from 8″ focus fabric squares: Referring to Sample 1, measure and make registration marks at the midpoints of the outside edges (4″ from the corners) of all four sides of a square (Sample 1).
Refer to Sample 2 illustration showing the position of the QCR on the fabric square. The red dashed line indicates the curve cut-out you follow with your rotary cutter. You can see that the cut-out curve is right over the registration marks on the left and bottom sides of the square.
First Light Designs tip: Note that the curve cut-out in the QCR is about â…›” wide. Rather than centering that â…›”-wide channel over your registration marks, position the ruler so that the inside edge of the channel is right over your registration marks. When you make your cut, follow the inside edge of the channel with your rotary cutter just as you would when making a cut with a straight-edged ruler. Your cut curves will be more uniform in size.
After making the first cut, rotate square 180º and repeat on other side. Repeat with remaining squares. Total: 36 A shapes.
First Light Designs tip: Instead of marking every square four times, arrange the square on a rotary cutting mat with all four sides aligned with the inch lines printed on the mat. (It doesn’t matter where on the mat as long as it’s several inches from outer edges.) Count over 4″ from the corners of the square and position the inside channel of the cutout curve over those points at the edge of the fabric:
“B” shapes, cut from 5″ x 8″ rectangles: Measure and make registration marks 3″ in from the top left edge and 3″ in from the bottom right edge. Refer to Sample 3 illustration. Note that the ruler is positioned so that the dotted red line showing the cutting channel goes from the upper left corner of the fabric to the registration mark on the bottom right side. After making the cut, rotate the block 180° and repeat. Discard the slivers of leftover fabric.
First Light Designs tip: Instead of marking the fabric rectangle, arrange it on a rotary cutting mat with all four sides aligned with the inch lines printed on the mat. Position the QCR so that inside channel of the cutout curve is over the upper left corner of the rectangle and the 3″ mark from the bottom right edge:
Curve begins in upper left corner, ends 3″ in from opposite corner
Did you know? You can stack your squares and rectangles and cut multiple units at one time if your rotary blade is very sharp. Try cutting two layers first. If that works, try up to four.
Piecing the Curves (Page 1) Referring to Sample 4 and Sample 5 illustrations on page 1 of the pattern: See the arrow pointing toward the 1/4″ that Piece B extends beyond Shape A? Change that measurement to 3/8″. When you position Shape B on top of Shape A, right sides together, be sure the tip of B extends 3/8″ beyond the tip of A. Press seam toward A. Note in Sample 4 how the edges of Shape B extend beyond Shape A at the curved seam. This is what you want, as the excess fabric is trimmed when the block is squared up.
Squaring up AB Units (Page 2)
With two B shapes sewn to a shape A, the unit is now called AB.
Referring to Sample 6 on page 2 of the pattern: Square up AB unit to 8″ square. Using an 8½” or larger square ruler, position the ruler so that the straight edges of AB (upper left and lower right corners of the block) measure 8″ square. Trim right side and top. Rotate block 180º, reposition ruler so that bottom and left side of block are on the 8″ lines of the ruler, and trim right side and top. Repeat with remaining squares.
First Light Designs tip: On your squaring up ruler, use an Ultra Fine-Point Sharpie marker to make two small dots — the first one 4¼” to the left of the upper right corner and the second one 4¼” down from the upper right corner, right at the edge of the ruler. When you square up your block, the curved seam that joins Shapes A and B should be right under those dots:
See the red dots?
If you find your curved seam falls a bit on either side of the4¼” measurement, that’s okay. The important thing is that your blocks are hitting the same mark consistently. (The Sharpie marks come off the ruler easily with a drop of nail polish remover, by the way.)
Sashing Assembly (Page 2)
Follow the directions, keeping in mind that your (60) C units are made with connector pieces measuring 2½” x 3″ and sashing strips measuring 3″ x 6″. Likewise the D units are made with two C units and a 3″ square of background fabric in the middle. Note: it would be more efficient to make these C and D units in strip sets but I decided to match my tutorial as much as possible to the original directions.
Block Assembly and Quilt Layout (Pages 2 and 3) Follow pattern directions, keeping in mind that the center of the block is a 3″ square of accent fabric, not a 2″ x 2″ background piece. Make (9) blocks which measure 18″ square.
Pressing I did deviate from the pressing directions. Instead of pressing seams open where directed, I always pressed toward the focus fabric, even when sewing rows together. Why? I was planning ahead, in case I wanted to stitch in the ditch around my focus fabric. It’s very difficult to do that when a seam has been pressed open. As it happened, I decided to have both quilts custom quilted; the longarmer stitched in the ditch on both quilts at my request and I really like how much extra definition the stitching gave to the focus fabric shapes.
If you have any questions, please feel free to ask.And if you make a supersized version of Mini Mod Tiles, I would love to see a photo. I know the Sew Kind of Wonderful sisters would, too!
The Junior Billie Bag I am currently working on is slowly taking shape. I’m pacing myself on the construction so I can show my current group of students at the Pine Needle how thisquilter’s tote goes together step by step. The bag is a gift for a friend with a November birthday so the timing is perfect.
In the photo below you see most of the individual elements — front and back panels, handles, side panels, inner and outer pockets:
This particular bag is going to have plenty of pockets — 21 to be exact. The pockets have been carefully sized tohold everythinga quilter might need, from file folders to acrylic rulers torotary cutters. The Junior Billie Bag was designed by Billie Mahorney to be customized –makers of the bag decide how many pockets they want and what size they will be.
Now that the secondpanel on this bag has been quilted and the handles attached, you can see what thebag is going to look likefrom front andback:
Which is the front and which is the back? It doesn’t matter!Thefront/back panelsare totally interchangeable. The front of the bag is whichever side the owner turns to the outside on any given day.
And you can quilt the panelsvery simply or be very creative with free motion quilting. I’ve done both on previous bags. On this one I optedto stitchin the ditch in the central part of the panels and to useaserpentine stitch on the strips around the center blocks. I used the same decorative stitch on thehandles:
The next step is sewing the front/back panels to the side panels and bottom unit. I’ll demonstrate this in Friday’s class. My students arealmost readyfor the third dimension!