Category Archives: free motion quilting

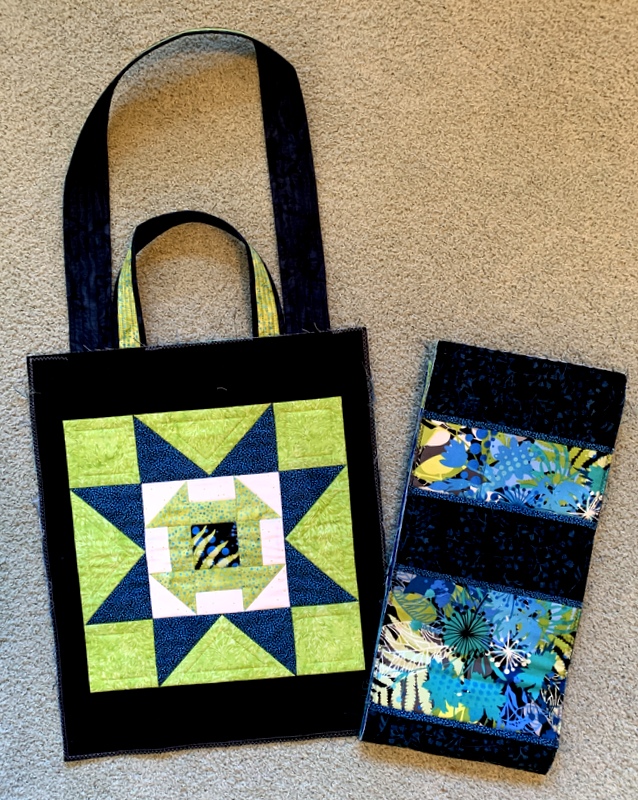
Throwback Thursday: Early Quilts

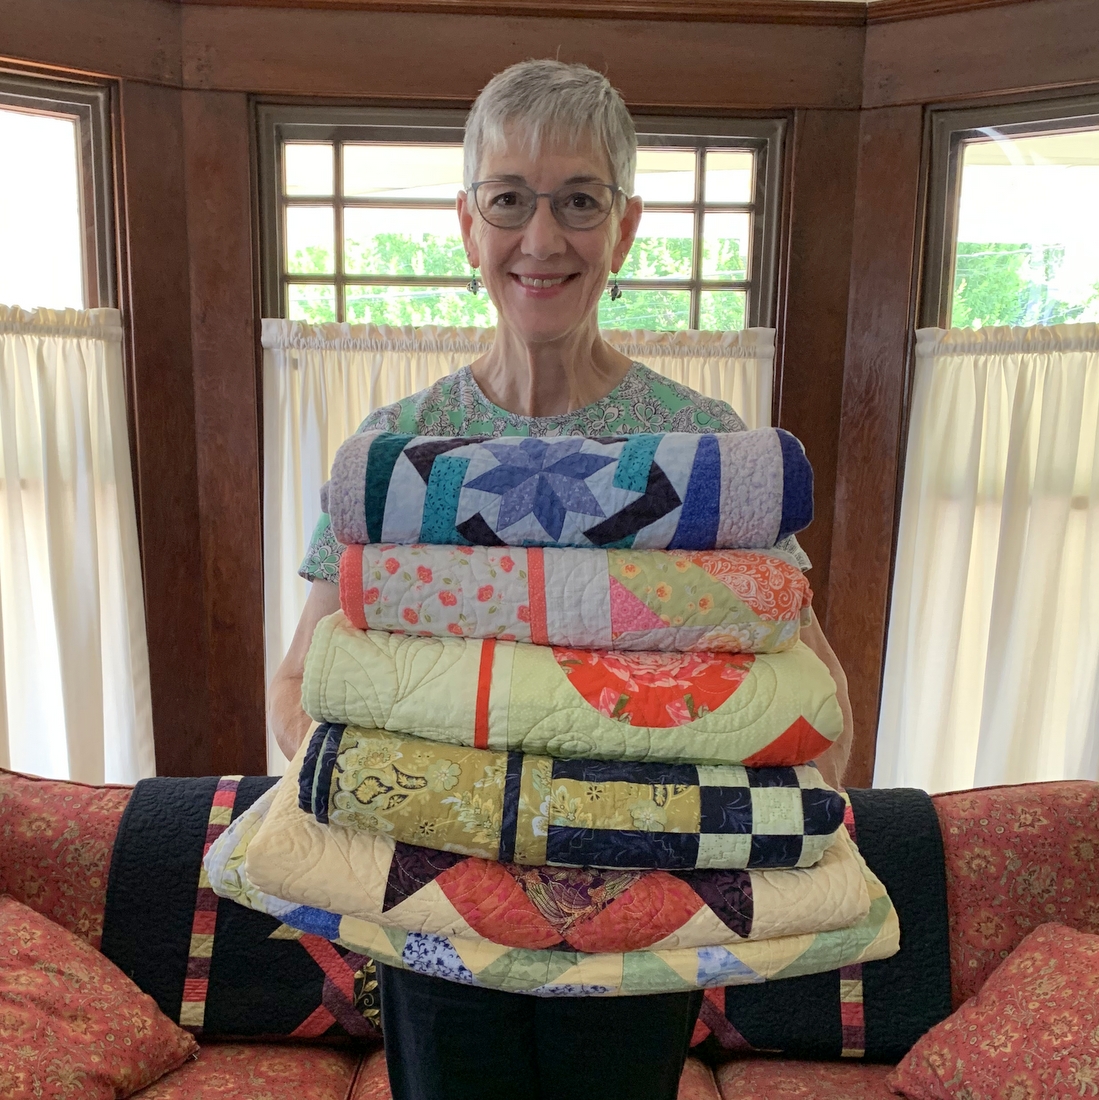
When I showed a picture on my blog a couple weeks ago of a stack of six quilts I had donated to Hopewell House, a hospice care facility in Southwest Portland, some of my readers asked to see pictures of the full quilts. Three of the quilts pictured above were made before starting my website/blog in 2012 so I thought it would be fun to do a “Throwback Thursday” post and show you these early quilts as well as the more recent ones.

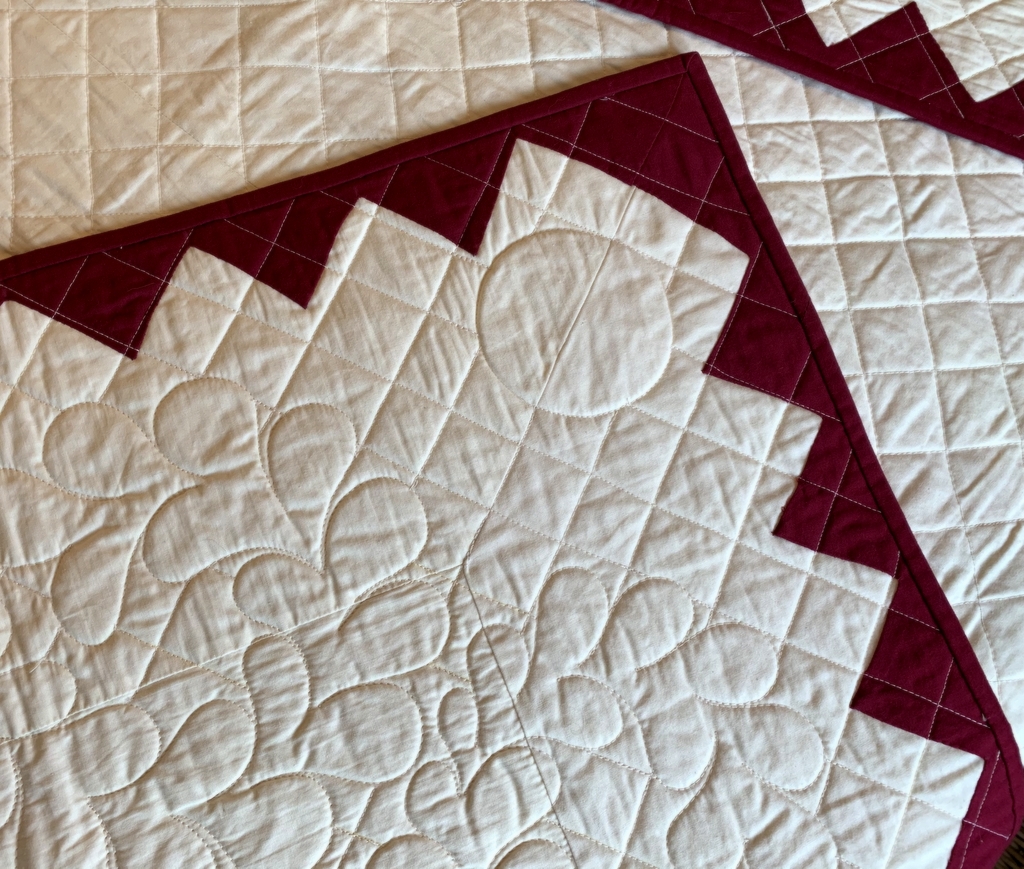
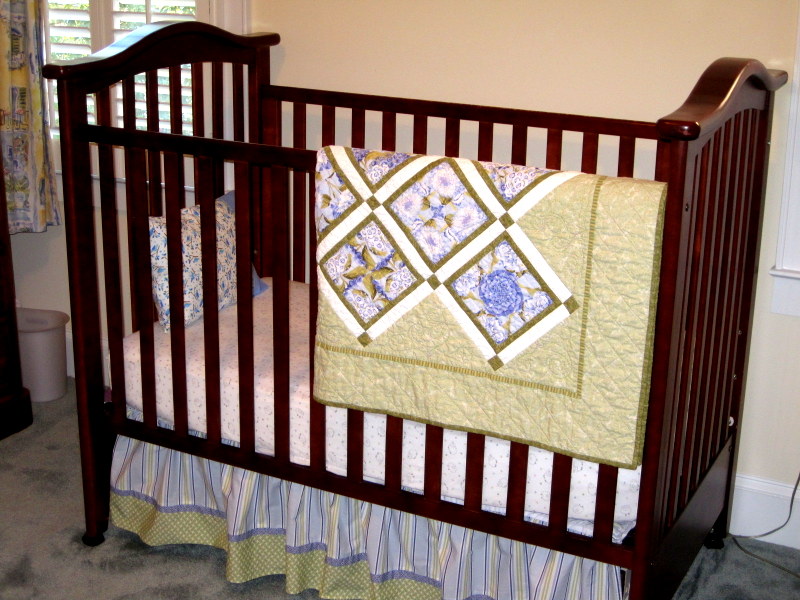
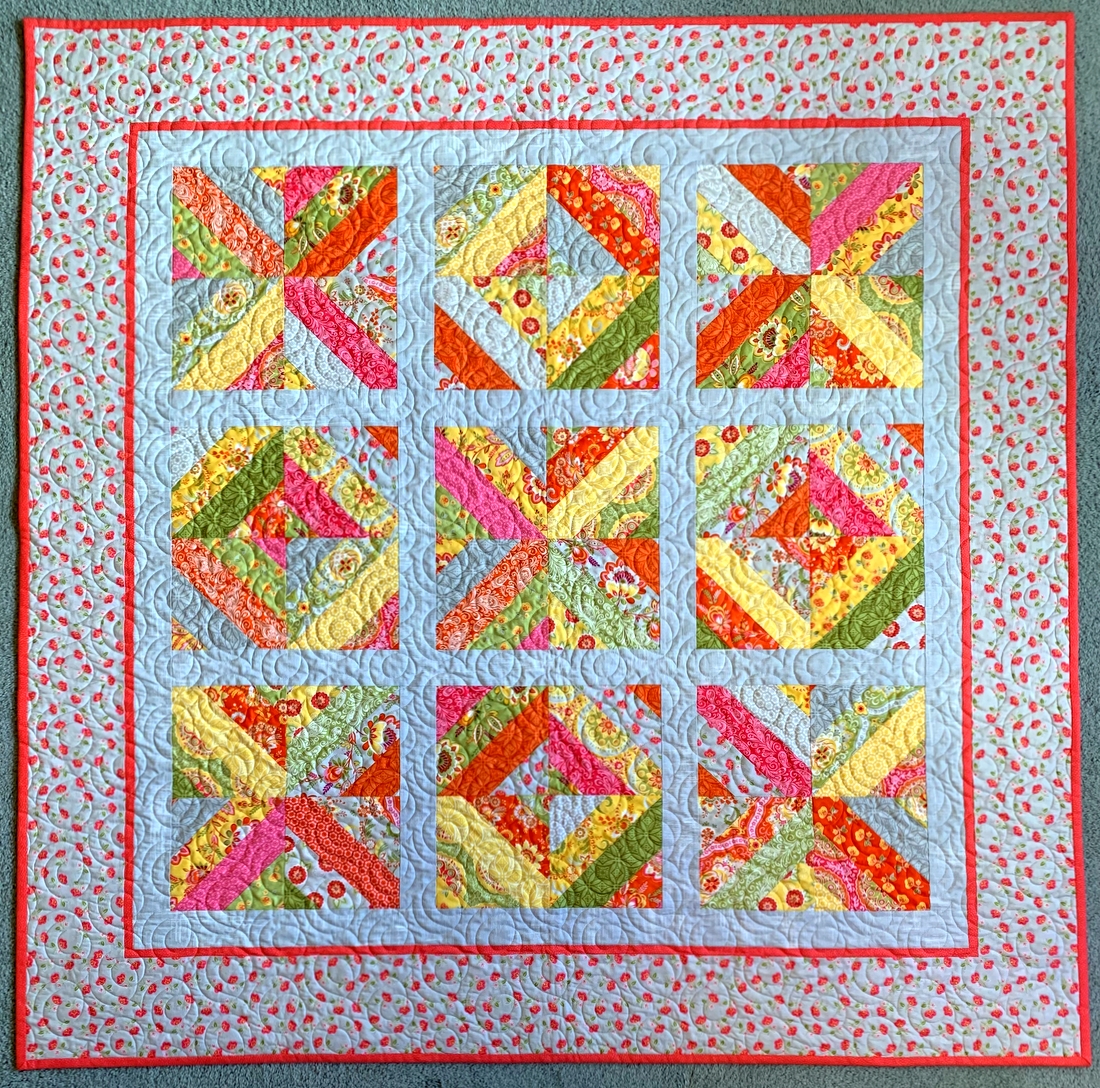
We start with the the quilt at the top of the stack — Swinging on a Star, the quilt I pieced in 2005 under Billie Mahorney’s tutelage in Quiltmaking III, the third installment of the Quiltmaking class she taught for so many years at the Pine Needle Quilt Shop in Lake Oswego (current home of the Lake Oswego branch of Montavilla Sewing Center):

Swinging on a Star, 46″ x 58″ (2006)

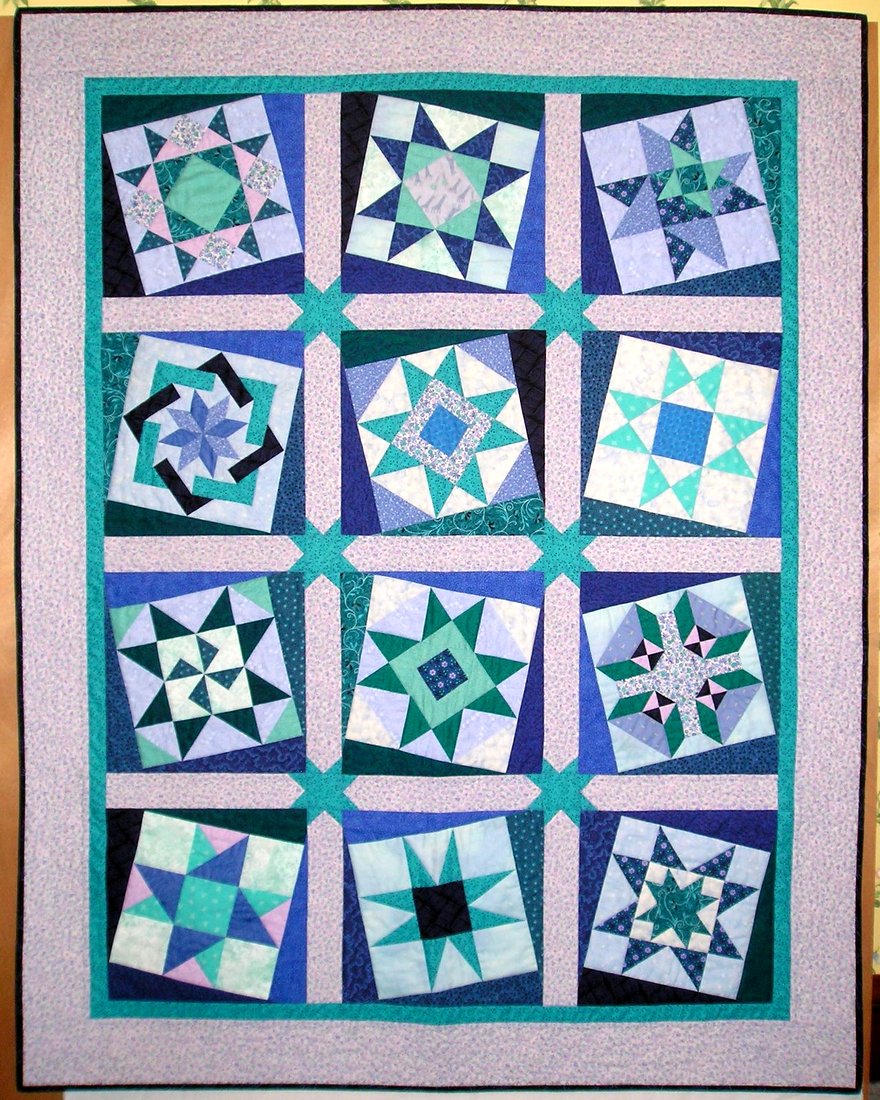
In this class Billie taught us how to draft blocks (including some from Quiltmaking II) that finish at 9″ square, and how to set them in a “Twist ‘n Turn” technique described by Sharyn Squier Craig in her 1996 book of the same name. At the time I started this quilt my focus was on using up cottons I had accumulated in the 1980s while making charity quilts for babies. Little did I know that setting foot in a quilt shop 20 years later would cause me to abandon all hope of using up that old fabric as I quickly began accumulating a much larger amount of new fabric that would become known as “my stash.”

Swinging on a Star was the first of my quilts that included free motion quilting (FMQ). Billie insisted that we learn how to do that. I stitched in the ditch around the star blocks and did free motion quilting in the borders. Happily the ditsy print in the borders hid a multitude of FMQ sins.

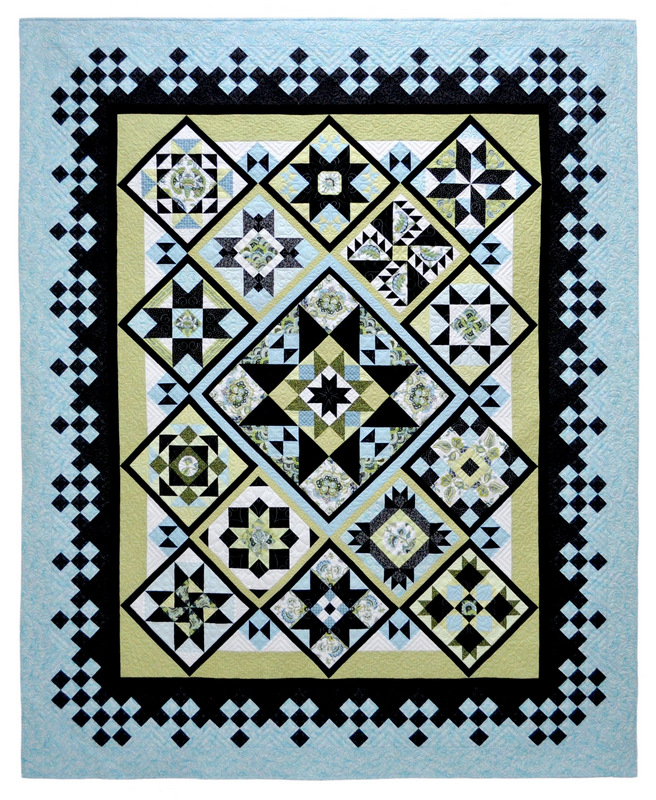
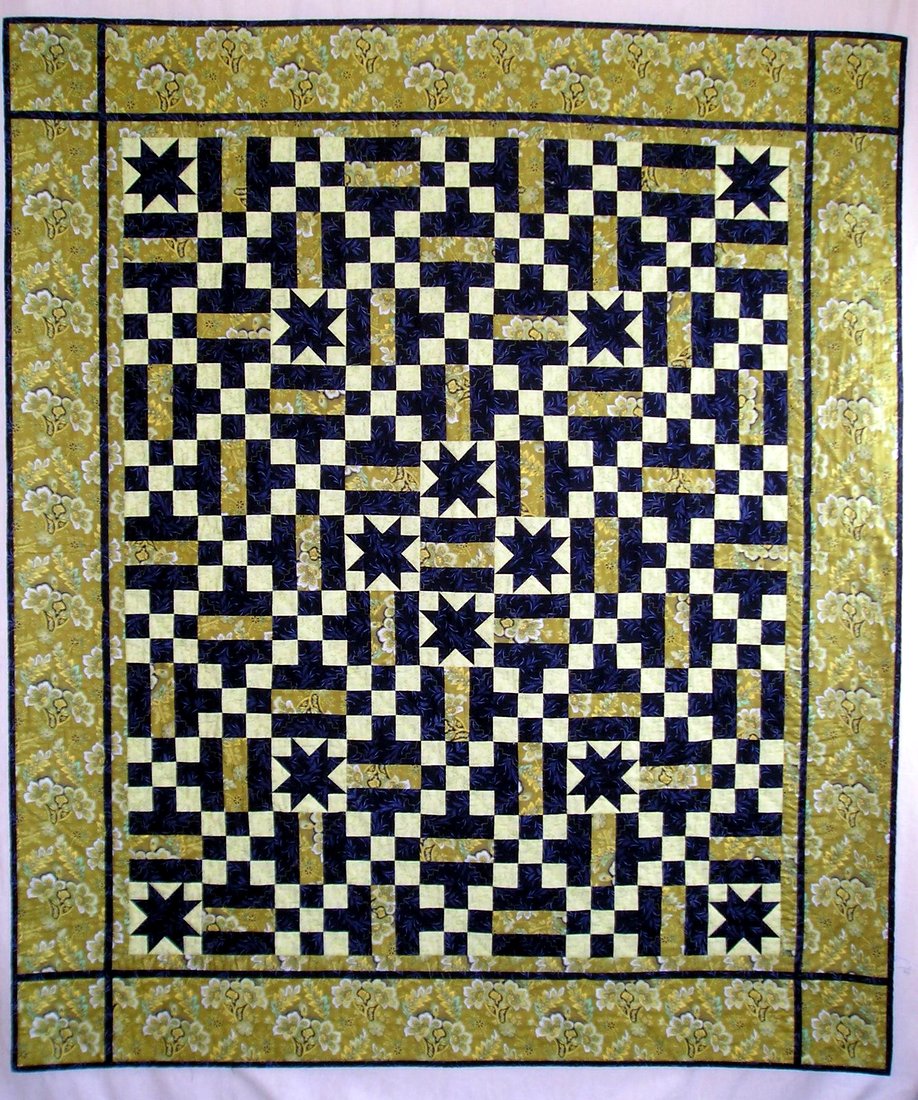
The fourth quilt I am holding in the first photo is Starry 9-Patch, finished in 2007. I took Billie’s Quiltmaking series out of order, starting with the second class. I learned so much in Quiltmaking II and III that I decided to take Quiltmaking I when she offered it again. The basic design was a combination of 9-Patch and Rail Fence blocks but I threw in some Sawtooth Stars to jazz it up a bit:

Starry 9-Patch, 56″ x 63″ (2007)

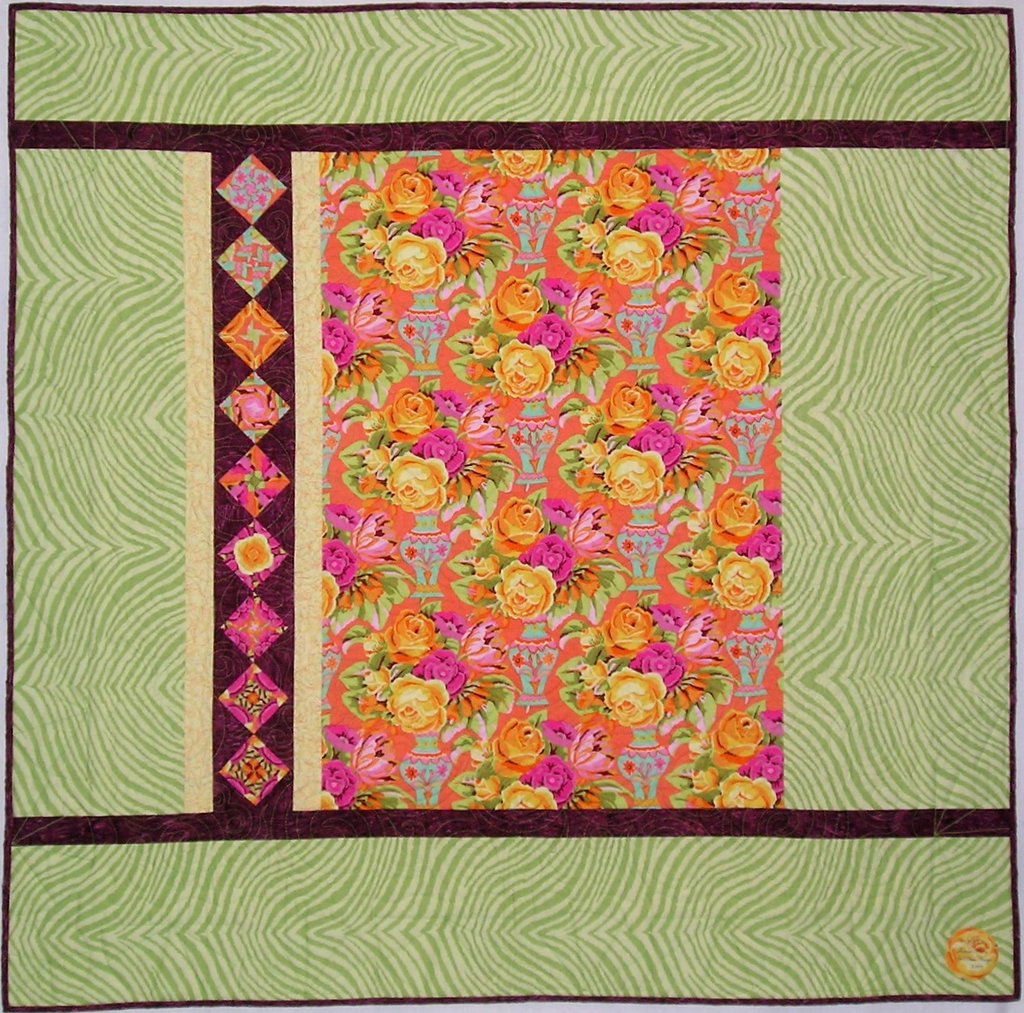
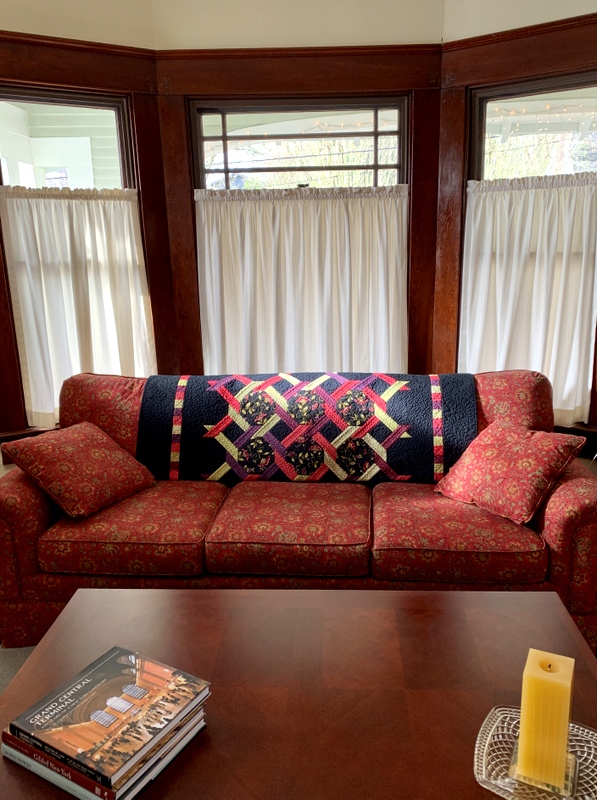
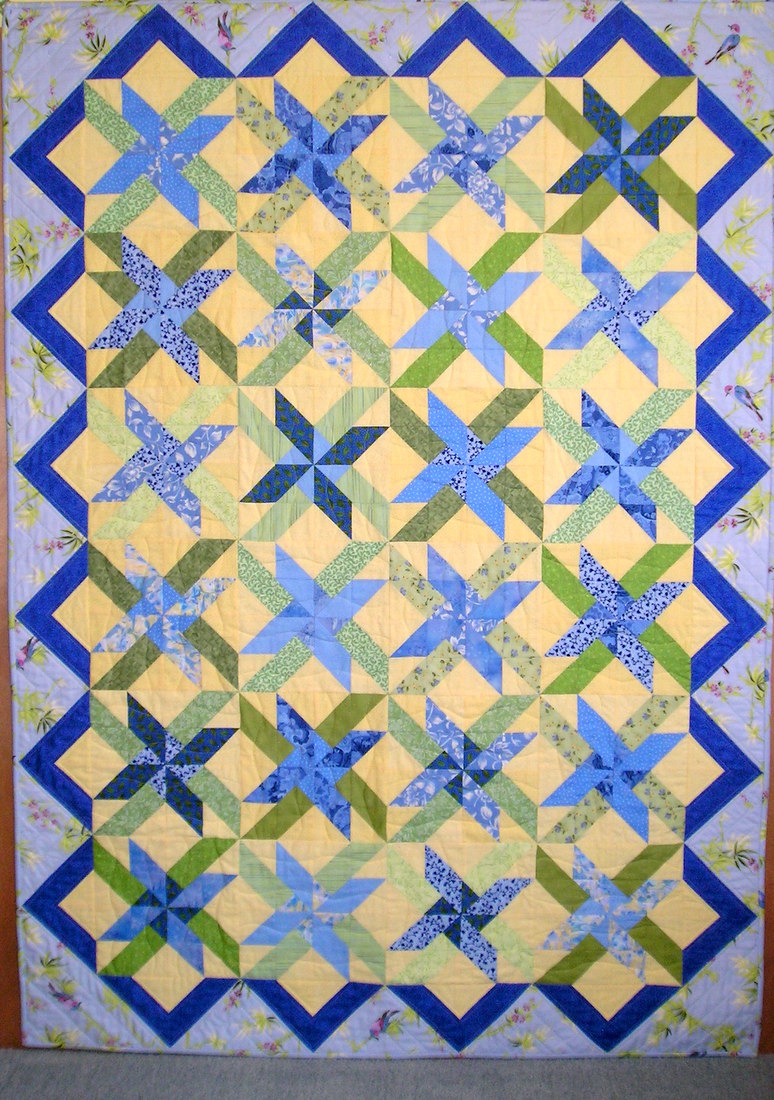
The bottom quilt in the stack pictured is based on Billie’s original design called Maisie’s Garden. She taught this class at the Pine Needle in 2007 and I happily jumped in, using a palette of blues, greens, and yellows, a combination I still love to this day:

Star Garden, 44″ x 62″ (2007)

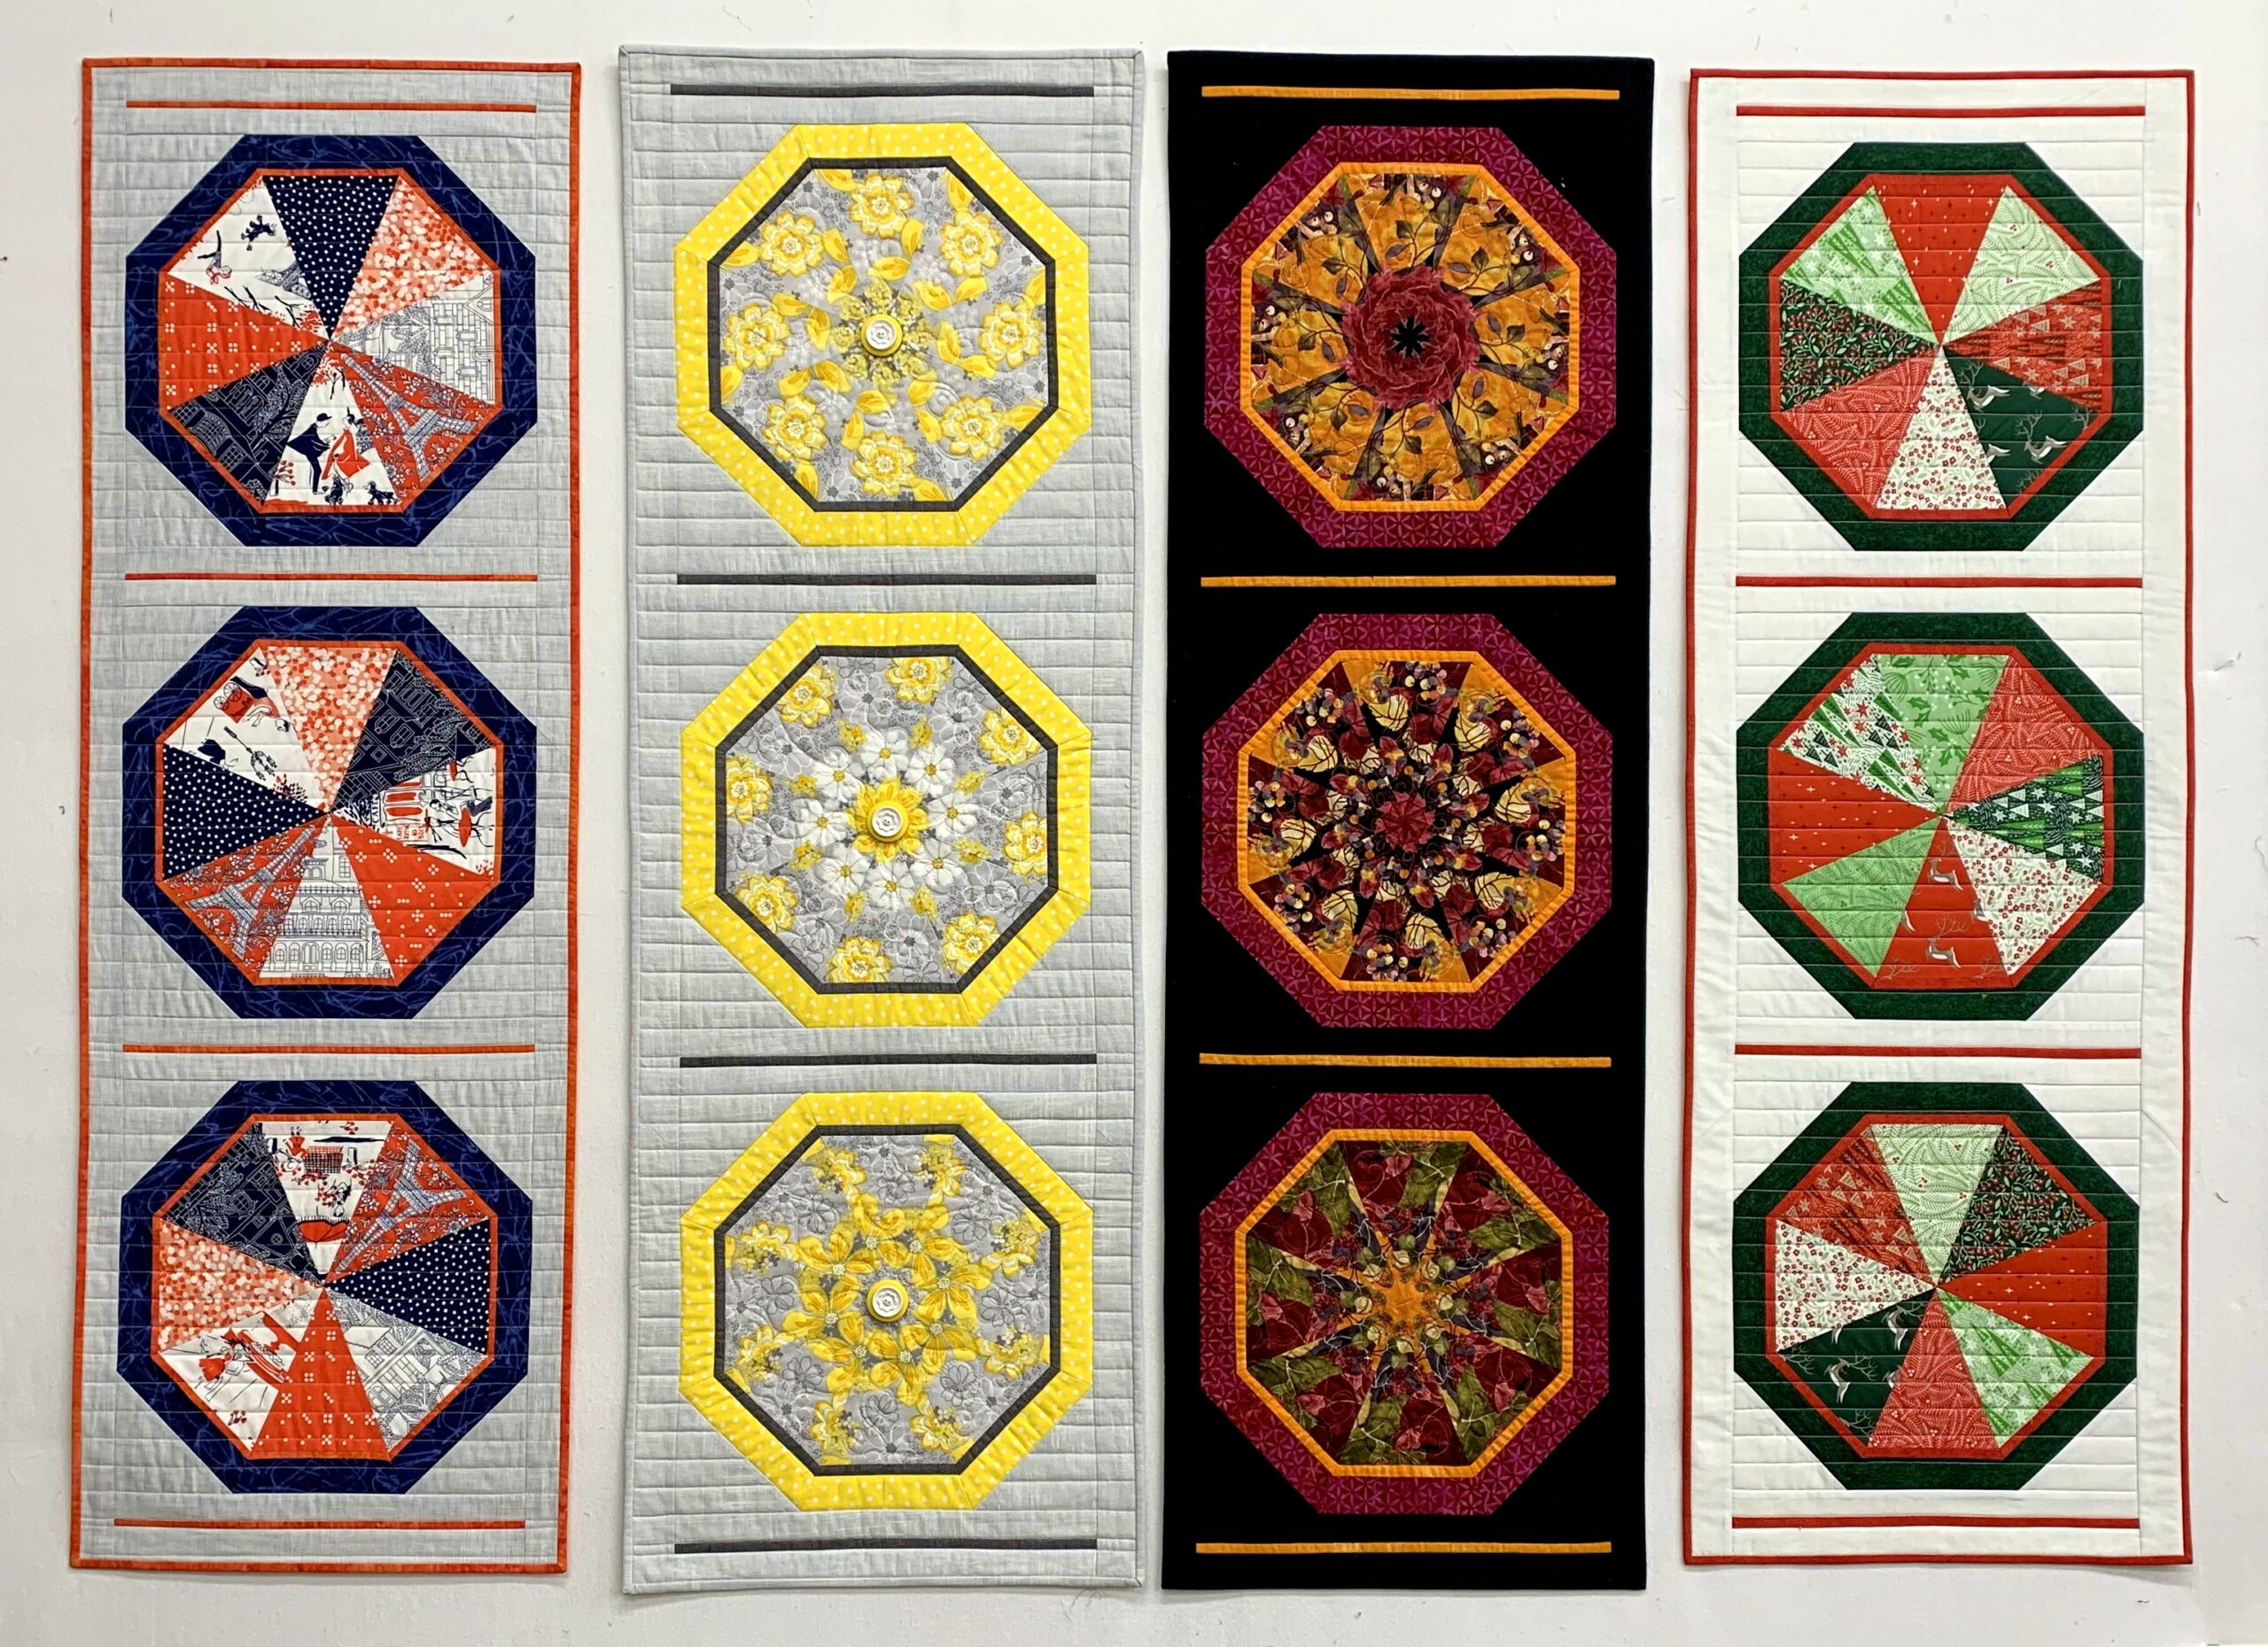
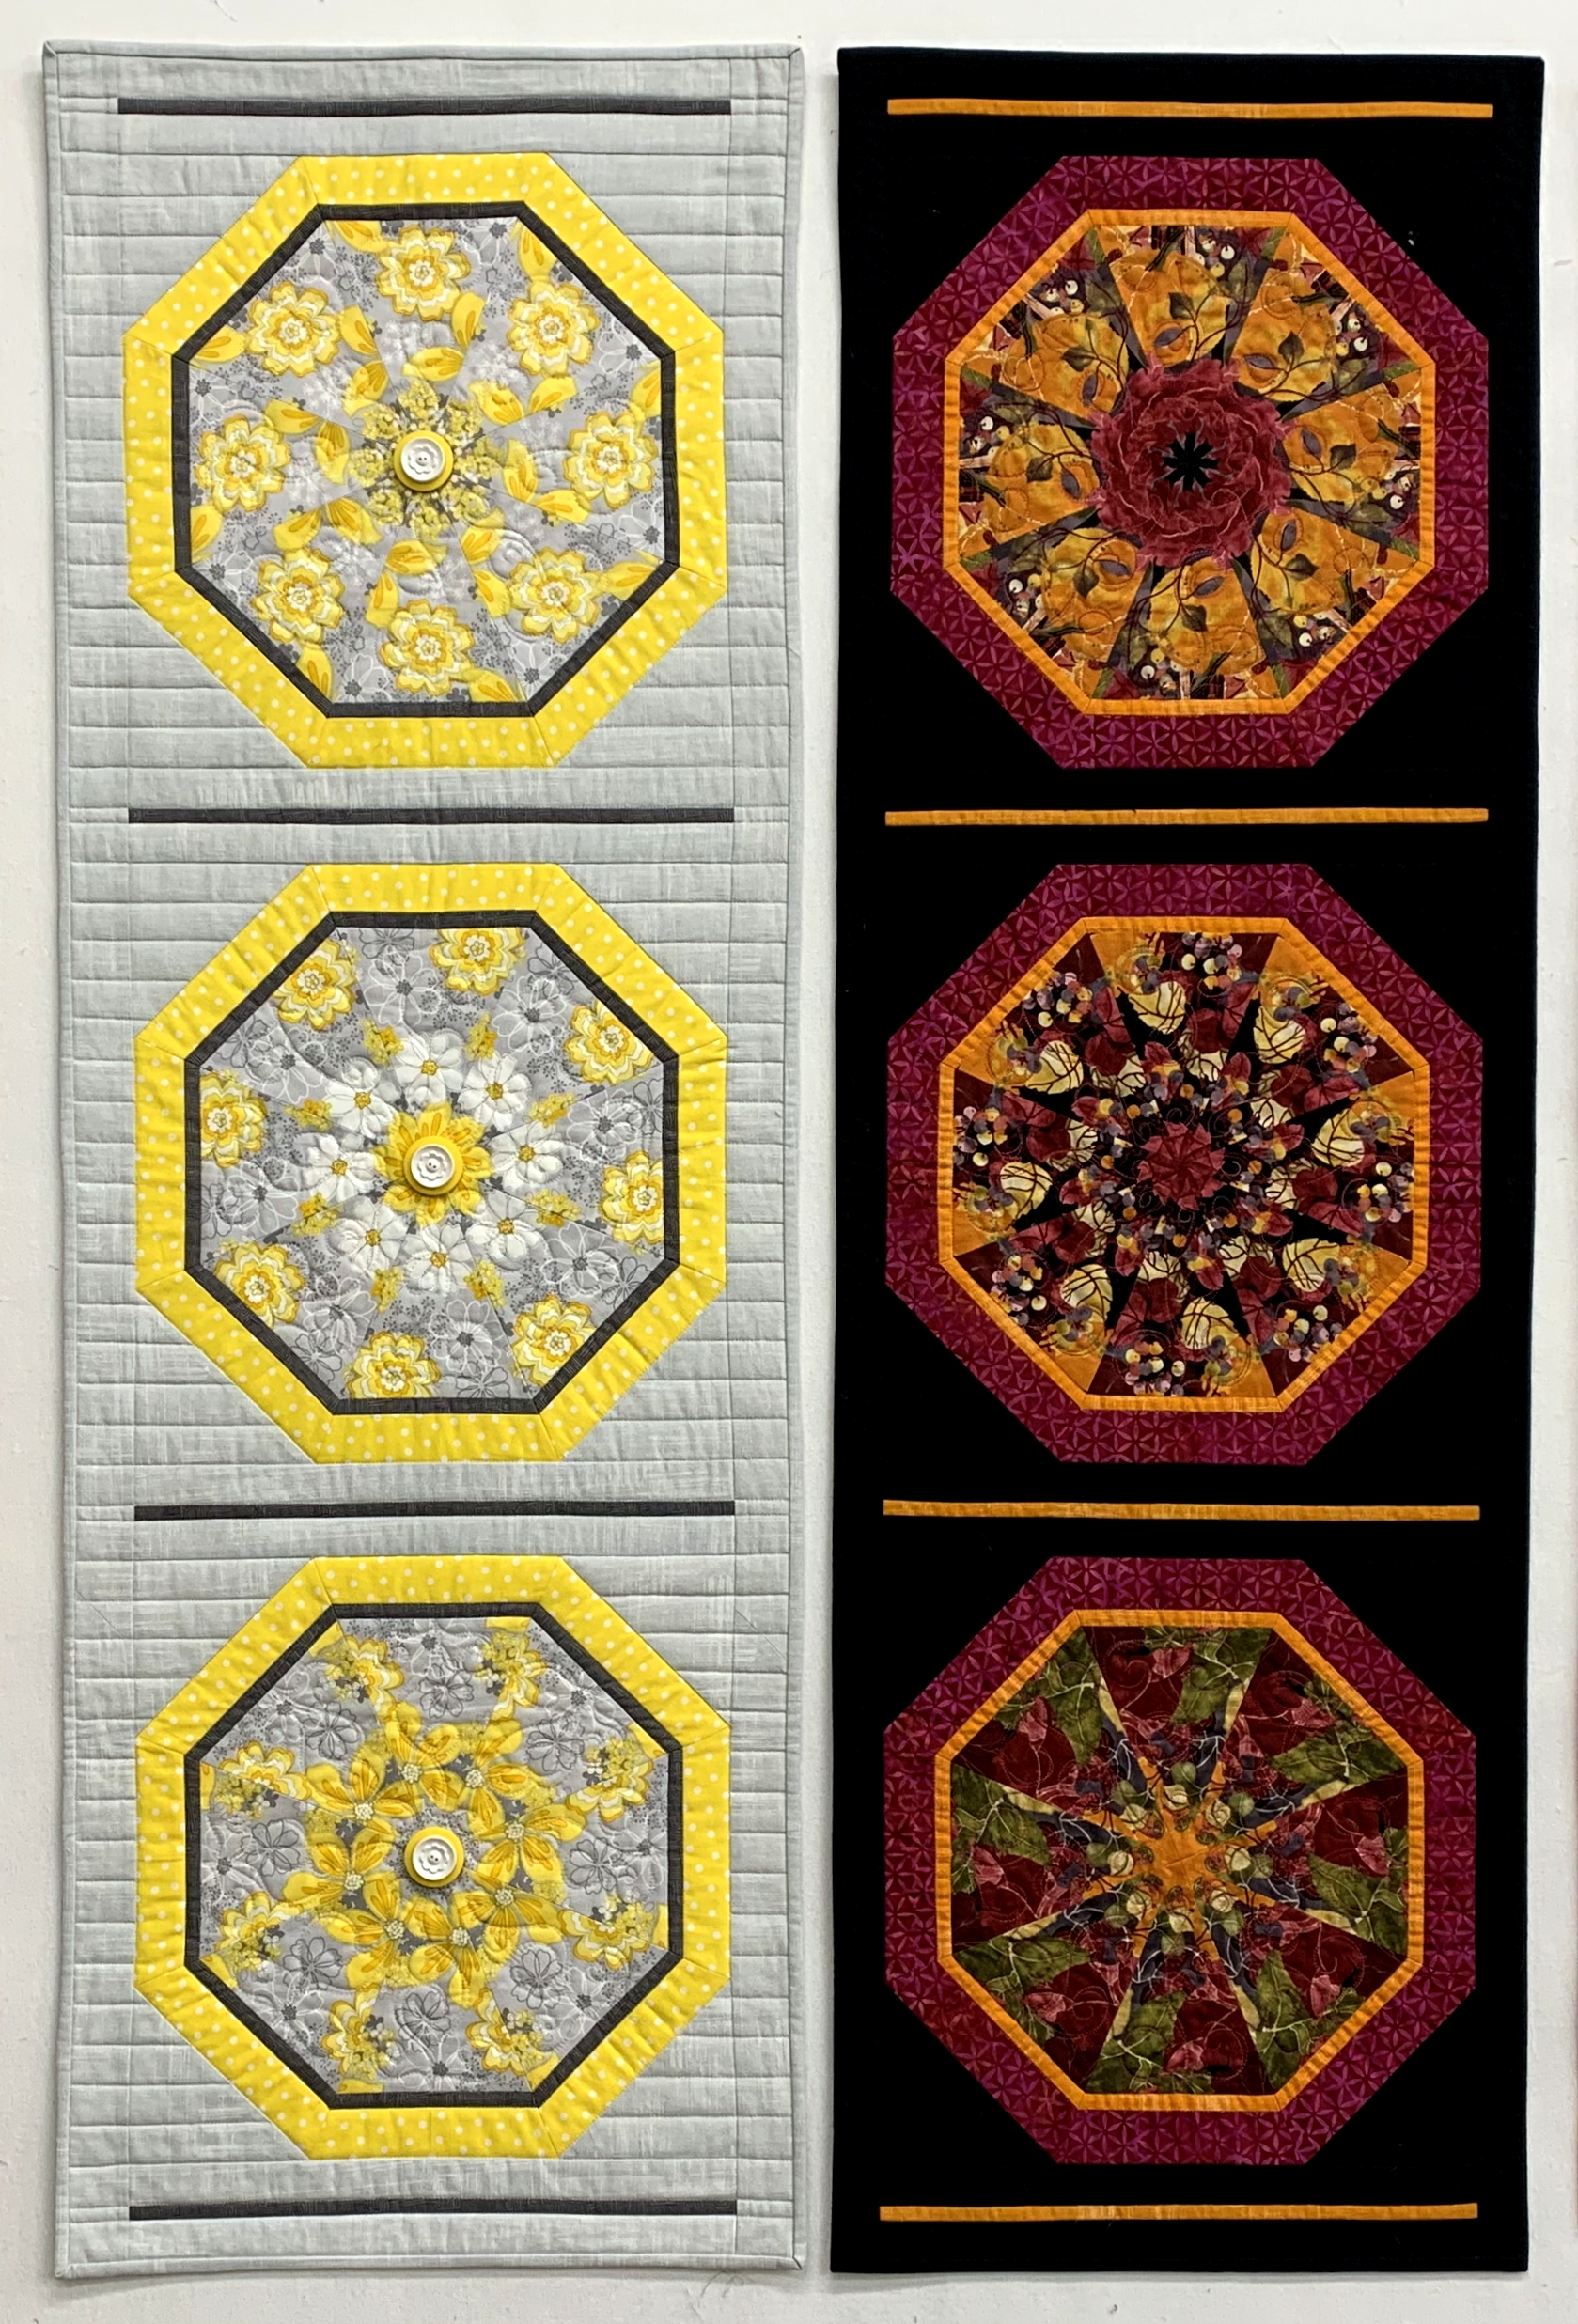
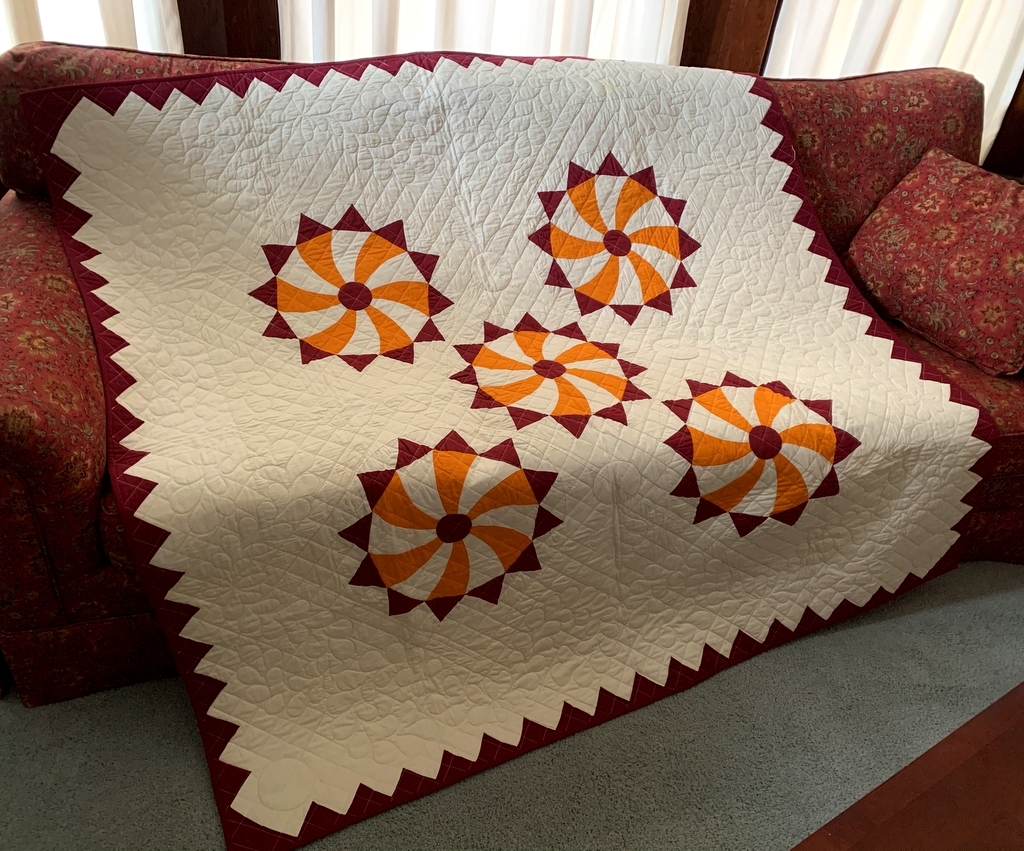
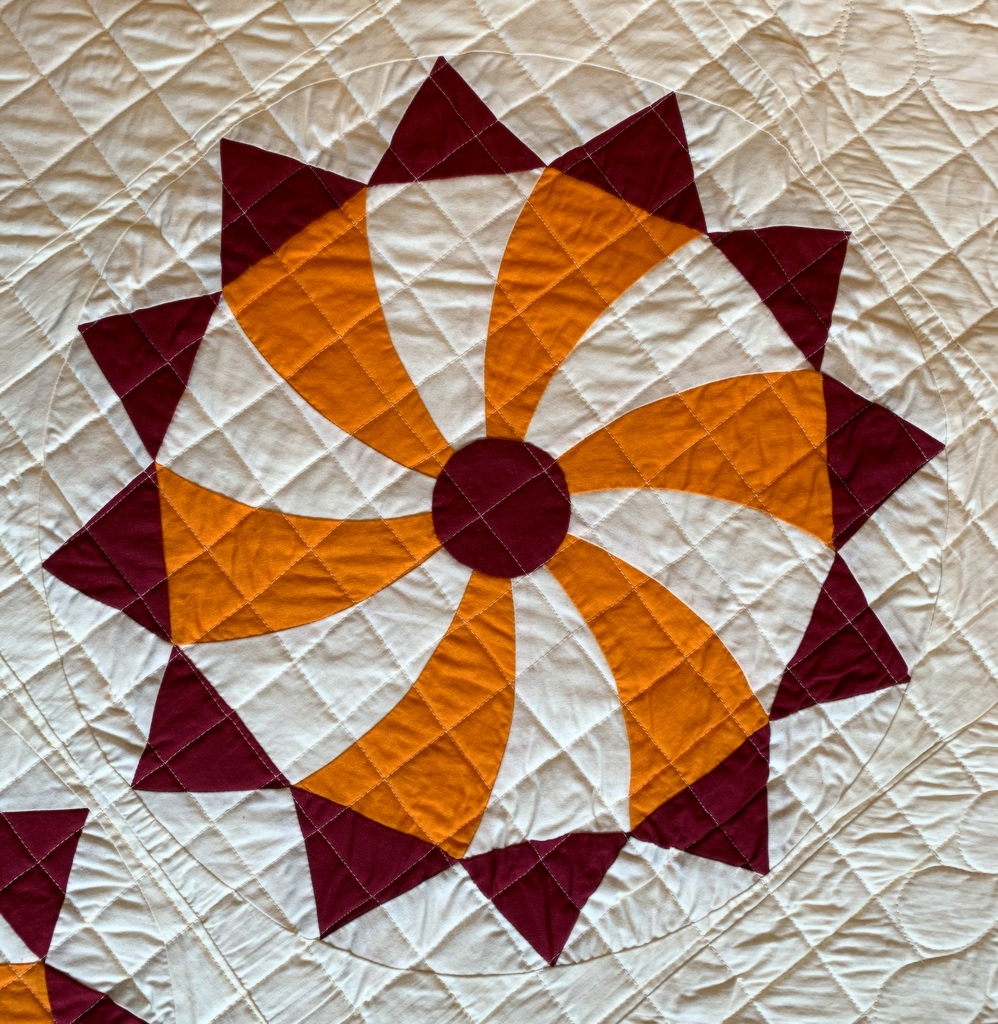
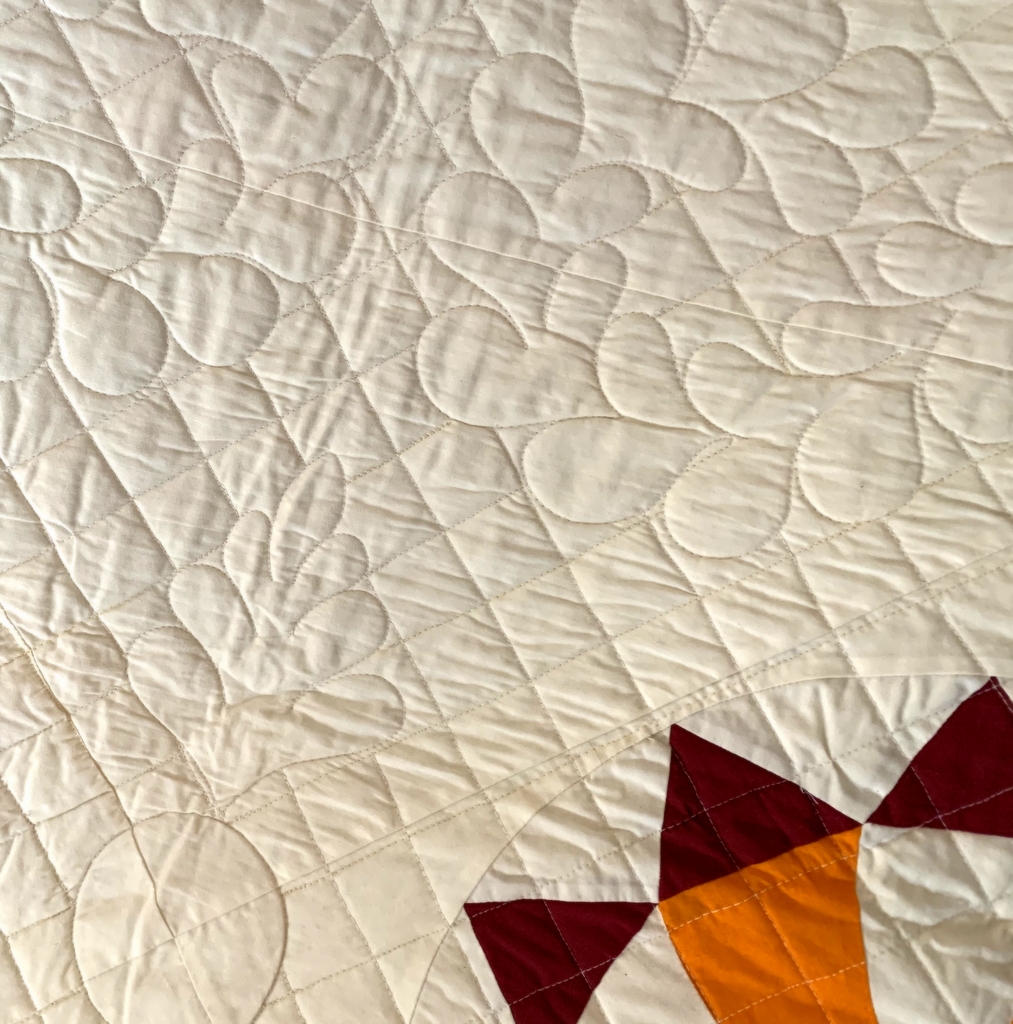
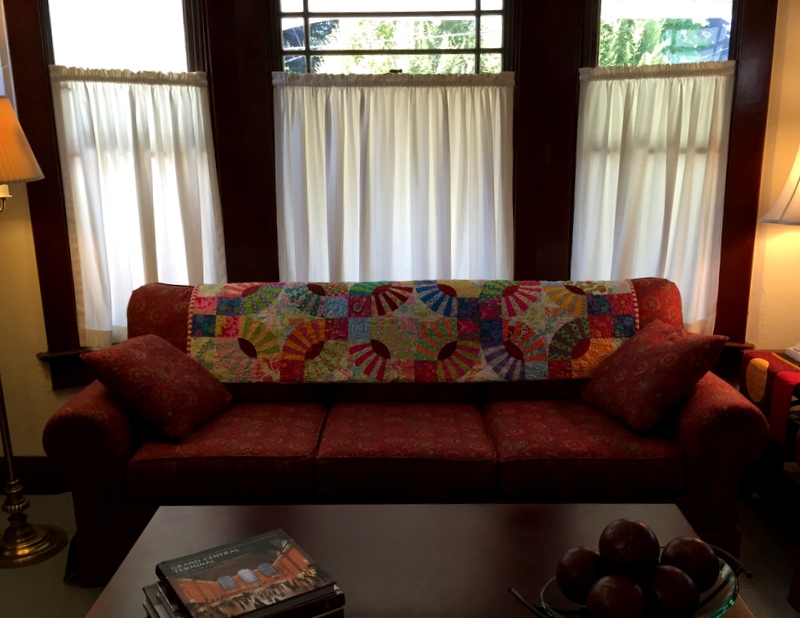
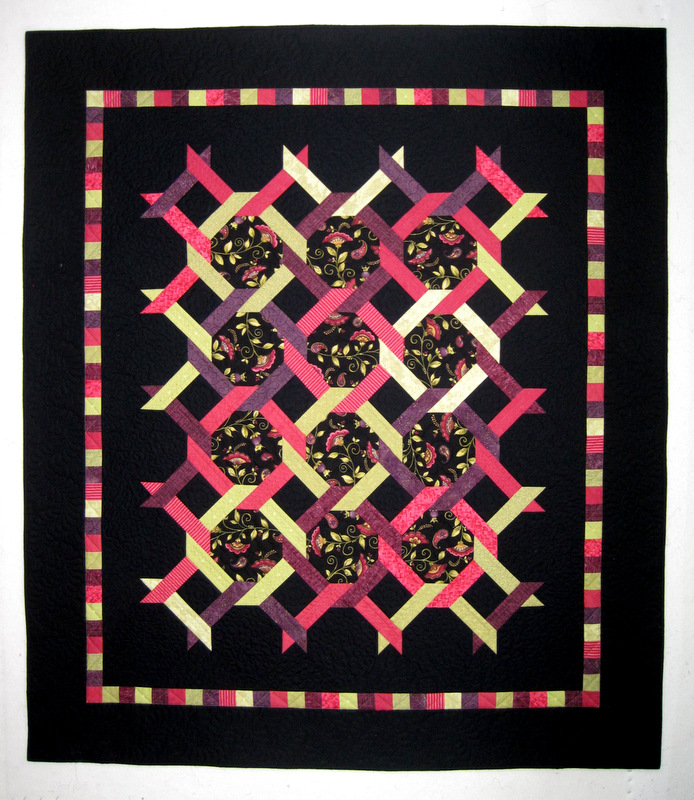
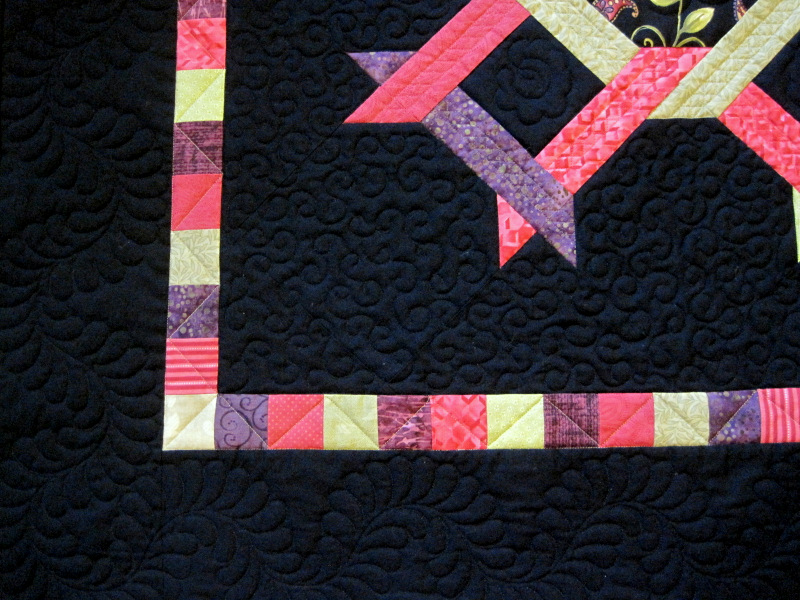
The next quilt in chronological order is V8, a quilt I designed to highlight my discovery of kaleidoscope blocks and inset circles:

V8, 55″ x 64″ (2010)

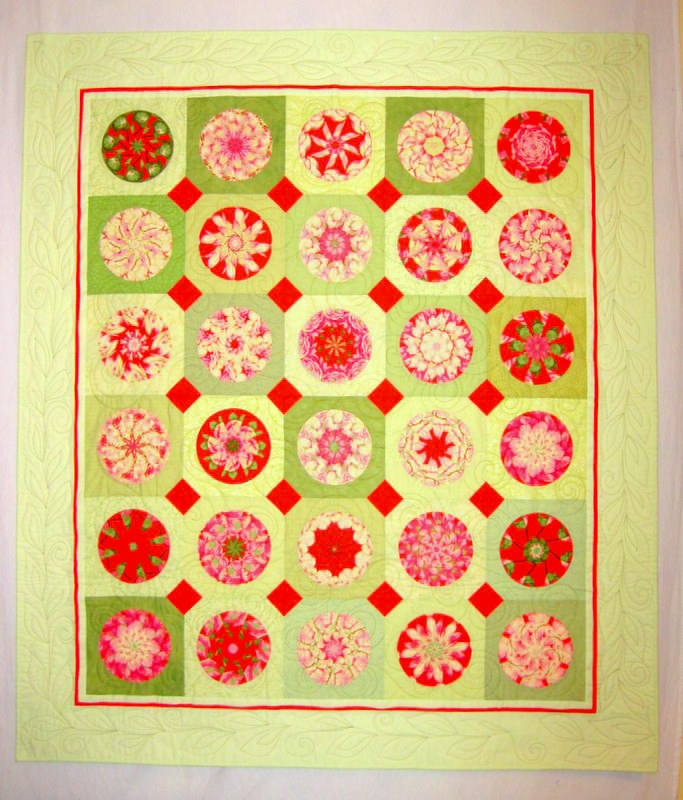
Every circle is a revelation! You don’t know what a block will look like until you have sewn eight 45-degree triangles together. I named my quilt V8 because the colors reminded me of the vegetables that go into the making of the vegetable juice blend.

One thing I can definitely say after posting these photos is that digital photography has certainly improved over the last 15 years!

Number 5 in the grouping of quilts is Simply Dashing, also an original design, this one focusing on four-patch kaleidoscope blocks, the ones I call “4-Patch Wonder” or “faux kaleidoscope” blocks:

Simply Dashing, 55″ x 64″ (2010)

In this quilt the centers of the Churn Dash blocks (on point) and the alternating blocks (also on point) are 4-Patch Wonder blocks.

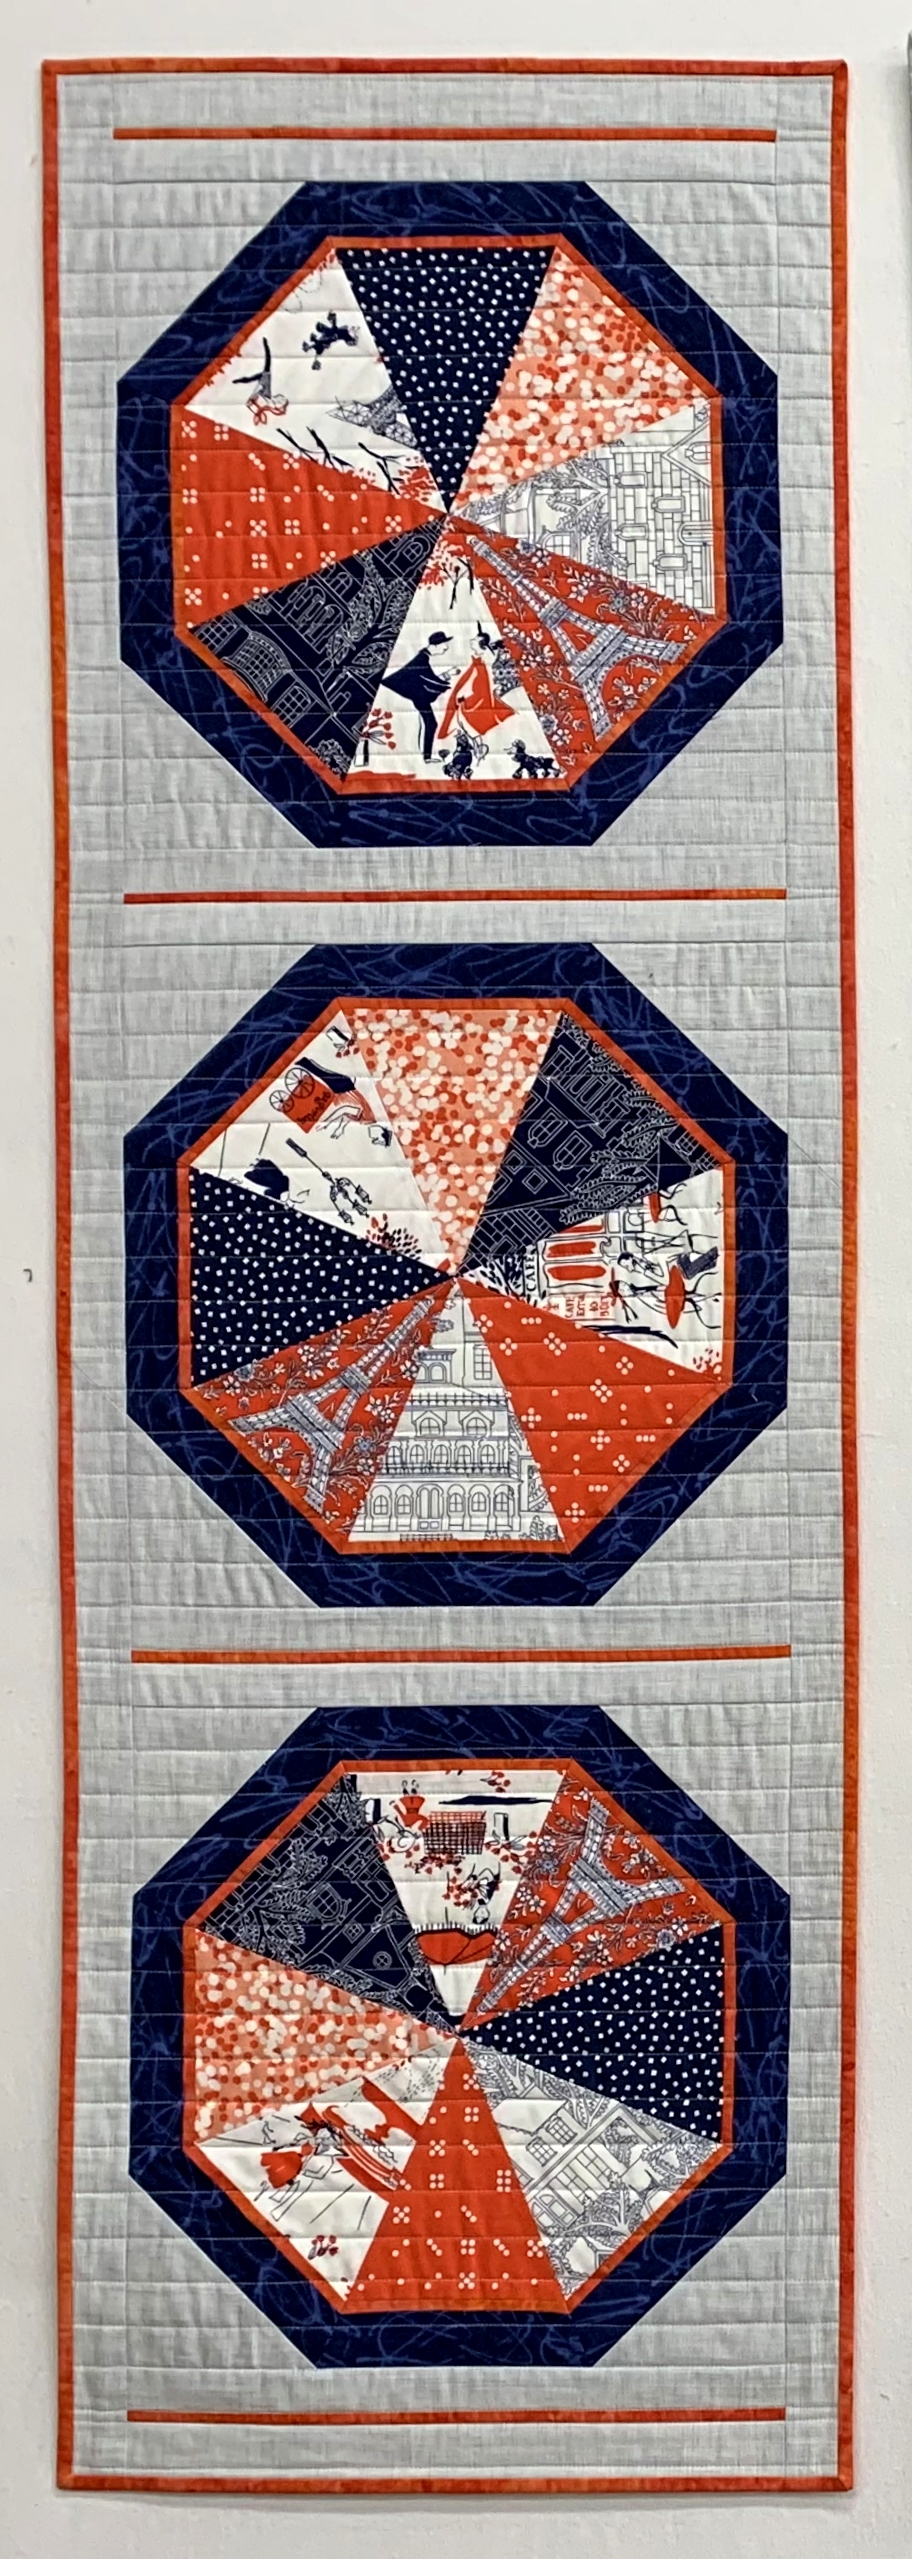
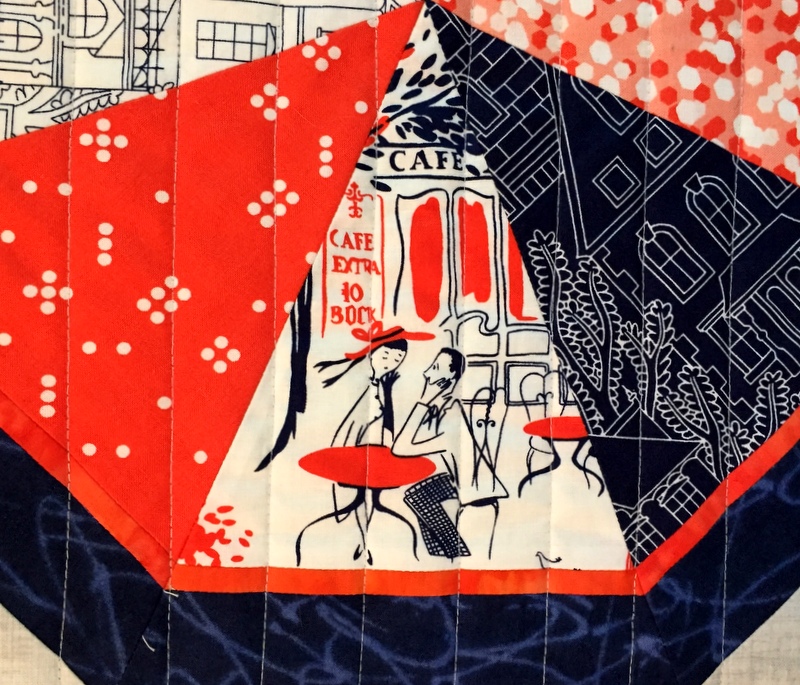
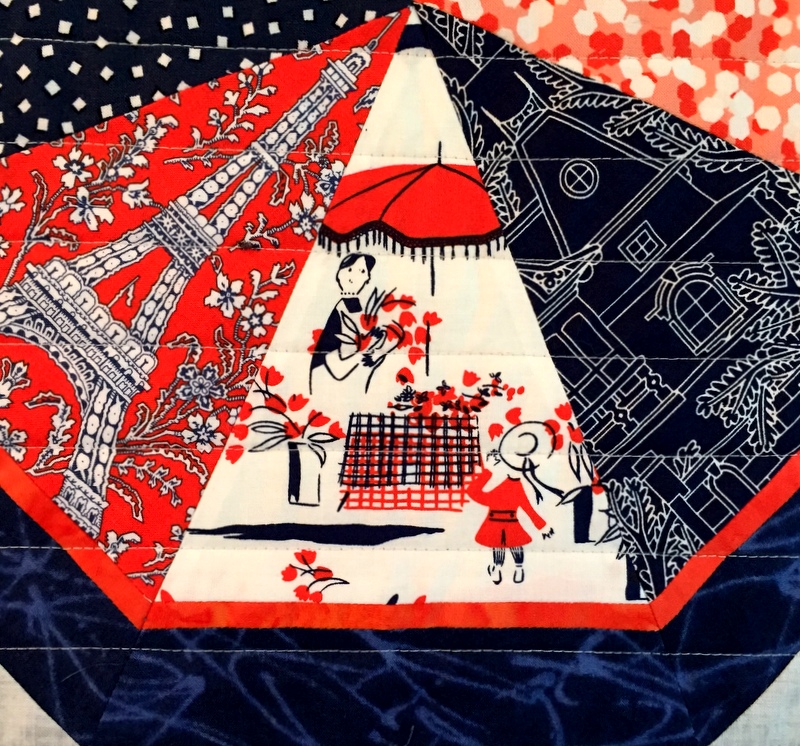
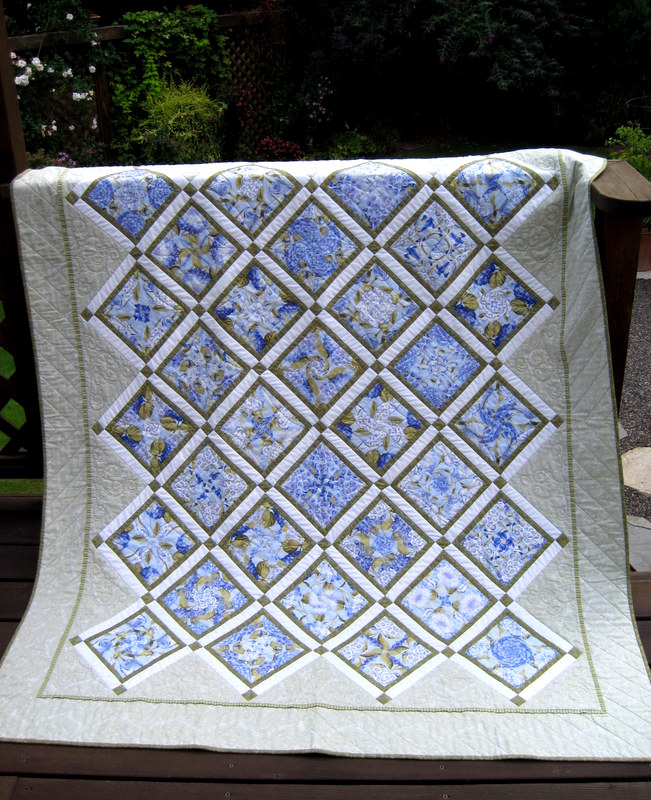
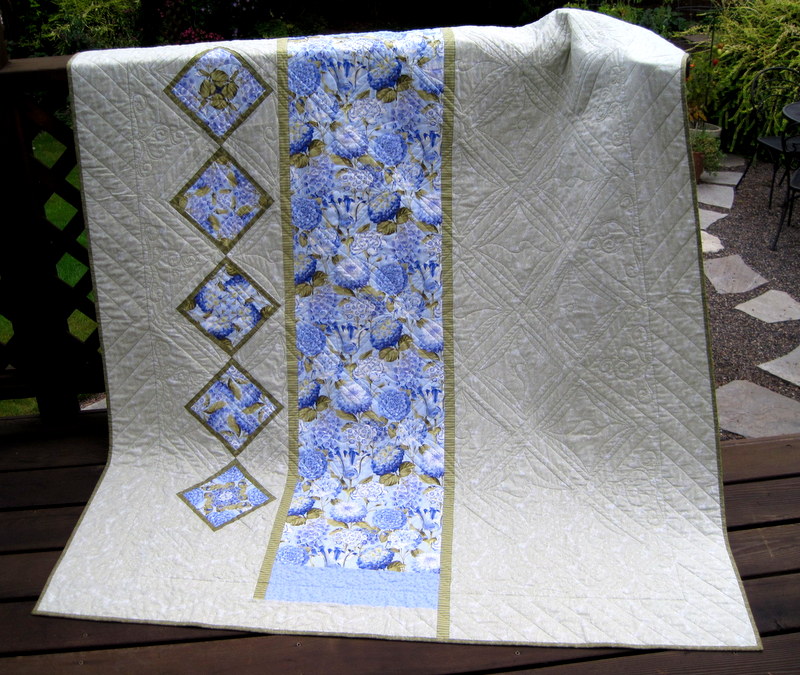
The final quilt I donated to Hopewell House is a recent one, Tea Time on High Street, finished in 2021:

Tea Time on High Street, 55″ Square (2021)

Was it hard to part with these quilts? To be honest, yes. The first three have a lot of sentimental value because of their association with my teacher and mentor Billie Mahorney. The other three represent steps I took in trying out my own designs and/or moving outside my comfort zone. The hospice patients and their families who become the recipients of these quilts may never know their significance in my quilting journey but the fact that they are helping people on a different kind of journey makes it all worthwhile.


Posted in 4-Patch Wonder, faux-kaleido quilts, free motion quilting, kaleidoscope quilts, Throwback Thursday, update | 11 Comments

Cue Vivaldi

Imagine you are hearing the strains of Vivaldi’s “Four Seasons” as you view all four versions of my Season to Taste table runner/wall hanging design:

Four versions of Dawn’s pattern Season to Taste

Aligning with Vivaldi’s concerti, the presentation begins with spring, followed by summer, fall, and winter. The winter version, named Winterwood, was the last one to be made:

Winterwood (2021)

When I started working on this quilt using fabrics with a holiday vibe (red and green prints, though not overtly Christmas-y), I thought about making a second winter version that is weather-related, i.e. not associated specifically with the holidays. The other day I found a piece of fabric in my stash that may just fill the bill. I’m not sure when work will begin on it but I’m giving myself until winter 2022 to finish it. (Do you think that’s enough lead time??)

The 45-degree triangles in the spring and winter versions were made with a selection of fabrics while the summer and fall versions, seen below, were each made with one focus fabric for a true kaleidoscopic effect:

Sun Flowers (2015) and Autumn Reflections (2014)

The fabric I have in mind for the second winter version would yield this kind of design.

I’m happy with the way all of of these turned out but I confess I have a favorite. It’s my spring version, Under Paris Skies:

Under Paris Skies (Sous Le Ciel de Paris) (2014)

The quilt contains fussycut images of street scenes of Paris that always make me smile (in addition to which spring is my favorite season). Here are a couple of those street scenes:

So . . . what about you? Of the four quilts pictured here, do you have a favorite?


Posted in free motion quilting, home dec, kaleidoscope quilts, Paris, table runner, update, wall hanging | 6 Comments

A Gift Beyond Compare

I received the most wonderful gift in the mail last month, this striking quilt made in 2004  by Lee Fowler:

Lee was an incredibly talented quilter and crafter who was only 54 when she died of cancer in 2013. I didn’t meet her until 2009 so I had the pleasure of knowing her for only four years but she touched my life in many ways. I greatly admired her intellect and talent, and I loved her goofy sense of humor.

The quilt you see above is named Rolling Star Revisited. It was designed, pieced, appliquéd, and quilted by Lee. Here are a few detail shots, starting with a single rolling star:

Each star measures 15″ from point to point; the entire quilt measures 58″ square.

Lee was an accomplished longarm quilter. She did hand-guided quilting without a stitch regulator. Here you can see some of her beautiful free-motion quilted feathers:

The circles in the center of each star are hand-appliquéd using the needleturn method as is the reverse-appliquéd border:

You must be wondering how I came into possession of this treasure. Well, in early December I received an email from Lee’s husband Rick, now remarried and living in another part of the state. Rick wrote that he and his daughter Liz were on a mission to send Lee’s quilts out into the world where they could be “loved, cherished, and above all used,” and asked if I would like to have one. He included photos of 16 quilts. I replied immediately, telling Rick I would be thrilled to own one of Lee’s creations and that it had taken me all of two seconds to identify the quilt I would love to have.

Rolling Star Revisited arrived a few days later. Doesn’t it look wonderful on the back of my couch?

This is actually the second quilt Lee made using the Rolling Star block (hence the Revisited part of this quilt’s name). Her first version, made with Depression-era reproduction fabrics, was featured as a pattern in the September 2005 issue of Quilter’s Newsletter Magazine:

Lee had found a circa-1930s newspaper clipping of the block and drafted her own pattern. It’s a challenging project with curves and set-in seams; the directions include sewing the curved pieces by hand or by machine. One of these days I might make a single block just to test my skills.

By the way, this isn’t the first time one of Lee’s quilts has graced my couch. I was one of  two dozen friends who helped Lee complete her last quilt, a magnificent version of Pickle Dish. I wrote about that here. Rick dubbed us “the Pickle Dish Gang.” The quilt was displayed at Lee’s memorial service and afterward it was circulated to each member of the group to have in her own home for a month. It was my turn in 2015:

2015-08-07 13.20.25

I wrote about that here. It was such an honor to have one of Lee’s creations in my home, however temporarily. And now! Now to have one of her quilts as my very own . . . You can understand why I consider Rolling Star Revisited a gift beyond compare. It will be loved, it will be cherished, and it will be used.


Posted in appliqué, free motion quilting, home dec, needleturn appliqué, update | 5 Comments

Label Me Surprised

A quilt I made over 10 years ago has an updated label, thanks to a mistake I made the other day creating a computer-generated label for my latest quilt, Uptown Funk. The label pictured above is the fourth one I’ve made using my computer and inkjet printer — and I may never go back to printing them by hand. (The smaller label on the left is the one I removed from the quilt so I could sew the new one on.)

For the first computer-generated label I made, created last fall for Give me the Simple Life, I followed a tutorial that called for label fabric to be fused to a layer of freezer paper and run through the printer. I had to use two layers of freezer paper before I was successful. Even then, the freezer paper rippled a little bit so it took a couple of tries (i.e. the printer jammed and I had to start over) before I got a label I could use.

On my second label, made for All You Need Is Love, I wanted an extra layer under the label so the print on the backing fabric wouldn’t show through. As an experiment I fused interfacing to the back of my label fabric before pressing it to one layer of freezer paper. There was very little rippling of the freezer paper. It went through the printer easily and I got a useable label on the first try. That in itself was serendipitous. Little did I know there was more serendipity to come!

To make label #3 for Uptown Funk, I decided to follow the second method. Three layers: label fabric, fusible interfacing, freezer paper. I made my preparations and trooped from my sewing room on the second story of our house down to the basement where the computer and printer are. Once there I realized I had only two of my three layers. I had fused the interfacing to the label fabric and trimmed it to size but had forgotten all about the freezer paper.

Arghh!! Did I really want to climb two flights of stairs to my sewing room to complete the freezer paper step? Or should I take a chance and run the fabric through the printer without the freezer paper? The worst that could happen is the printer would jam, right? So I tried it with just the two layers . . . and it worked — beautifully!

Was it just a fluke? Or have I stumbled onto an important discovery?

I decided to test my inadvertent discovery today by making a new label for a quilt I’d made in 2009. Back then my standard label information consisted of the name I had given the quilt, my name, and the year completed. At the time I didn’t appreciate the importance of providing additional information, such as the the designer of the quilt (if it wasn’t me) or the name of the person who quilted it for me. Nowadays I make it a point to include all that information on my labels.

Fiesta was quilted for me by the late great Lee Fowler, and I have been wanting to update the label information to acknowledge that for a very long time. I’ve actually been meaning to go back and remake several of my older labels but have always found an excuse to put it off. Creating labels by hand can be onerous and time-consuming, even when the results are pleasing. But now, thanks to the ease and speed of making a computer-generated label, my procrastination may be a thing of the past.

Here, very briefly, are the steps I took to make this label:

First, featherweight interfacing is fused to the label fabric. (I used Pellon 911FF.) Both pieces are cut slightly larger than a standard sheet of paper, 8½” x 11″:


Second, the fused fabrics are trimmed to 8½” x 11″ exactly:


Third, the two layers are fed into the inkjet printer and the label is printed from a file created on the computer. I tried two different sizes of type since I had room on the page for two labels:


Going with the smaller type, I decided I wanted a round label 4″ in diameter. (Labels can be any shape but I like the look of a round label.) My standard pattern is a compact disc measuring 4⅝” in diameter but it seemed a bit large so I made a trip to the kitchen to find just the right size to trace around. This small blue bowl is exactly 4″ across:

The larger circle drawn around the label was made with a compact disc, the smaller with the blue bowl.

I traced around the blue bowl on the wrong side of my label backing fabric so that when I held both layers up to the light I could position the top layer properly:

I don’t have a light table so the window had to do.

After being stitched and turned inside out, my label was ready to sew into place:

I chose to appliqué mine by hand but on another quilt it might be machine appliquéd if the stitching lines wouldn’t be distracting on the right side of the quilt.

My labels were printed on an HP OfficeJet Pro 8620. I know that all inkjet printers are not created equally. There must be wide variations between brands and models. I can’t help but wonder: with two successful labels behind me made with the new combo of label fabric + fusible interfacing + fabric for the back of the label, how transferable is this method of printing computer-generated labels?

Ah, that’s where you come in. If you are the least bit intrigued with my accidental discovery, would you be willing to make a test label? If this method works with different brands of printers — and different brands of fusible interfacing — I would be willing to create a  tutorial for my website with detailed instructions and a lot of photos. I thank in advance any quilter who decides to go for this.

Before I sign off, here’s a look at Fiesta, the first in my series of kaleidoscope quilts, front and back:

Fiesta, 54″ square (2009)
Back of Fiesta (2009)

Yes, I need to get a new photo of the back with the updated label!


Posted in appliqué, free motion quilting, kaleidoscope quilts, quilt labels, tutorial, update | 12 Comments

A Walk in the Neighborhood

It’s a bit of a stretch. The reference is to the walking foot on my Janome sewing machine, used to quilt Uptown Funk, my version of the Dresden Neighborhood quilt.


I seriously considered doing some free motion quilting in the background. Little spirals would have looked good or perhaps some pebbling. Alas, free motion quilting is not my strong suit. After considerable waffling I opted to keep it simple and go for straight lines. The doors on my wonky Dresden houses appear to radiate from the center circle so I extended the concept with my quilting lines radiating to the outer edges of the quilt.

Here’s a peek at the backing fabric:

The fabric, an older print from Timeless Treasures, features another kind of uptown neighborhood: Central Park in New York City. I’ve used this fun retro print in other projects and am happy to report I have plenty left. (There’s a funny story about this fabric you can read about here.)

My wonky Dresden neighborhood quilt measures 24″ x 26″ after trimming. Now I’m trying to decide what fabric to use for binding. Solid black seems too severe. Solid green? No, that would be too much green. I’m leaning toward using one of the black prints from the quilt and maybe inserting a very thin green flange.

Do you approve?


Posted in free motion quilting, Janome 9450QCP, update, wall hanging, wonky Dresden neighborhood | 7 Comments

Throwback Thursday: Give Me the Simple Life (2019)

It’s time for the tenth and final installment in my Throwback Thursday series looking at quilts made in the last decade. Coming up with my choice for 2019 was easy: it was the only quilt I completed last year! Here is Give Me the Simple Life:

Give Me the Simple Life, 95″ square (2019)

The pattern is Hazel’s Diary Quilt by Shelly Pagliai of Prairie Moon Quilts. Regular readers followed the making of this quilt from my very first block (and post) in January 2018 till its completion in September 2019.

I’m very proud of this accomplishment, as I made it my goal to become proficient in needleturn appliqué during the making of the quilt. It certainly provided ample opportunities for practice! Longarm quilter Kazumi Peterson did the amazing quilting.

Approved by Coco the Cat Inspector

Give Me the Simple Life will be on display later this month at Northwest Quilters’ 46th annual show, “A Festival of Quilts,” in its new venue, Camp Withycombe, in Clackamas, Oregon. Dates are Friday and Saturday, March 20 and 21. If you are in the neighborhood, please stop by. There’ll be over 300 quilts on display and lots of vendors selling wonderful things (like fabric).

Thank you so much for joining me in this 10-week lookback at some of my favorite quilts!


Posted in appliqué, cats, free motion quilting, Hazel's Diary Quilt, needleturn appliqué, Throwback Thursday, update | 6 Comments

Throwback Thursday: Catch a Falling Star (2015)

Today marks Week Six of Throwback Thursday. Each week since the beginning of the year I’ve highlighted one quilt made in successive years beginning in 2010. This week we’re up to a quilt made in 2015.

Choosing my quilt for 2015 was easy. It had to be Catch a Falling Star, my version of Terri Krysan’s Reach for the Stars:

Catch a Falling Star, 84″ x 105″ (2015)

Often when I finish a quilt, there are one or two things I would have done differently. Not with this one. I love every block, I’m happy with every modification I made to Terri’s original design, and I’m thrilled to pieces with the combination of computerized and free-motion quilting done by Loretta Orsborn.

Instructions for Reach for the Stars appeared in seven consecutive issues of Quilters Newsletter Magazine, beginning with the Oct./Nov. 2013 issue and ending with the Oct./Nov. 2014 issue. Sadly, QNM is no longer in publication.

Almost every month I receive a request from a quilter wanting to know how to get directions for Reach for the Stars. A few years ago I could point to eBay or Etsy for the needed issues but copies are getting harder to find. My advice nowadays is to check with a local quilt guild to see if any member has these seven issues and would be willing to lend or sell them to the person wanting to make the quilt.

Catch a Falling Star was my first ever sampler quilt. I wasn’t sure I would ever make another one. But I did. You’ll see that one when I reach Week 10 of Throwback Thursday.

Thanks for joining me on my weekly trip down Memory Lane!


Posted in 4-Patch Wonder, faux-kaleido quilts, free motion quilting, mitered corners, Reach for the Stars sampler quilt, Sew-Along, Throwback Thursday, update | 4 Comments

Throwback Thursday: Square Dance (2014)

Throwback Thursday already?? It seems impossible but we are in the final week of January, Week 5 (and Year 5) of my 10-year-lookback at quilts. I started with 2010 at the beginning of the month and now I’m up to 2014.

In Square Dance you see my interpretation of the classic Twist block. Every Twist quilt I’ve ever seen features a solid fabric in the center of each block and two fabrics for the lattice. My version incorporates a lovely folk art floral in the center of each block and 12 fabrics in the lattice — four each of rose, green, and purple:

Square Dance, 55½” x 64½” (2014)

It was quite a challenge getting the balance of fabrics just right but I was very pleased with the outcome.

The beautiful quilting by Melissa Hoffman of Fiddlestitches is hard to see so here’s a close-up:

I remember Melissa telling me she had to wear a headlamp to stitch the free-motion filigree design in the interior of the quilt. Black thread on solid black fabric: what a challenge that must have been!

Square Dance is one of my quilts in rotation on the back of the couch in our living room. In fact, it’s there right now, and I managed to get a shot just now while the sun was briefly shining:


Posted in free motion quilting, home dec, snowball blocks, Throwback Thursday, update | 4 Comments

Throwback Thursday: Dianthus (2010)

First things first:  Happy New Year!! Can you believe it’s 2020?

I’m taking a look back at some of the quilts I’ve made over the last 10 years, starting in 2010. (I got the idea from Thelma at Cupcakes’n’Daisies who posted on Instagram yesterday with photos of 10 gorgeous quilts she made between 2010 and 2019. Check out her beauties at instagram.com/thelmacupcake.

For 2010 I chose this quilt, Dianthus:

Dianthus, 57″ x 67″ (2010)

The pattern is 4-Patch Stacked Posies by HD Designs. I had recently discovered the four-patch kaleidoscope block and was having great fun investigating the possibilities with other fabrics and other settings. Here you see a large strip of the focus fabric as well as the blocks that didn’t make the cut for the front of the quilt:

I quilted this one myself and I don’t mind telling you I was a bundle of nerves during the process. Here are a couple of close-ups:

I used a variegated thread of green and lavender. The color variation is very subtle, which is just what I wanted.

Why the name Dianthus? The fabric is a gorgeous melange of blossoms including tulips, hydrangeas, and carnations. Dianthus is the Latin word for carnation. The quilt wound up at the home of my twin sister, Diane. ‘Nuff said.

When Diane’s grandson Edward was a baby, the quilt was used in his bedroom at her home:


Edward is now 10 years old. (How did that happen?) He’s still a frequent overnight visitor but as you might imagine his room looks very different today. The crib has been replaced with a trundle bed, for one thing.

And the quilt? Nowadays it’s folded at the bottom of the bed in the first floor guest room and is often pulled into service for a lap quilt while watching TV. The 57″ x 67″ size makes it a good candidate for that.

Thanks for stopping by on this second day of the New Year. Do come back for next week’s Throwback Thursday to see a quilt I made in 2011.


Posted in 4-Patch Wonder, baby quilt, family, faux-kaleido quilts, free motion quilting, home dec, kaleidoscope quilts, Throwback Thursday, update | 4 Comments

JBB 3-D

A rather cryptic title for a blog post, I know, but regular readers know what it means. My latest Junior Billie Bag in-the-making has gone three-dimensional:

As I’ve mentioned before, this is my favorite part of the process, when a series of flat panels like this . . .

. . . and this . . .

. . . and this . . .

. . . are transformed into the quintessential quilter’s tote known as the Junior Billie Bag.

Junior Billie Bags (JBBs for short) have been a frequent topic on my blog since I started teaching Billie Mahorney’s design three years ago. I have been asked many times about a pattern for this tote but Billie, who owns the copyright on the design, never wanted to create a pattern.

Teaching her design in a hands-on class is by far the best way to go because I can share tips and techniques that have come to me through experience and also troubleshoot problems my students may encounter, just as Billie did when she was teaching. I’m so sorry that quilters across the country and beyond who have seen pictures of various JBBs on my blog don’t have the opportunity to create one of their own.

As I was snapping photos for this post, a little white paw made its way into the frame:


Uh-oh. It can only be Coco the Photobomb!


Posted in Billie Bag, cats, Churning Stars quilt block, free motion quilting, Junior Billie Bag, tote bags, update | 5 Comments