Monthly Archives: November 2014

Diane’s Dream Kitchen, Part 3

My sister Diane’s kitchen renovation (subject of the this post and the previous one) included the creation of a built-in buffet in her dining room. It’s almost nine feet wide! Check it out:

buffet viewed from the left
The buffet replaced a standing sideboard that was just under five feet wide so you can imagine all the storage and display space she gained. Here’s a closer look at the top of the buffet:

buffet top view
Diane and I had such fun rearranging her “Rosalie” Spode china! It was given to her about 30 years ago by her mother-in-law. Thanks to antique stores, estate sales, and ebay, Diane has added to her collection over the years and, I am happy to report, uses it often.

The top cabinets of the buffet are glass-fronted without panes to show the china to its best advantage. Here are close-ups of each cabinet:

upper left cabinet 800upper right cabinet 800
Four of the six cabinets on the lower cabinets are also glass-fronted:

buffet, lower cabinets-001
A few years ago our stepmother Shirley gave Diane her yellow Fostoria glassware in the “Baroque” pattern, which features the fleur de lis, a favorite motif of mine. Every time I came from Oregon to Georgia to visit Diane, I would tuck a few carefully wrapped pieces of glassware into my luggage. It took a while for all the pieces to get here but the effort was well worth it. The Fostoria and the Spode look elegant together, don’t you think?

I must confess to being a little green with envy over these wonderful changes to my sister’s home. But I’m also very happy for her. After 40+ years in the working world, she recently retired. She has earned this renovation, and I know she will enjoy it for many years to come.


Posted in family, home dec, update | 7 Comments

Diane’s Dream Kitchen, Part 2

butler's pantry from dining roomWhat you are looking at here is the space between the kitchen and dining room in my sister Diane’s Atlanta home. This space, often called the butler’s pantry, was simply a nook before the kitchen renovation that Diane and her husband Ed undertook recently.

The butler’s pantry contained a lovely antique cabinet in which Diane stored some of her Spode china. The rest of the china was in the formal dining room in an antique sideboard. The kitchen renovation expanded to include turning the butler’s pantry into a wet bar and replacing the sideboard in the dining room with a built-in buffet.

Diane chose glass-fronted cupboards above the wet bar to show off her vintage glassware. Alas, it virtually disappeared against the white walls and glass shelves. What the cupboards needed was some depth of color. Her clever solution was to cover foam core with a rich paisley home dec fabric and place it on the back wall of the glass cupboard.

Here’s a look at the fabric with the cupboard doors open . . .

butler's pantry doors open

. . . and closed:

doors closed-001

Don’t you love the play of pattern between the swirls of the paisley and the straight lines of the basketweave backsplash?

Up next: the new built-in buffet in the dining room. Please come back for a look!


Posted in family, home dec, update | 3 Comments

Diane’s Dream Kitchen

For the last 15 years (at least) my husband and I have traveled from our home in Portland, Oregon to Norcross, Georgia to spend Thanksgiving with my twin Diane and her husband Ed. It’s a tradition we treasure.

Every year Diane would comment on how much easier it would be to prepare Thanksgiving dinner if her kitchen had two ovens. The two-oven conversation often evolved into what other changes she would make in her kitchen and dining room. The other big ticket item on her wish list was a built-in buffet in the dining room to display the set of Spode china that Ed’s mother passed on to them many years ago. Ed and Diane wanted a buffet that evoked the one in Ed’s family home in Laurelhurst, a lovely old residential neighborhood in Portland.

As I write this post, Diane is in her newly renovated kitchen making pumpkin pies. I’ll be joining her in the kitchen shortly to help with other tasks in preparation for tomorrow’s Thanksgiving feast for a dozen.

As often happens, what started out as a simple remodeling project — in this case, creating space for a second oven and building a buffet — turned into a complete renovation. In the process, Diane gained a kitchen worthy of the pages of House Beautiful, a wet bar in the butler’s pantry, and a built-in buffet that beautifully showcases her Rosalie Spode.

Let’s take a look at Diane’s new kitchen. First, the northwest corner:

nw corner 1
The southwest corner:

fish corner
Looking south-southeast:

south
This view from the northeast corner takes in a good part of the kitchen:

looking from the living room-001

This is the time of year we tend to reflect on the things for which we are thankful. You can bet that Diane is thankful for her beautiful new kitchen!

In my next post I’ll show you the dining room buffet and the butler’s pantry. Diane did something very clever in the latter with a piece of home dec fabric. I hope you’ll come back in a few days for a look. In the meantime, I send my best wishes for a wonderful Thanksgiving! I hope you get to spend it with people you love.


Posted in family, home dec, update | 7 Comments

Pillowcases for Edward

My husband Charlie and I depart later this week for Atlanta for an extended visit over Thanksgiving with my twin sister Diane and her husband Ed. I usually make a pair of pillowcases as a hostess gift but this year, at Diane’s request, I made a pillowcase for her five-year-old grandson, Edward, a frequent overnight guest at his grandparents’ home.

Diane was captivated by the fabric I had used a few weeks ago on the back of Susan Elinor’s quilt. The fabric features vignettes of Dick and Jane and Spot, those charming characters from the early reader books I remember as a kid growing up in the 1950s. Now Edward is learning to read, and Diane loved the idea of the same fabric in a pillowcase he could sleep on at his grandma’s house.

Luckily, I had just enough fabric left to make one pillowcase. I paired it with a simple paisley print for the band:

Dick and Jane pillowcase for Edward
Fun with Dick and Jane (and Spot)

Diane knows about this pillowcase but she doesn’t know yet that I made Edward a second one:

robot pillowcase for Edward
Robot Love

What little boy doesn’t like robots? I adore these fabrics, part of the Mechanical Genius line by designer Mo Bedell that came out a couple years ago.

Now Edward has two new pillowcases to sleep on:

pcases for Edward
Pillowcases for Edward


Posted in family, roll-it-up pillowcases, update | 5 Comments

Reach for the Stars: I’m There!

Yes, indeed! My Reach for the Stars quilt top is completely pieced, all 88″ x 108″ inches of it. I finished it at Quilt Camp last week. It’s a bit wrinkled from being all folded up during transport, but here it is:

RFTS PN 11-14
Dawn’s Version

I like the look of the black squares floating in the outer border, so rather than binding the quilt in solid black to frame it, as originally planned, I’m going to use more of the background fabric.

But I’m getting ahead of myself. The quilt has to be quilted first! I am going to (gulp) invest in custom longarm quilting on this one. The quilter I have chosen is equally at home with free motion and digitized quilting, and I expect my quilt will have some of both. I’ll have a better idea after we meet next week.

While I was at Quilt Camp I also pieced the back. It measures about 96″ x 116″ and incorporates the two Jacobean floral focus fabrics I used for the fussy-cut images in the center medallion and individual blocks. This is a partial view of the back:

RFTS back, partial
Jacobean Florals on the Back

One of the prints was a border print, so I pieced it in both directions for a bit more visual interest.

I’m still grappling with the realization that this quilt may not fit my queen-size bed. The 88″ width is fine, even if the quilting draws it up a few inches. It’s the length that’s the problem. According to several websites I’ve looked at, the recommended length for a standard queen or king-size quilt is 94″. Even if the quilting shrinks 4″ from the length, it’s still going to be 10″ longer than the recommended length. If this had dawned on me sooner (like when I started making this quilt in January), I might well have resized the blocks. Too late now. But I’m not going to fret about it. Surely I’ll find a good spot to display this quilt.

On a brighter note, I’ve selected a name for my quilt:  Catch a Falling Star. If you were around in 1957 (as I was), you’ll recognize it as the name of a song by Italian-American crooner Perry Como.


Posted in Reach for the Stars sampler quilt, update | 10 Comments

Reach for the Stars: Almost There!

The final two corners are on my Reach for the Stars quilt top, and already it is huge. It measures 80″ x 100″ — oh my! It will measure 88″ x 108″ once the final borders are on. The custom quilting will shrink it a few inches, of course, but still — I think it’s going to be too big for my queen size bed. I was lamenting this to my twin sister, Diane, who quickly pointed out that she has two king size beds in her home and oh, by the way, wouldn’t this quilt look terrific in the upstairs guest room?

There’s no room in my house big enough to photograph the entire quilt top so I placed an old sheet on the patio out back, centered the quilt on top of it, and took a picture in the waning light:

2014-11 all but last border
Final Border to Come

Those of you who have been following my efforts to achieve a symmetrical checked border now have a good look at how it all fits together. Your next view of this will be a finished quilt top!


Posted in Reach for the Stars sampler quilt, update | 20 Comments

Reach for the Stars: Border Breakthrough, Part 2

Border Breakthrough? More of a Corner Crisis. Okay, that’s a bit dramatic. It wasn’t really a crisis, but what I had envisioned as an easy way to extend the points of a narrow inner border into the wide outer border on the corners of my Reach for the Stars quilt turned out to be anything but.

(As regular readers know, my quilt is based on designer Terri Krysan’s quilt of the same name that was recently serialized in Quilter’s Newsletter magazine. I’ve been working on this quilt for the better part of a year, posting progress reports as often as I had something to show. The previous post recounts my efforts to achieve a symmetrical border and to carry the symmetry into the corners. If you haven’t read that post yet, you might want to, as it helps put today’s post in context.)

I could have taken the easy way out and simply attached the corner units without fussing with inner border points at all. The quilt has strong diagonal lines, and it probably would have looked just fine:


Corner 1

Butting the components up against each other gives you a better idea of what a corner would look like sewn together:

Corner 2

But I wanted the point of the solid black border to extend into the print border. Although I have departed in several ways from Terri Krysan’s design, this was one element I wanted to preserve. All I needed to do — I thought — was replace a 2″ black print square with a  block that included a solid black piece, like this one:

Corner 3

Easy enough to make. I toyed with the idea of paper piecing the unit but it was just as fast to sew two half-square triangles to a larger triangle. I made a 2½” block and then trimmed it to the finished size of 2″ square to test its position as a replacement block. Much to my dismay, it was too small. The bottom edges of the triangle didn’t match the seamlines in the solid black border.

The cause of the discrepancy, I finally figured out, was the finished width of the narrow black border: 1⅜”. I had cut the border strips 2½” inches wide, not knowing how wide they would turn out to be, knowing only that the finished width would be determined by where the setting triangles came together at the corners. This is because of the highly unscientific but vaguely mathematical way I figured and constructed the borders. If the narrow black border had finished at 1¼” wide, I think it might have fit.

But it didn’t. What to do?

The solution came to me only when I started thinking outside the box. Literally. Instead of working with a 2½” square (the box), I played with a 2½” x 6½” rectangle of black print — the equivalent of three squares — and larger triangles of the solid black. That gave way to two 2½” x 3½” rectangles when I realized they would give me the shape I desired in the size needed to match the other seams. Let me show you what I mean:

Corner 4The larger pieces are the 2½” x 3½” rectangles. The solid black pieces are 1⅝” squares, about to become foldover corners:

Corner 5

When I joined the two pieces in the middle and tested the edges of the resized triangle against the seamlines in the black border, they were right where they needed to be. Hurrah!

Here is the new rectangular unit inserted into part of a corner unit . . .

Corner 6 rep

. . . and here is that corner unit joined to the quilt:

Corner 7


This close-up shows how the seam joining the two solid black triangles becomes, in effect, an extension of the mitered seam in the narrow black border:.

Corner 9a
This view of the second corner shows you how it all fits together:

Corner 8

Two more corners to go. Then all that’s left is to add the final border of background fabric, which helps float the nine-patch units. Can you believe it? I am almost done!


Posted in Reach for the Stars sampler quilt, update | 5 Comments

Reach for the Stars: Border Breakthrough

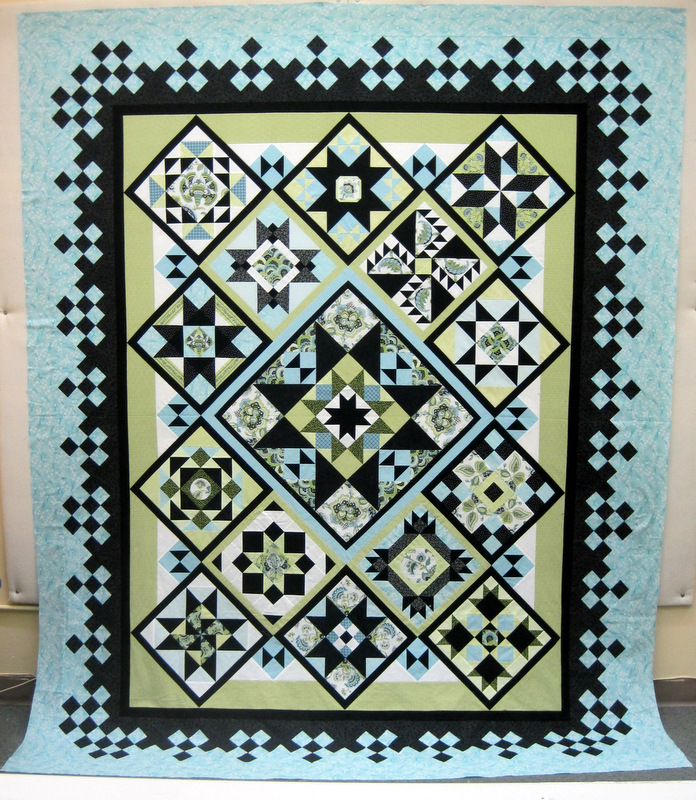
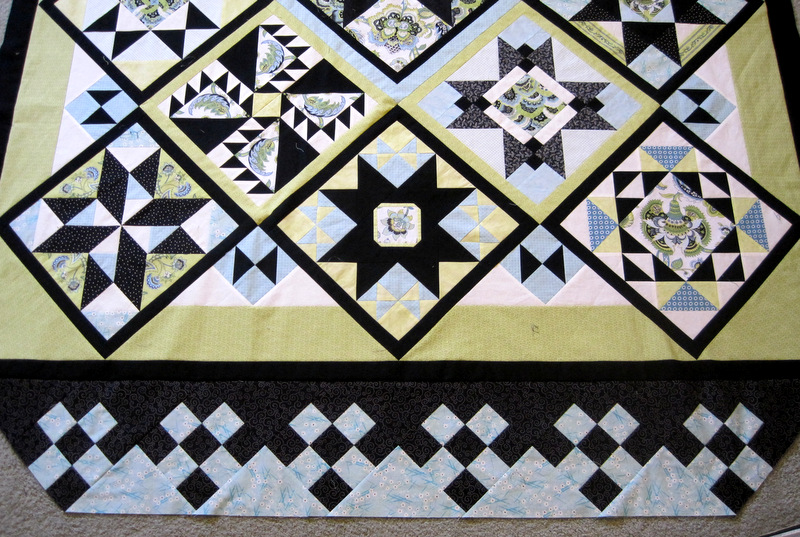
When I posted almost a month ago on my Reach for the Stars sampler quilt, pictured here . . .

2014-10, RFTS before borders

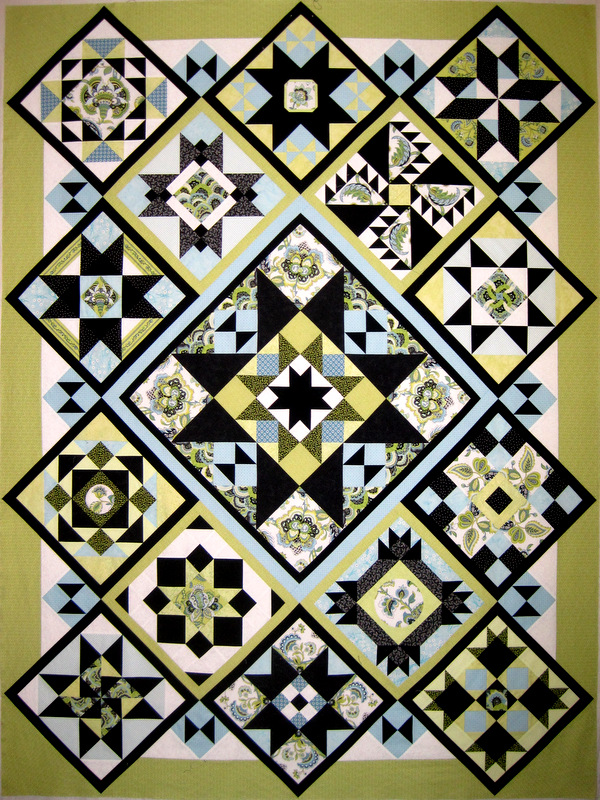
. . . I had finished the center medallion and 14 surrounding blocks and was getting ready to tackle the intricate pieced border. I say “tackle” because I knew it would be a challenge figuring out how to get the corners perfectly symmetrical. I knew I wanted to emulate the lacelike effect designer Terri Krysan achieved by putting nine-patch blocks on point in her border, but I also knew I wanted all of my corners to match.

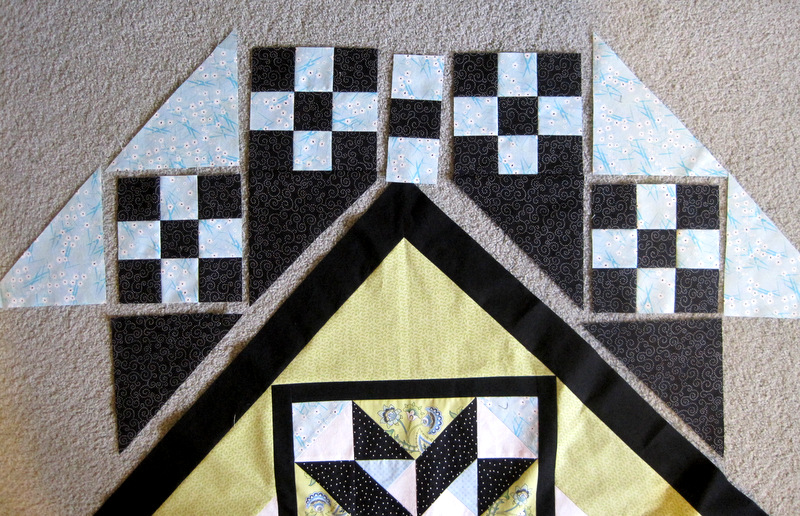
First I added a narrow black border on all four sides, mitering the corners. Next I made several nine-patch units and cut several setting triangles and then just started playing with their positions around the perimeter of the quilt top, which had been moved to the floor after outgrowing my design wall. I walked around the quilt countless times, trying out nine-patch units and setting triangles in different spots along the outer sides.

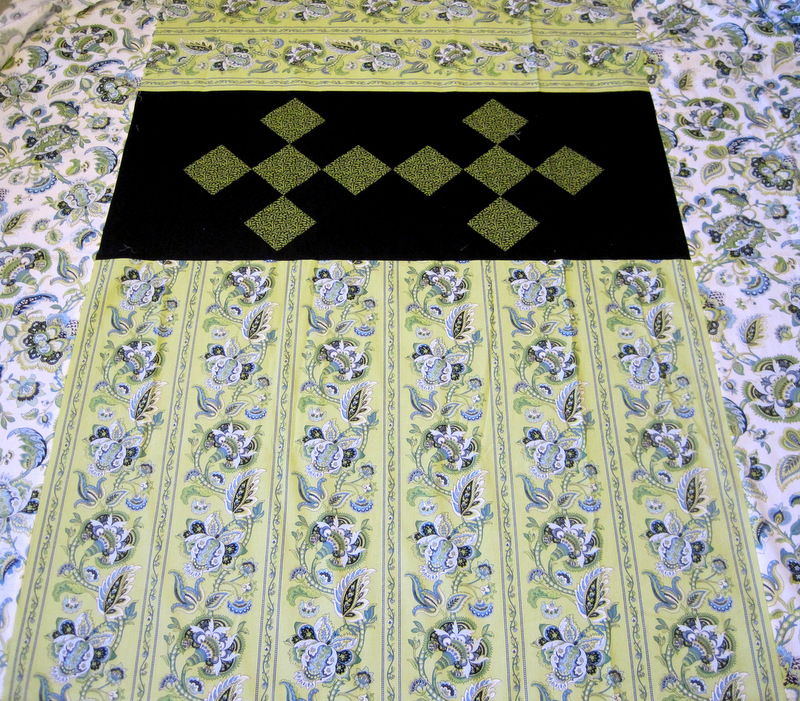
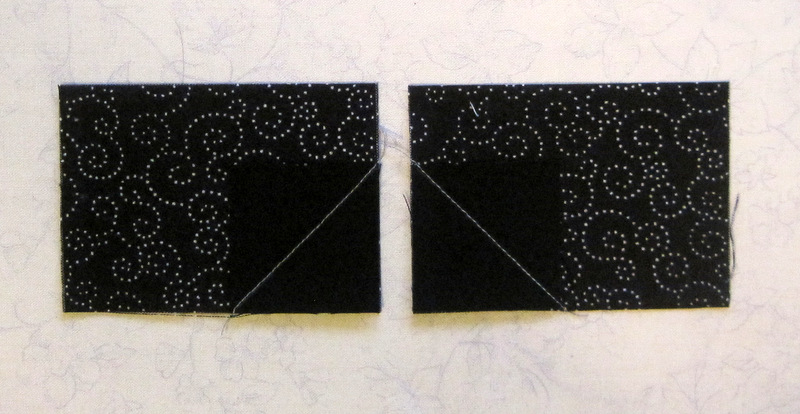
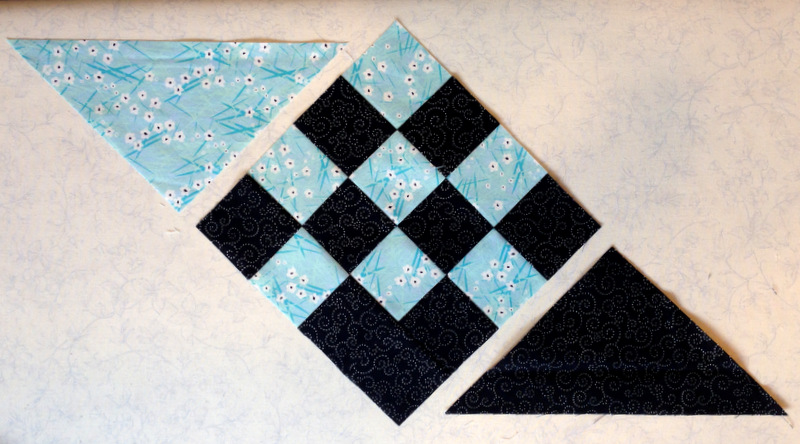
Border Breakthrough #1 occurred when it became apparent to me that the corner design needed to include two nine-patch units with a strip between them, like this:

Border Breakthrough 1
I mocked up the rest of the corner and even sewed some pieces together. I expected I would need to miter the corner with a seam in the middle of the center strip to match the mitered seam in the narrow black border.

Border Breakthrough 2
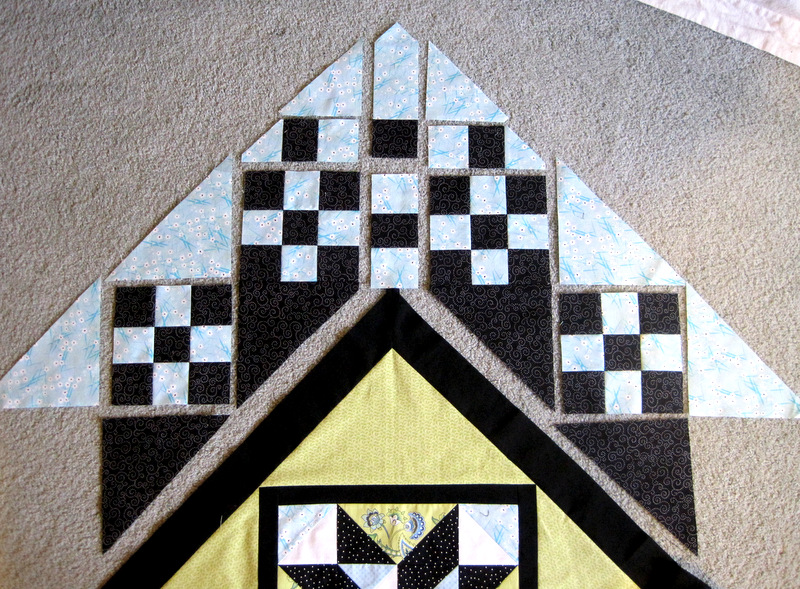
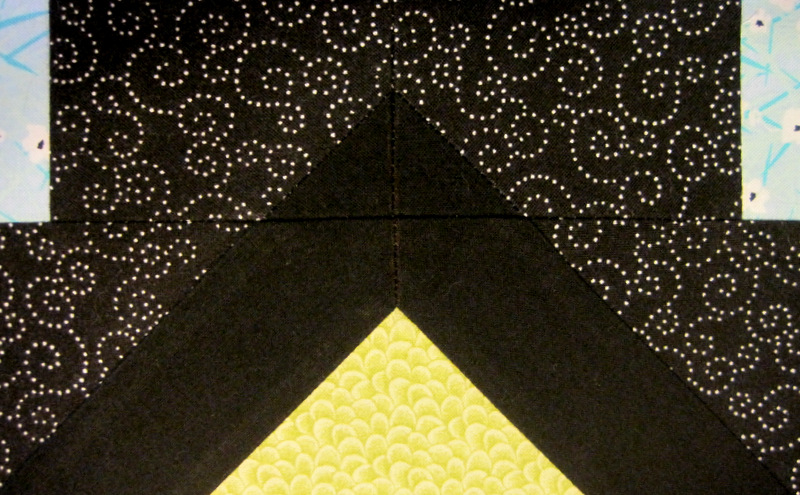
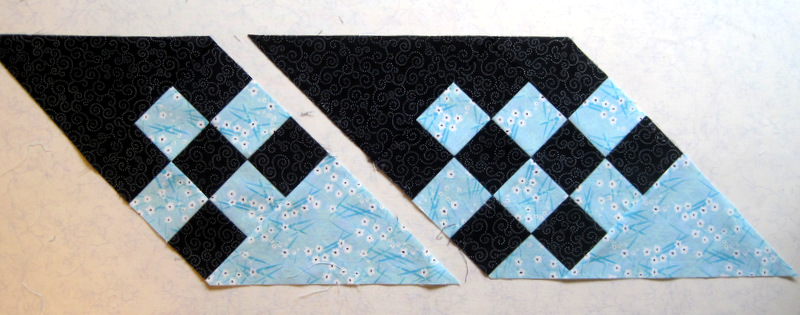
When I looked at the photo I had taken above, it hit me that I didn’t need to miter the seam at all! If you follow the horizontal line at the tip of the narrow black border, you’ll see what I saw. Here is Version 2 of the corner unit . . .

Border Breakthrough 3
. . . showing a much easier way to finish the corner. And here is Version 3, which assures the continuity of the black print fabric all around the quilt next to the narrow black border:

Border Breakthrough 4
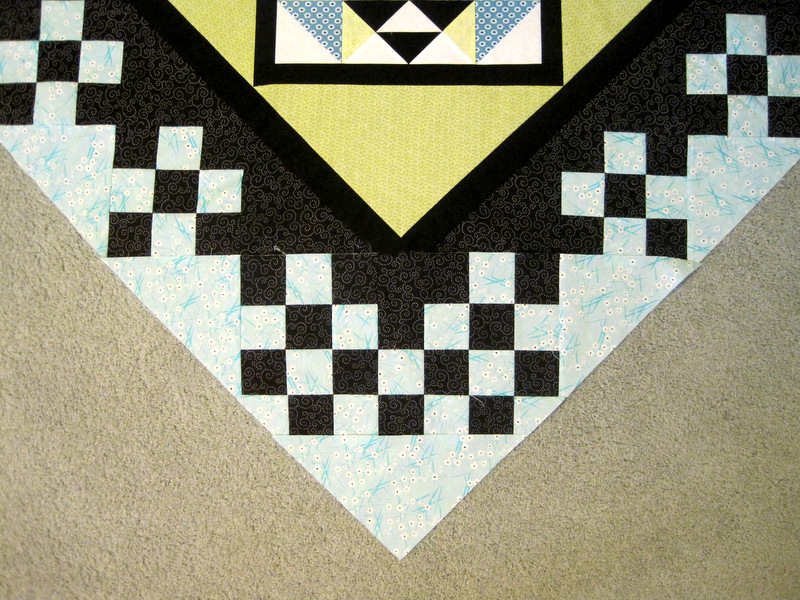
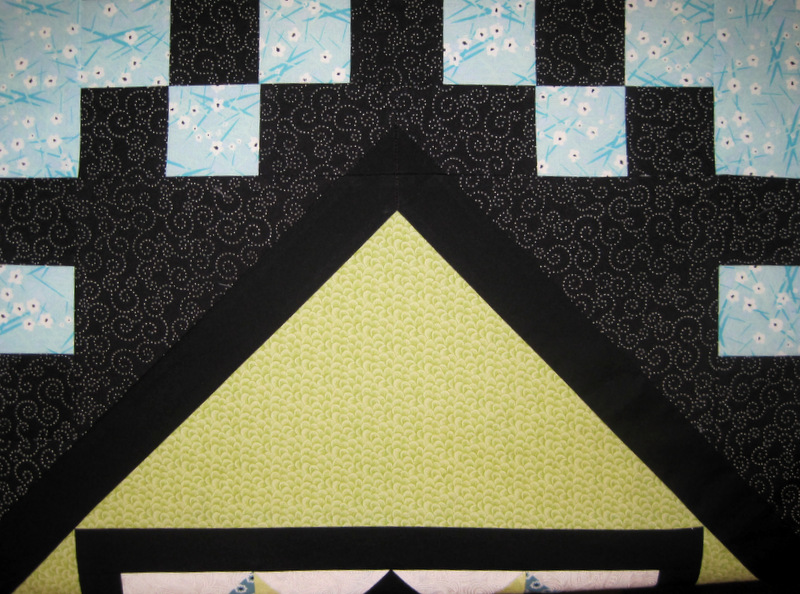
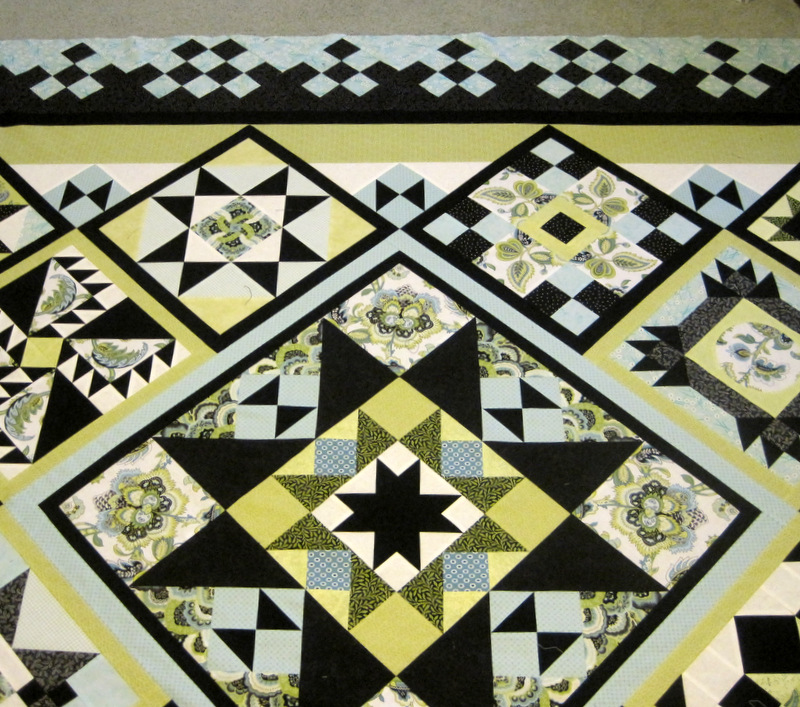
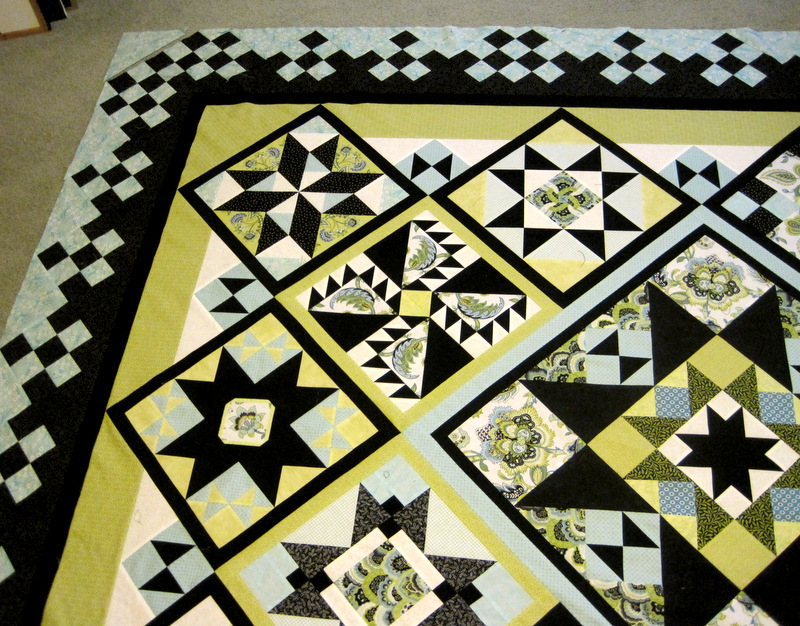
The position of the black print setting triangles at each corner coincided with a black print setting triangle hitting the exact center of the top and bottom of the quilt. You’ll see what I mean when you look at the next photo:

Border Breakthrough 5
See the point of the black sashing on the middle block, right where it touches the narrow black border? Follow the line into the border and note how it intersects both the black print setting triangle next to the black border and the blue setting triangle on the outer edge.

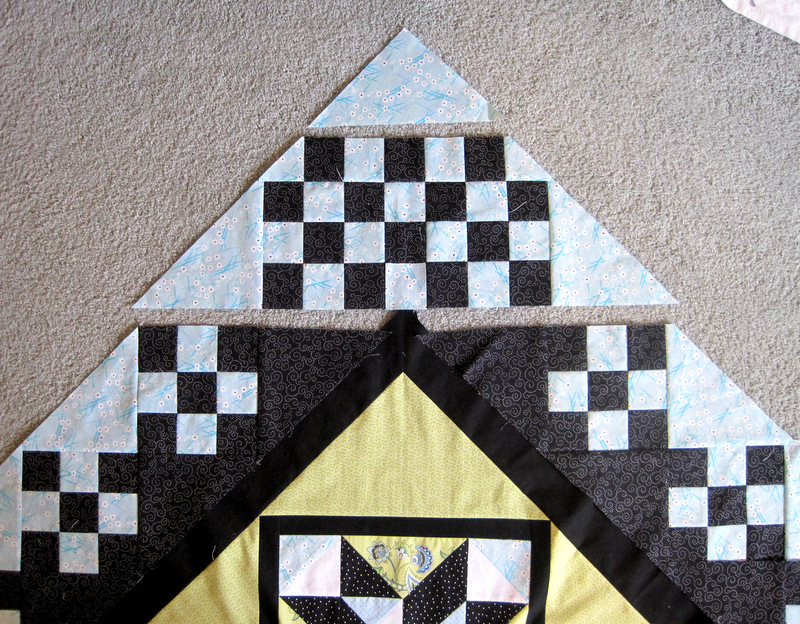
Unfortunately, there was no way that same design element was going to hit the middle of the long sides. That’s when Border Breakthrough #2 came into play. After much fiddling around, I determined that if I completely removed one nine-patch unit from a long side and added one more strip to two of the remaining nine-patch units, the middle of a black print setting triangle would hit the middle of the long side. Just what I wanted it to do!

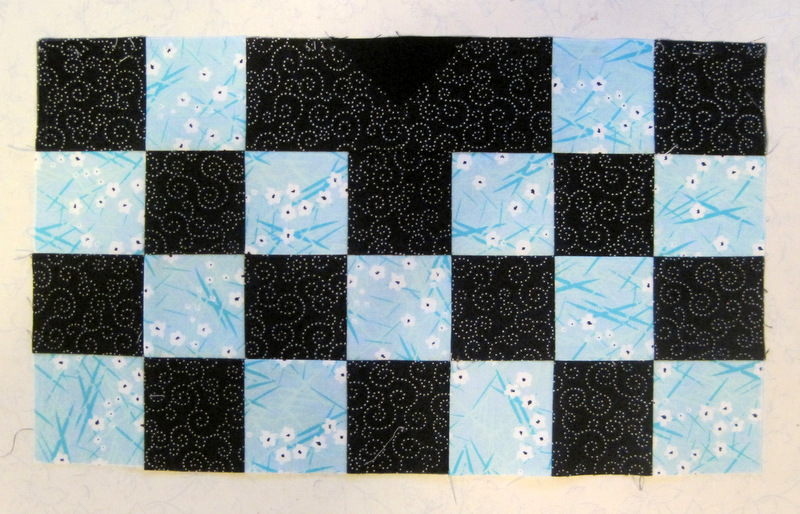
Here’s what the “nine-patch plus” unit looked like just before adding the setting triangles . . .

Border Breakthrough A

. . . and here’s what it looked like next to a regular nine-patch:

Border Breakthrough B
I sewed all of my blocks together and then discovered that the border strip was about an inch too long (much better than an inch too short!). My solution? To re-sew the nine-patch units taking a full quarter-inch seam rather than my regular scant quarter-inch seam. Doing that with six nine-patch units and two “nine-patch plus” units took up the excess fullness, and my border fit perfectly. Was someone doing the Happy Dance? Oh, yeah!

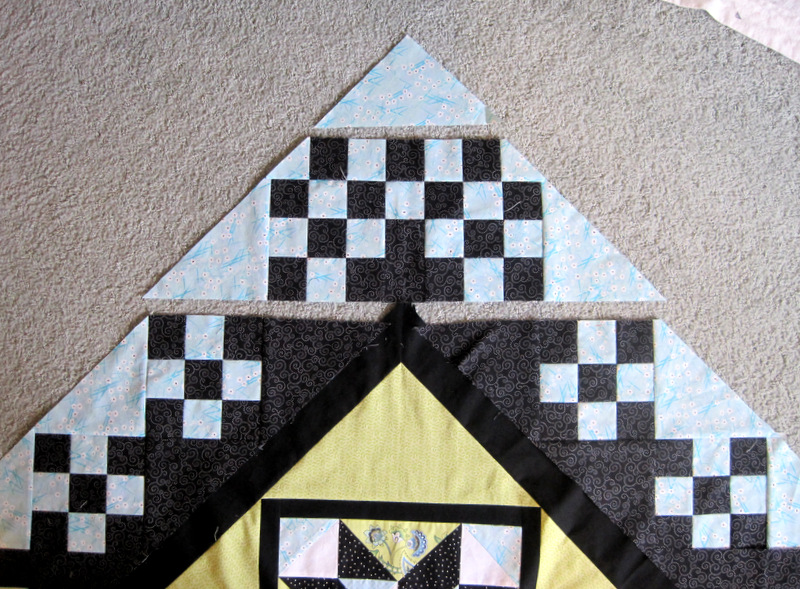
Here’s a look at the middle of one long side, with the setting triangle hitting in just the right spot. Look above the small blue and black hourglass block in the valley between the two blocks near the top center of the photo:

Border Breakthrough 6
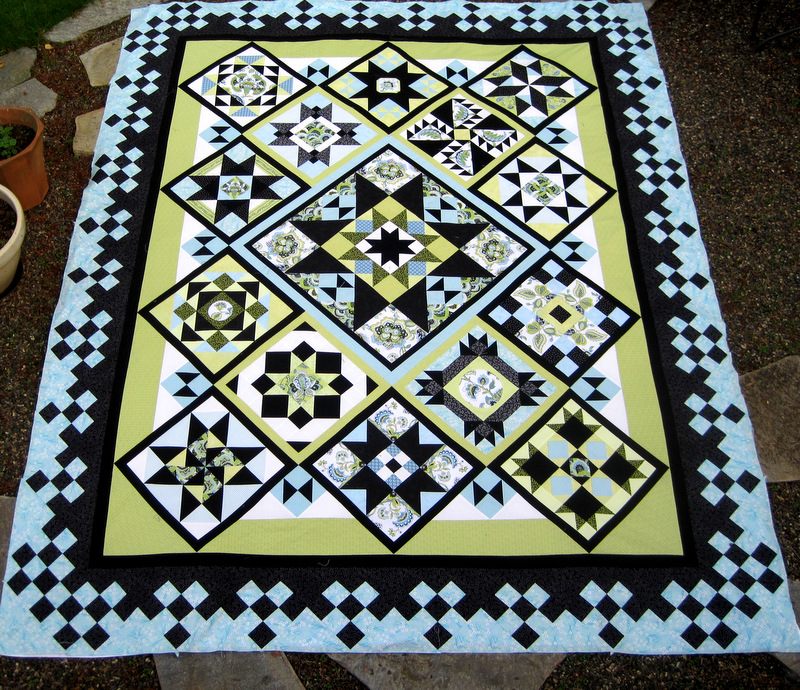
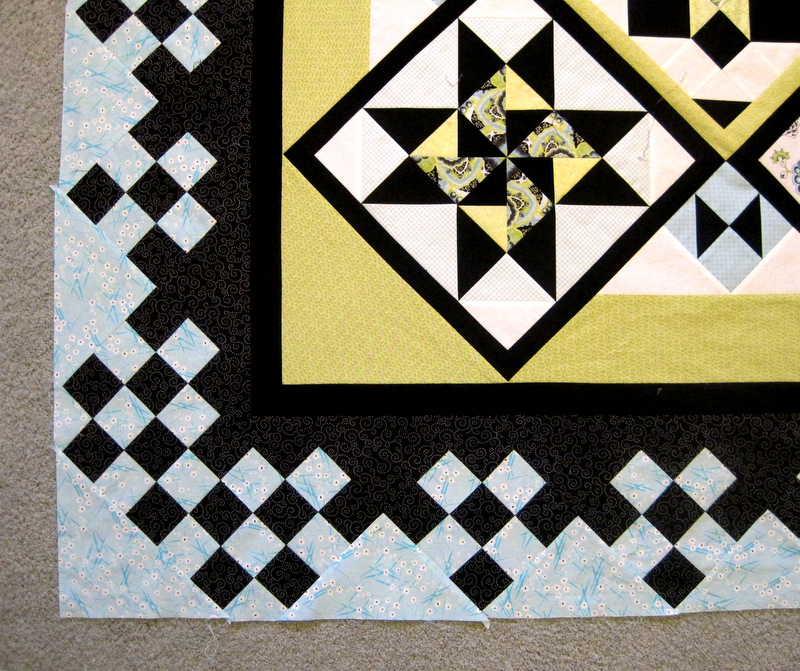
Here you are looking across the quilt to one corner:

Border Breakthrough 7
The “nine-patch plus” units — the ones with two black print squares on point — are evenly interspersed along the long sides, and even though the two short sides have no “nine-patch plus” units, everything still looks balanced because the borders match. My approach was strictly trial and error — no graph paper, no computer software program, no calculator work — with just a dash of intuition and a lot of luck.

I do have one more thing to figure out. It has to do with preserving the points of the narrow black border and it just may involve some paper piecing. Have I piqued your curiosity? I hope so! Please come back in a few days to see what I’m talking about.


Posted in Reach for the Stars sampler quilt, update | 11 Comments