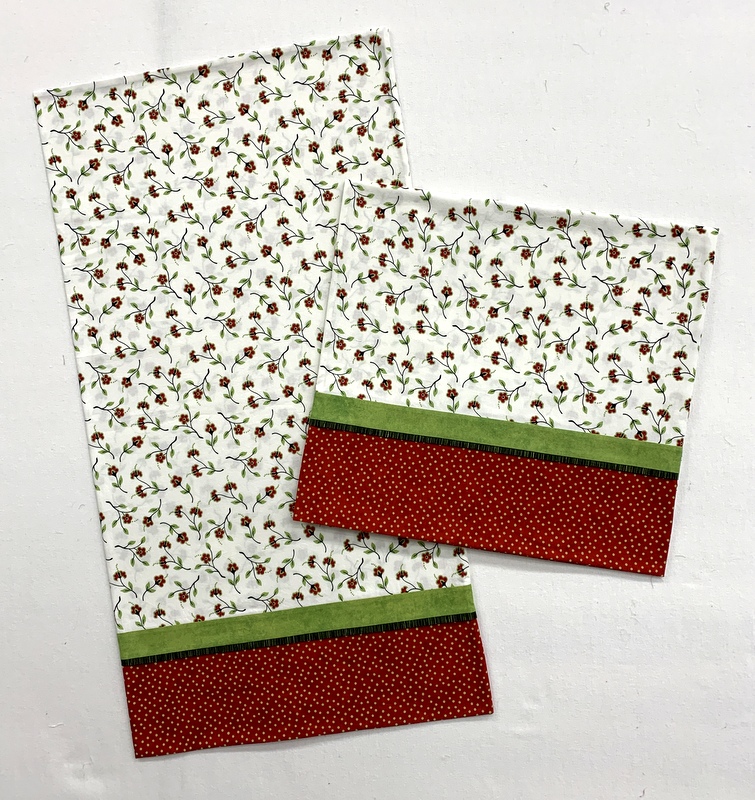
Now that Christmas is over, I can show you the pillowcases I made for my twin sister Diane and her husband Ed:
The cases are made for a king size bed so they measure a generous 20″ x 33″. I am so in love with that floral fabric; it’s from a 2010 line for Henry Glass Fabrics called “At Home for Christmas” designed by Heather Mulder Peterson of Anka’s Treasures. It’s been in my stash for years. Knowing I would be using most of it, I scoured the Internet looking for more and even contacted Heather to see if she still had some in her shop; alas, it is gone.
I confess it was really hard to cut into that fabric but I knew that pillowcases made from it would look wonderful in Diane and Ed’s master bedroom:
The colors are Christmas-y but the prints are not, making the pillowcases appropriate for use all year round.
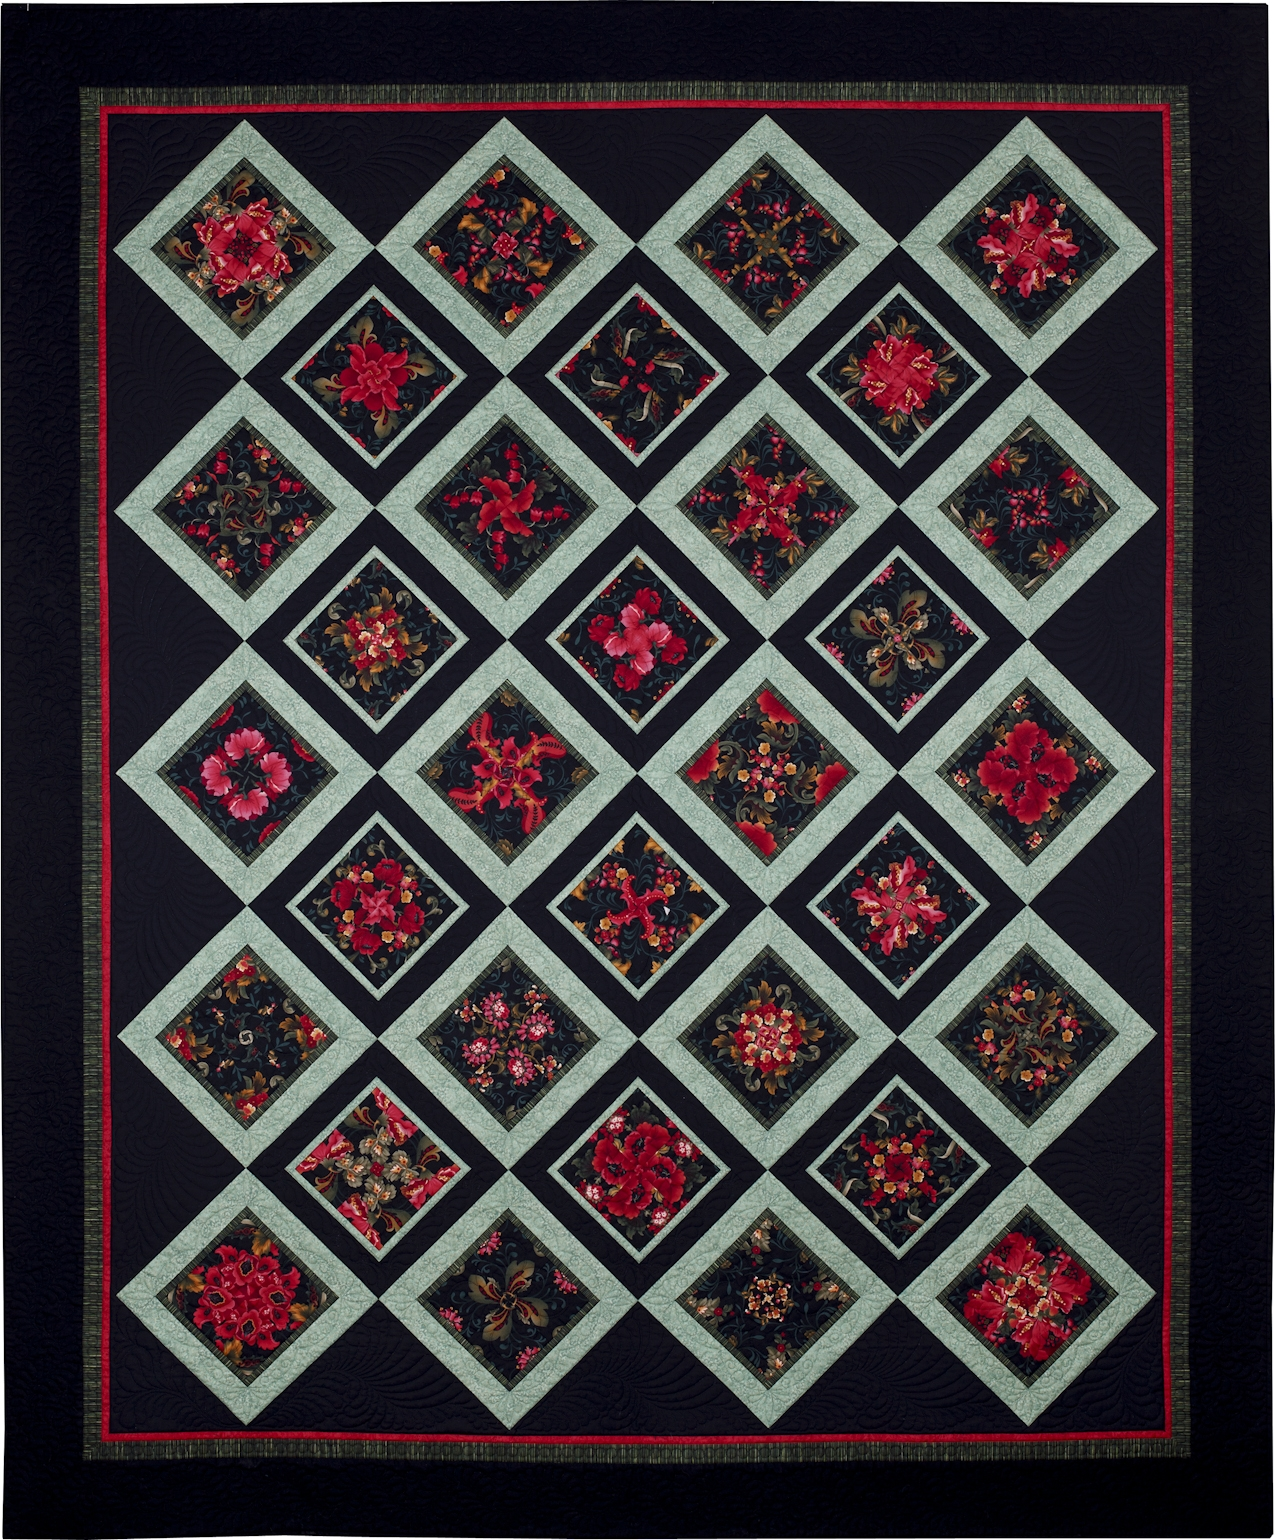
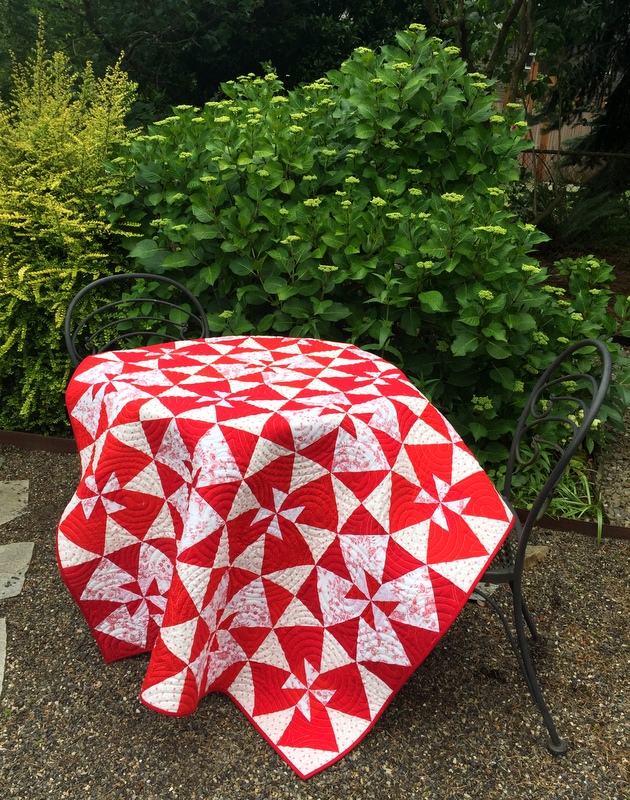
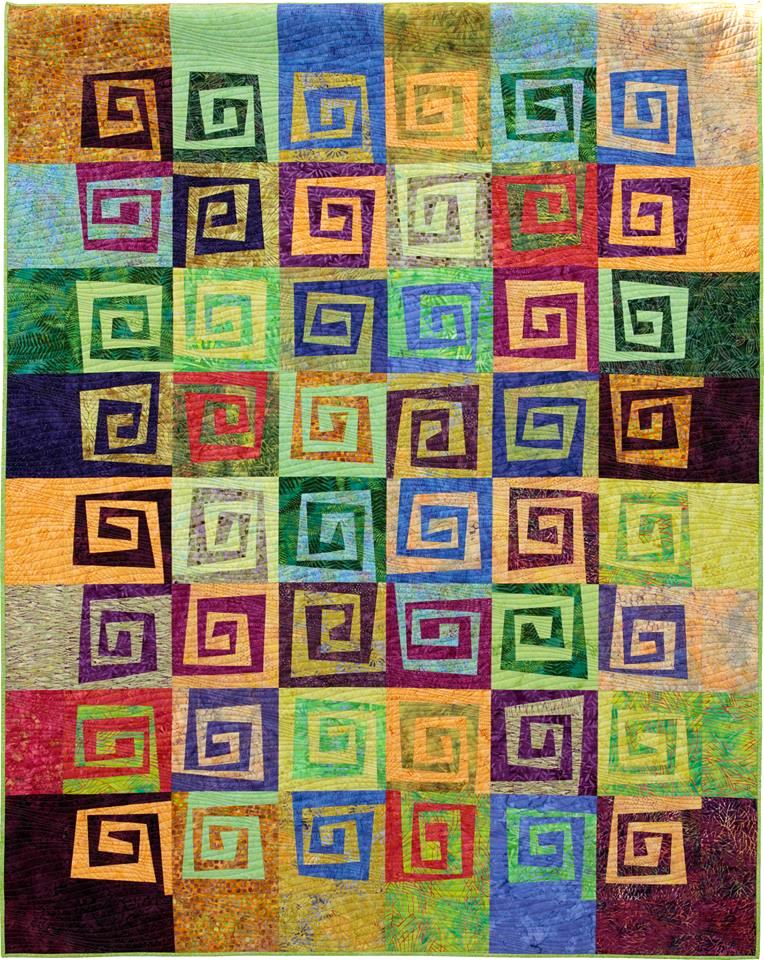
I had one other thing in mind when I chose the fabric. In the picture below you can just get a glimpse of a quilt on the wall:
It’s Midnight in the Garden, one of my very favorite quilts, made from my pattern 4-Patch Wonder:
I gave the quilt to Diane for her 60th birthday a few years ago and I get to see it whenever I travel to Georgia to visit her. I figured the pillowcases would complement her quilt very nicely. And they do, don’t they?!
Greetings from Norcross, Georgia, the Atlanta suburb where my twin sister Diane and her husband Ed live. My husband and I are here for our annual Thanksgiving visit spanning two weeks. We’ve already been here a week. The time is going by way too fast!
Before we left Portland, Diane asked if I would bring fabric to make a pair of what she calls “Dawn pillowcases” as a thank you gift for a friend of hers. These are pillowcases made in such a way that all seams are enclosed. You may know them as burrito or roll-it-up pillowcases (see my tutorial here.) I love to have a sewing project to work on while I am here so of course I said yes.
Diane figured I would have something appropriate in my stash. (How well she knows me!) I texted her photos of possible fabrics and she quickly zeroed in on this lovely sage and cream toile from Timeless Treasures that I’ve had for a few years:
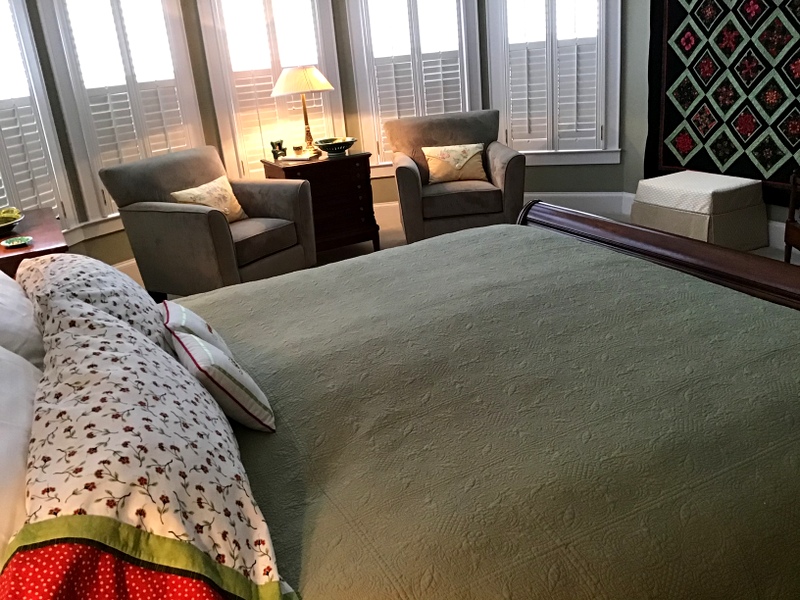
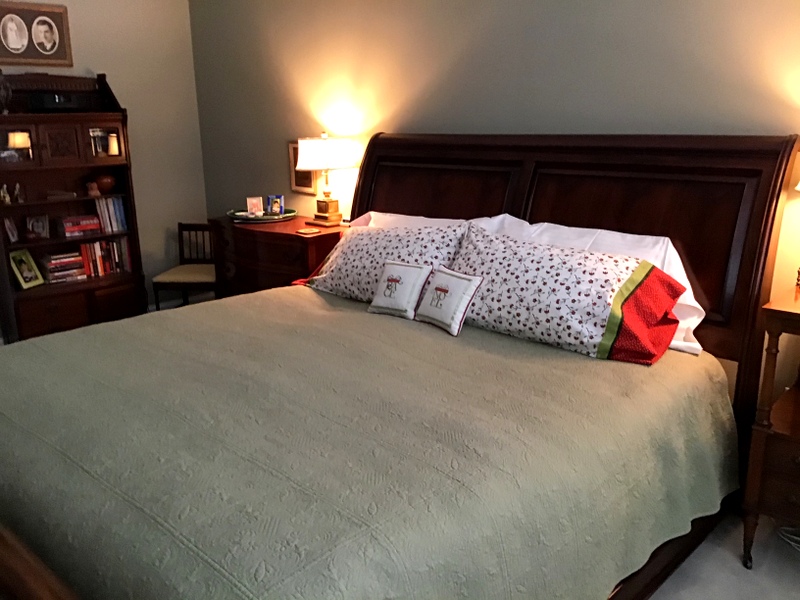
I brought several other fabrics as candidates for contrast strips, flanges, and bottom bands. Diane chose a narrow stripe for the flange and a small leaf print for the band, deciding against a third fabric for a contrast strip between the flange and the body of the pillowcase. This is the result:
The pillowcases are pictured on the bed in the main floor guest room, whose bedspread and quilt (the latter made by moi several years ago) match the cases perfectly.
As it happened, I didn’t have quite enough of the leaf fabric to make two bands without having to piece them. I used strips of the toile to do that. Take a peek inside a pillowcase:
Here’s a close-up of the inside:
I stitched the seam allowances down so they will stay flat when the pillowcases are washed.
Diane arranged the cases in a lovely gift box:
They’ll be in the mail tomorrow.
I had five yards of that toile; perhaps I was thinking of it as a potential quilt backing. There’s enough left to make two more sets of pillowcases — one for Diane’s guest room (since we know how well the pillowcases go with the furnishings) and one for the Portland White House. I’m thankful for that!
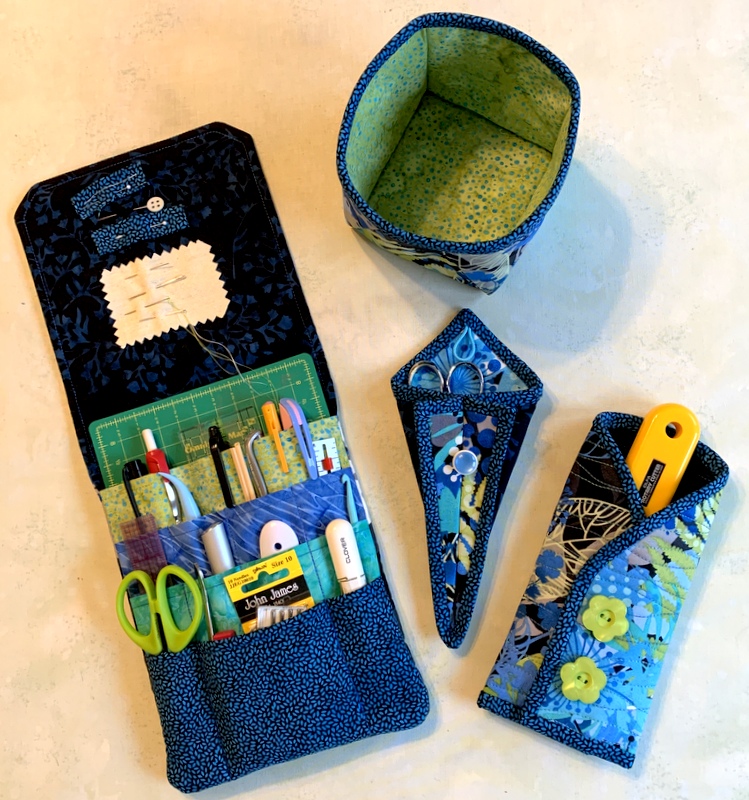
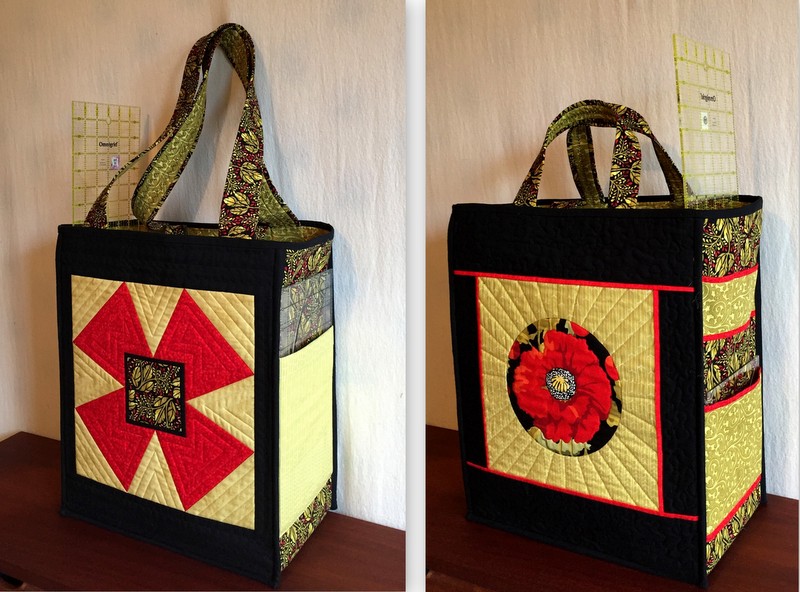
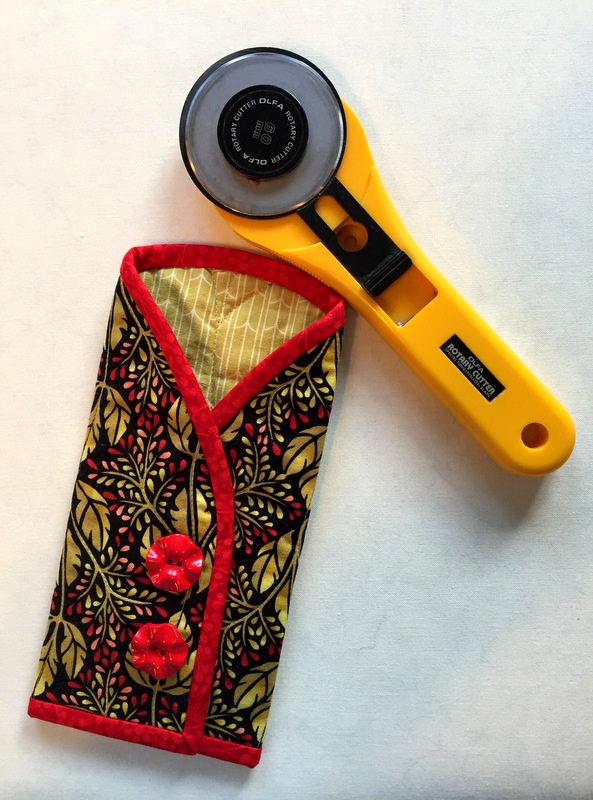
With a new Junior Billie Bag in my sewing room and a coordinating tool caddy, it was just a matter of time before I gave into the temptation to complete the suite of accessories. Pictured with the tool caddy below are a scissors case, a rotary cutter coat, and a fabric box:
I love these fabrics and colors so much!
You can find picture-heavy tutorials for the scissors case and rotary cutter coat under the Tutorials link at the top of my home page . . . or you can just click on this link.
Speaking of Junior Billie Bag accessories, I forgot to show you the tool caddy I made recently to go with the JBB completed last spring for a class I was teaching:
My friend Cheryl S. was the surprise recipient of this JBB and tool caddy when we were together at Quilt Camp earlier this month.
I’m so ready to shift gears! There’s a new-ish project I’m eager to get back to as soon as I finish up a couple of ongoing projects. And as my twin sister Diane keeps reminding me, the newly remodeled kitchen won’t be complete until I make those valances . . .
When I spotted this whimsical travel-themed fabric at a quilt shop in central Oregon last year, the first person I thought of was my friend Anna. Anna loves animals (especially dogs), France, and world travel — probably in that order.
Several years ago Anna sold her home in Portland and moved to Paris to live. Imagine that! It was a dream she had had for many years. I knew her through a mutual friend but had not seen her for some time when we ran into each other on the street just weeks before her departure. We stayed in touch after this chance meeting and a few years later, when Anna proposed a short-term house swap, my husband and I jumped at the chance.
In 2015 Charlie and I spent three weeks at Anna’s apartment in Paris taking care of her sweet cat Buddy . . .
. . . while Anna stayed at our home in Portland taking care of Empress Theodora:
The arrangement worked out splendidly. And I was lucky enough to go back to Paris in the fall of the same year with my twin sister, petsitting for Anna while she went to the United Kingdom to visit her beau, an American who had spent his professional life working in Europe.
Anna subsequently married her beau and they bought a house in France’s Loire Valley which they share with Buddy and two rescue dogs. So you can see how this fabric seems to have Anna’s name written all over it. (In fact, the travel documents on the fabric are in the name of Jane S. Doe but we can use our imaginations.)
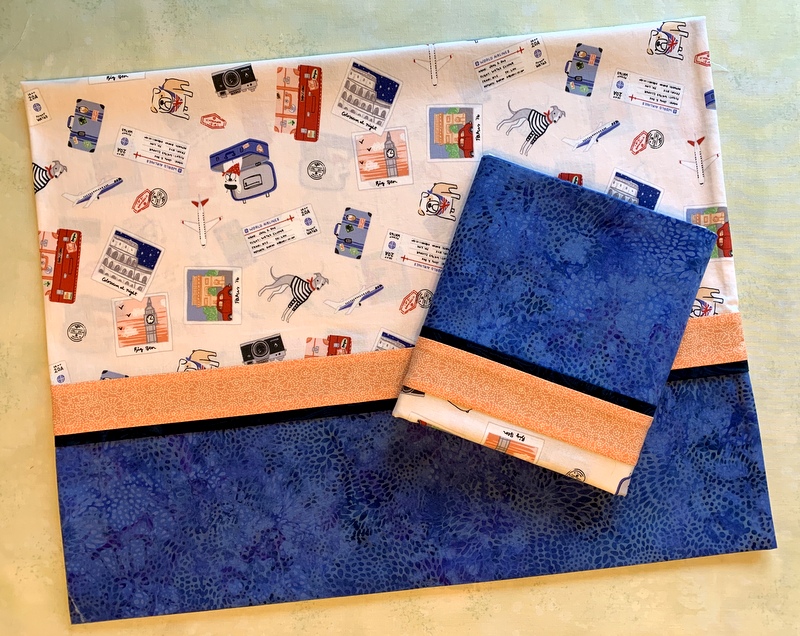
I decided to make a pair of pillowcases with the fabric and send them to Anna in France. Months came and went while the fabric stayed in my stash. Then I learned Anna was coming to Oregon this summer for her 50th high school reunion. In no time at all I had made a pair of pillowcases, which were waiting for Anna when she arrived last week:
I tried to tone down the cuteness factor by choosing a rather masculine batik for the cuffs of the cases. After all, husband Joe has to sleep on them too!
(For those who might be interested, the fabric is from the line “Jetset Europe” by Anne Bollman for Clothworks Fabrics. I used my own tutorial to make the pillowcases.)
One of the benefits of teaching quilting classes is learning from my students. The other day my friend and student Arden showed me a great method of cutting binding strips that she learned from Marjorie Rhine of Quilt Design NW. It’s very likely this method is known to many already but it was new to me so I wanted to share it with you.
Cut strips to your desired width. Strips can be of varying lengths, of course, but most quilters cut strips along the crosswise grain from selvage to selvage, also known as width of fabric or WOF.
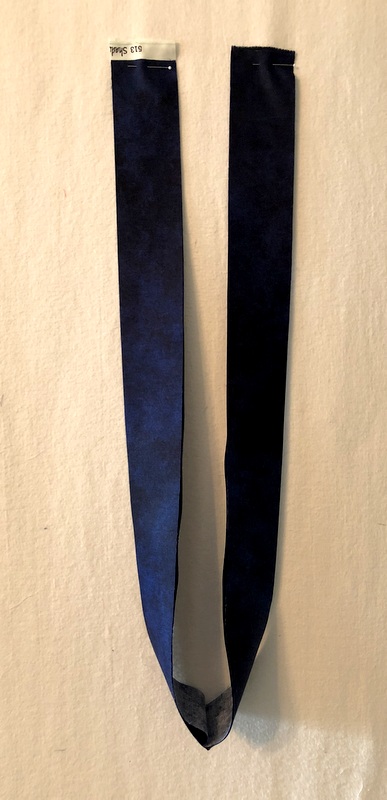
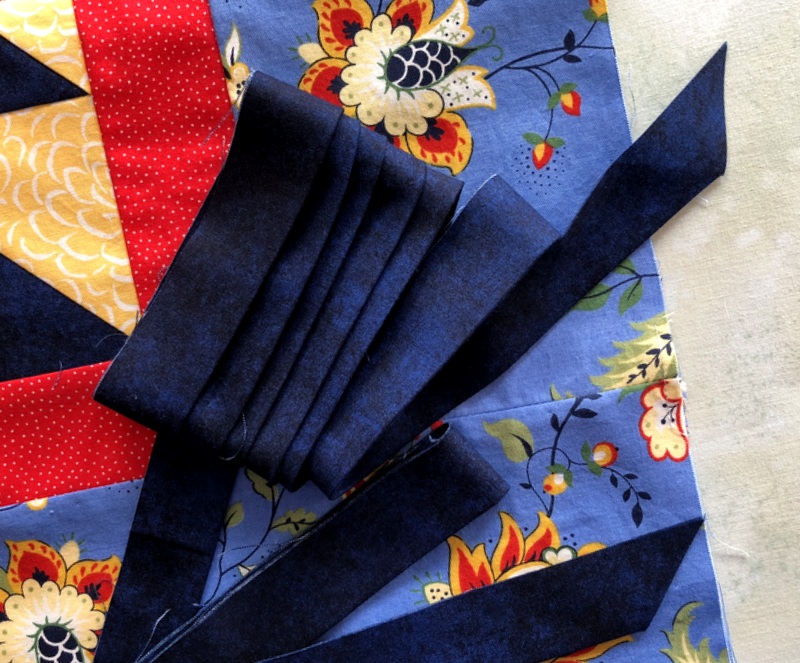
Lay one strip on top of a second strip, right sides up, aligning the edges. Bring the short edges of the doubled strips up next to each other, still with right sides up. I’ve pinned these to my design wall so you can see that the strips form a U shape and the ends of the strips are parallel at the top:
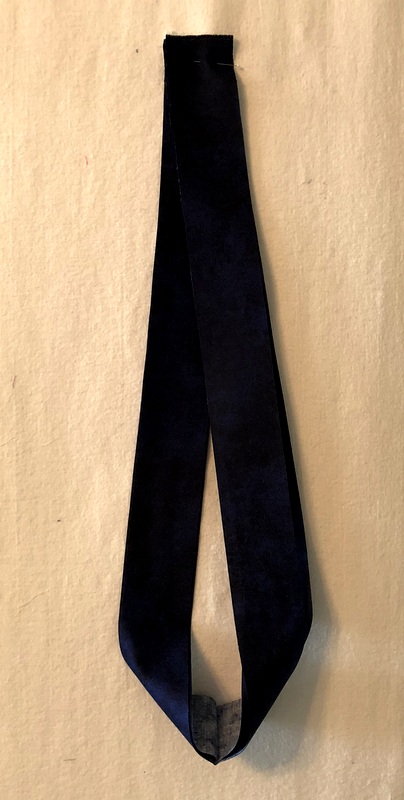
Layer the strips at the top so that you have four layers, all right side up:
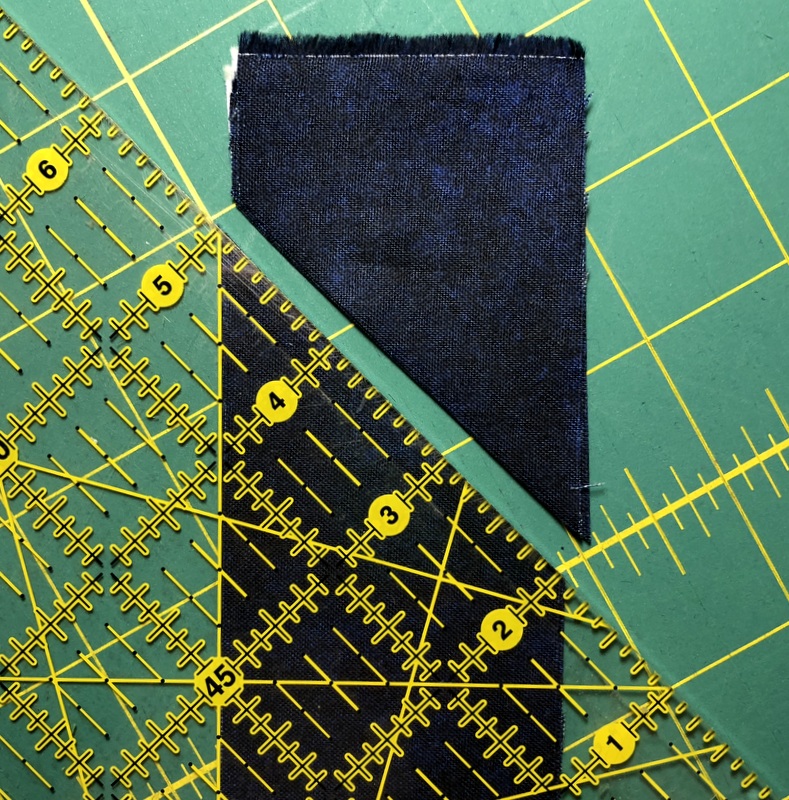
Take the strips to a cutting mat and cut through all four layers at a 45° angle:
You wind up with strips with parallel diagonal cuts at each end:
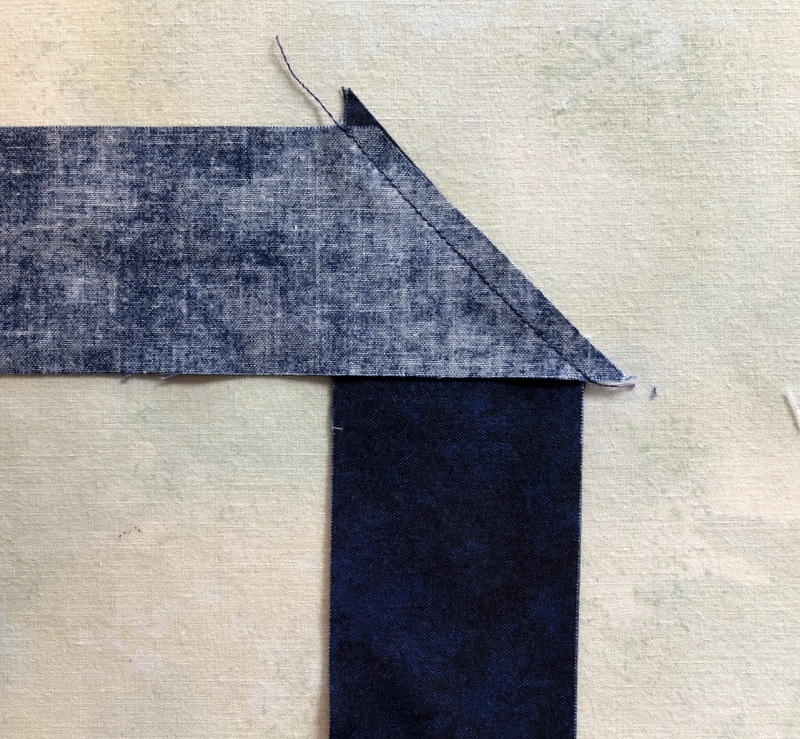
Place one strip in front of you and feed the second strip in from the left, aligning the edges and allowing for a ¼” offset at each end for the seam allowance:
Stitch from notch to notch:
Join remaining strips the same way, press seams open, press in half lengthwise, and before you know it your binding is ready to attach:
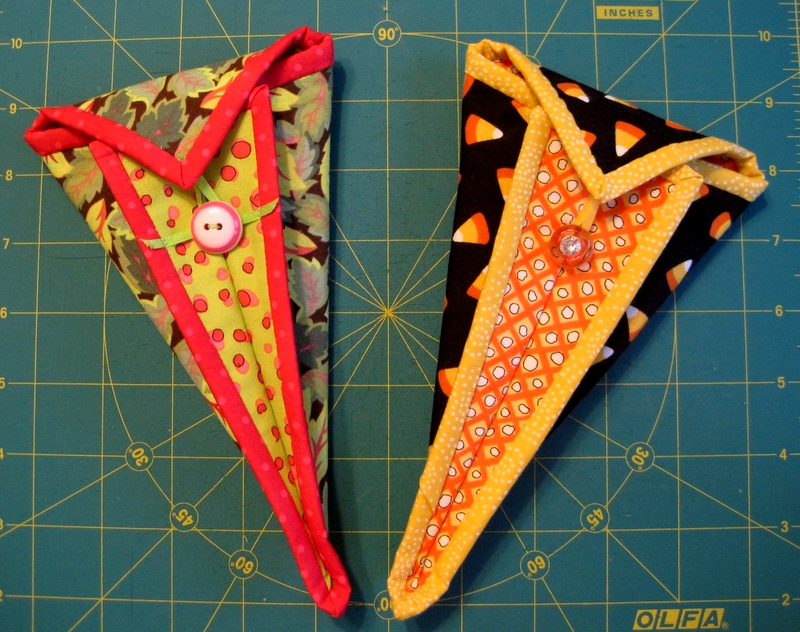
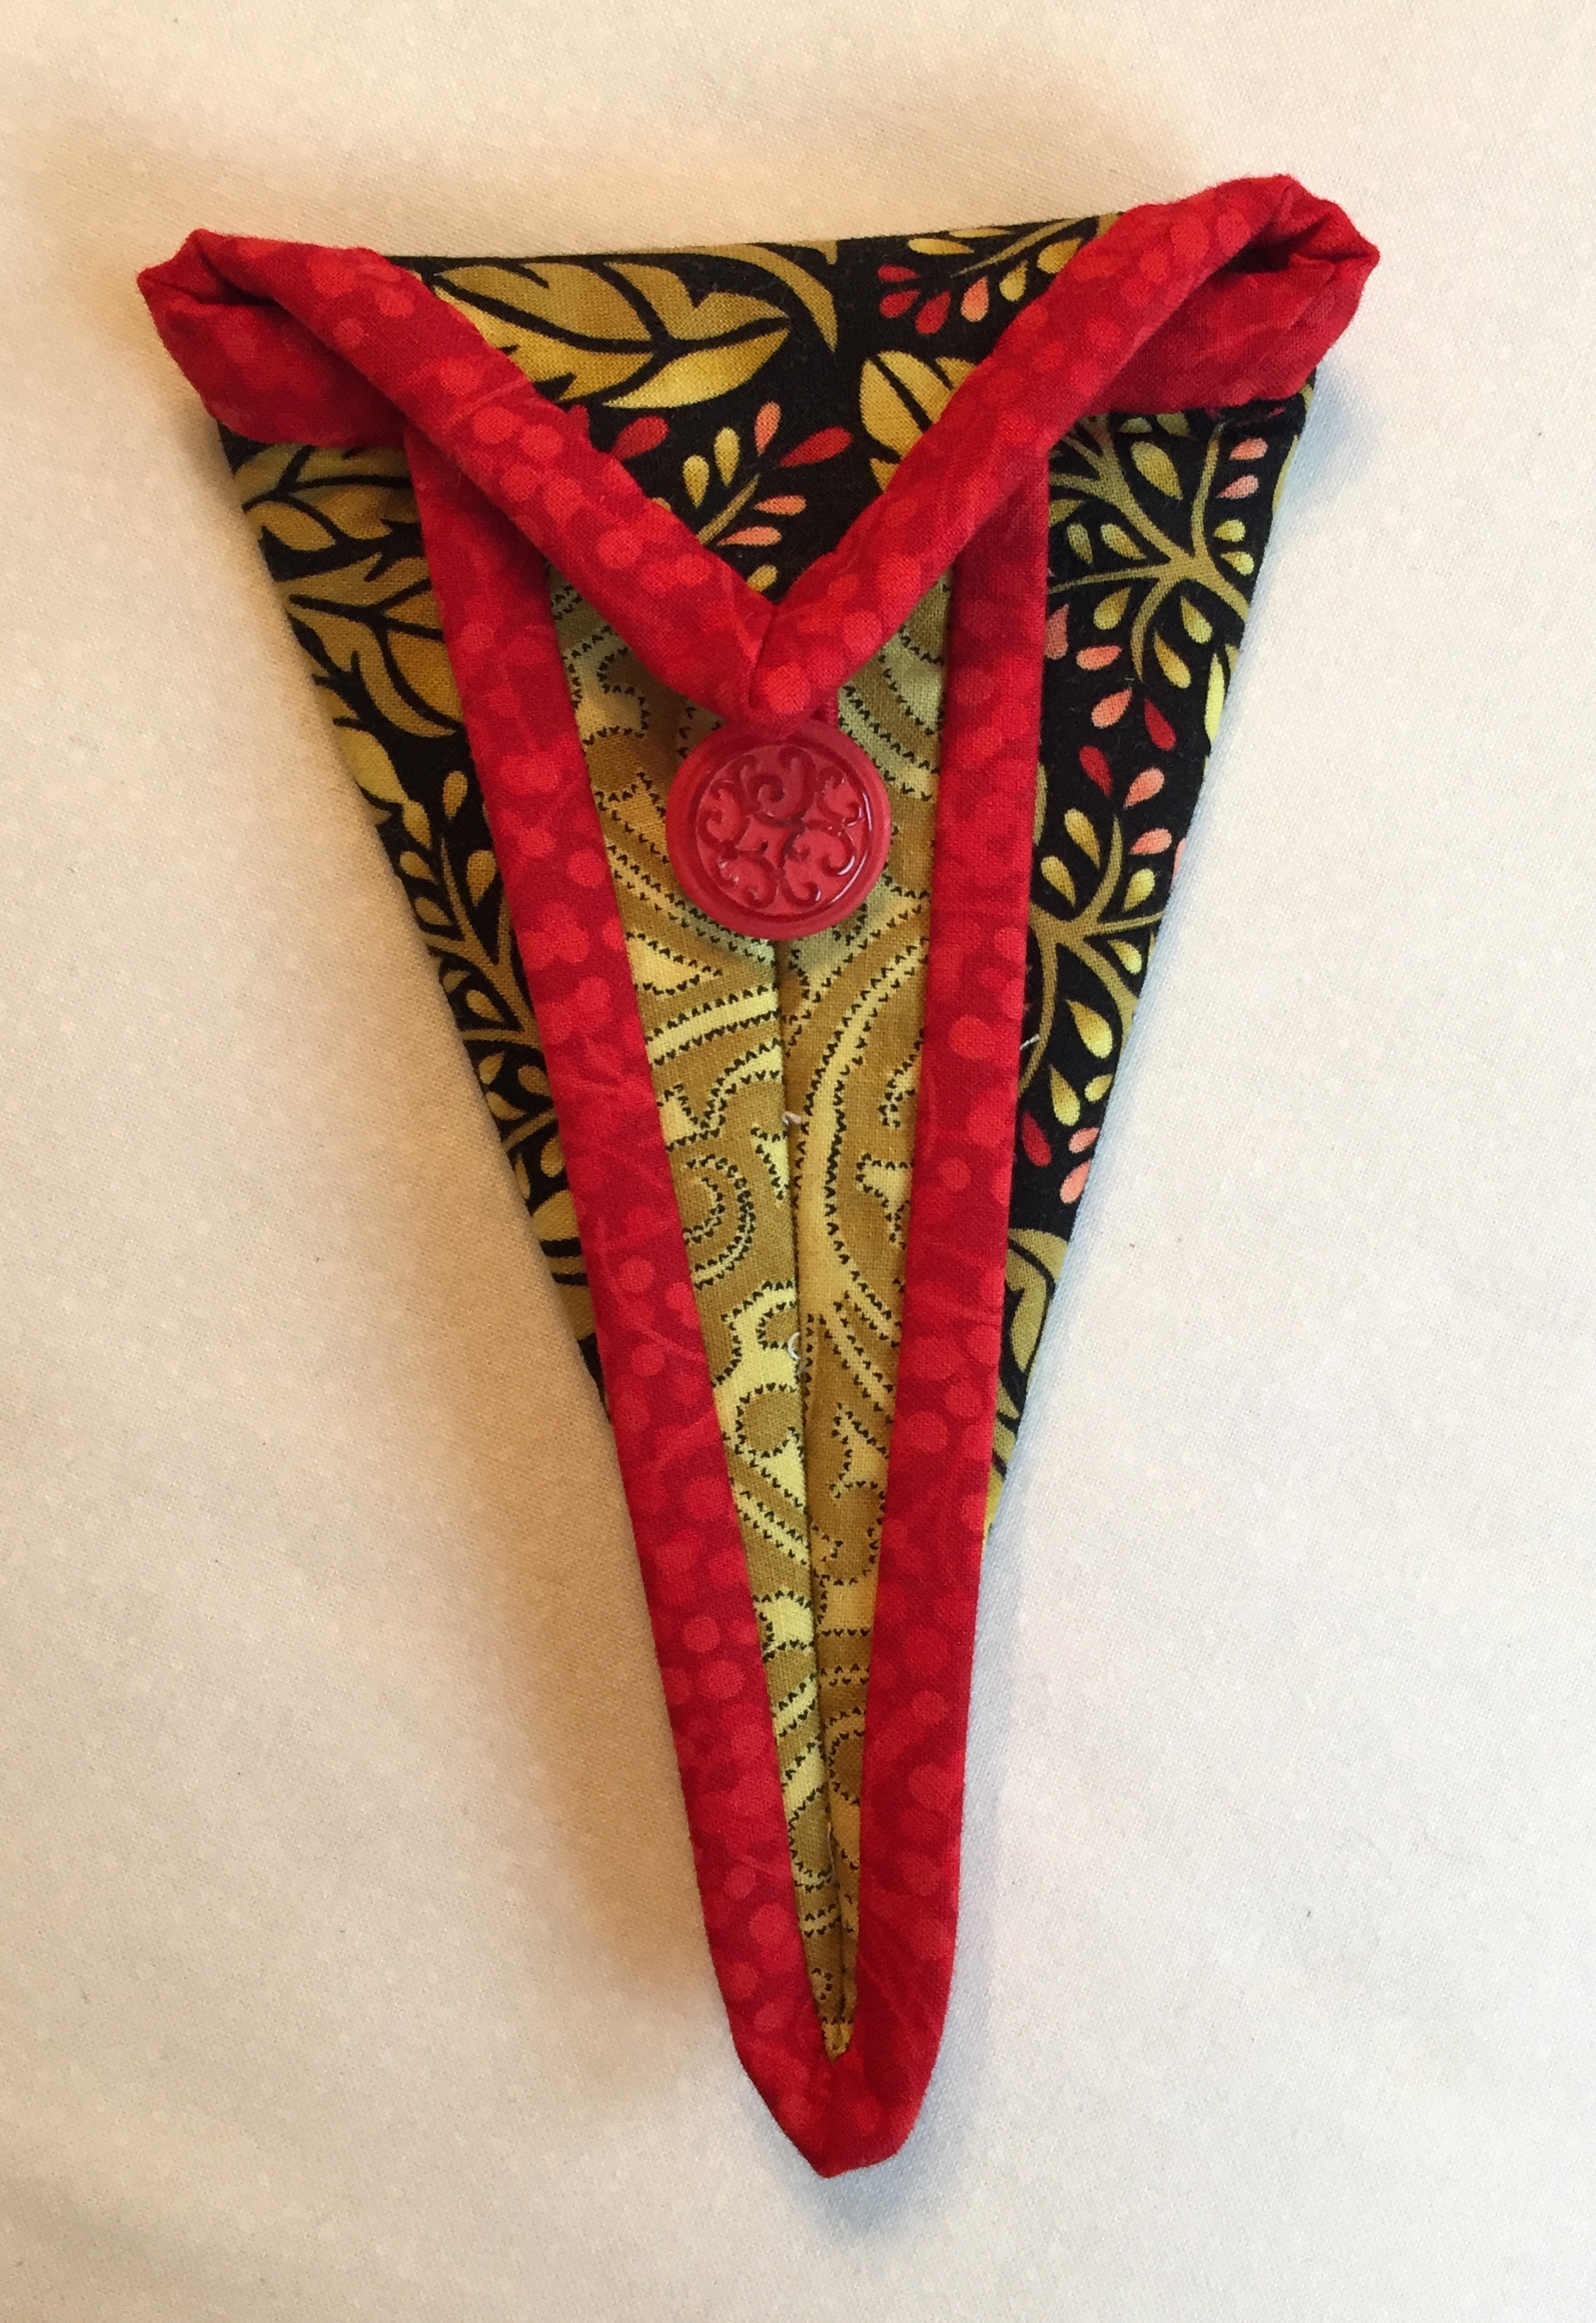
These safe and stylish scissors cases look complicated but they are surprisingly easy to make. Each case is made from a little quilt sandwich that’s bound, folded in half on the diagonal, and stitched with one seam. If you’ve ever bound a quilt using double-fold binding (also known as French binding), you’ll have no trouble making one of these cases. They make wonderful gifts as well as delightful additions to your own sewing basket.
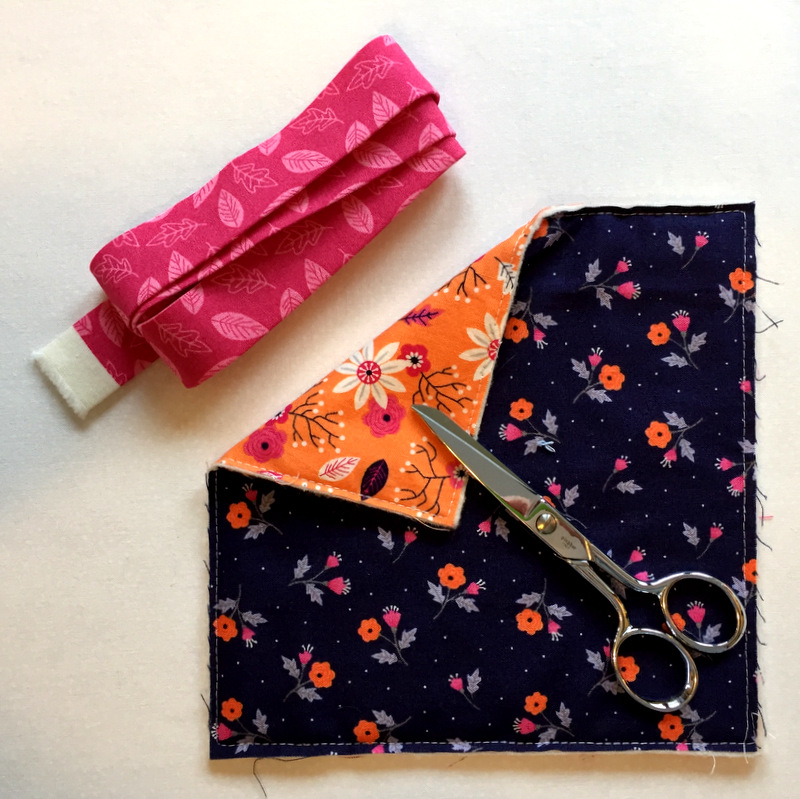
All you need are two squares of contrasting fabric, one square of batting, and a length of 2″-wide binding (straight grain or bias, your choice) in a third fabric:
Bits of ribbon, small pony tail elastic bands, and vintage buttons combine to make charming fasteners. These are completely optional, however. Even though I usually put a loop and button on my scissors cases, I tend to leave the top flap open so I can easily see if the scissors are there when I look into my quilter’s tote.
If you start with 7″ squares, you’ll wind up with a scissors case that measures about 5″ x 10″. This case was made with 6″ squares and measures about 4″ x 8″ opened . . .
. . . and about 4″ x 6¼” closed:
I like this size best for my 5″ Ginghers.
(If you’re not sure what size square you need for the scissors you have in mind, experiment with squares cut from sheets of paper. Fold the paper using the instructions below as a guide. Insert your scissors into your paper “case” and test the fit.)
This tutorial is for the slightly larger case using 7″ squares but can easily be modified for the 6″ size.
Scissors Case from First Light Designs
Finished size: about 5” x 10” (from top point of flap)
Materials (2) 7” squares of cotton
(1) 7” square of light to medium weight batting
36” of binding fabric cut 2” wide and pressed in half lengthwise
Optional: small ponytail elastic band or 4” length of ⅛” – ¼” wide satin or grosgrain ribbon
Optional: button
Optional: ¼”wide Steam-a-Seam fusible web
Recommendation: use a walking foot for construction
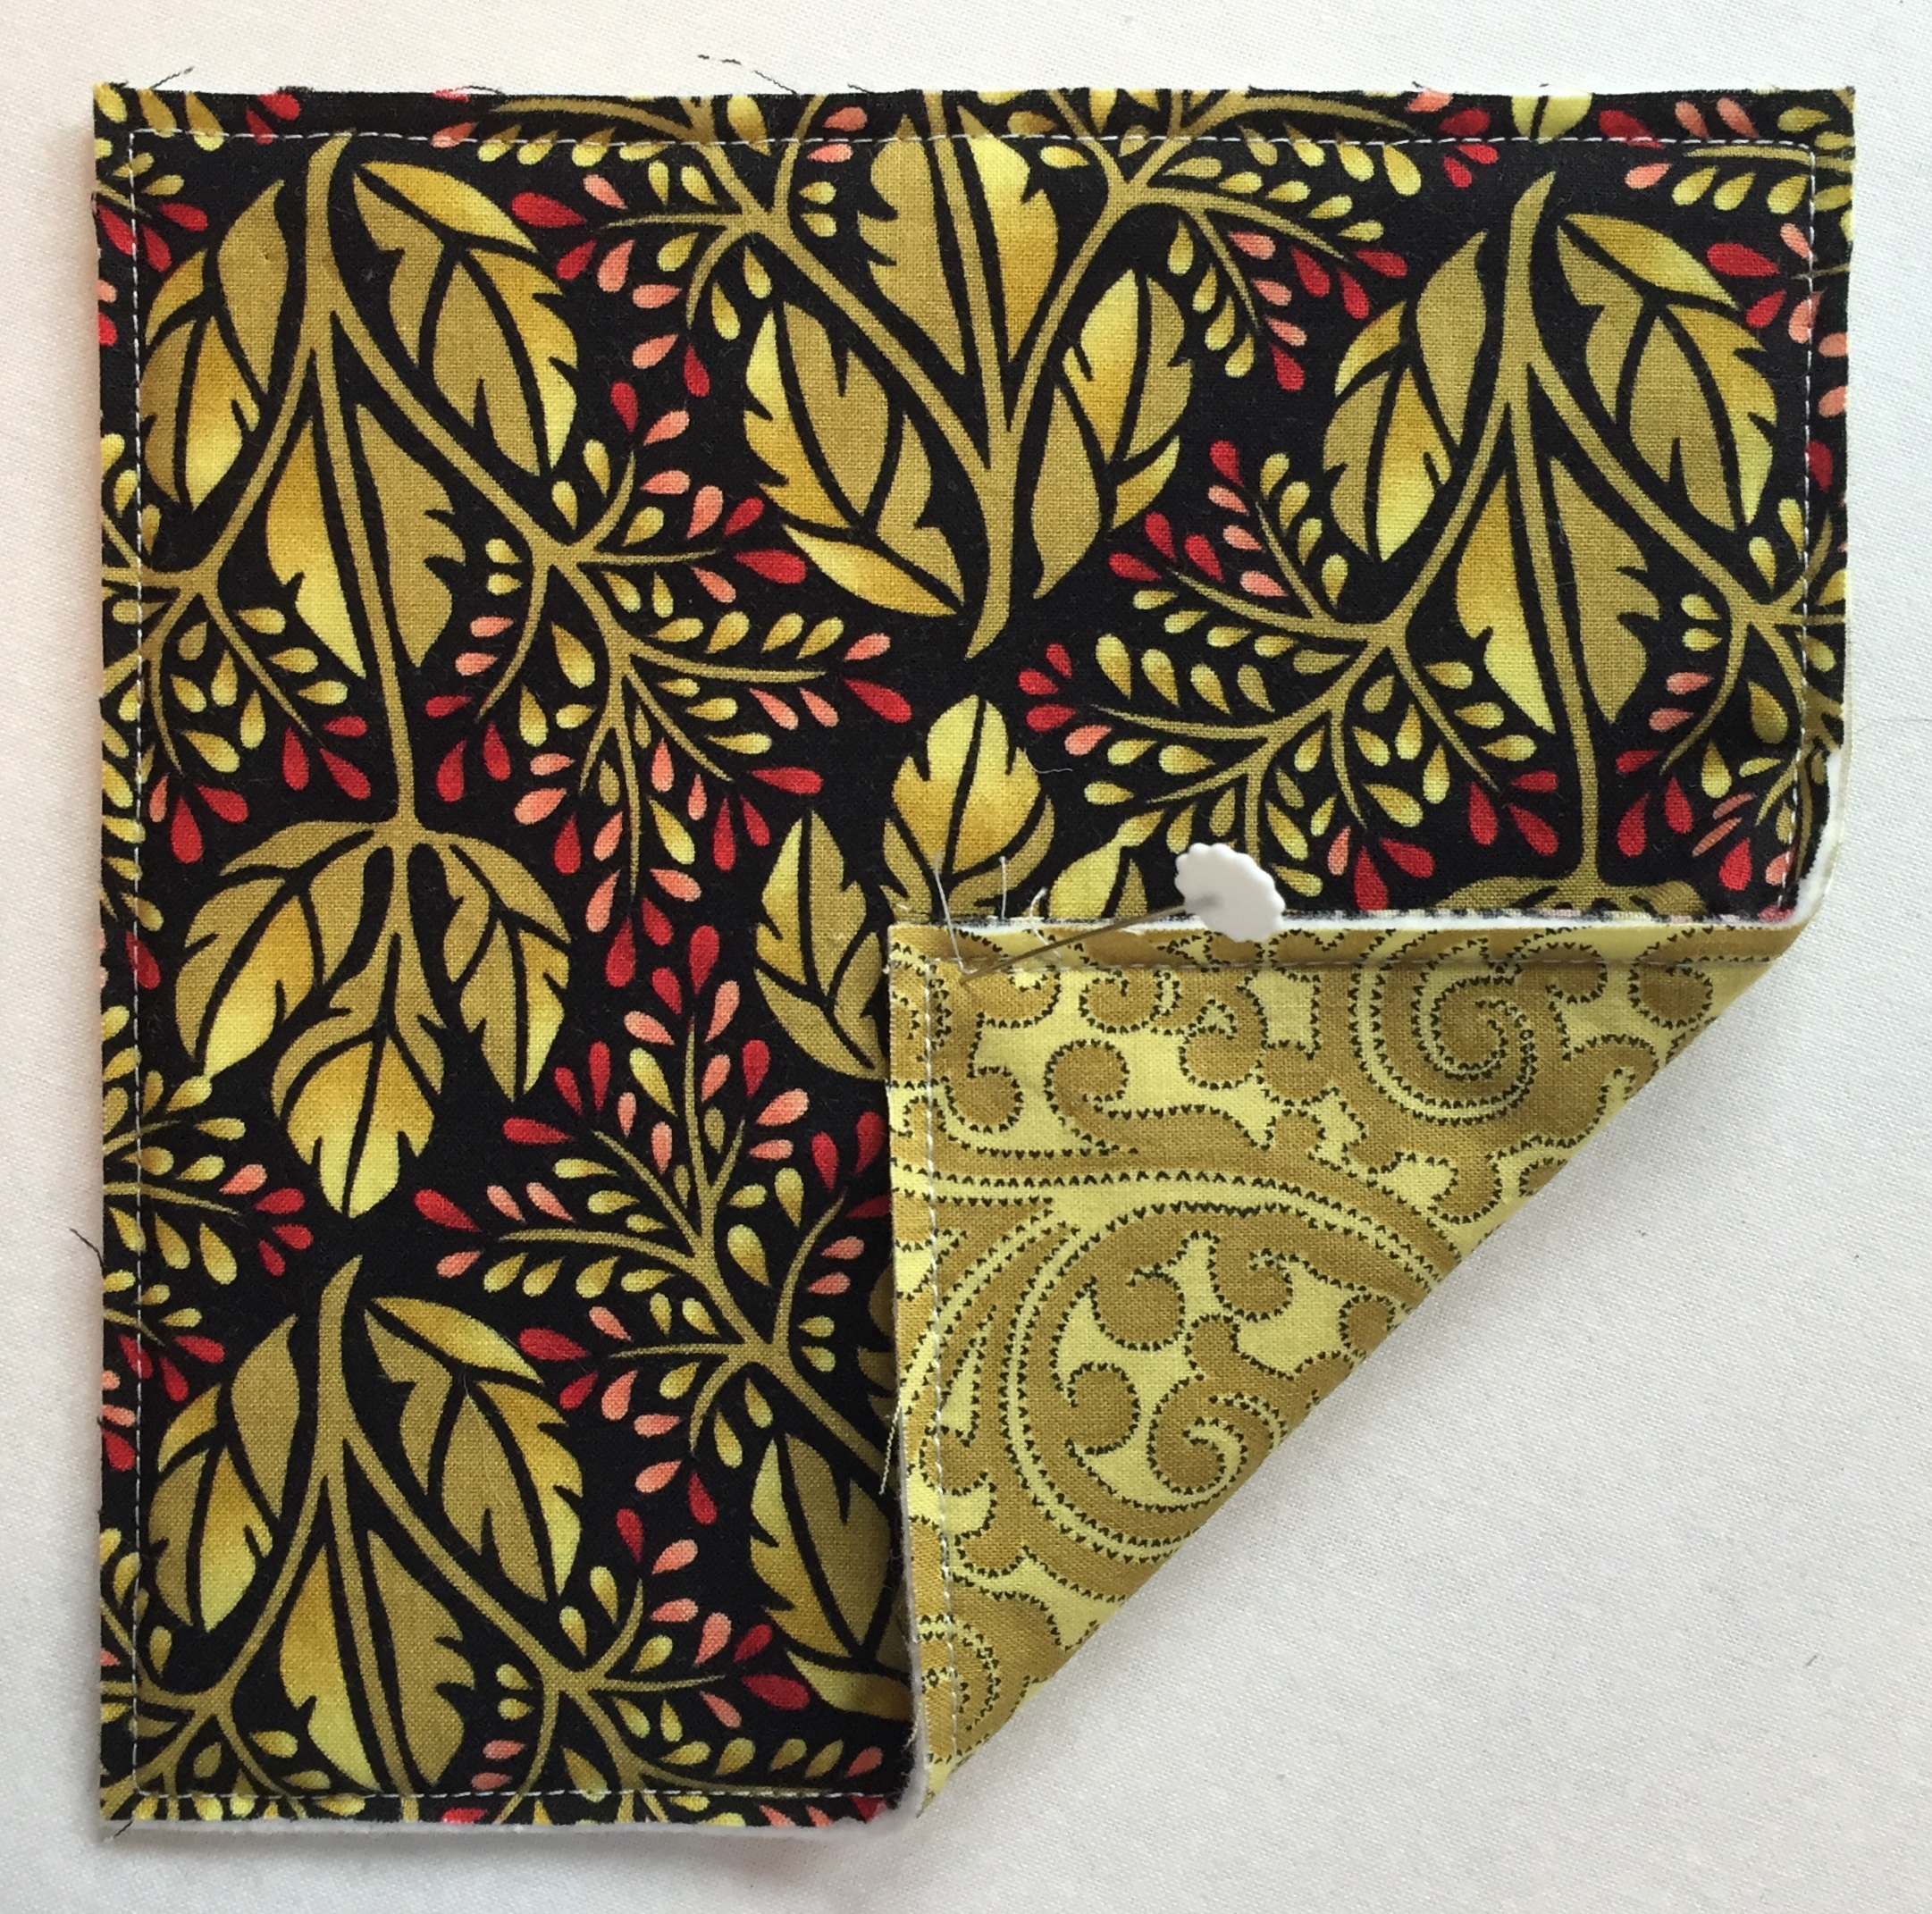
Step 1. Layer the cotton squares and batting as for a quilt and stitch ⅛” from the outside edges to hold the layers together:
In the photo above, the darker print is the outside of the case and the two-toned gold fabric is the lining.
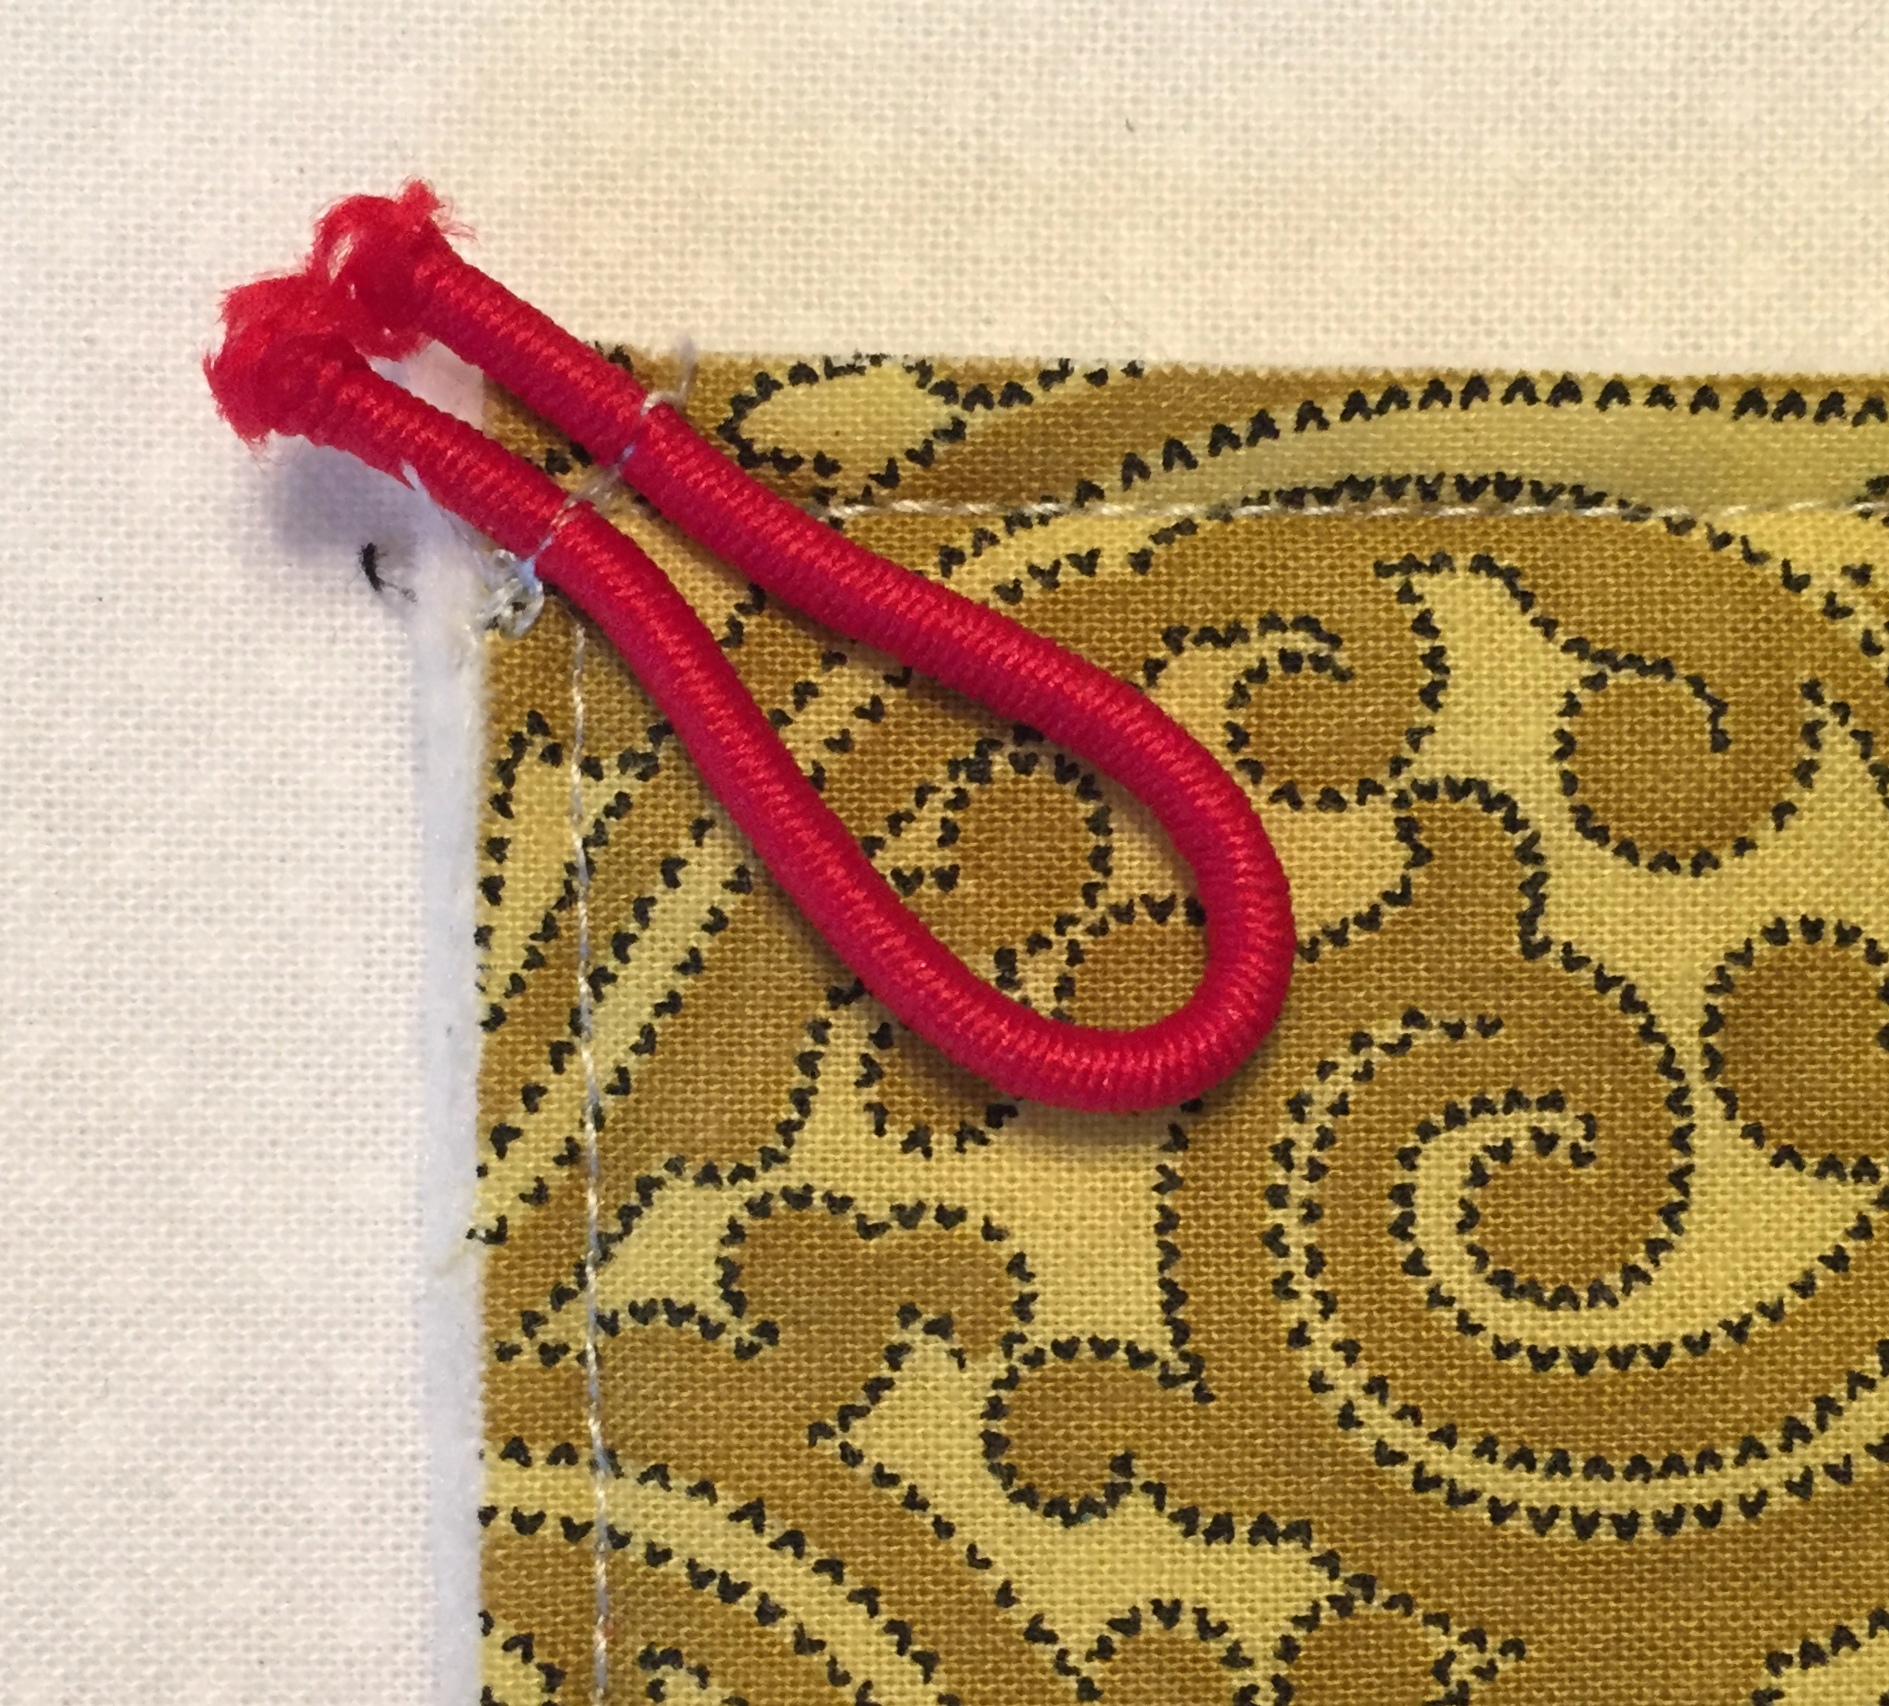
If using a loop and button closure, stitch a loop in one corner on the lining side, keeping stitching inside the seam allowance:
I used a small ponytail elastic on this case but you could also use narrow ribbon as I did in the two cases at the top of this post.
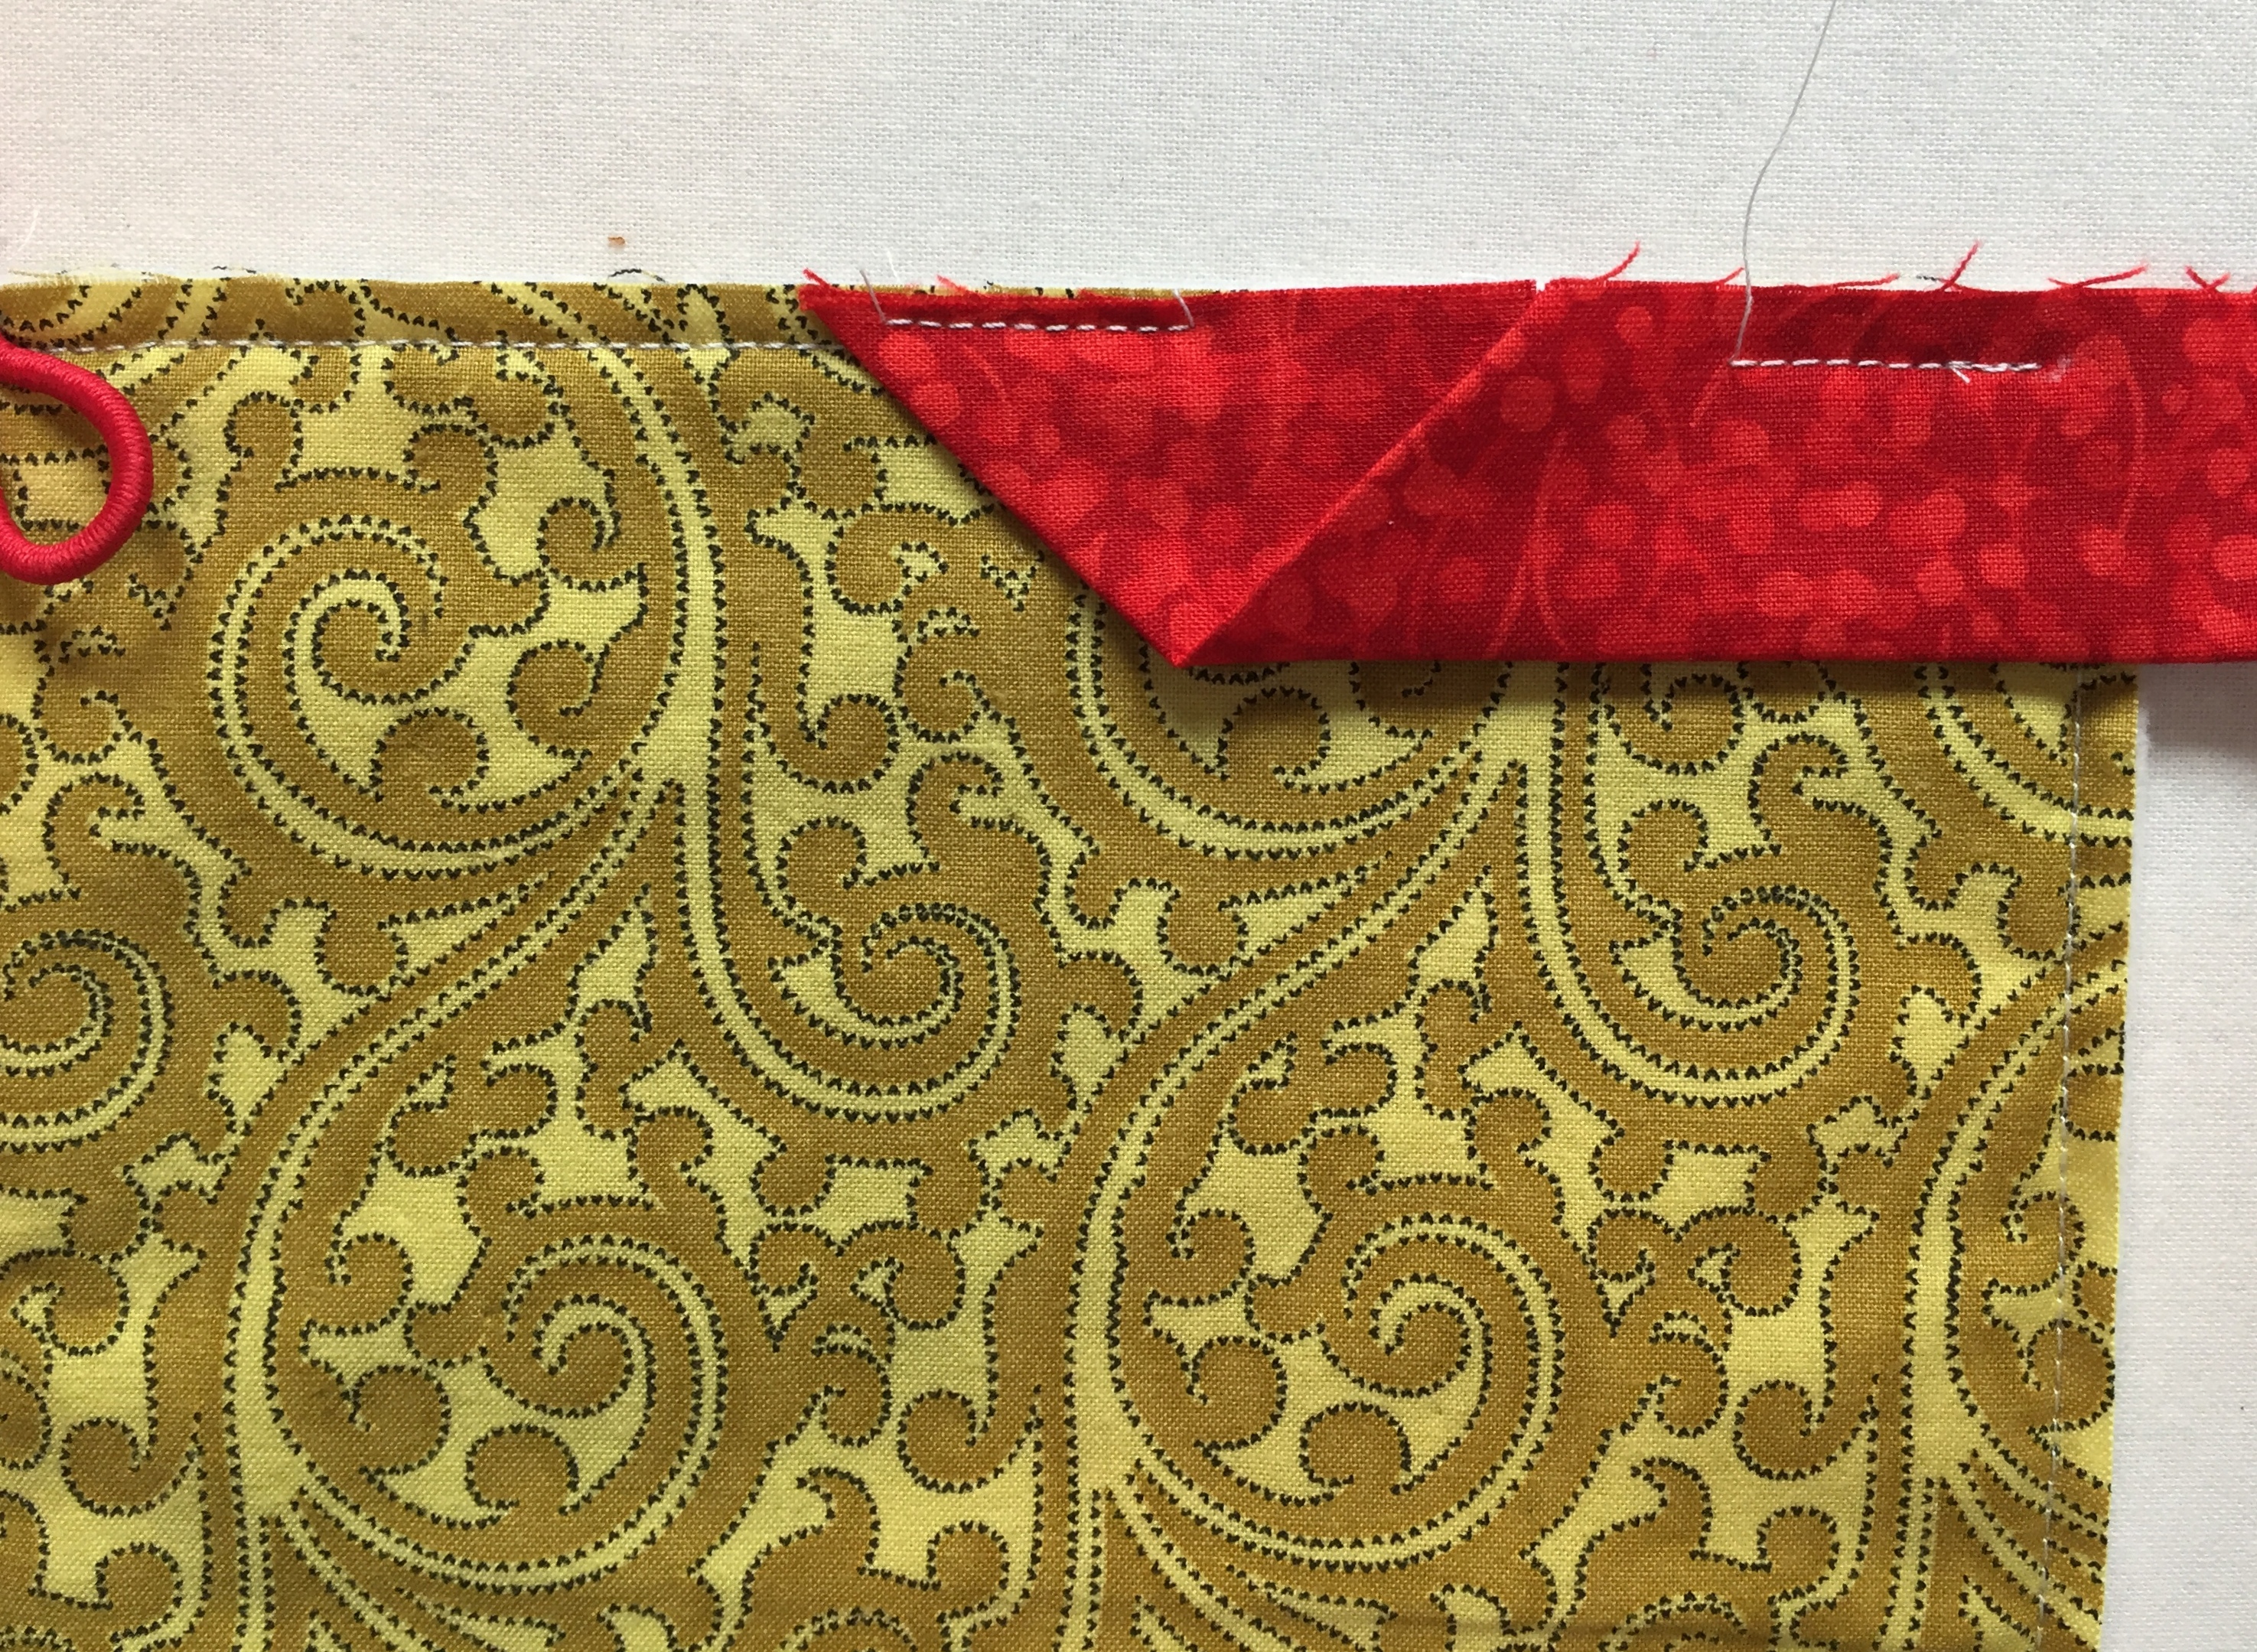
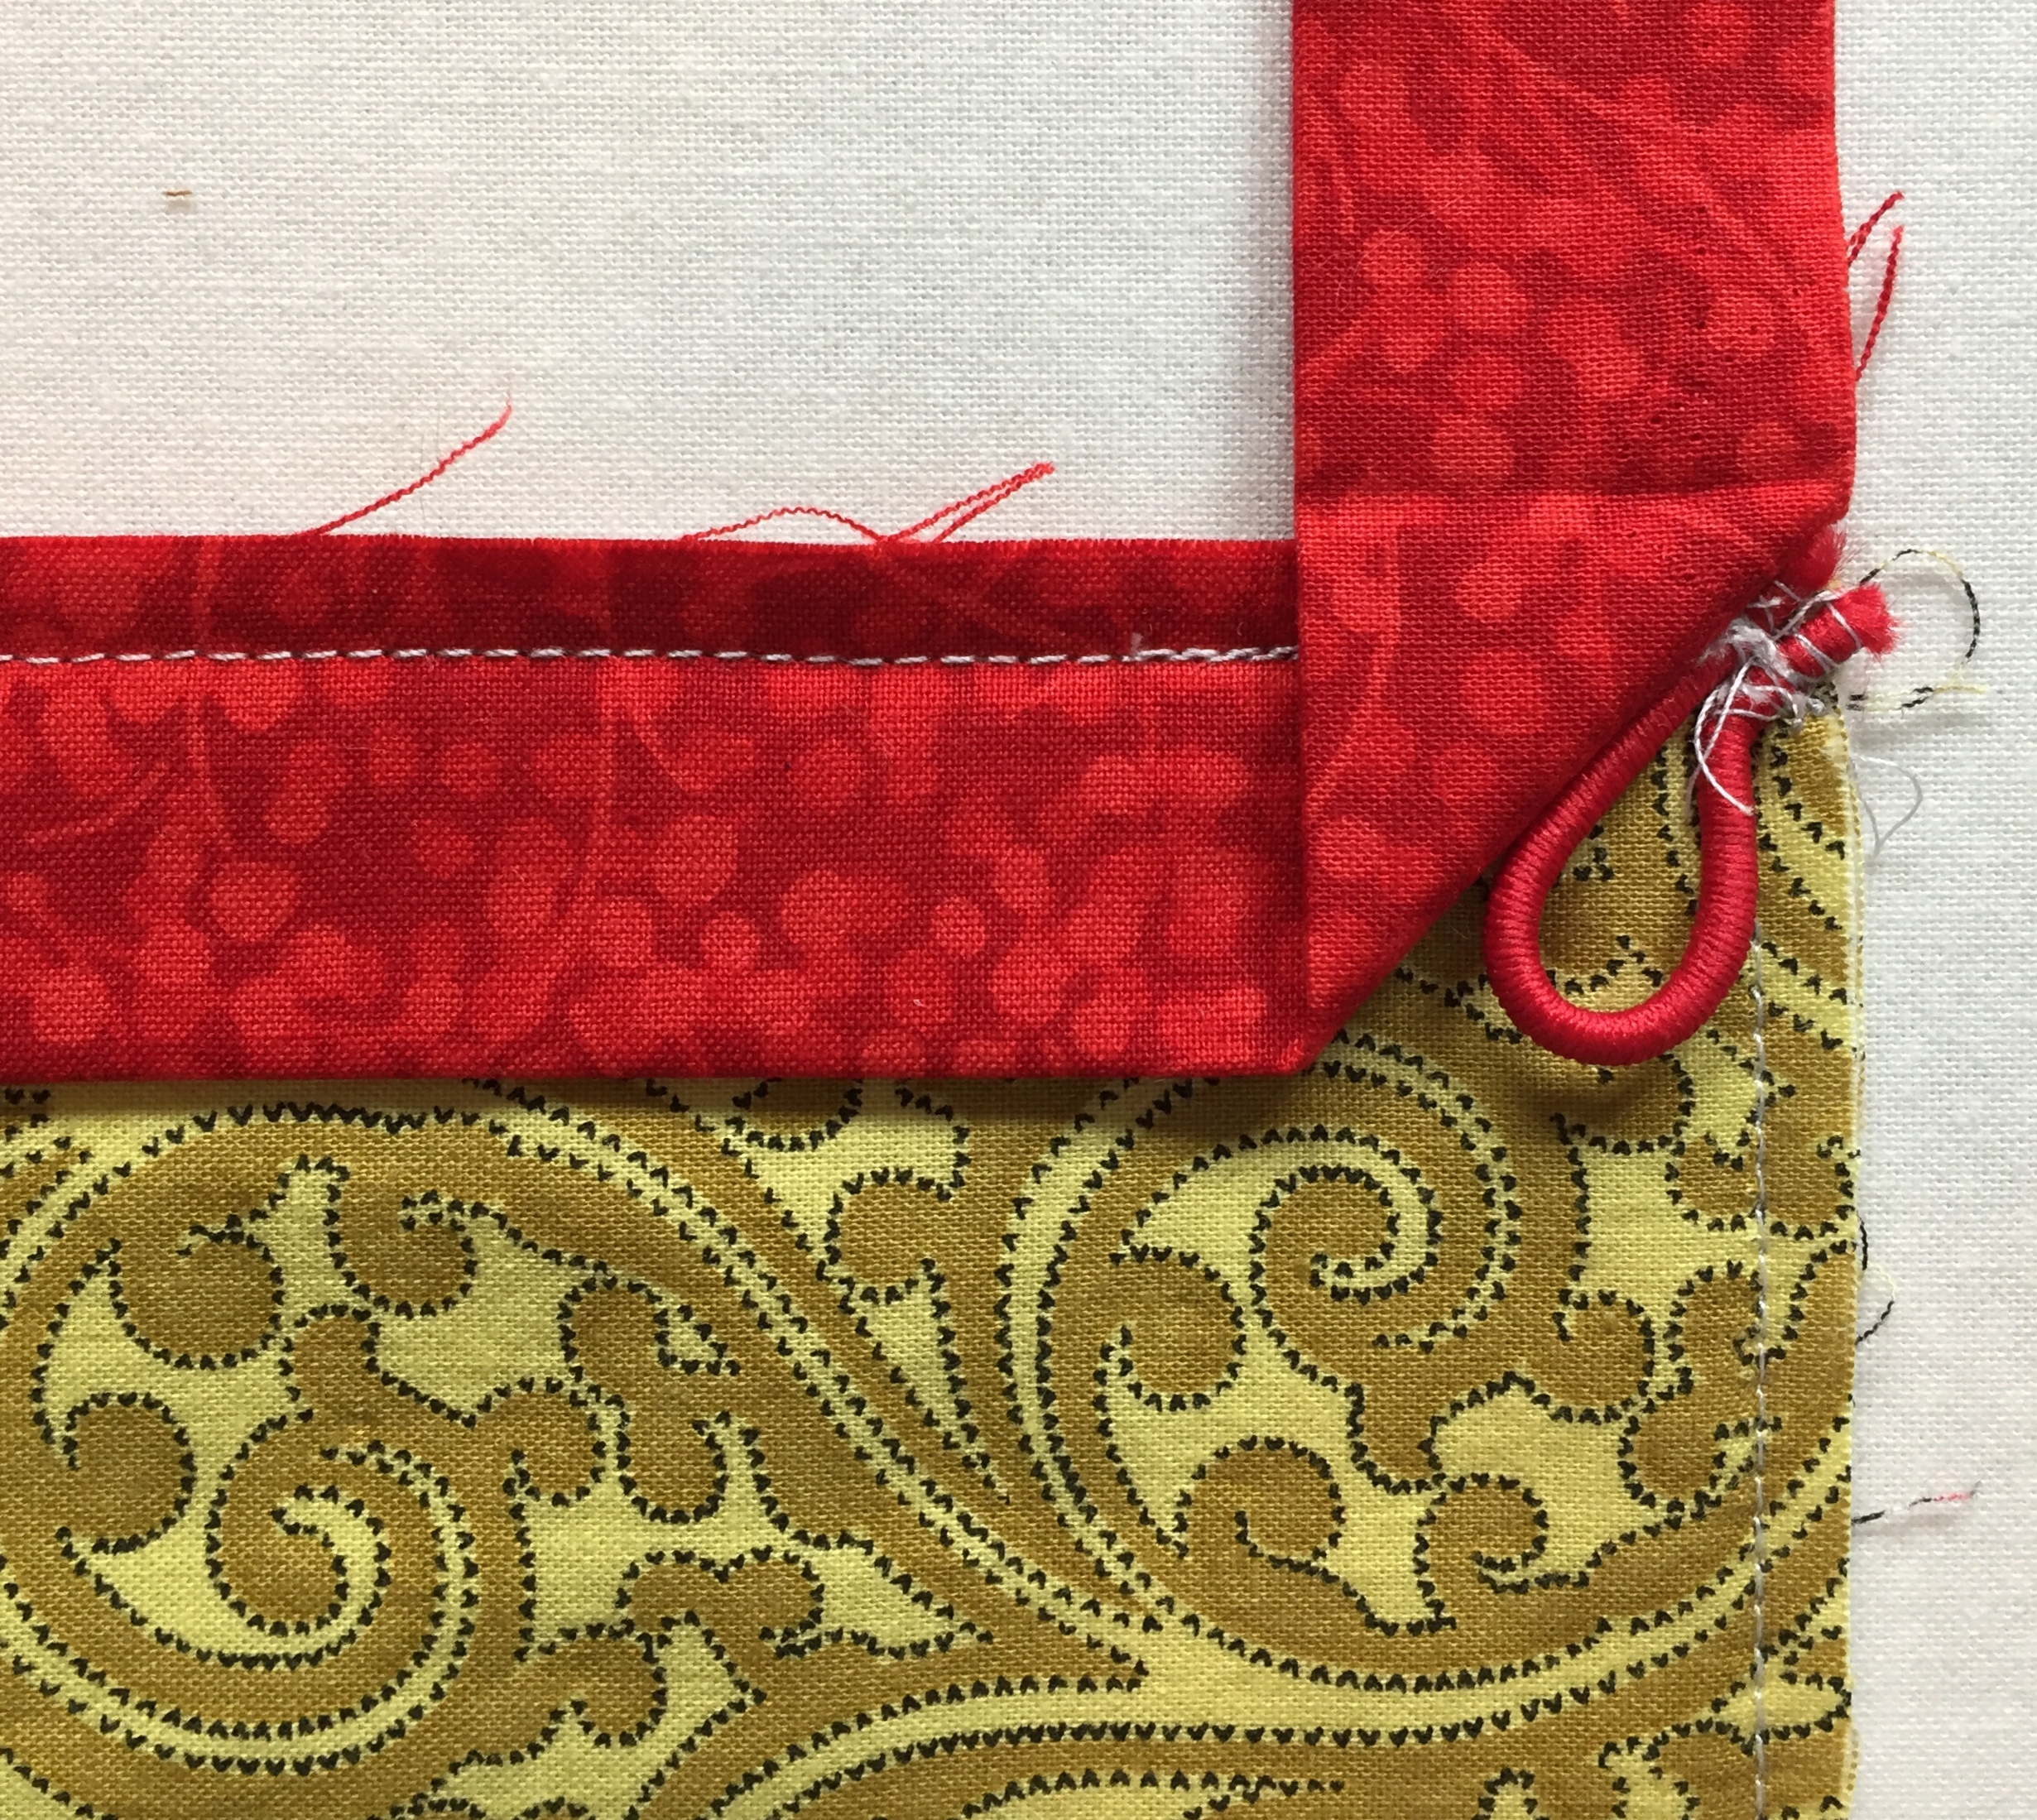
Step 2. Still working on the lining side, position the binding strip halfway down the side from the loop:
Note how the edge of the binding has been folded at a right angle and how I added a few stitches inside the seam allowance to secure the binding to the edge of the quilt sandwich.
Step 3. Leaving enough room to tuck the other binding tail into the fold, begin stitching the binding with a scant ¼” seam, stopping ¼” from the end in order to miter the corner:
When you come to the fourth corner, be careful not to catch the loop in the binding seams when you miter that corner:
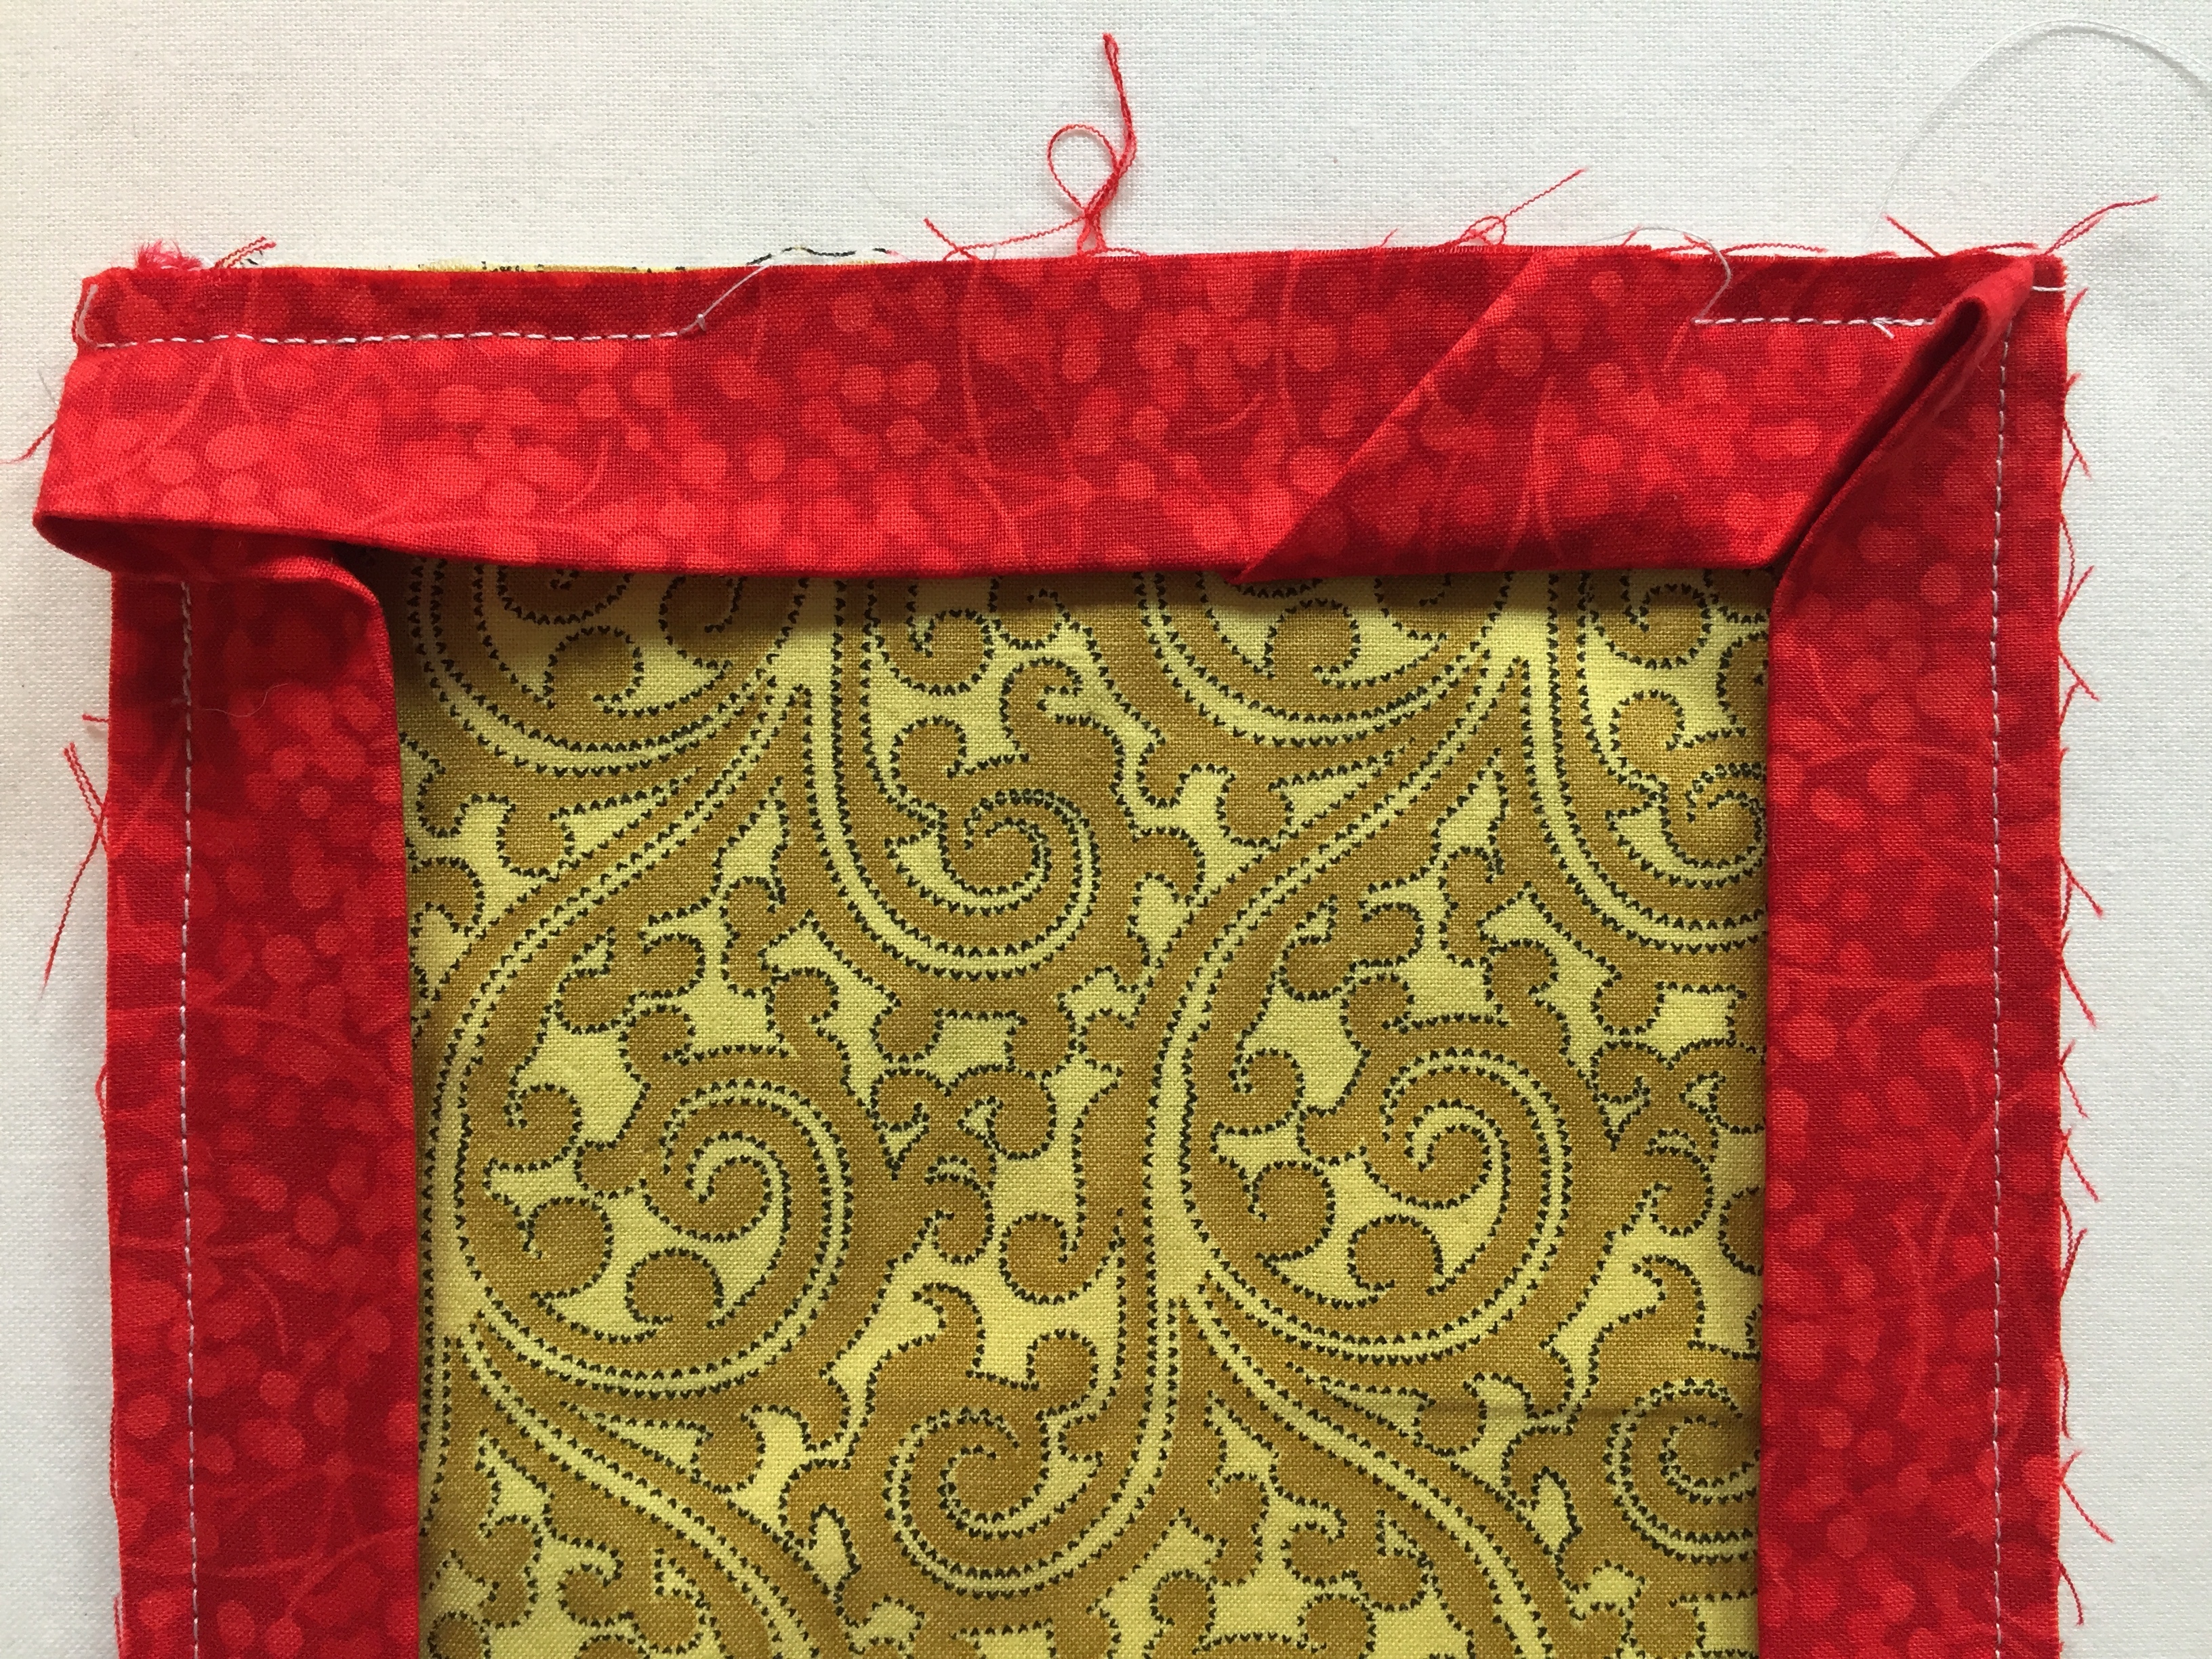
Step 4. Tuck the left tail into the fold of the right tail . . .
. . . and finish stitching the seam, starting and ending a few stitches beyond the original stitching.
Step 5. Turn the binding to the right side and stitch by hand or fuse in place using ¼”-wide Steam-a-Seam 2 (not Steam-a-Seam 2 Lite). If using fusible web, take care not to melt ponytail elastic with hot iron!
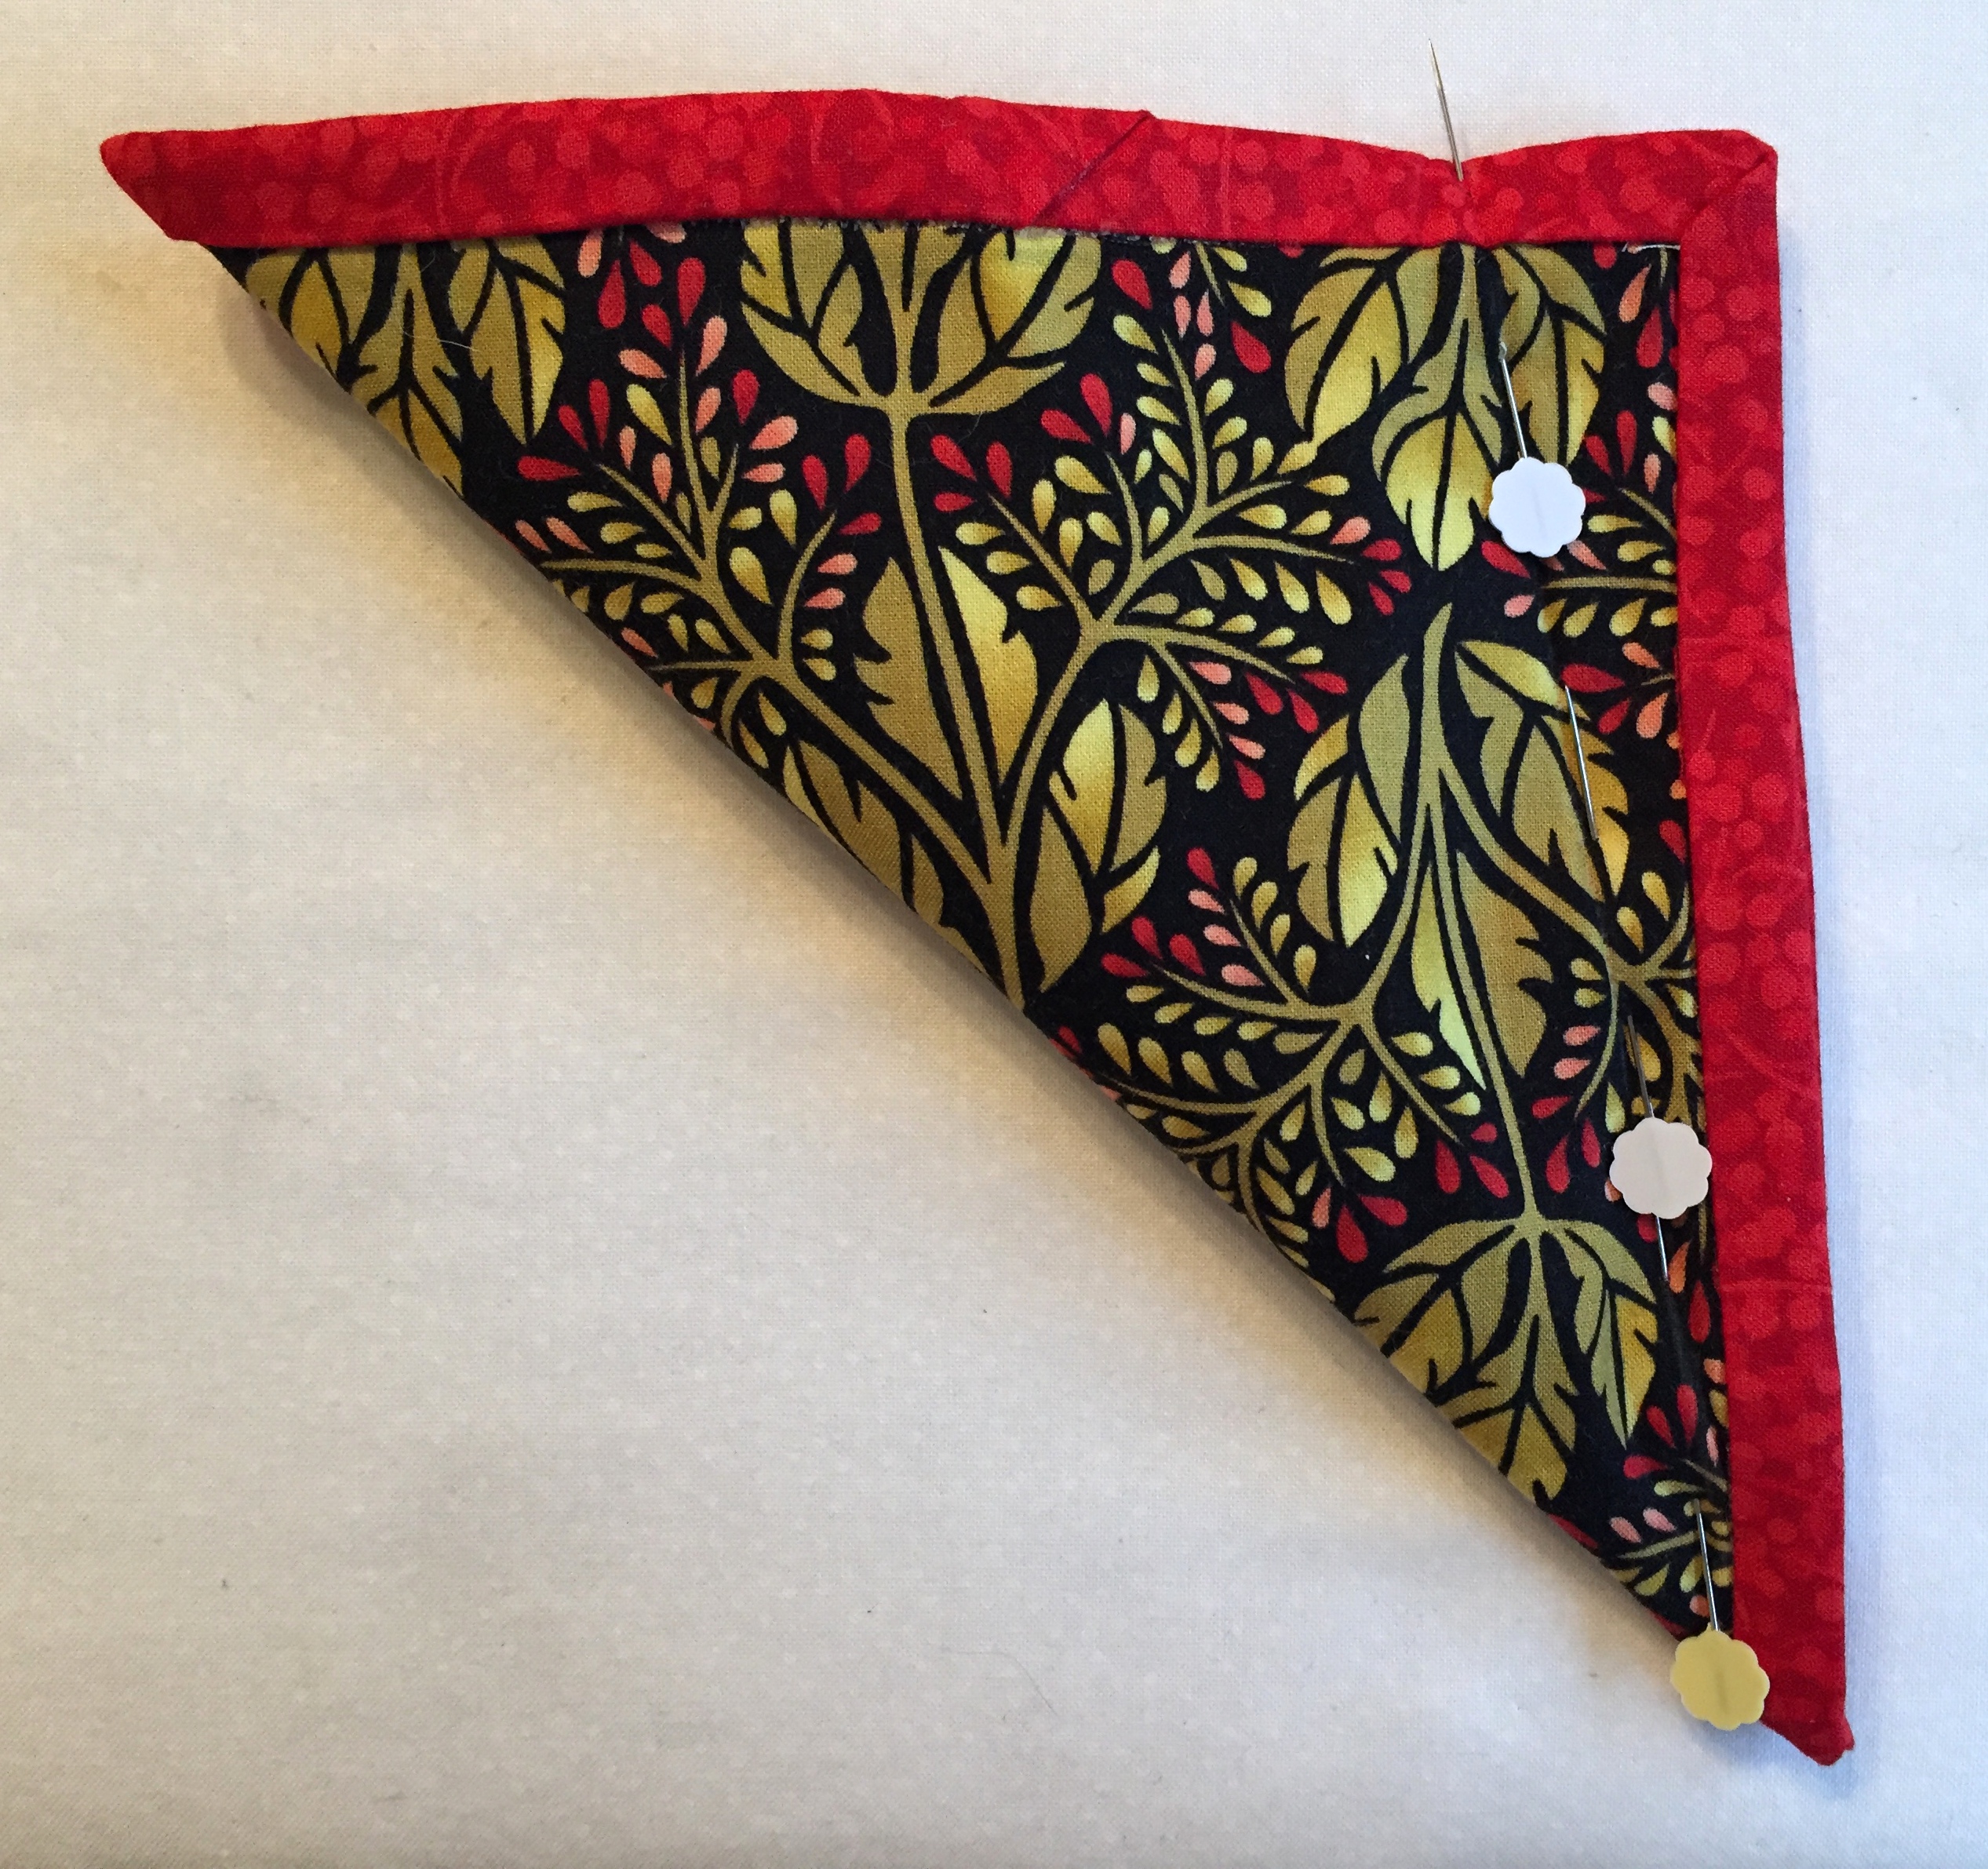
Step 6. Fold the case in half diagonally and mark a stitching line 1¼” in from the upper right corner, tapering to the bottom as close to the binding at the bottom as you can get. (Note: loop is in the upper left corner). The pins in the photo below show the stitching line:
Stitch, backstitching at both ends:
Note that you stitch through the binding at the top of the seam and taper down toward the corner with the stitching ending right next to the binding. Try using a zipper foot for this line of stitching if the walking foot skips stitches. The stitching will not show when the flaps are folded back. (If using 6″ squares, mark your stitching line 1″ in from the right edge rather than 1¼”.)
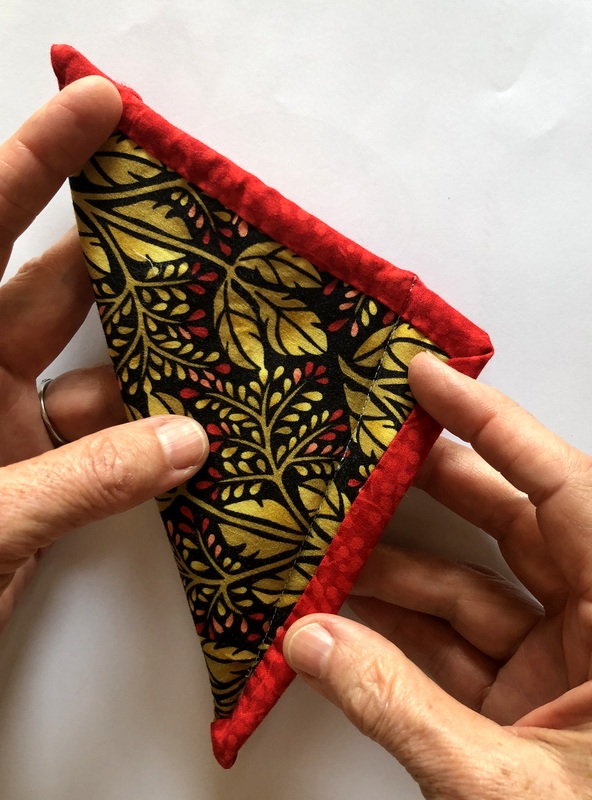
Open up the seam and press flat as shown below. Sew button on seam line (test placement by holding top flap down to see where loop is in relation to button).
Cheryl at Meadow Mist Designs is hosting a Best of 2017 Linky Party, inviting bloggers to highlight their top five posts of the year. It’s a fun way to look back over the last 12 months and identify some of the high points.
My top five are below, in reverse order. Clicking on the links will take you to the original posts.
5. Dutch Treat. Although I didn’t finish this quilt till June, I started it in January during an epic snowstorm that kept me and many Portlanders indoors for several days.
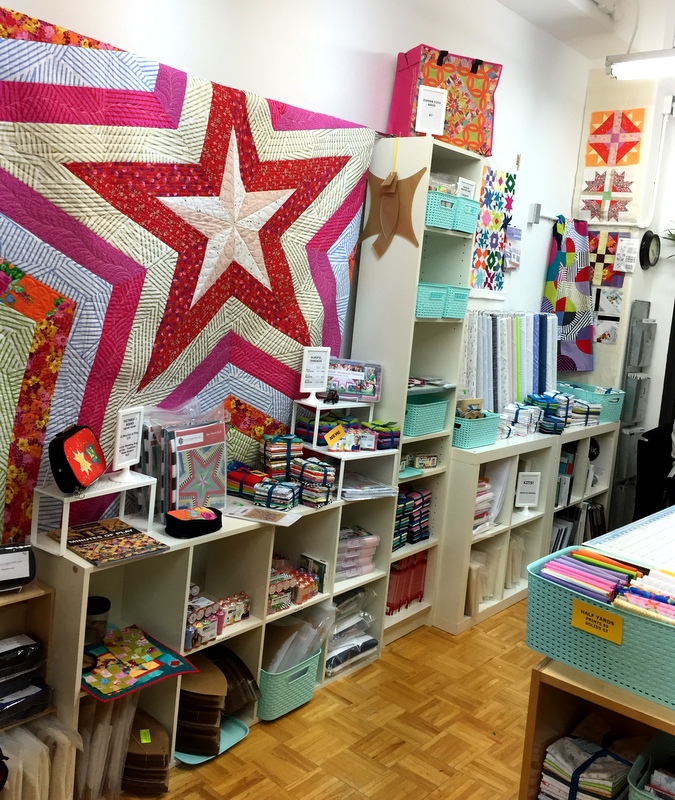
4. NYC and VFW. A trip to New York City with my twin sister in March combined many of the things I love in life: family, travel, theater, museums, and quilting. The quilting part? A visit to the Manhattan shop of Victoria Findlay Wolfe:
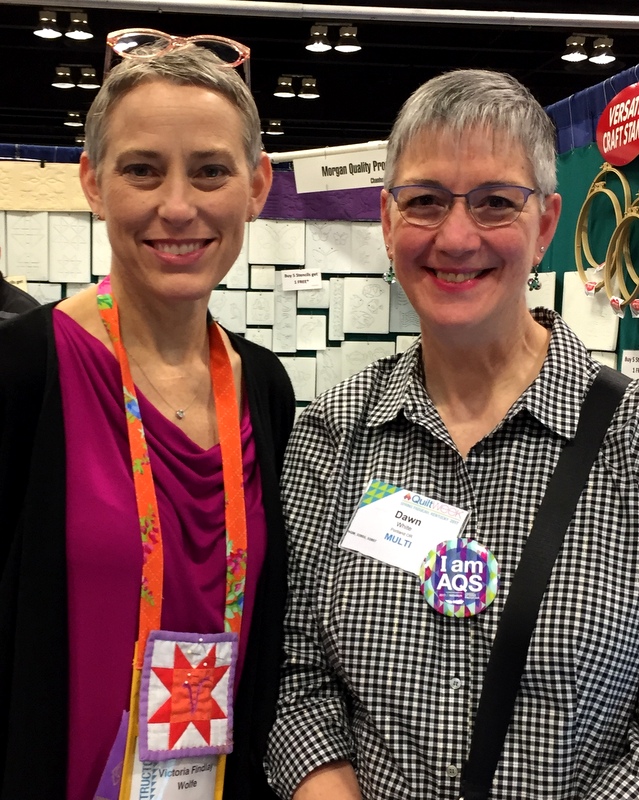
Victoria didn’t happen to be there that day but I had the pleasure of meeting her the following month in Paducah, Kentucky during AQS Quilt Week:
The larger one was made by “supersizing” the original pattern, using the larger of the two curved rulers Sew Kind of Wonderful designed for cutting curves. I wrote a tutorial showing how I did it.
2. Junior Billie Bag. This was the first of two JBBs I made in 2017:
Designed over 20 years ago by Billie Mahorney, it’s a fabulous quilter’s tote personalized by each maker, starting with the design on the front and back panels and ending with the pockets inside and out. Two years ago Billie turned the teaching of her design over to me, and I make a bag every time I teach a class. This may be my favorite of the eight I have made so far.
Without consciously planning to, I wound up making a suite of accessories to go with my Junior Billie Bag:
(See the rotary cutter coat in the lower left corner? I wrote directions for it in 2014 and it remains my most popular tutorial. Every now and then when I see a huge spike in the number of views on my website/blog, I know it’s because someone provided a link to the tutorial.)
1 . Where It’s @. Much to my surprise and delight, this quilt won a second place ribbon at the Northwest Quilting Expo in Portland, Oregon in September:
The design is Rewind by Karla Alexander of Saginaw Street Quilts. I started the quilt in a class with Karla in Sisters, Oregon in July 2016. Getting a ribbon was honor enough but the award came with a check for $500. My first reaction? “Think how many yards of fabric I can buy with that!”
Well, this has been a nice little trip down memory lane. Do you want to join Cheryl’s party, too? The link is open until January 2. Be sure to check out the top five posts of the other quilting/blogging partygoers. And thank you for checking out mine!
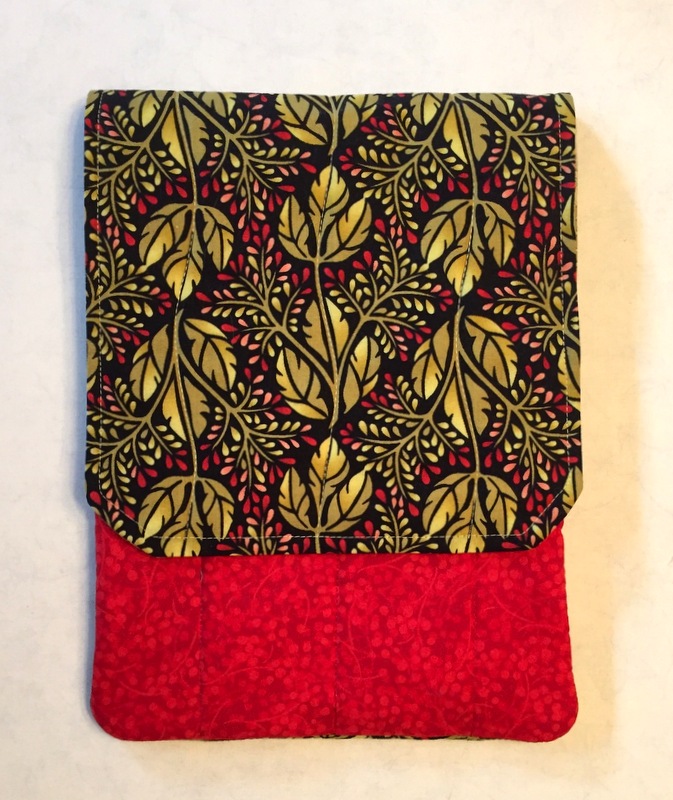
You may recognize the fabrics in this sewing tool caddy, which I made last month at Quilt Camp:
They’re the same fabrics used in the Junior Billie Bag I made earlier this year.
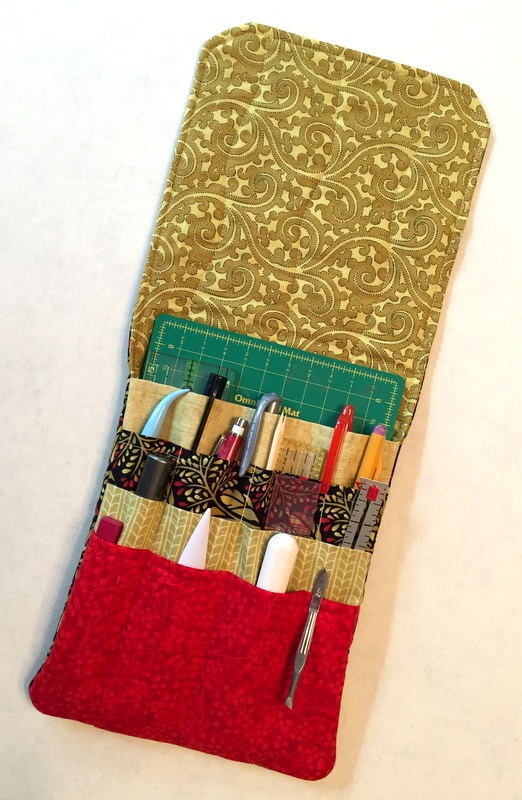
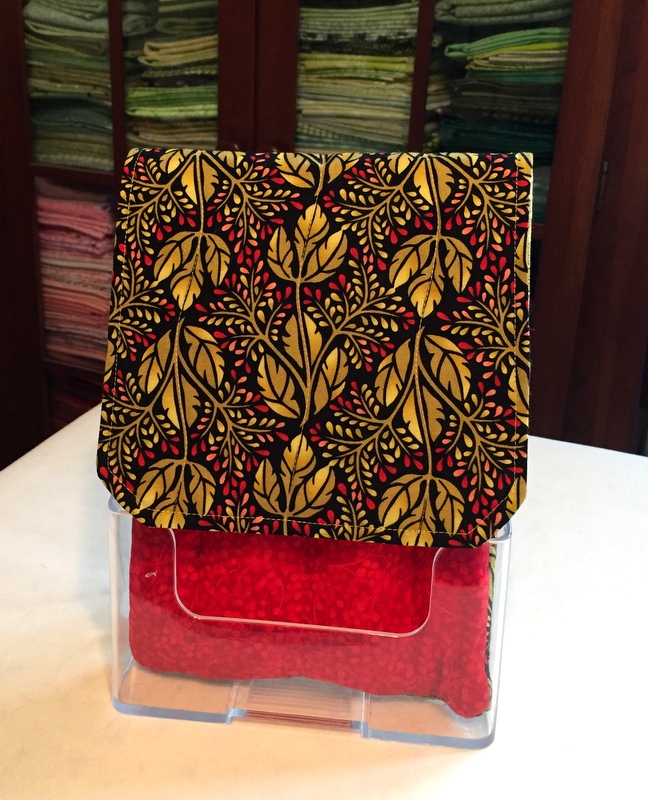
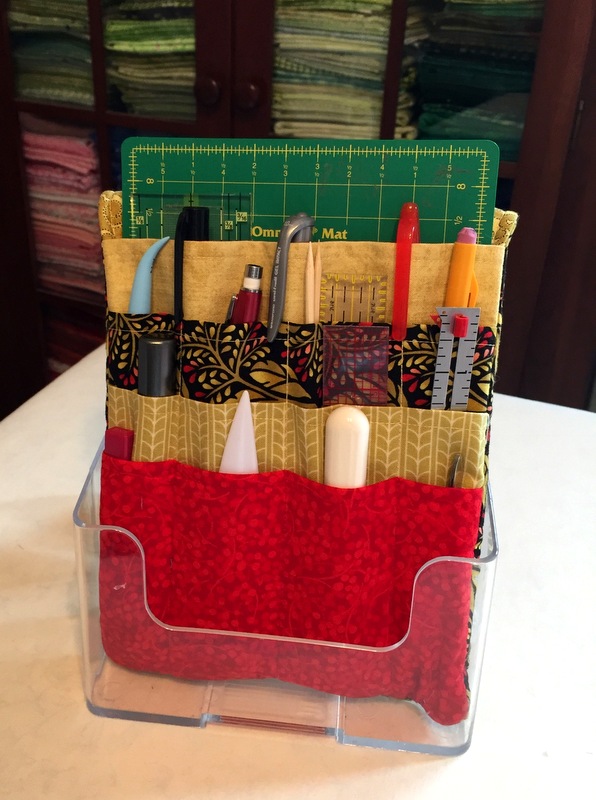
The pattern for the tool caddy is Travel Case by Pearl Pereira of p3designs.com. I’ve made it several times, modifying it the last few times by adding an extra pocket. I keep my tool caddy in an acrylic brochure holder one of my students gave me:
With the flap turned back, all of my smaller tools are right at my fingertips. At the end of a sewing session the tools go back in the caddy. It really does help me keep my sewing room organized.
Having made the caddy, I couldn’t help but make a coordinating rotary cutter coat:
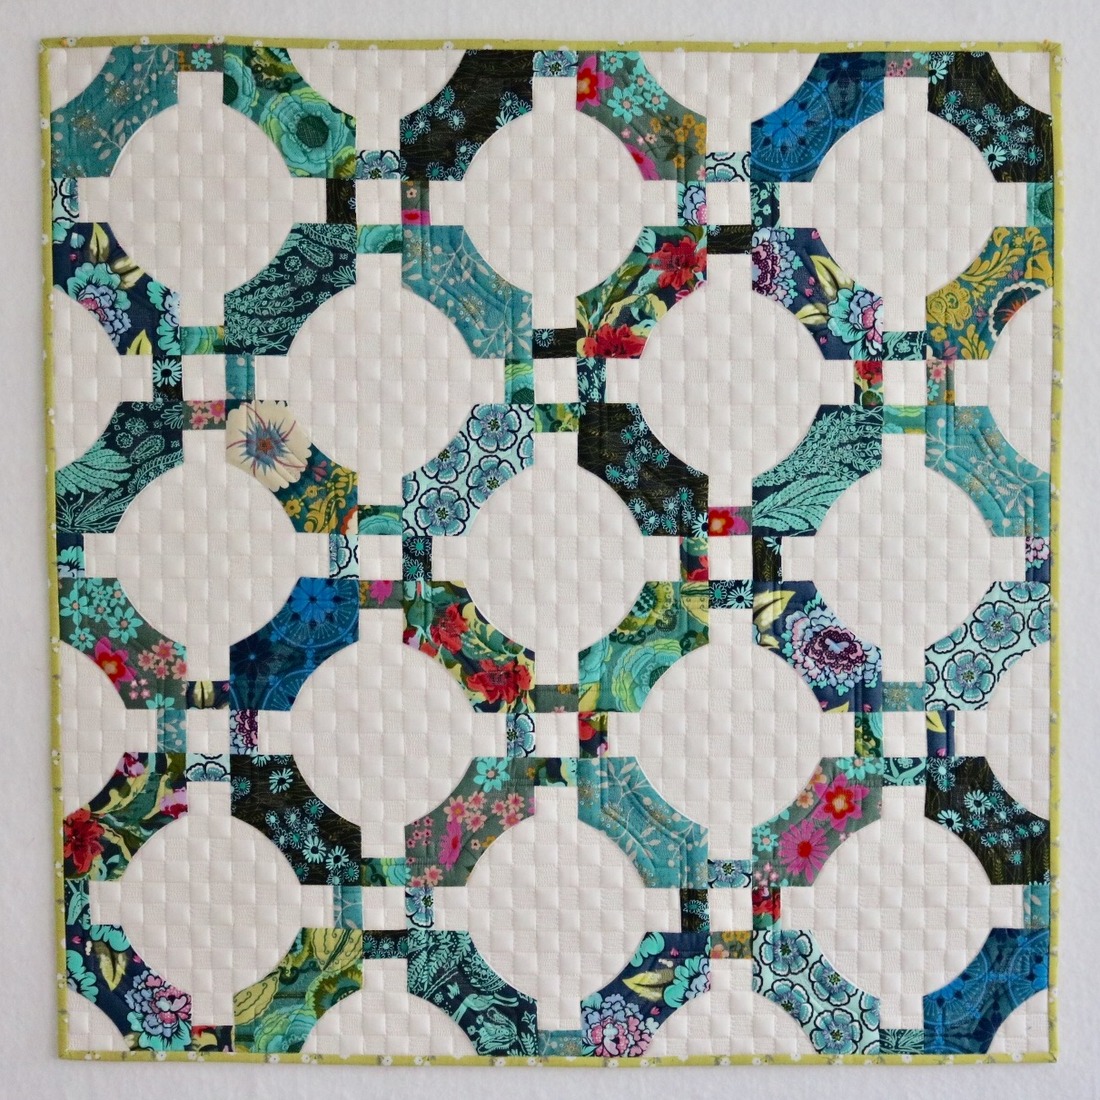
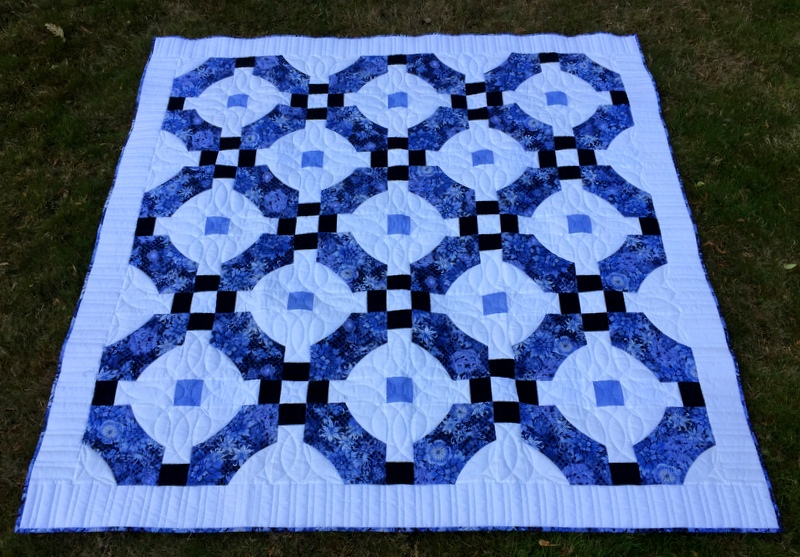
Last spring the talented sisters at Sew Kind of Wonderful released a free pattern called Mini Mod Tiles:
Mini Mod Tiles, about 34″ Square, made by Sew Kind of Wonderful (2017). Photo used with permission.
I was instantly enchanted. I downloaded the directions from Sew Kind of Wonderful’s website and made my own version using just three fabrics:
Piccolo Terrazzo Tiles, 34½” Square. Made by Dawn White, Quilted by Karlee Sandell.
I knew this was the design I wanted to teach at a quilt retreat in June. But I wanted to give my students the option of making a larger quilt. Sure, they could have added more blocks to increase the size of their quilt — but I was thinking of a bigger block. Thus was the “supersized” version of Mini Mod Tiles born:
Terrazzo Tiles, 63″ Square (2017). Made by Dawn White, Quilted by Karlee Sandell.
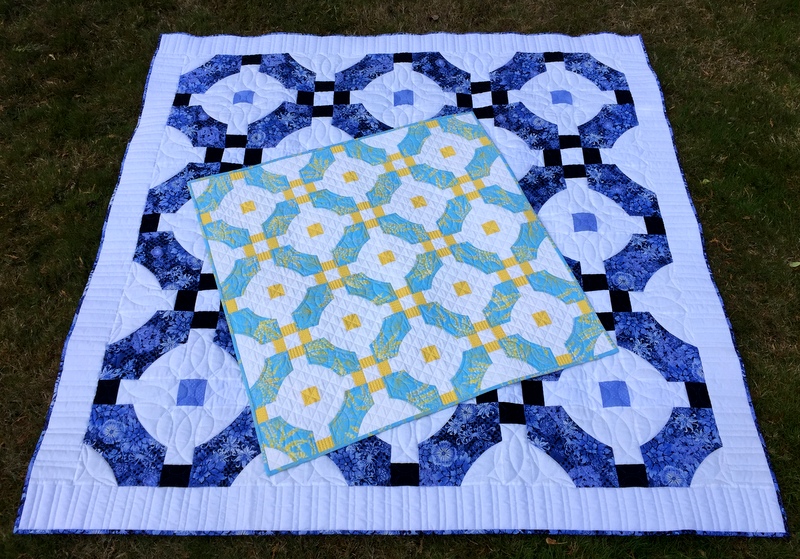
The supersized version was made with the original Quick Curve Ruler whereas the original Mini Mod Tiles was made with the QCR Mini. Here are both quilts to give you an idea of the relative sizes:
Two Versions of Mini Mod Tiles: Original and Supersized!
The SKW sisters graciously gave me permission to show how I supersized their pattern, hence this tutorial. My directions will be easier to follow if you have already made a quilt using the original Mini Mod Tiles pattern.
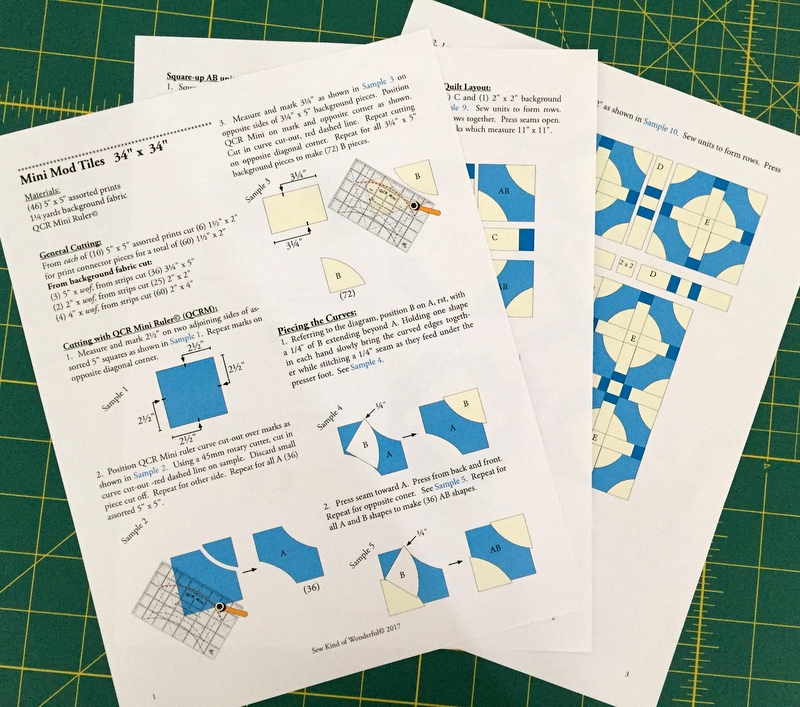
This tutorial has two parts. Part 1 is a two-page handout showing fabric requirements and advance cutting for both a scrappy version using multiple prints like the original SKW version and the more controlled version I made with just four fabrics. Download Part 1: Fabric Requirements and Advance Cutting.
Part 2: Sewing Directions for Mini Mod Tiles “Supersized”
Required: Quick Curve Ruler by Sew Kind of Wonderful (available at many local quilt stores and at Sew Kind of Wonderful’s website).
Required: free pattern Mini Mod Tiles, downloaded from the SKW website.
Download the three-page pattern by going to the Free Patterns link on SKW’s website and double clicking on the photo of Mini Mod Tiles — the same photo you see at the top of this tutorial. Click on the print icon on the upper right side. Print in color:
Free download: Mini Mod Tiles pattern by Sew Kind of Wonderful
Study the directions carefully. The cutting, sewing, and squaring up instructions are almost the same as for the mini. The main differences are the cut sizes of fabric and the fact that you are using the original Quick Curve Ruler.
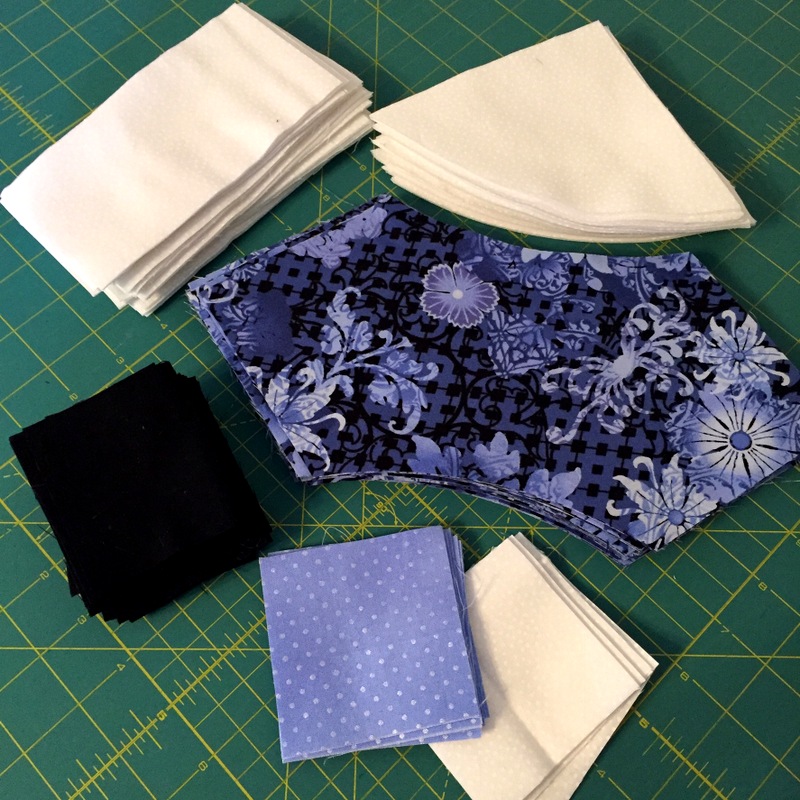
Here are my cut pieces, neatly stacked and ready for sewing:
Ready, Set, Sew!
Cutting with the Quick Curve Ruler (QCR) (Page 1) Refer to the illustrations on the pattern marked Sample 1, Sample 2, etc.
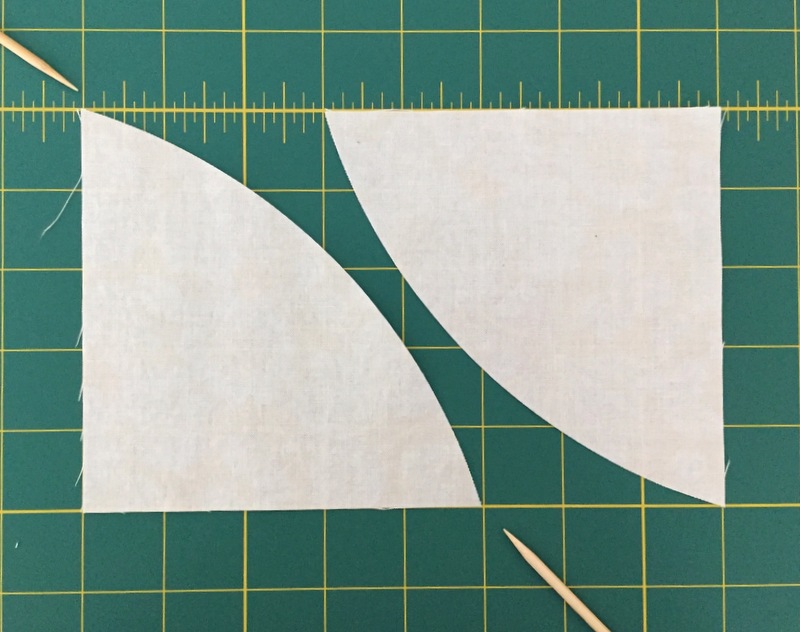
“A” shapes, cut from 8″ focus fabric squares: Referring to Sample 1, measure and make registration marks at the midpoints of the outside edges (4″ from the corners) of all four sides of a square (Sample 1).
Refer to Sample 2 illustration showing the position of the QCR on the fabric square. The red dashed line indicates the curve cut-out you follow with your rotary cutter. You can see that the cut-out curve is right over the registration marks on the left and bottom sides of the square.
First Light Designs tip: Note that the curve cut-out in the QCR is about ⅛” wide. Rather than centering that ⅛”-wide channel over your registration marks, position the ruler so that the inside edge of the channel is right over your registration marks. When you make your cut, follow the inside edge of the channel with your rotary cutter just as you would when making a cut with a straight-edged ruler. Your cut curves will be more uniform in size.
After making the first cut, rotate square 180º and repeat on other side. Repeat with remaining squares. Total: 36 A shapes.
First Light Designs tip: Instead of marking every square four times, arrange the square on a rotary cutting mat with all four sides aligned with the inch lines printed on the mat. (It doesn’t matter where on the mat as long as it’s several inches from outer edges.) Count over 4″ from the corners of the square and position the inside channel of the cutout curve over those points at the edge of the fabric:
Curves Begin and End 4″ from the corners
By the way, don’t discard the leftover curved pieces! They are a great size for appliqué or paper piecing projects or can be cut into 2¼” or smaller squares for another quilt.
“B” shapes, cut from 5″ x 8″ rectangles: Measure and make registration marks 3″ in from the top left edge and 3″ in from the bottom right edge. Refer to Sample 3 illustration. Note that the ruler is positioned so that the dotted red line showing the cutting channel goes from the upper left corner of the fabric to the registration mark on the bottom right side. After making the cut, rotate the block 180° and repeat. Discard the slivers of leftover fabric.
First Light Designs tip: Instead of marking the fabric rectangle, arrange it on a rotary cutting mat with all four sides aligned with the inch lines printed on the mat. Position the QCR so that inside channel of the cutout curve is over the upper left corner of the rectangle and the 3″ mark from the bottom right edge:
Curve begins in upper left corner, ends 3″ in from opposite corner
Did you know? You can stack your squares and rectangles and cut multiple units at one time if your rotary blade is very sharp. Try cutting two layers first. If that works, try up to four.
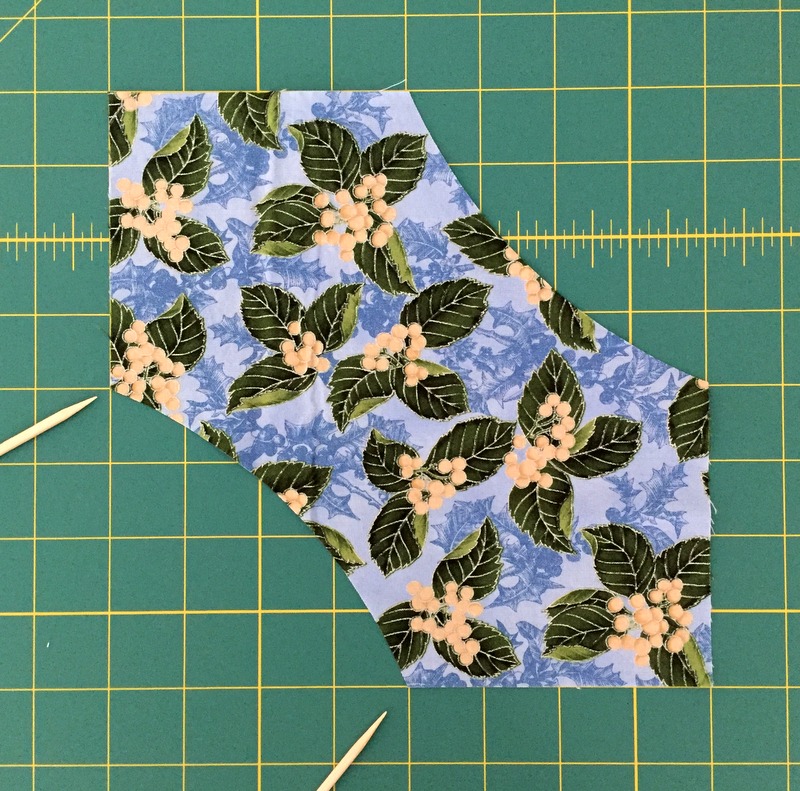
Piecing the Curves (Page 1) Referring to Sample 4 and Sample 5 illustrations on page 1 of the pattern: See the arrow pointing toward the 1/4″ that Piece B extends beyond Shape A? Change that measurement to 3/8″. When you position Shape B on top of Shape A, right sides together, be sure the tip of B extends 3/8″ beyond the tip of A. Press seam toward A. Note in Sample 4 how the edges of Shape B extend beyond Shape A at the curved seam. This is what you want, as the excess fabric is trimmed when the block is squared up.
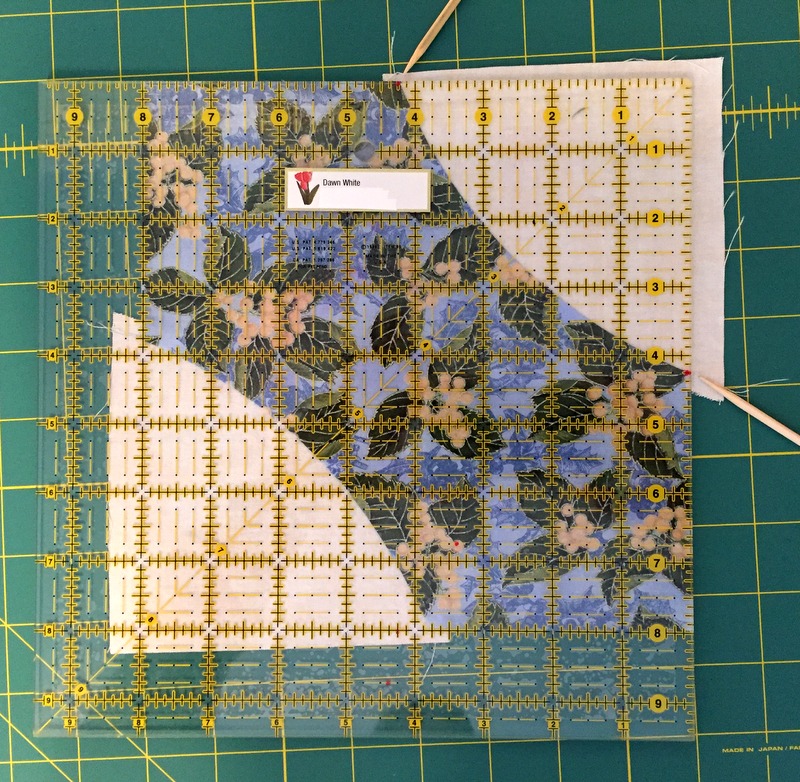
Squaring up AB Units (Page 2)
With two B shapes sewn to a shape A, the unit is now called AB.
Referring to Sample 6 on page 2 of the pattern: Square up AB unit to 8″ square. Using an 8½” or larger square ruler, position the ruler so that the straight edges of AB (upper left and lower right corners of the block) measure 8″ square. Trim right side and top. Rotate block 180º, reposition ruler so that bottom and left side of block are on the 8″ lines of the ruler, and trim right side and top. Repeat with remaining squares.
First Light Designs tip: On your squaring up ruler, use an Ultra Fine-Point Sharpie marker to make two small dots — the first one 4¼” to the left of the upper right corner and the second one 4¼” down from the upper right corner, right at the edge of the ruler. When you square up your block, the curved seam that joins Shapes A and B should be right under those dots:
See the red dots?
If you find your curved seam falls a bit on either side of the 4¼” measurement, that’s okay. The important thing is that your blocks are hitting the same mark consistently. (The Sharpie marks come off the ruler easily with a drop of nail polish remover, by the way.)
Sashing Assembly (Page 2)
Follow the directions, keeping in mind that your (60) C units are made with connector pieces measuring 2½” x 3″ and sashing strips measuring 3″ x 6″. Likewise the D units are made with two C units and a 3″ square of background fabric in the middle. Note: it would be more efficient to make these C and D units in strip sets but I decided to match my tutorial as much as possible to the original directions.
Block Assembly and Quilt Layout (Pages 2 and 3) Follow pattern directions, keeping in mind that the center of the block is a 3″ square of accent fabric, not a 2″ x 2″ background piece. Make (9) blocks which measure 18″ square.
Pressing I did deviate from the pressing directions. Instead of pressing seams open where directed, I always pressed toward the focus fabric, even when sewing rows together. Why? I was planning ahead, in case I wanted to stitch in the ditch around my focus fabric. It’s very difficult to do that when a seam has been pressed open. As it happened, I decided to have both quilts custom quilted; the longarmer stitched in the ditch on both quilts at my request and I really like how much extra definition the stitching gave to the focus fabric shapes.
If you have any questions, please feel free to ask. And if you make a supersized version of Mini Mod Tiles, I would love to see a photo. I know the Sew Kind of Wonderful sisters would, too!
If you’ve been quilting a while, you probably have a good-sized number of acrylic rulers on hand, the ones you use every day for cutting fabric and trimming blocks plus the specialty rulers you use on occasion. And let’s not forget the ones you bought (but maybe haven’t used yet) because they promised a faster, easier, more accurate way of cutting fabric or making a block.
With a few exceptions, these rulers tend to slip and slide on fabrics. How many of you have experienced a shift in position just as you were running your rotary cutter along a ruler’s edge? My hand is in the air.
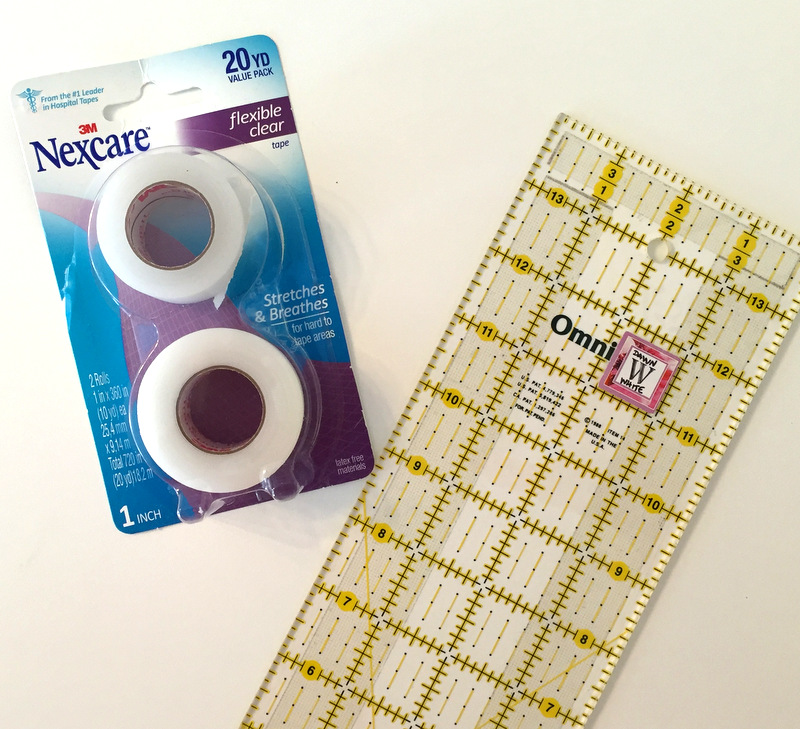
Enter a product that may already be in your first aid kit or medicine cabinet. It’s a flexible clear 1″-wide surgical tape called Nexcare made by 3M. My friend and fellow quilter Kathy Anderson told me about it and now I’m passing the word on to all my friends who quilt.
Here’s what the package looks like. If you look carefully, you can see I have applied it to my go-to 4″ x 14″ Omnigrid ruler.
For years I used a product called Invisigrip on the back of my rulers. Made by Omnigrid, it’s a roll of clear film that comes attached to a paper backing. You cut it into strips, peel the paper backing away, and apply the film to the back of rulers. Invisigrip works very well at keeping rulers from sliding on fabric but it does have a couple of disadvantages.
First, the film can loosen from the back of the ruler over time and need replacing. Second, after a package has been open a while, it becomes stale. That is, it becomes impossible to separate the film from the paper backing, rendering the rest of the roll unusable. I tried sealing the roll in a Ziploc bag between applications but it still got stale.
I found myself buying a new package almost every time I got a new ruler. Over the years I have spent a fair amount of money on this product. NexCare tape is much less expensive — I think I paid around $4.50 for this double-roll package containing 20 yards — and it is very easy to apply.
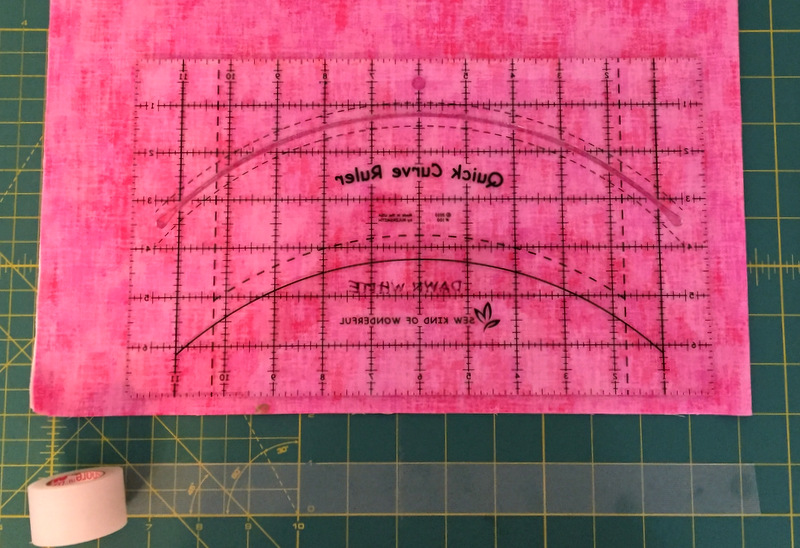
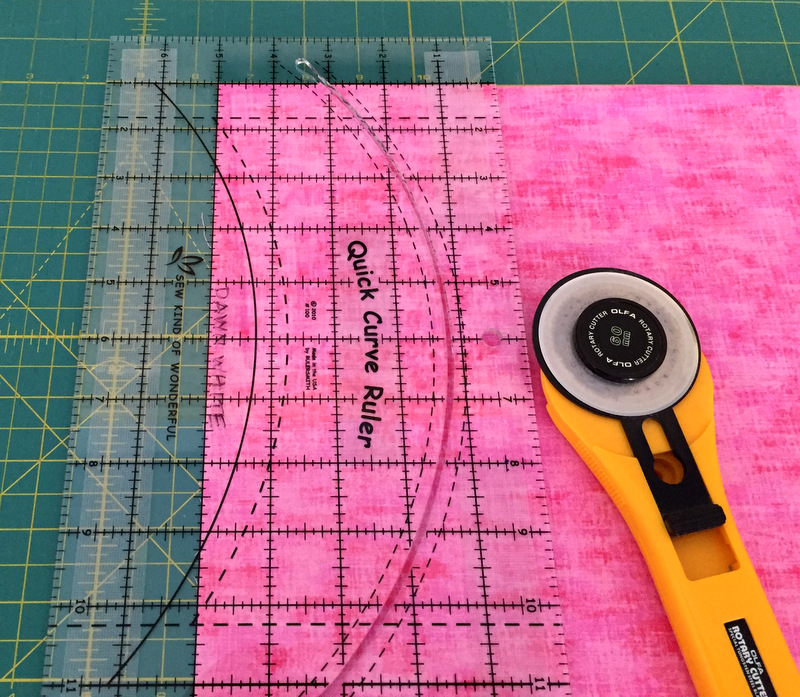
All you have to do is unroll the length of tape you need, cut it with scissors, and apply it to the back of the ruler. But, being a bit of a neatnik when it comes to my sewing tools, I like to use my rotary cutter to cut straight lines so the tape lines up with the lines on my rulers. In the photos below I’m putting it on the back of a specialty ruler that I use a lot, the Quick Curve Ruler.
I place the ruler wrong side up on my cutting mat. (I put the ruler on a piece of fabric here just so you can see the markings better.) Below the ruler I unroll a length of tape the same length as the ruler, following the marking lines on the cutting mat, and press the tape onto the mat:
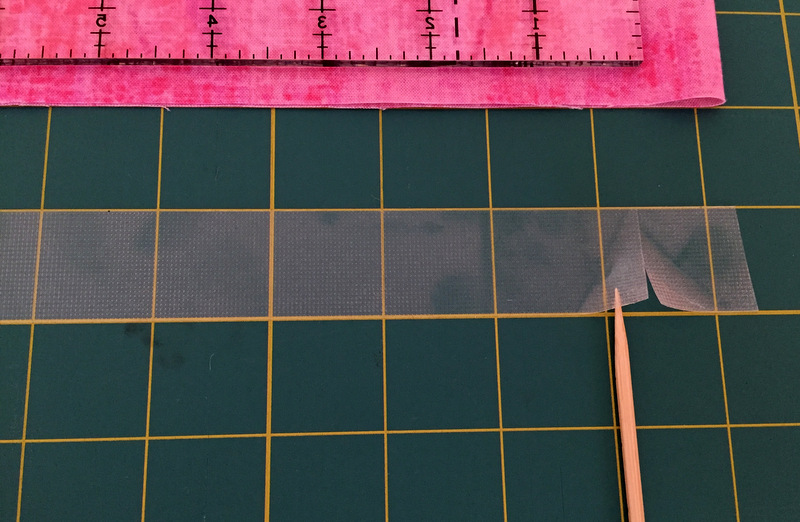
Next I trim the ends of the tape with my rotary cutter, allowing a ¼” margin between the end of the tape and the edges of the ruler. I use a stiletto (a bamboo skewer, actually) to lift up the edges of the tape where it was trimmed . . .
. . . and then peel the strip of tape off the mat.
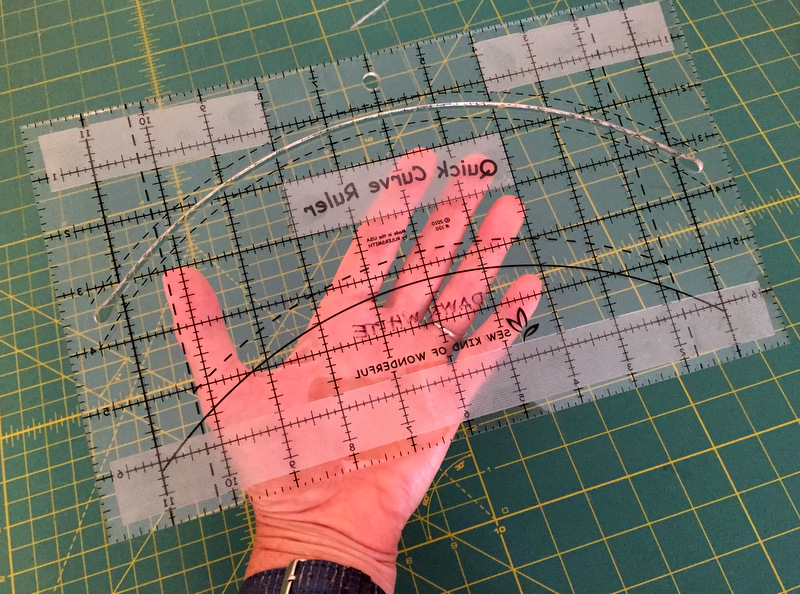
Using the markings on the ruler itself as a guide, I lay the strip of tape on the ruler, positioning it a quarter of an inch from the edges, and press it in place with my fingertips. Here you can see that I added strips to the top of the ruler, leaving the area around the hanging hole clear, and added an extra stabilizing strip under the curve cut-out.
You can put strips around all four sides of the ruler if you wish. You can put them anywhere, for that matter. Because the cutting channel on the Quick Curve Ruler comes within a half-inch of the sides, I opted not to put strips there, adding the stabilizing strip in the center instead.
When I’m ready to use the ruler, I can see clearly through the tape:
Pretty nifty, don’t you think?
Updated added June 21, 2019: Since posting this tutorial I have learned that Nexcare tape tears evenly because it has a slight grid embedded in it. If you want to avoid the steps of placing the tape on a mat and cutting it with a rotary cutter and if you’re not particular about the exact length of the piece that you are applying, simply tear off the amount you think you need and put it on the back of the ruler. Easy peasy.

 The colors are Christmas-y but the prints are not, making the pillowcases appropriate for use all year round.