 In my last post I showed you some face masks I made following ER nurse Jessica Nandino’s tutorial posted on a craft website called instructables.com. Jessica’s pattern calls for cutting strips from cotton fabric but I made my first few masks using packaged double-fold bias tape in ¼” and ½” finished widths. I wanted to give ⅜”-wide tape a try, thinking it might be more suitable — less bulky than half-inch wide tape but more substantial than quarter-inch — knowing I would have to make my own. I don’t think ⅜”-wide tape is made commercially. Even if it were, I wouldn’t be going to the store for some. This is all about making do with what’s on hand.
Some of my readers were interested in my experiment so I’m showing you the result.
This is what Jessica’s mask looks like when the two layers are stitched together:

Next step is pinning and stitching three pleats on each side of the mask. Normally when you sew, the fabric you are handling is to the left of the needle. In the photo below, the fabric is to the right of my needle. This enables me to sew with the pleats rather than against them:

(When I sew the other side, the mask will be to the left of my needle, the normal way, and I will also be sewing with the pleats rather than against them. And just so you know, I remove each pin before stitching the folds in place.)
To make my binding strips I cut several strips of fabric 1½” wide, cutting on the crosswise grain (from the fold to the selvages). I could have cut bias strips but I wanted to try it first with straight grain fabric, which would give me at least 40″ lengths (no need to piece the strips). Another plus: no struggling to iron folds in stretchy bias strips.
Double-fold tape is pressed in such a way that one side of the tape is slightly narrower than the other (from the fold to the outside edge). The narrow side always goes on the right side of the fabric. When fabric is inserted into the fold of the tape, the wider side of the tape, underneath, is caught in the line of stitching from the top.
Here’s a piece of double-fold bias tape opened up:
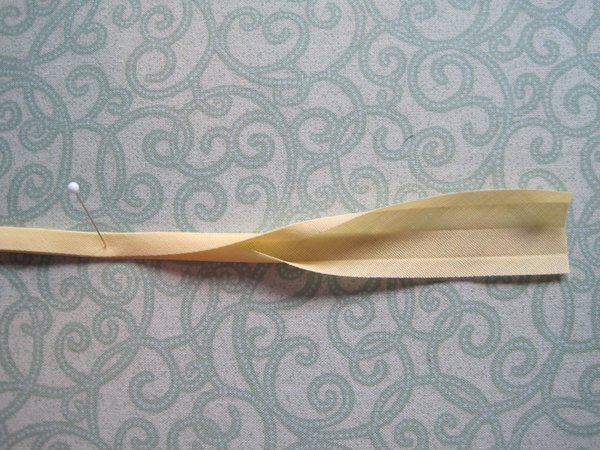
You can see three press lines: there’s a fold in the middle, then each end is pressed toward the middle. That’s exactly how I folded my strips, with one long edge pressed a full quarter-inch and the other side a scant quarter-inch, giving me the result you see below:

My finished binding actually measures a little over ⅜” wide. Next time I’ll cut my strips 1⅜” wide.
Now I’m ready to encase the left and right sides in my binding. The raw edges of the mask are snuggled up to the center fold of the binding:

The binding is folded over the seam allowance and pinned in place:

This is how it looks from the back:

The binding is stitched from the front through all layers. You can see how the stitching caught both layers:

The ends have been trimmed . . .

. . . and now it’s time to add the top and bottom strips, which measure about 40-42″, depending on the width of fabric after selvages are removed.
I mark the middle of one strip and match it with the dart in the center of the mask (remember, there’s a nose dart and a chin dart in Jessica’s pattern). I put in three pins only: one at the dart, one where the side of the mask meets the top strip, and one between those two. The pins go through all the layers:

Now I’m ready to start stitching at the far end of the strip, holding the binding in place as I stitch very close to where the two folded edges meet. When I get to the center dart, I insert the next section of mask fabric into the center of the binding fabric and continue stitching, stopping as often as I need to adjust the layers of fabric. My stitch length is short — 2.2 on a computerized machine or about 12 stitches to the inch — because the binding strips are going to get some stress when they are tied behind the head.
I don’t bother finishing the ends of the strips because I’m going to trim them at a 45 degree angle when I’m done . . .
 . . . and it’s quite likely that someone winding up with one of my masks will find the strips too long and want to trim them anyway. As long as the ends are trimmed on the diagonal, they shouldn’t ravel, even after being washed multiple times.

My experiment turned out pretty well although the straps still feel just a tad bit bulky. For the next mask I might try making bias binding to see if it makes a noticeable difference. By the way, I like the fabric on this mask so much — it’s from an older line called “Birdie” by Pam Kitty Morning for Lakehouse Dry Goods — that I’m keeping it for myself. The mask I was wearing in my last post was laundered and mailed to my twin sister in Georgia.
I hope you are all staying as safe and protected as you possibly can and maintaining social distance. It’s the least we can do . . . and it’s so terribly important. As I continue to shelter at home, I have some great advice to follow: Keep Calm and Sew On.
 I wanted the long skinny doors to really stand out, like rays radiating from a sun, so I cut them all from black and green solids. I thought the effect might be diluted if I used prints.

