Category Archives: tutorial

More Marvelous Mitts

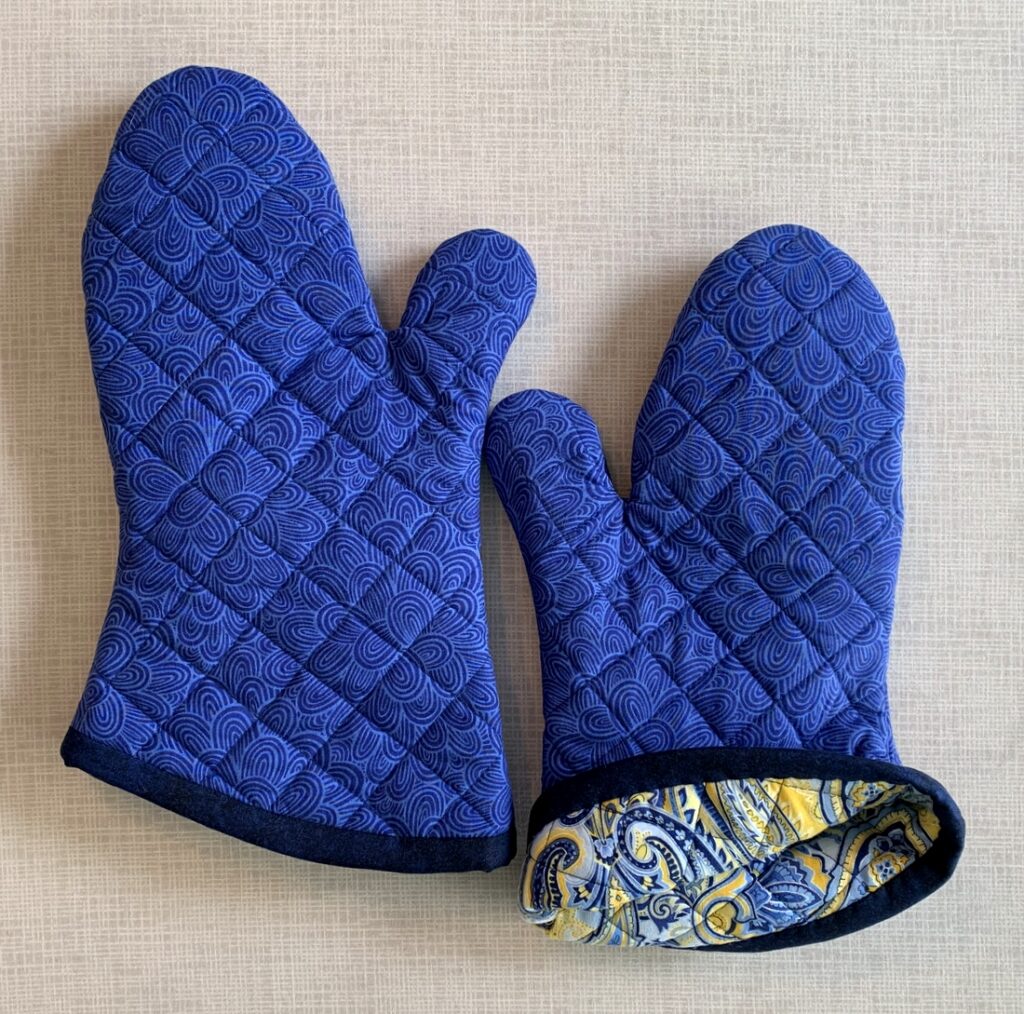
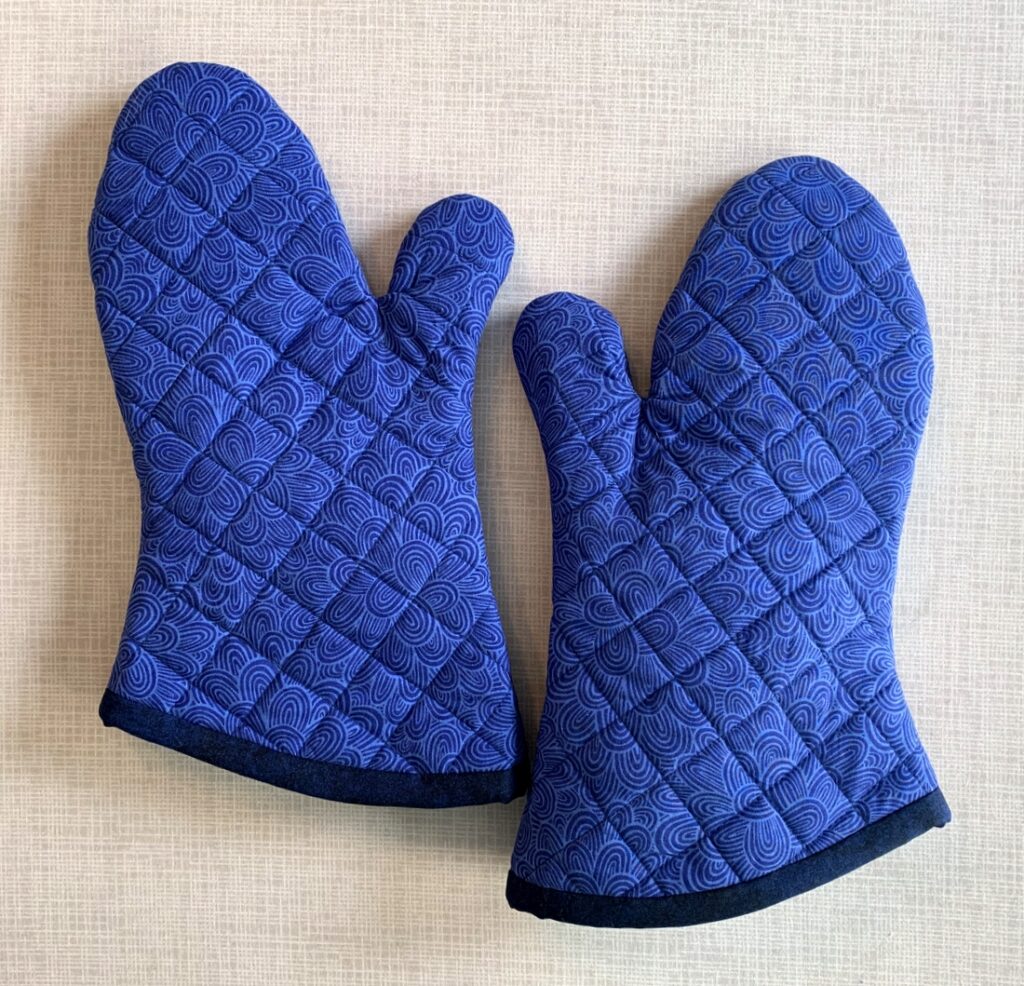
Oven mitts, that is. I’ve made a few pair recently for friends and family. Tracy’s mitts are a royal blue tone-on-tone floral:

I quilted a 1″ grid which offers a pleasing contrast to the curves of the petals. The lining fabric is a bright blue and yellow paisley print with just a touch of silvery metallic:

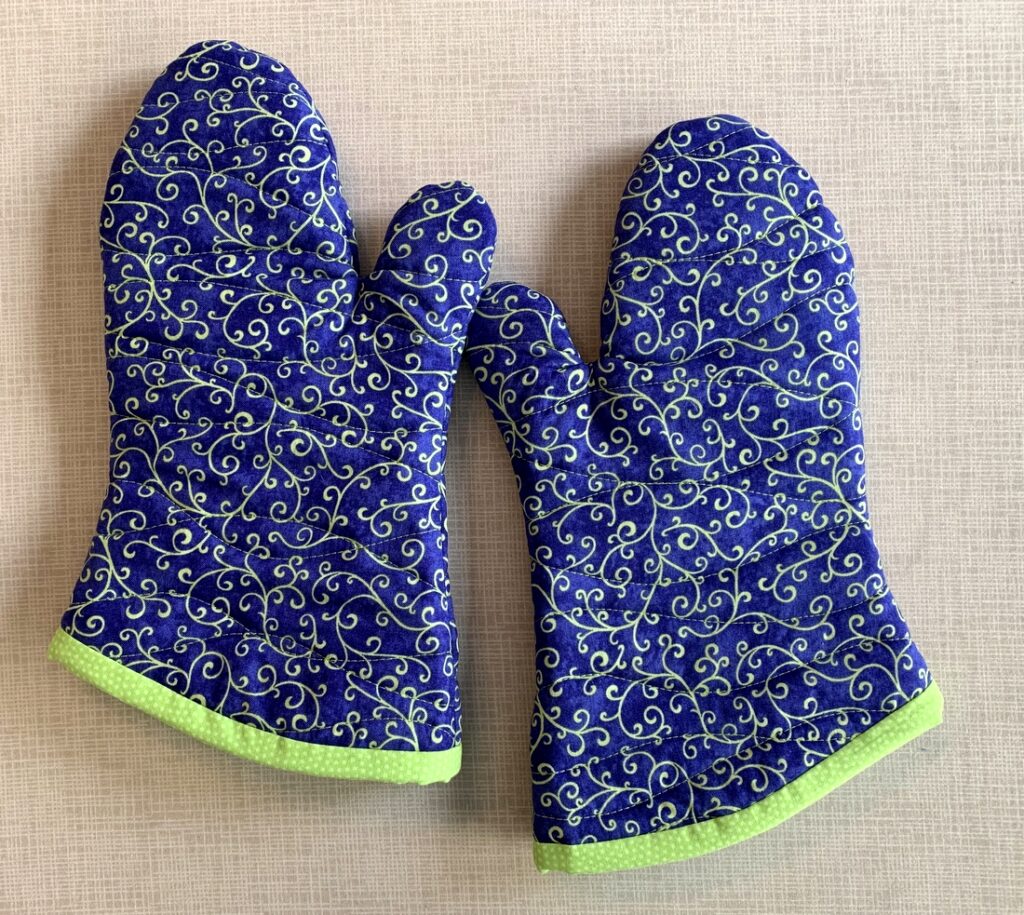
Jeanne Ann’s mitts are made of a blue and green filigree fabric that I’ve used in several projects:

These were quilted with random wavy lines, a design I like a lot and can do easily and quickly using my walking foot (no marking lines needed). The lining is the same dotted fabric used for the band at the cuff.

I love that filigree fabric so much I scoured the Internet last week for more and was lucky enough to find a yard. I’m tempted to make a pair of mitts for myself out of it. But wait! I’m using that fabric — as well as the royal blue floral in Tracy’s mitts — in my current Sea Sampler project so I’d better move the idea of new mitts to the back burner. (I don’t need new mitts in any case; the ones I made two years ago look almost new, despite having made multiple trips through the washer and dryer.)

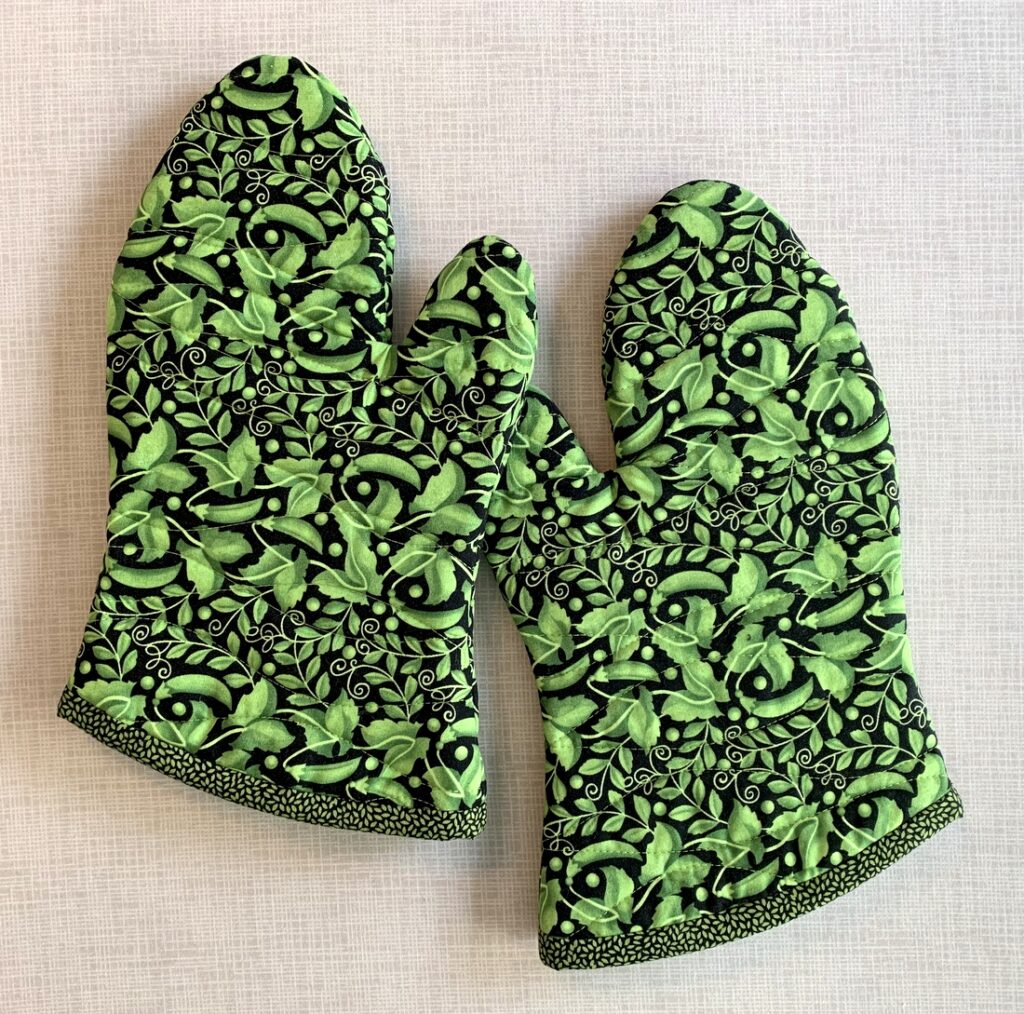
My friends David and Ken embarked on a major kitchen remodel last year so I told them I’d make them a pair of mitts as a “kitchen warming” present. The remodeling project was drawn out much longer than expected due to the pandemic. Shipping delays, mostly. But their kitchen is finished now and so are their mitts:

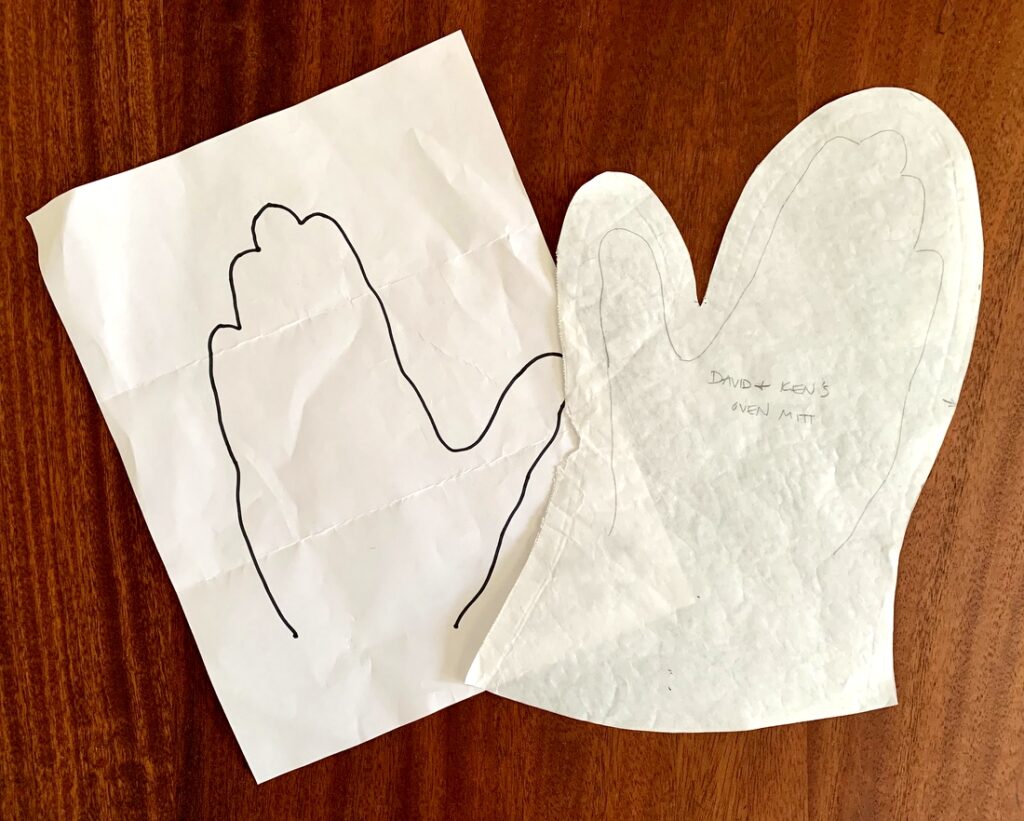
David gave me an outline of his hand so I could make a custom pattern:

These mitts are considerably larger than the other ones I’ve made so far. In fact, they’re close to the “one size fits all” mitts one sees in the stores – the ones that are too big for me, which is precisely what led me to make my own pattern last year, followed by a tutorial.

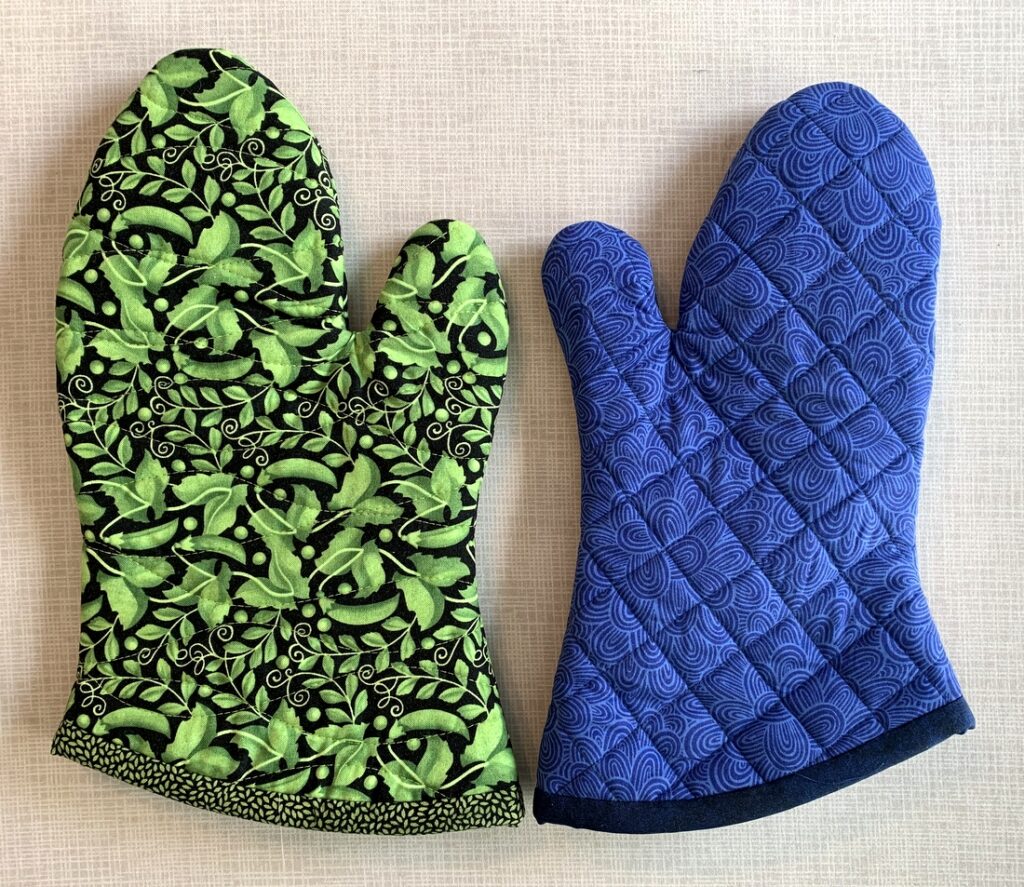
Here’s one of David and Ken’s mitts next to one of Tracy’s:

Quite a difference, eh?

Are you ready to make yourself a pair of oven mitts? You can either use my free pattern or follow my directions (in the Prequel to the Tutorial, below) to make a pattern to fit your own hand.

Click here to download the free pattern:
Oven Mitt Pattern, page 1 of 2
Oven Mitt Pattern, page 2 of 2

Oven Mitts that Fit: Prequel to the Tutorial

Oven Mitt Tutorial from First Light Designs, Part 1

Oven Mitt Tutorial from First Light Designs, Part 2


Posted in family, oven mitts, tutorial, update | 5 Comments

First Light Designs: Best of 2021

For the sixth consecutive year, Cheryl at Meadowmist Designs is hosting a “Linky Party,” inviting quilt bloggers to share their top five posts of the year. It’s a fun way to look back on the past 12 months and identify some of the high points as well as see what marvelous things other quilters are creating. So thank you, Cheryl. I’m delighted to join the 2021 party!

Clicking on the links below will take you to the original posts where you can read more about the finishes and see more photos.

Number 1. Best Tutorial:  Oven Mitts that Fit

I’m still waiting for the quilting and crafting world to discover my tutorial on quilted oven mitts. I worked really hard on writing this tutorial and loading it with pictures. So much so that the tutorial is in two parts with a prequel!

Oven Mitts that Fit: the Prequel gives the background for my taking on this project and shows you how to make your own pattern based on the size of your hand.

Part 1 covers fabric requirements, instructions for downloading and printing the pattern, assembling the layers, and quilting the resulting “quilt sandwich.”

Part 2 covers the sewing of the mitt and contrasting band around the cuff edge as well as the final step of tacking the band down before turning the mitt right side out.

These mitts make great gifts for friends and family. I invite you to take a look!


Number 2. Best UFO Finish

Okay, I confess:  This is the only UFO (UnFinished Object) I busted this year. It’s an updated version of the traditional pattern Grandma’s Surprise. I started working on this quilt in 2015 in a class taught by Joyce Gieszler. Her book Then and Now Quilts (Kansas City Star Quilts, 2014) had come out the year before and Grandma’s Surprise was one of the quilts featured in the book. My version of this design is called Currant Affairs (there’s a pun in that name).


Number 3. Best Quilt Made for a Car

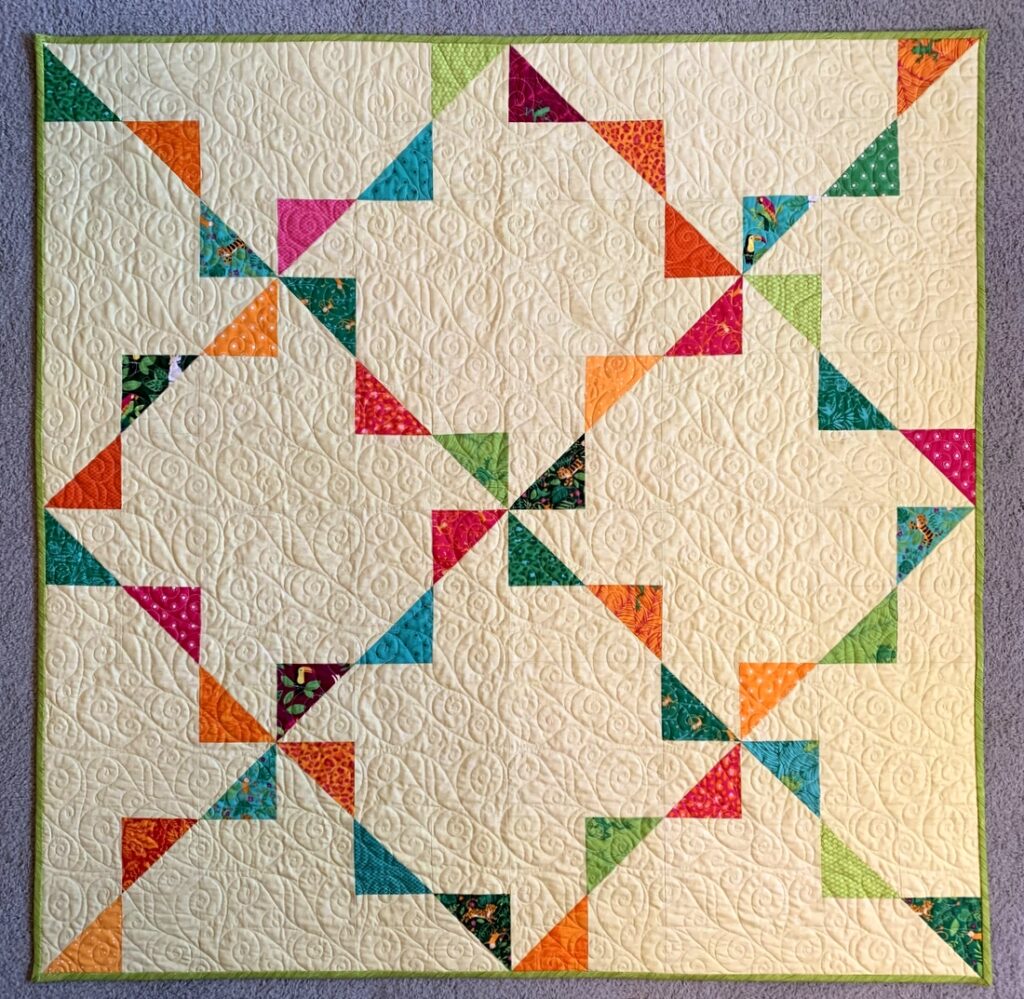
You read that right. I made this quilt for my 2019 Subaru Forester aka the Green Goddess. I’d been wanting to make a car quilt for some time and was prompted to do so when I discovered the line of “Jungle Paradise” fabric designed by Stacy Iest Hsu and the free (and very easy) pattern State Fair by Melissa Corry. This is my Green Goddess Car Quilt.


Number 4. Best Quilt Made from a Jelly Roll

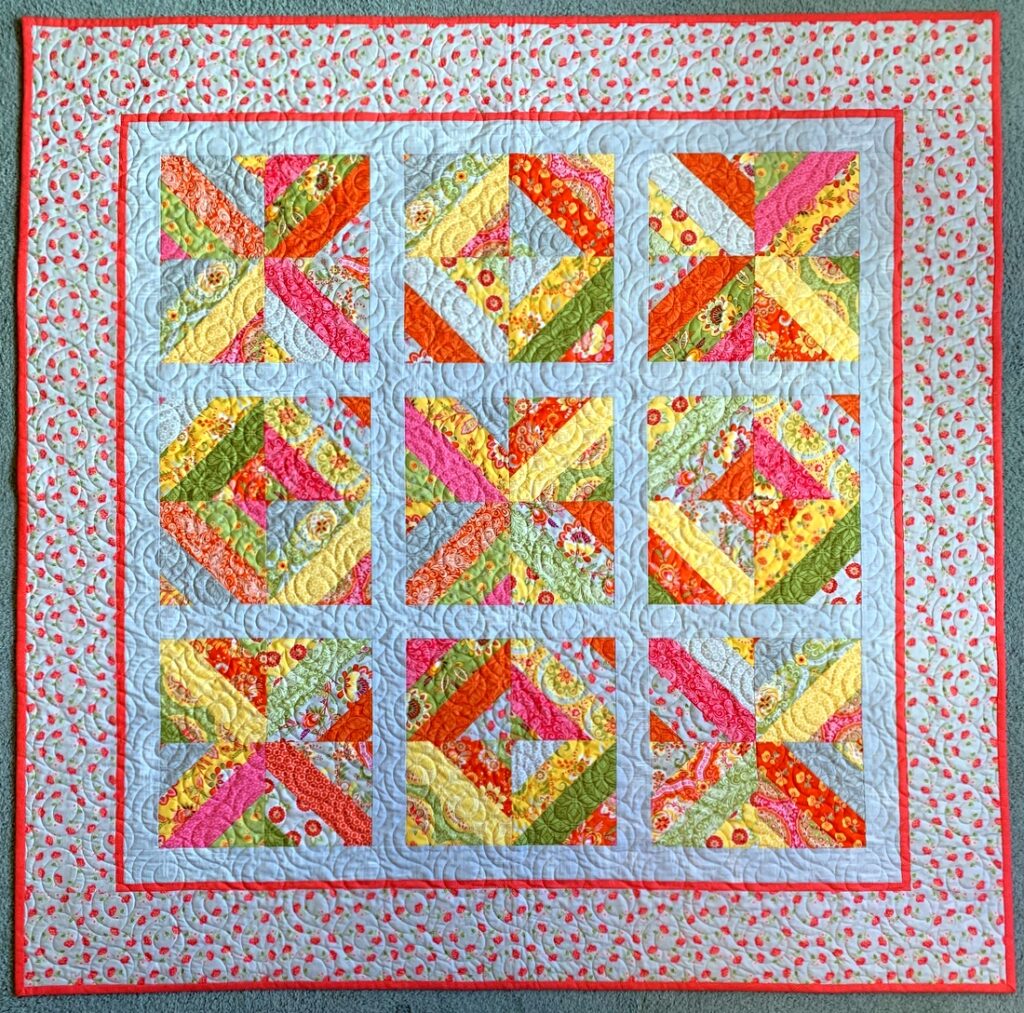
I don’t use precuts very much, mainly because I like to prewash my fabrics. But in my stash was a Jelly Roll (2½” strips) of “High Street,” a line of fabrics by Lily Ashbury for Moda Fabrics. I used the Jelly Roll in a free pattern called Tea Time in Bali and wound up with a quilt I named Tea Time on High Street.


Number 5. Best Red and Green Quilt

It’s a tie! I made two quilts this year using red and green fabrics. First up is ‘Tis the Season:

It’s actually my first quilt finish of 2021 but I saved it for the fifth slot because we’re still celebrating the season. ‘Tis the Season was made using the Missouri Star Company’s pattern Quatrefoil and Corey Yoder’s fabric line called “Holliberry.”

My second red and green quilt of 2021 is the very recently finished Winterwood, based on my pattern Season to Taste:

It can be a wall hanging or a table runner. I gave it to my sister Diane for Christmas so now we know: it’s a table runner:


With five days left in the year, there’s a good chance I’ll be able to add a third red and green quilt to the mix. (You may see it in next year’s Linky Party.)

Be sure to check out the top five posts of the other quilting/blogging partygoers. If you’re a quilter, you can join Cheryl’s Best of 2021 Linky Party, too. The link is open until January 2. Thank you for visiting First Light Designs. All the best in 2022!


Posted in home dec, kaleidoscope quilts, oven mitts, Quatrefoil, single-fold binding, State Fair quilt pattern, table runner, tutorial, update, wall hanging | 8 Comments

“Just So”

In my last post I promised to explain my method of getting the narrow accent strips on my kaleidoscope blocks to line up just so:


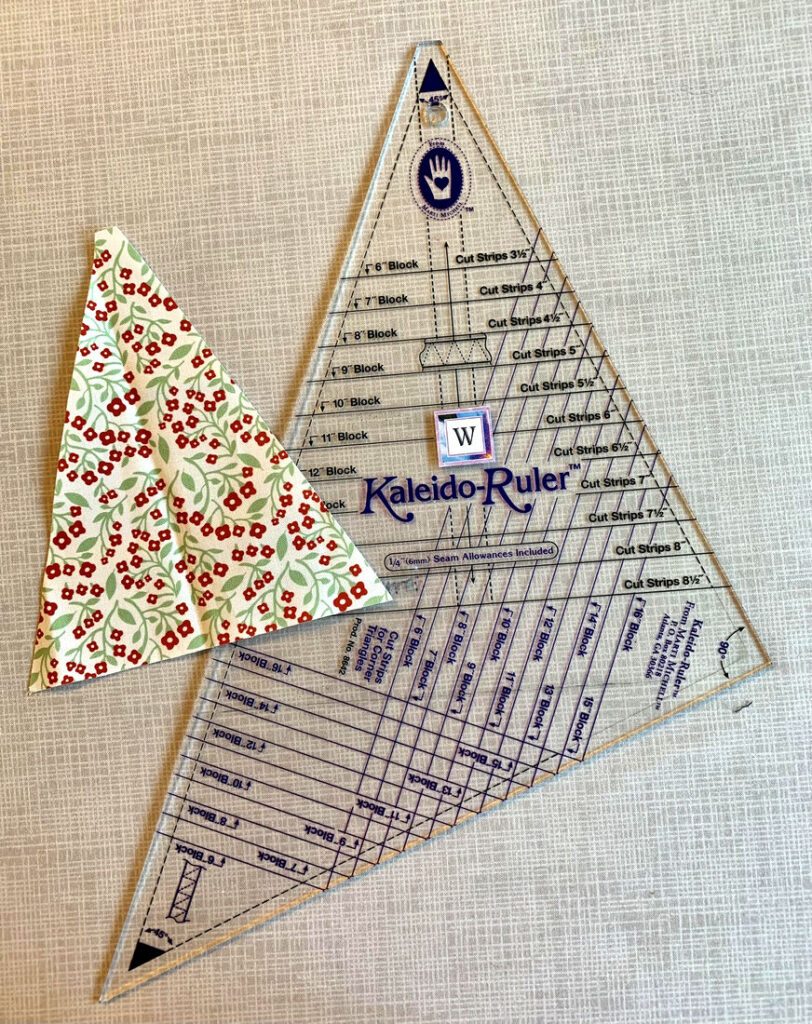
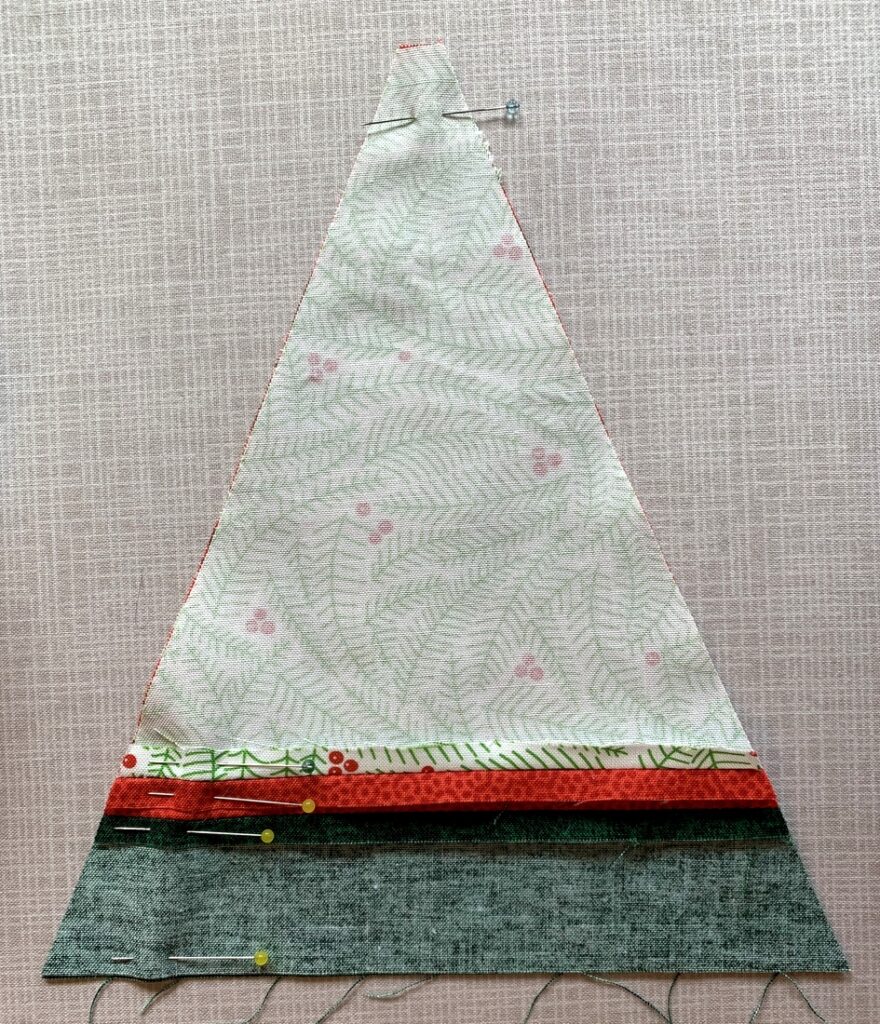
In this example I’m starting with a 45˚ triangle cut from a 6½” strip of fabric using the Marti Michell Kaleido-Ruler . . .

. . . but this technique will work with other sizes of triangles and strips.

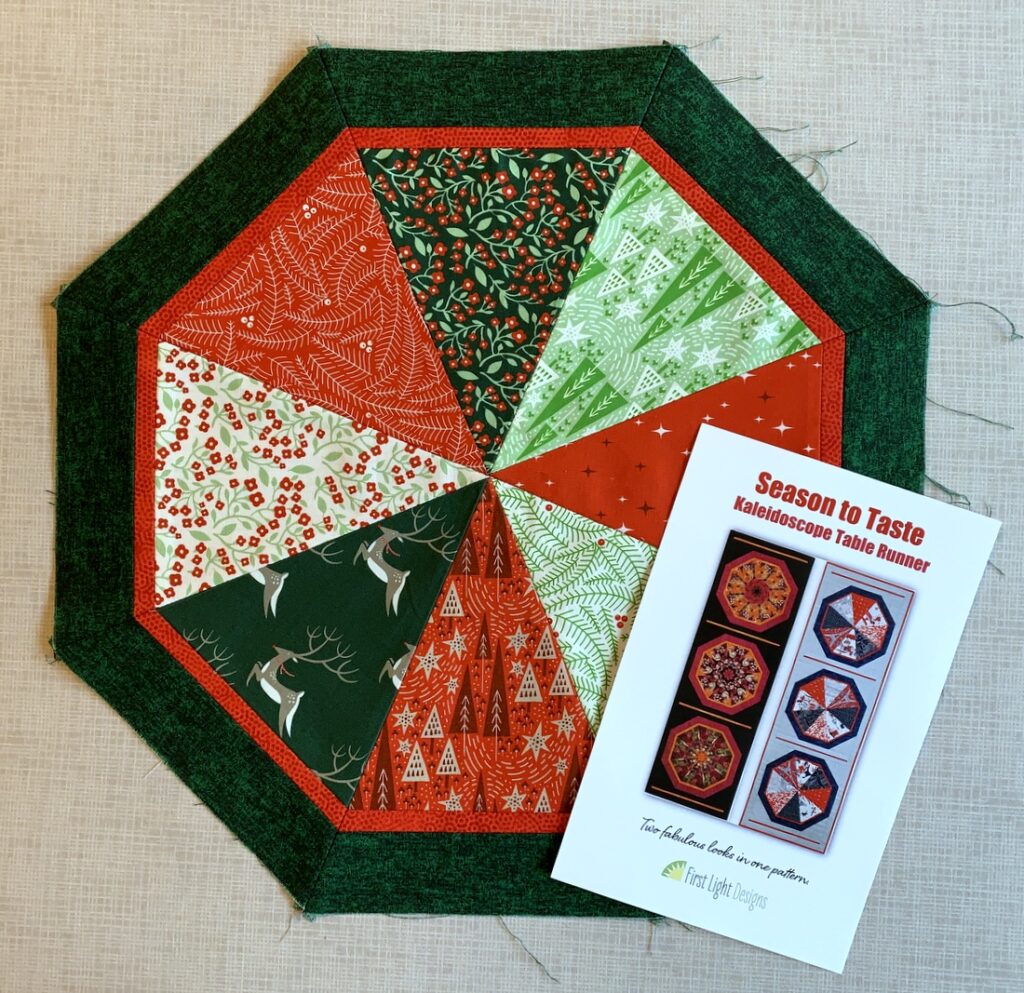
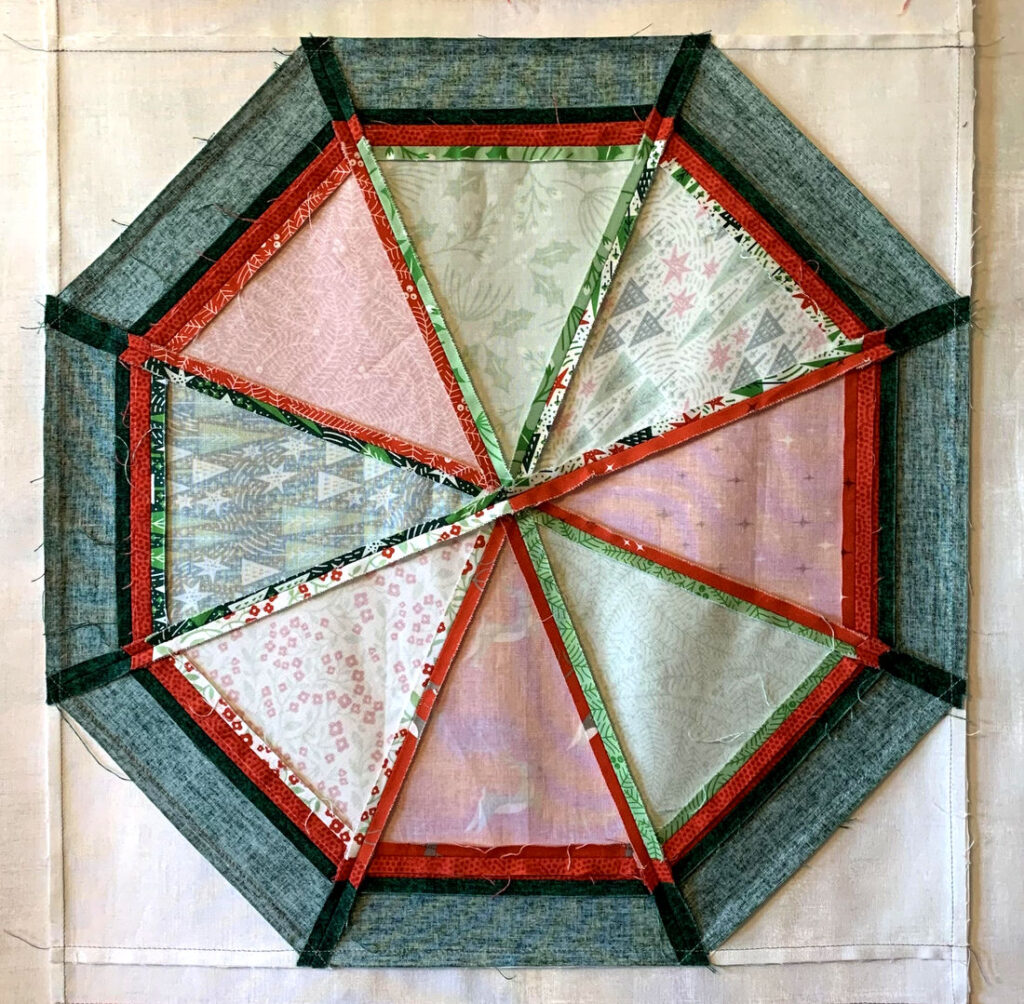
Eight of these triangles (from a 6½” strip) sewn together result in a 12″ kaleidoscope block. With the addition of the narrow and wide accent strips, the block will finish at 15″ square:


The narrow accent strips finish at ⅜”. This calls for ⅞”-wide strips, to allow for ¼” seams on either side but I find it difficult dealing with strips less than an inch wide, especially when it comes to pressing. For this reason I cut my strips a quarter of an inch wider — 1⅛” — and trim them to size after sewing them on to the wider accent strip.

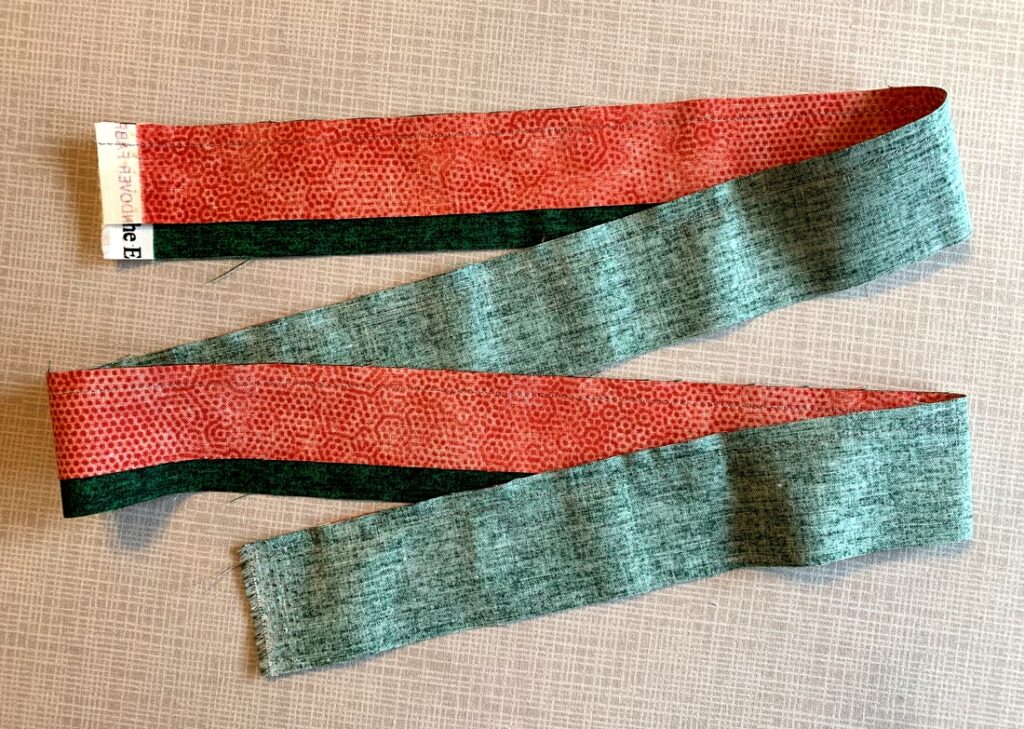
So:  my narrow accent strips are cut 1⅛” x WOF (width of fabric). The wide accent strips are cut 1¾” x WOF. The narrow and wide accent strips are sewn together with a scant ¼” seam:

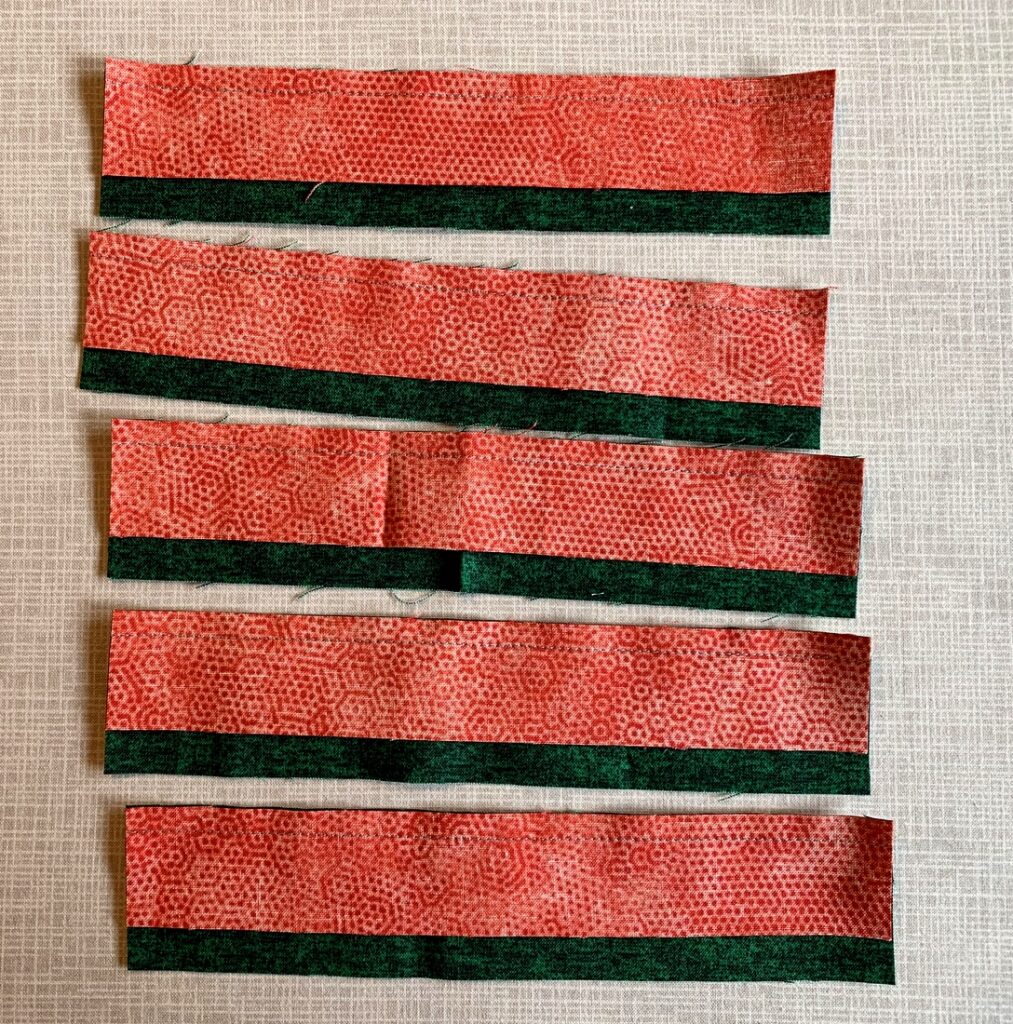
Before pressing the seam open, the strip is subcut into five 8″ lengths:

(I need eight of these strips for one kaleido block so a second strip set is needed.)

Why do I subcut the strip set before pressing? Because it’s extremely difficult to press a seam on a 45″ length of fabric without creating a curve. By cutting my long strip into shorter pieces, I can carefully press the seam on each piece open using just the tip of my iron without much distortion:


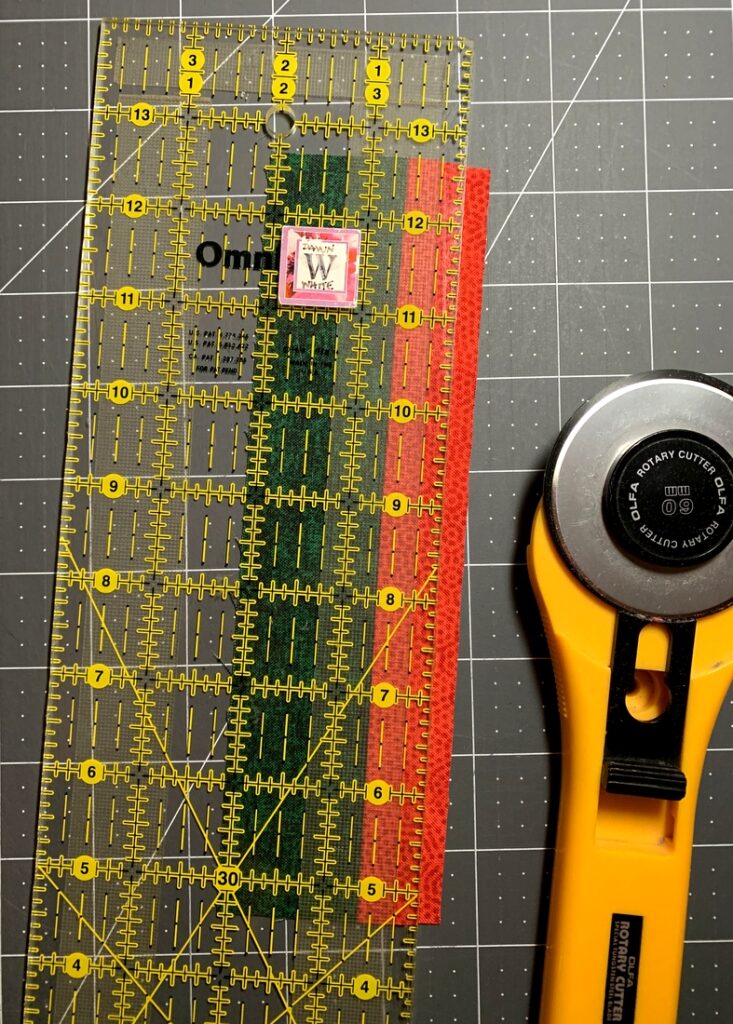
The next step is to trim a quarter inch off the narrow strip. I do this by aligning the ⅝” line on my ruler with the seamline . . .

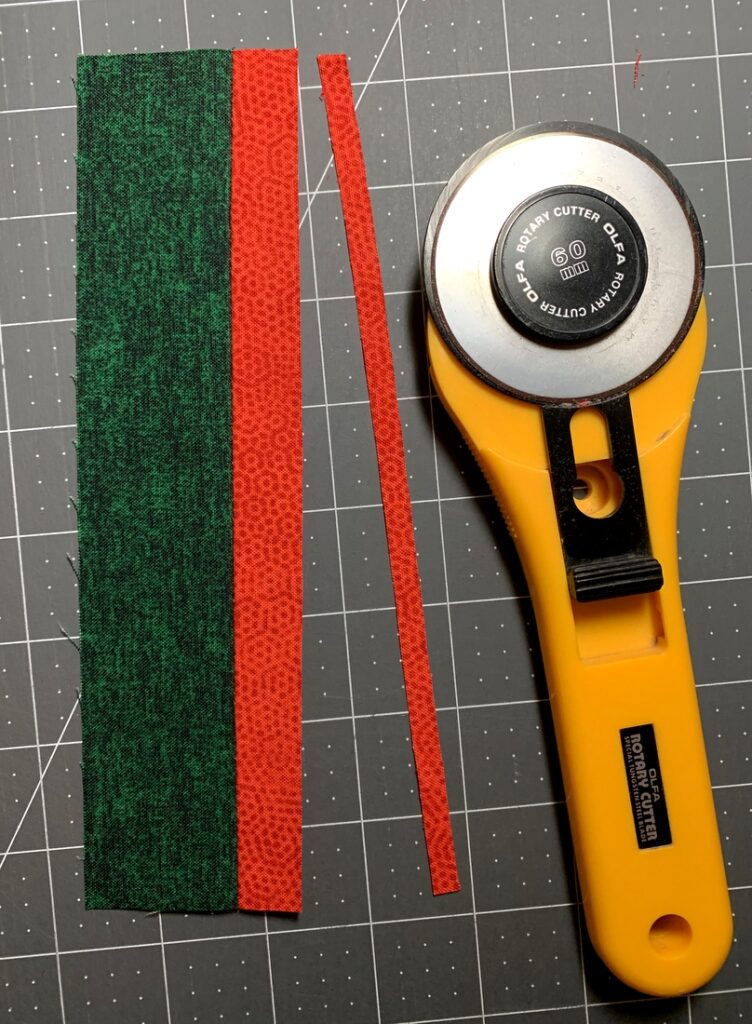
. . . and trimming the excess quarter inch:

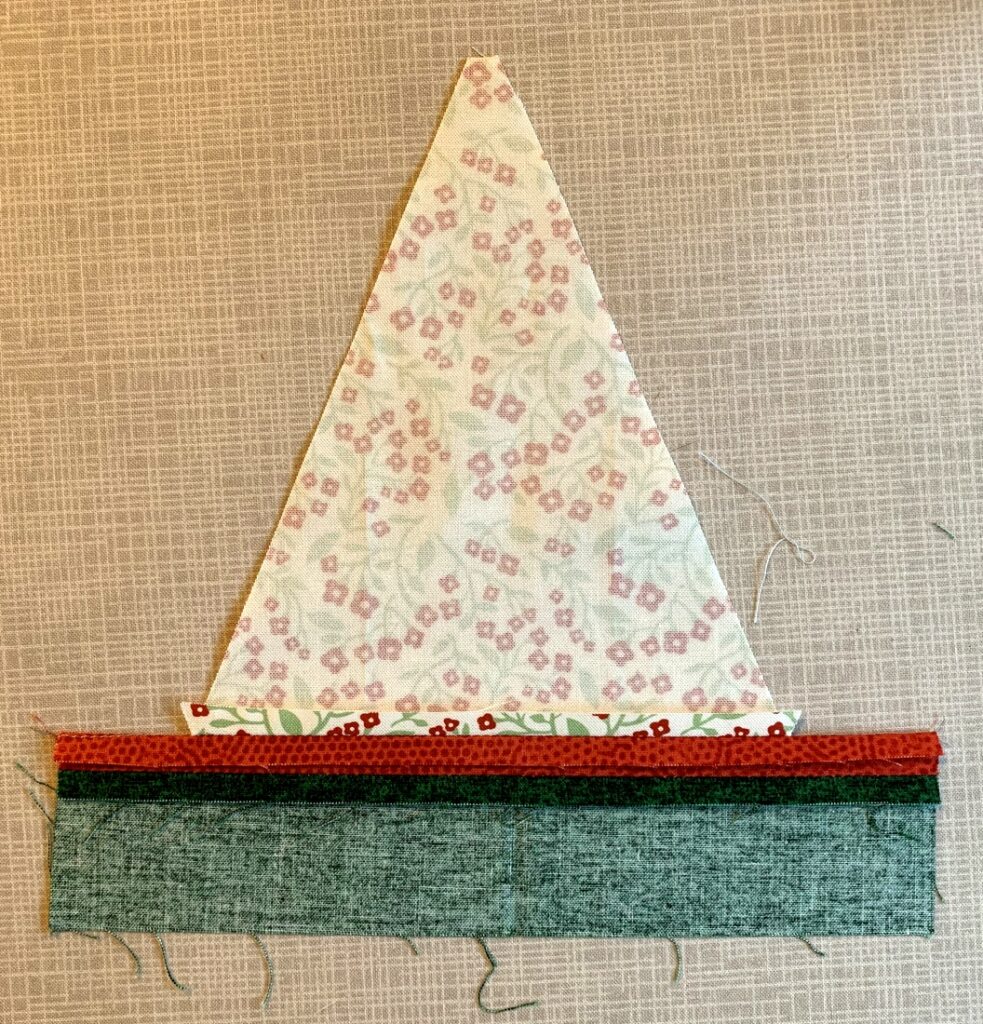
Now I can chain piece the triangles to the trim pieces, centering each triangle on its trim strip:

I press this seam open as well, taking care to use the point of the iron (no steam) and not letting the iron touch the bias edges of the triangle:

Note that with both seams pressed open, the seam allowances on the narrow trim overlap each other slightly.

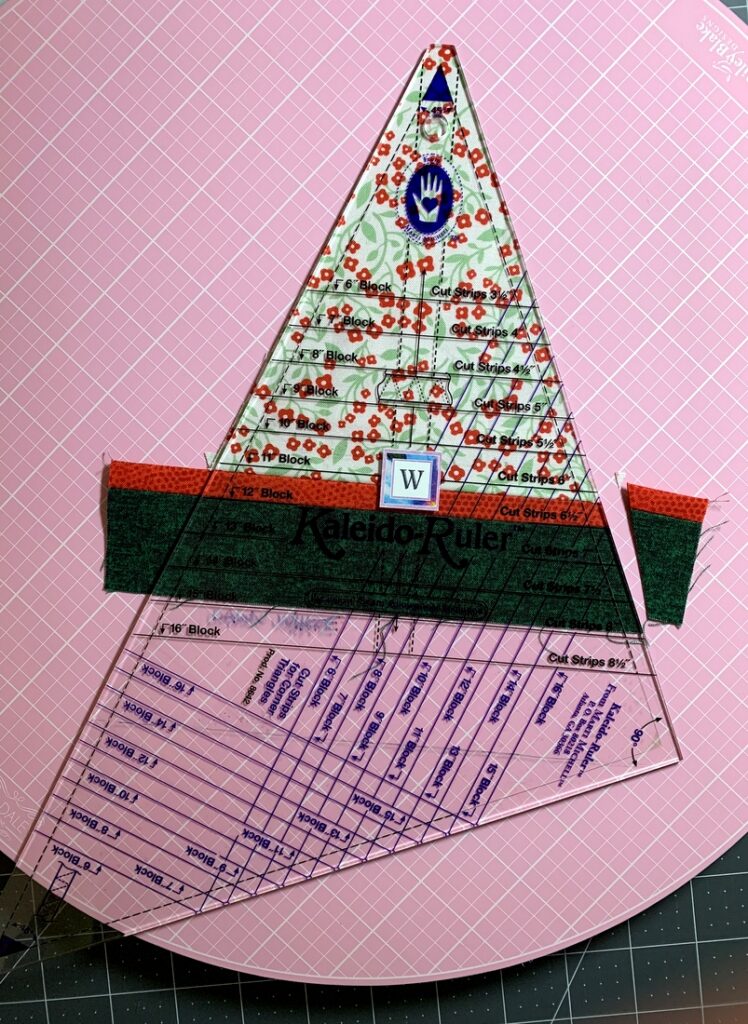
Now I can lay the Kaleido-Ruler over the triangle and trim the right side:

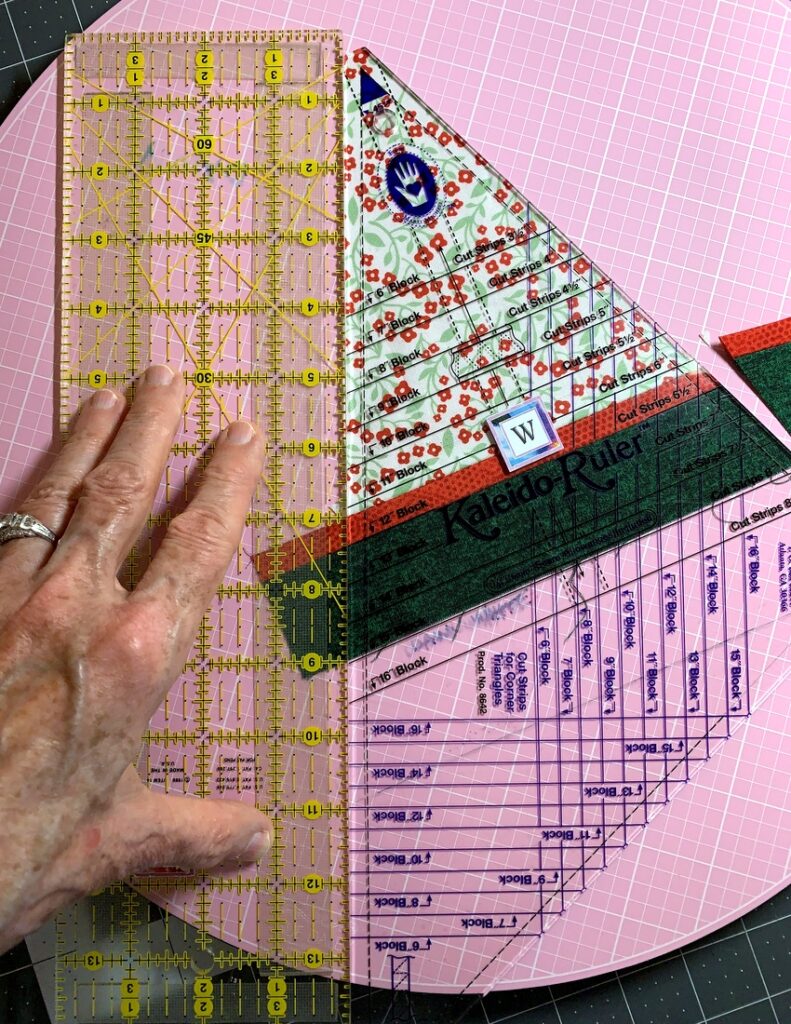
I’m cutting this one on a rotating mat, which means I can turn it around and trim the other side just by moving the mat. If you don’t have a rotating mat, it’s very easy to butt up a second ruler right next to the Kaleido-Ruler . . .

. . . slide the Kaleido-Ruler out of the way, and make the second cut.

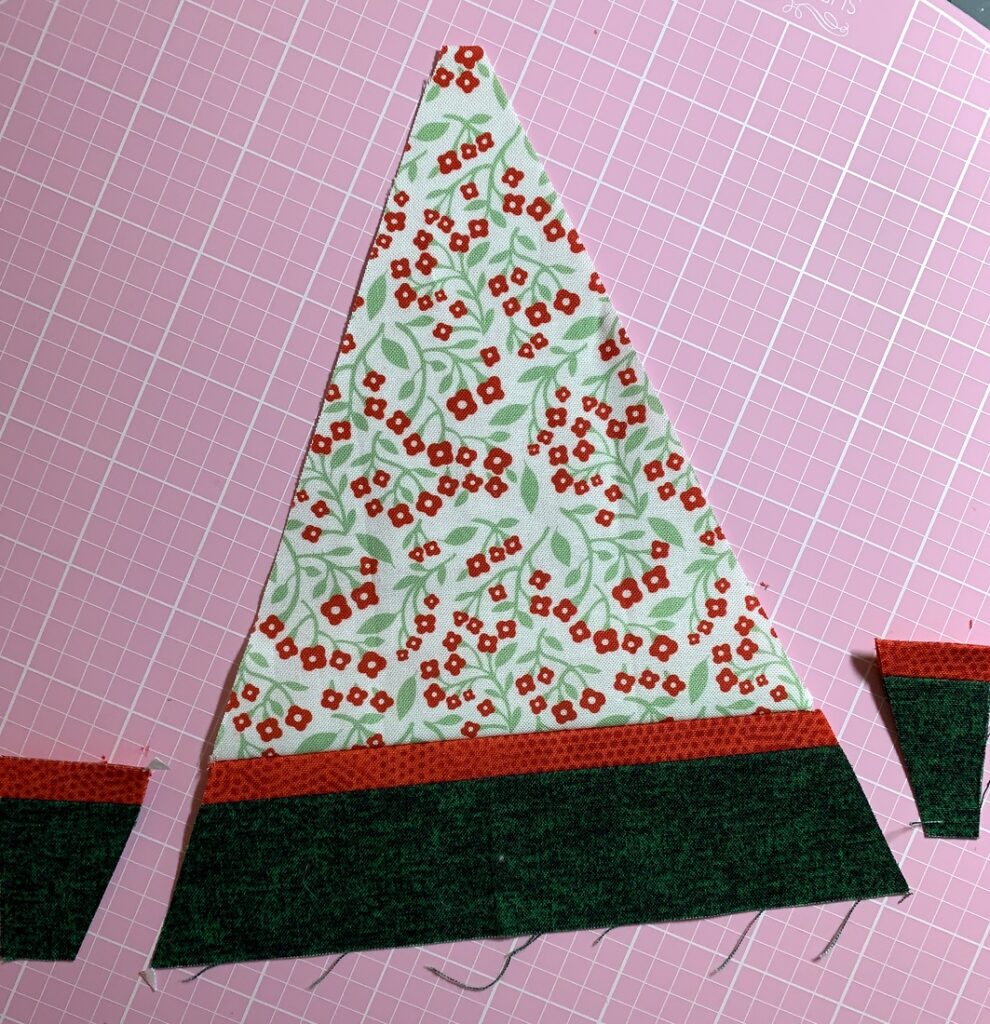
Here’s the trimmed triangle:


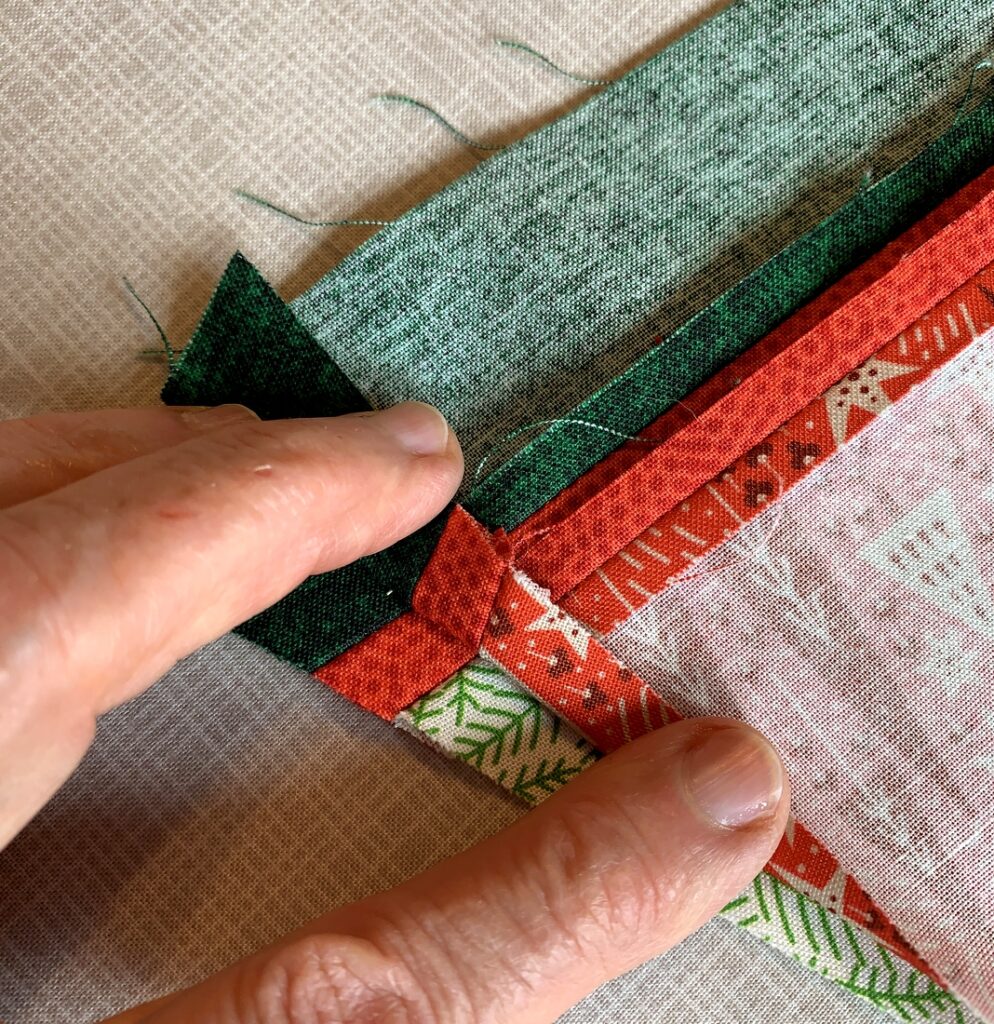
Now to sew it to another triangle! Here’s how I pin the two triangles:

After lining up the seams on the two triangles, I place pins to hold the seams in place. Note that the points of my pins are toward the outside edge. When I flip the triangles over and pull one side back from the edge, I can clearly see that the trim seams on my triangles match exactly:


I can repin if necessary (and sometimes must) to make sure the seams are properly aligned.

When I’m ready to sew the seam — starting from the wide end and going toward the point — I can pull each pin back slightly so that the point is not in the seam allowance, leaving the pins in place until the seam is completely sewn.

The seams are pressed open — again without steam and again using just the tip of the iron to nudge the seams open:


Once the block is complete and I’m satisfied my center points match, that’s when I move the iron setting to steam! I sometimes use a bit of starch or starch alternative (like Mary Ellen’s Best Press) to make sure my finished block lies nice and flat.

I hope you found this post helpful! I’m going to add it to my Tutorials page as a companion piece for my Season to Taste pattern.

Thanks for stopping by — and happy first day of summer!


Posted in home dec, kaleidoscope quilts, table runner, tutorial, update | 5 Comments

Oven Mitt Tutorial from First Light Designs: Part 2 of 2

Welcome to Part 2 of my Oven Mitt Tutorial, which covers the sewing of the mitt and contrasting band around the cuff edge as well as the final step of tacking the band down before turning the mitt right side out.

Part 1 of my tutorial covers fabric requirements, instructions for downloading and printing the pattern, assembling the layers, and quilting the resulting “quilt sandwich.” Click here to see Part 1.

Click here to download the free pattern:
Oven Mitt Pattern, page 1 of 2
Oven Mitt Pattern, page 2 of 2

Click here to see the Prequel to the Tutorial, in which I explain why I decided to write a tutorial and offer some tips on making sure my pattern fits your hand.

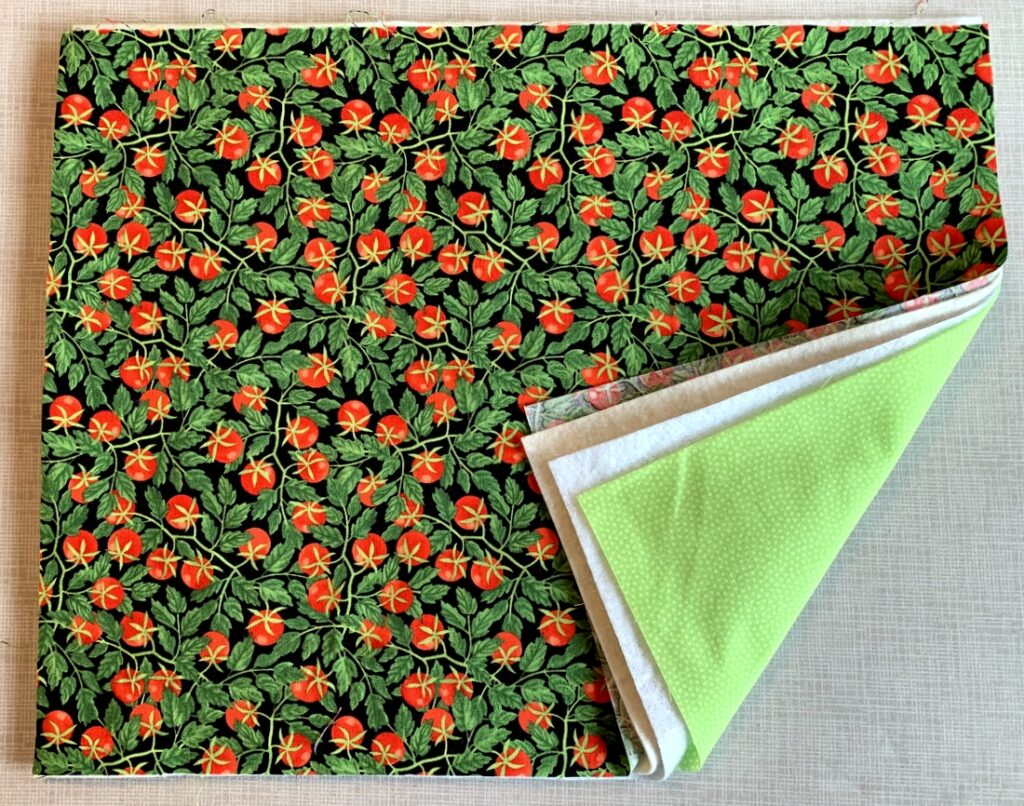
In Part 1 you create a 19″ x 14″quilt sandwich” composed of four layers: outer fabric, cotton batting, insulated cotton batting (Insul-bright), and lining fabric:
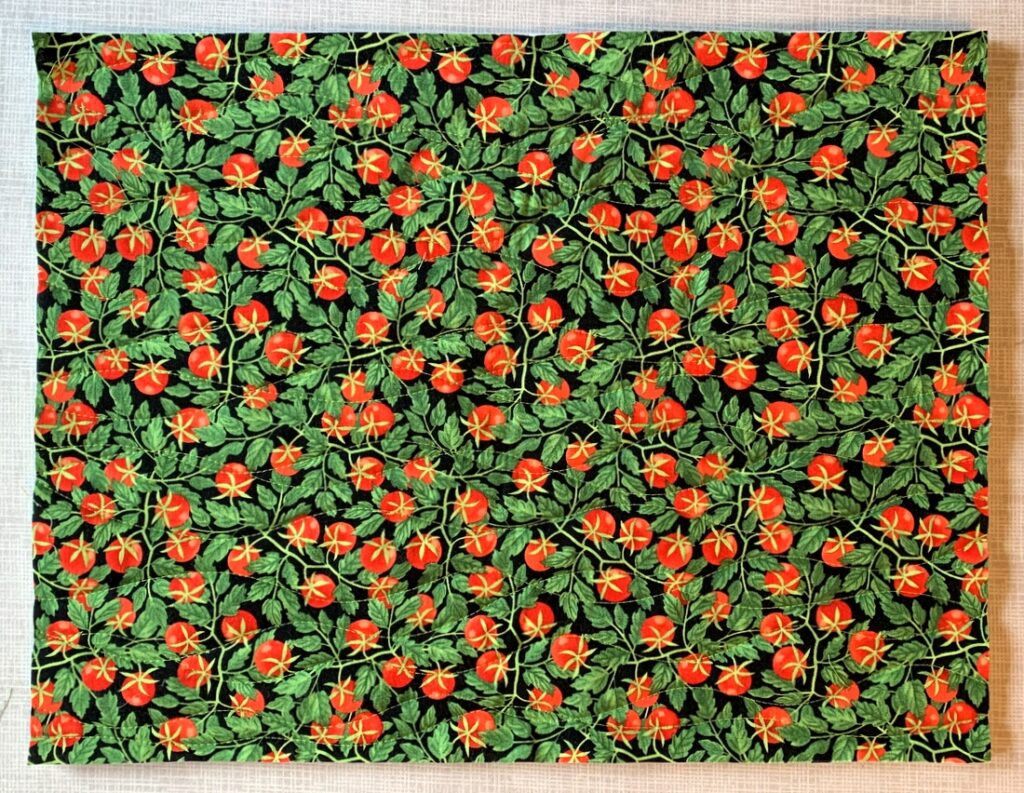
After quilting the four layers you trim them to 18″ x 13″:
Part 2 starts right now!

Fold the quilt sandwich in half, right sides together, with the fold on the left. Lay the freezer paper pattern on the fabric, shiny side down, making sure you have at least a half-inch clearance all around. Use a hot dry iron to press the pattern in place:
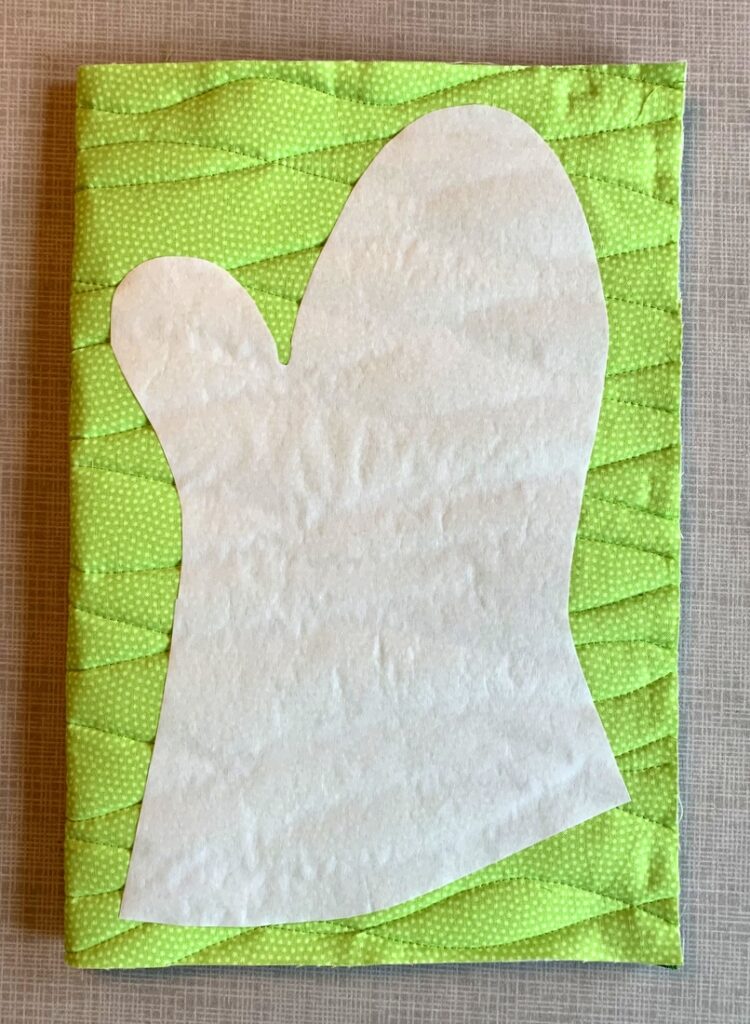

Using a marking pen or pencil, make a small dot on the fabric next to the pattern about halfway down the finger side of the pattern (see arrow in photo below). Draw a line along the edge of the pattern from the dot to the bottom edge. Draw a second line ¼” to the right starting ¼” above the arrow:
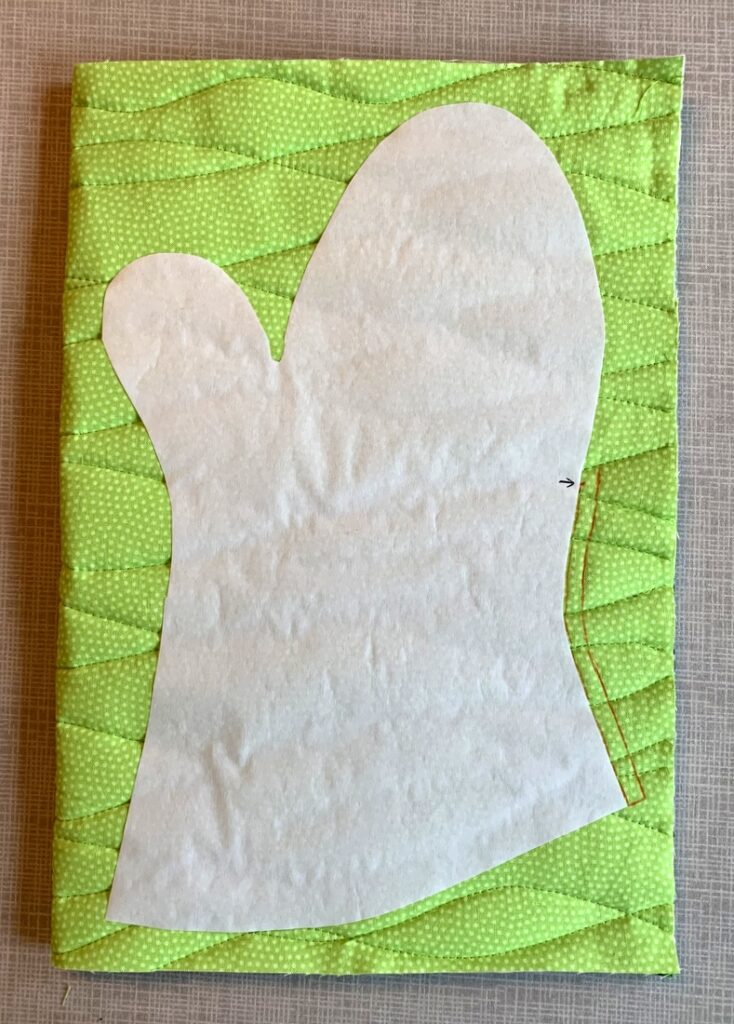
That second line is the cutting line.

Use Wonder Clips around the raw edges of the quilt sandwich. You don’t need a lot of clips – just enough to hold the layers together:
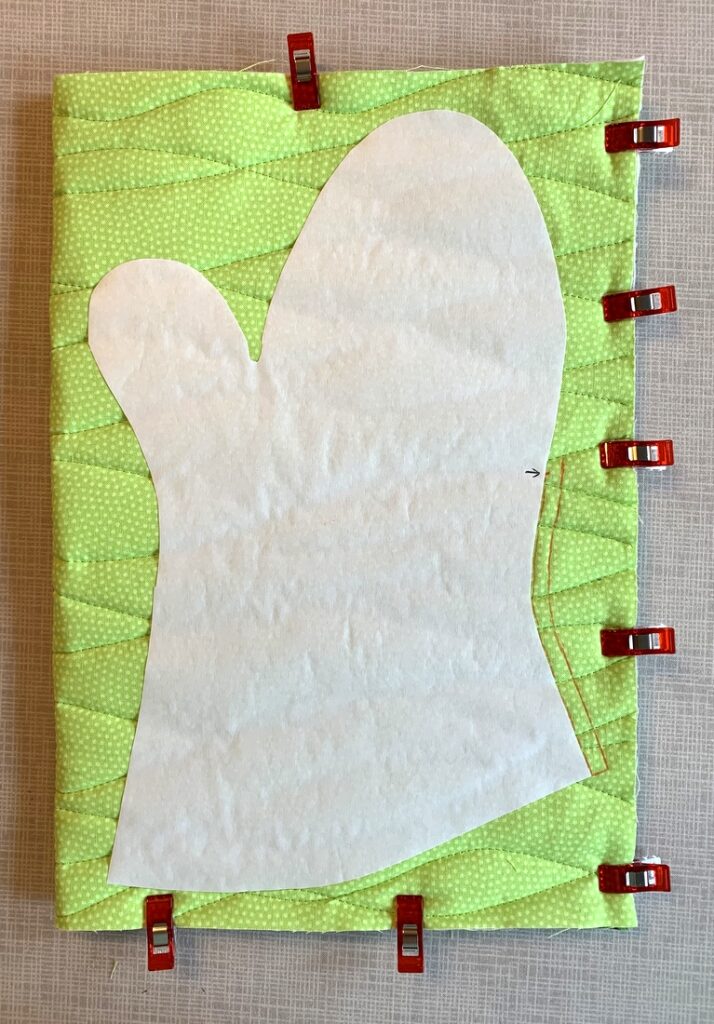

Now you’re ready to sew.

Before you start stitching: make sure the thread in your machine matches the dominant background color of the outer fabric. Once you turn the mitt right side out, you’ll be able to see thread stitches along the seamline. (This is also true of store-bought mitts, by the way.) It’s because you are stitching through eight layers; that’s a big load for two interlocking threads to carry, especially when four of the eight layers have some bulk to them. (There may be times when your bobbin thread is a different color than the top thread. It’s the bobbin thread you are likely to see once the mitt is turned.)

Using an open-toed walking foot, which feeds the eight layers together evenly, sew from the bottom edge of the thumb side of the mitt (see photo below) with the needle right next to the freezer paper, stopping when you get to the dot on the opposite side. Backstitch at the beginning and end of the stitching line.
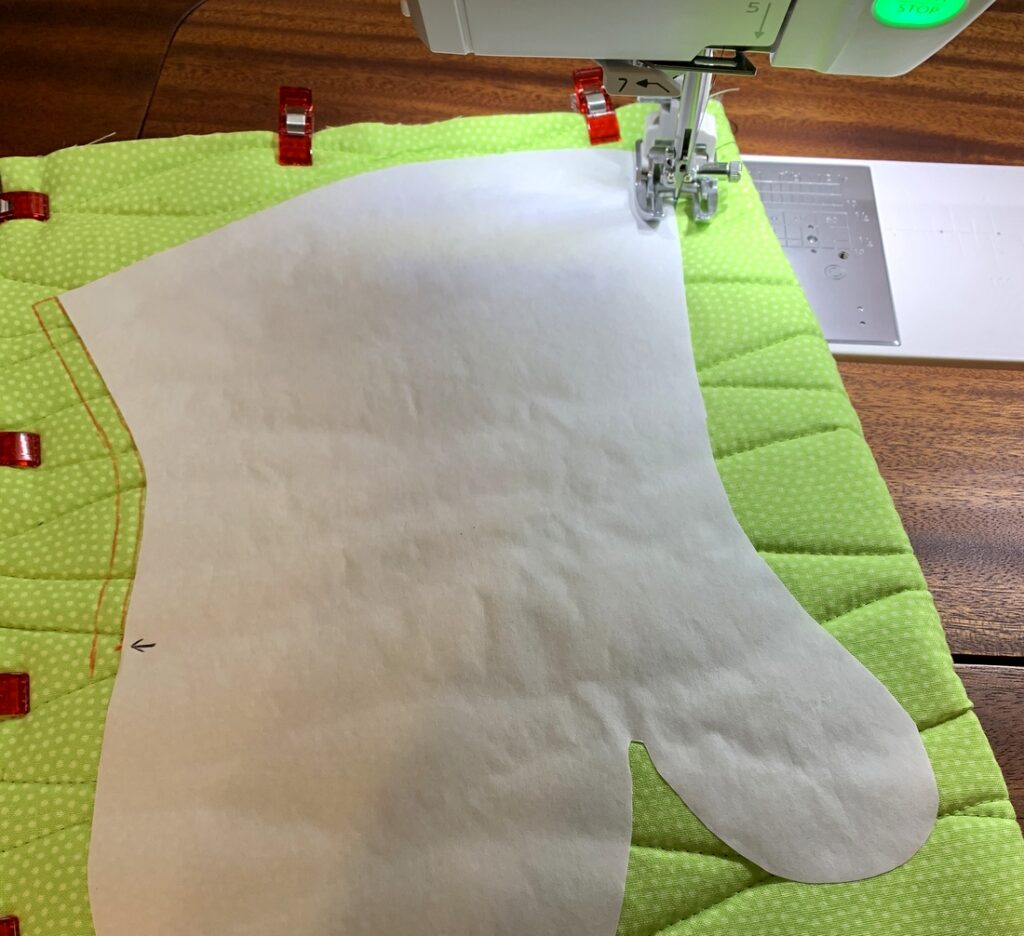
The secret to not getting any sharp points as you stitch around the curves of the thumb and finger portions is to go slowly, stopping when necessary to lift the presser foot and rotate the mitt ever so slightly to keep the line of the curve going smoothly. Any points that get stitched in will be visible when the mitt is turned right side out.

Here’s a close-up of the stitching in process:
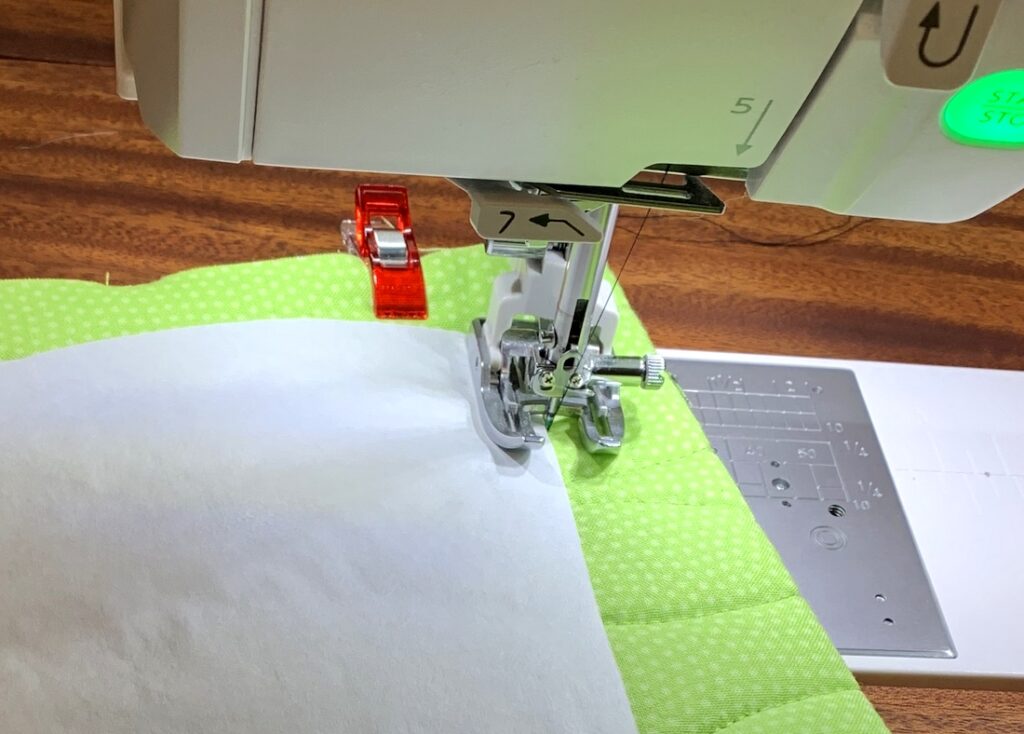
You can see why an open-toed foot is important: you need to see the needle going in and out of the fabric right next to the freezer paper.

Using very sharp sewing scissors, cut along the bottom edge (only) as shown:
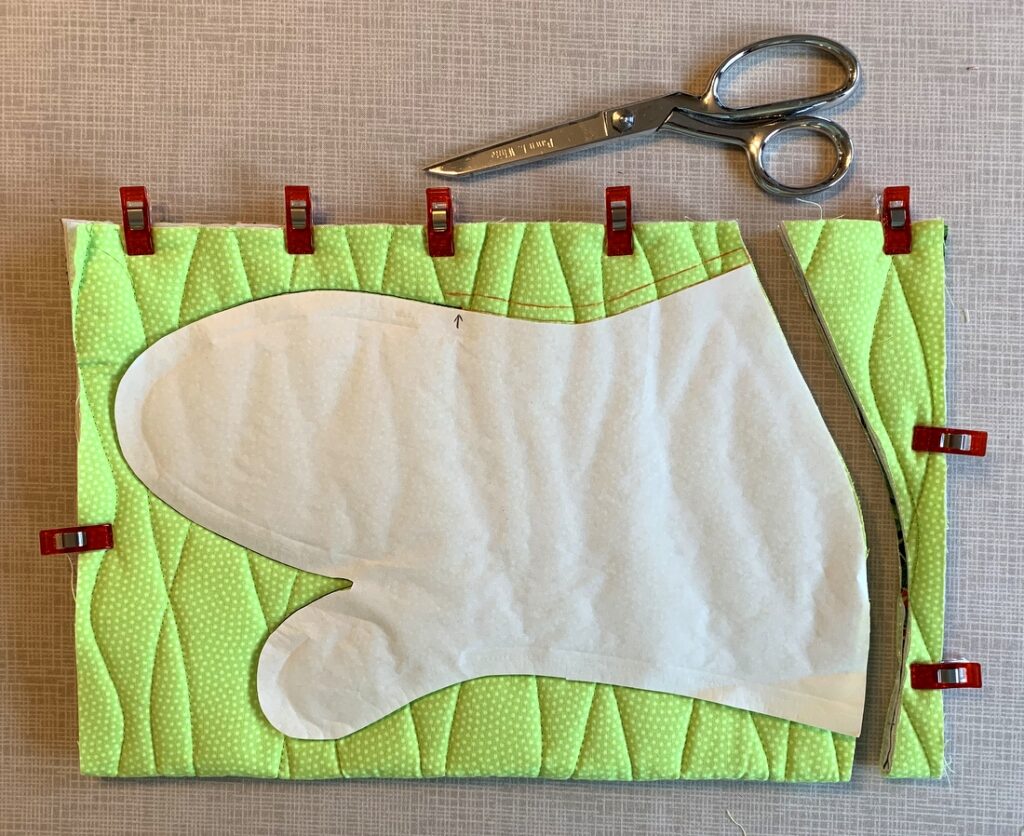

Gently peel off the freezer paper pattern:
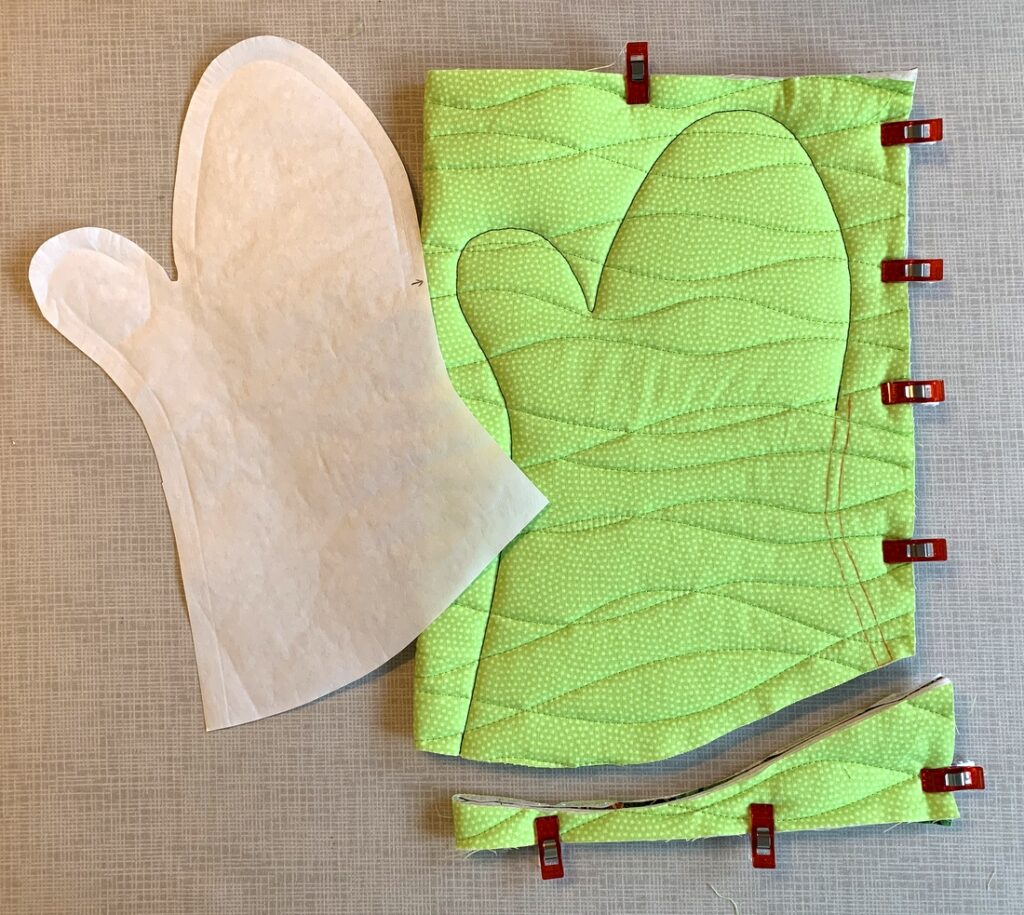
(You can use the pattern over and over again.)

Return to the sewing machine and stitch around the mitt again on the same stitching line, backstitching at the beginning and end:
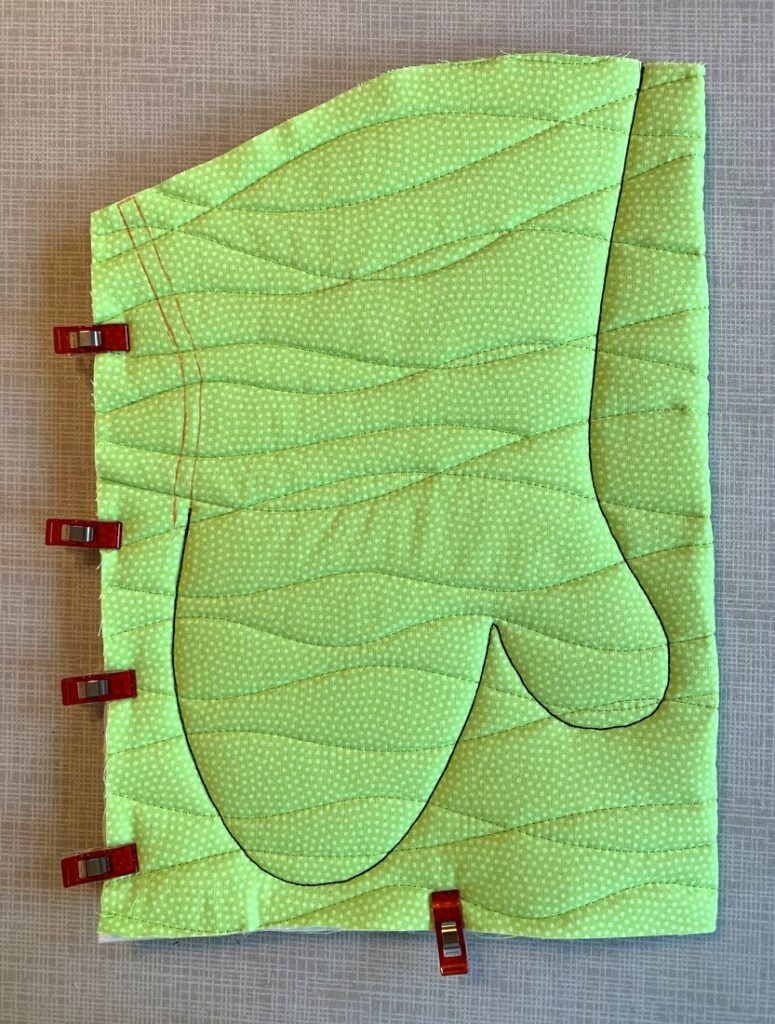
This step is important to strengthen the seam and relieve some of the stress on the stitching line when the mitt is turned. The stress is greatest on the notch between the thumb and finger sections.

Be as exact as you can stitching on top of the first stitching line. In this close-up of the notch you can see that I took two stitches in a slightly V shape:
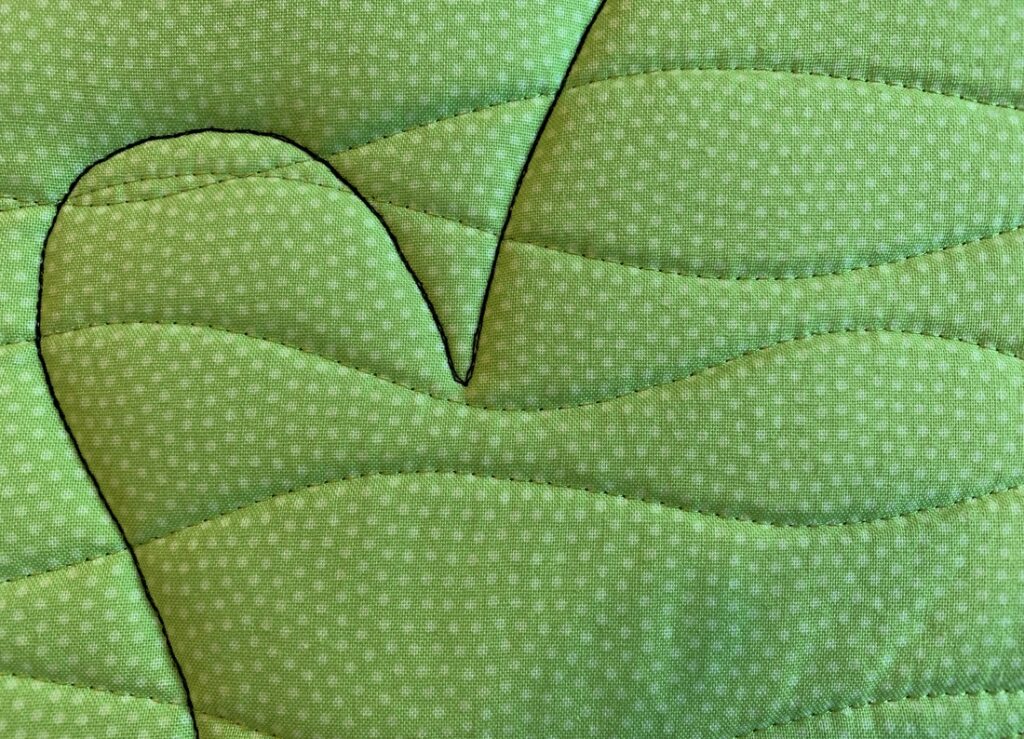
You can also pivot at the end of the thumb curve, take two very small stitches straight across, pivot again and start up the finger curve. I’ve tried both ways and it doesn’t seem to make a difference when the mitt is turned.

You can see I used black thread here. That’s because the background color on the right side of this mitt is black. When the mitt is done, you will not be able to see black thread on the inside of the mitt at all.

Now it’s time to trim the seam allowance.

Starting on the side with the partial seam where you marked the outside line (¼” away from the stitching line), cut along that outside line until you are a quarter inch beyond the dot you marked:
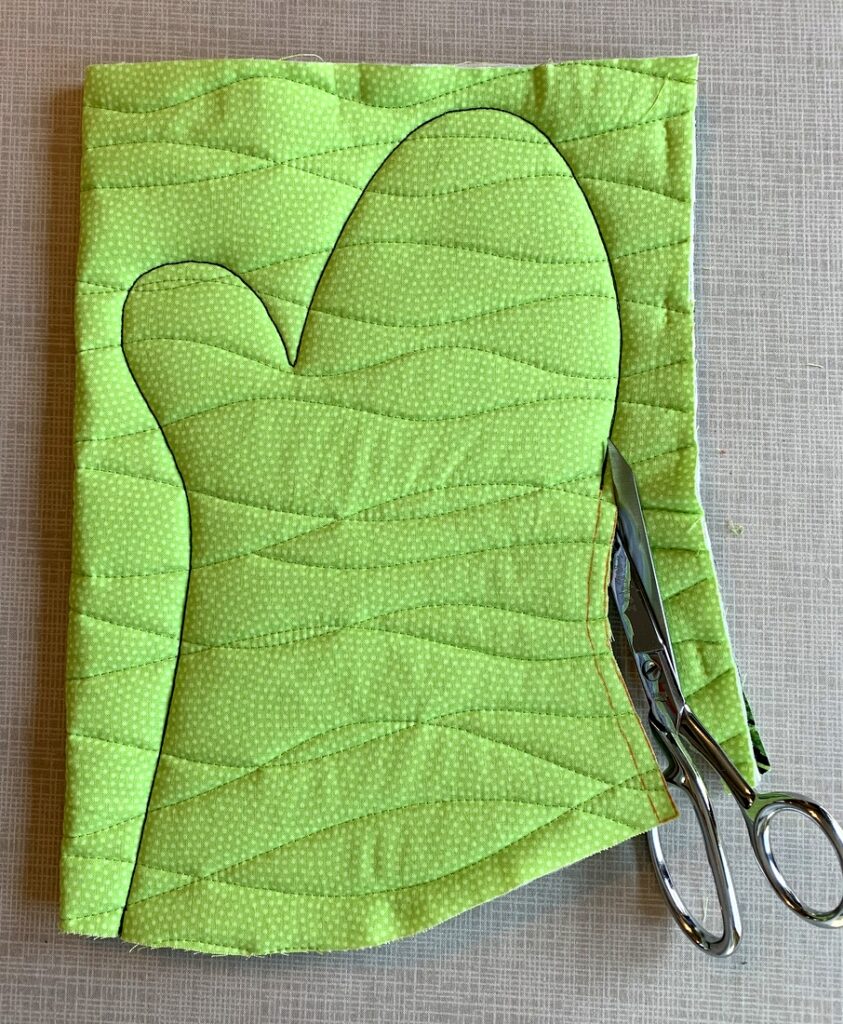

Taper to a full 1/8” seam allowance and continue cutting around the finger portion, stopping when you get close to the notch between the thumb and finger portion:
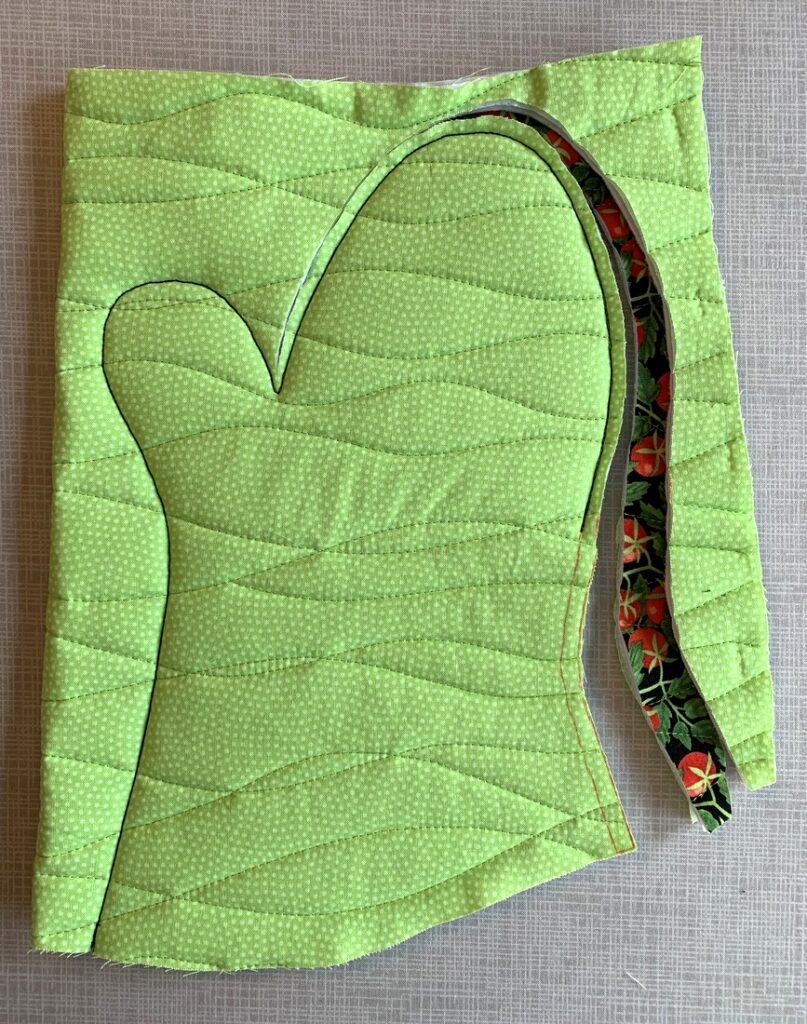
If a 1/8” seam allowance makes you nervous, shoot for 3/16”. It is not necessary to cut a ¼” seam allowance; in fact, it will make it harder to turn the mitt inside out and won’t give your mitt as smooth a look around the curves.

Flip the mitt over and start cutting from the other lower side, working your way around the thumb curve:
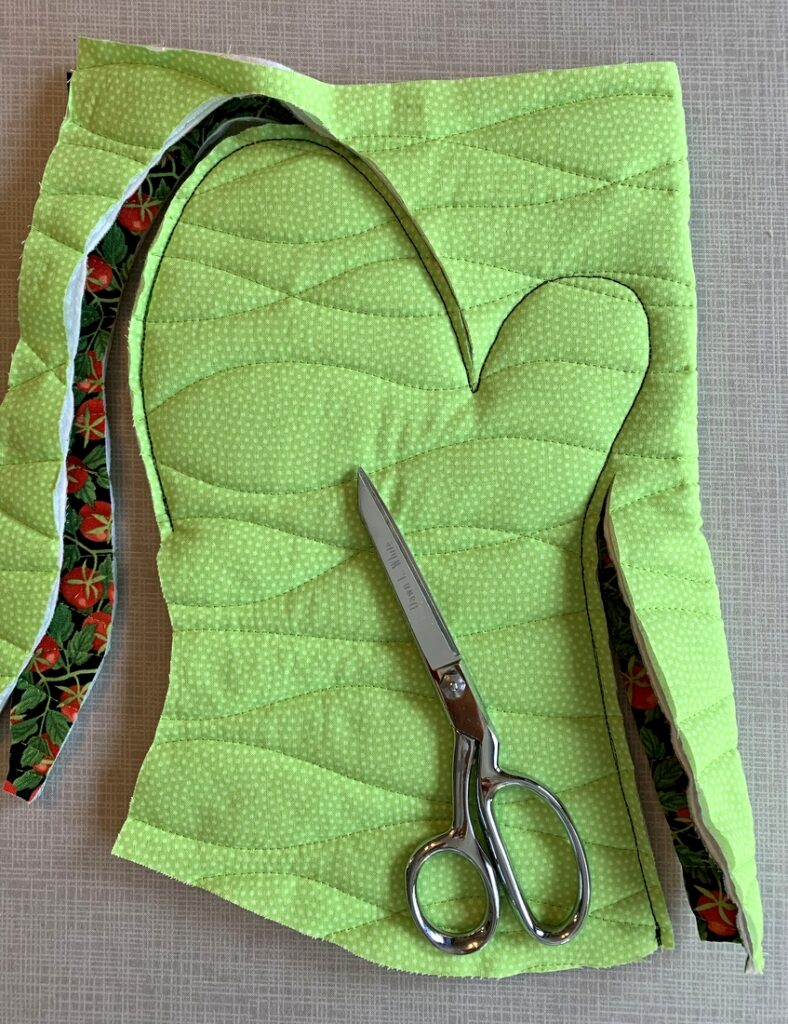

When you get to the notch, carefully trim to within 1/8” of the stitching line:
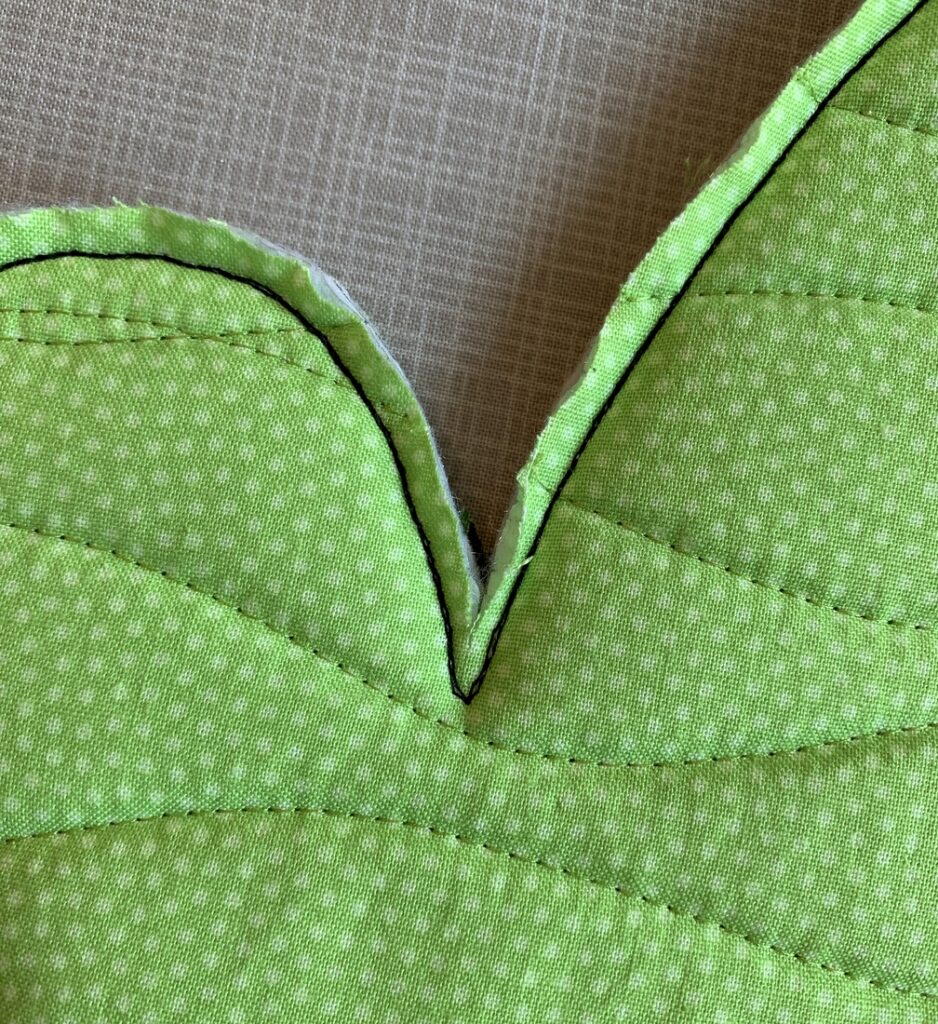

Because you left a partial seam, it’s going to be quite easy to apply the binding:
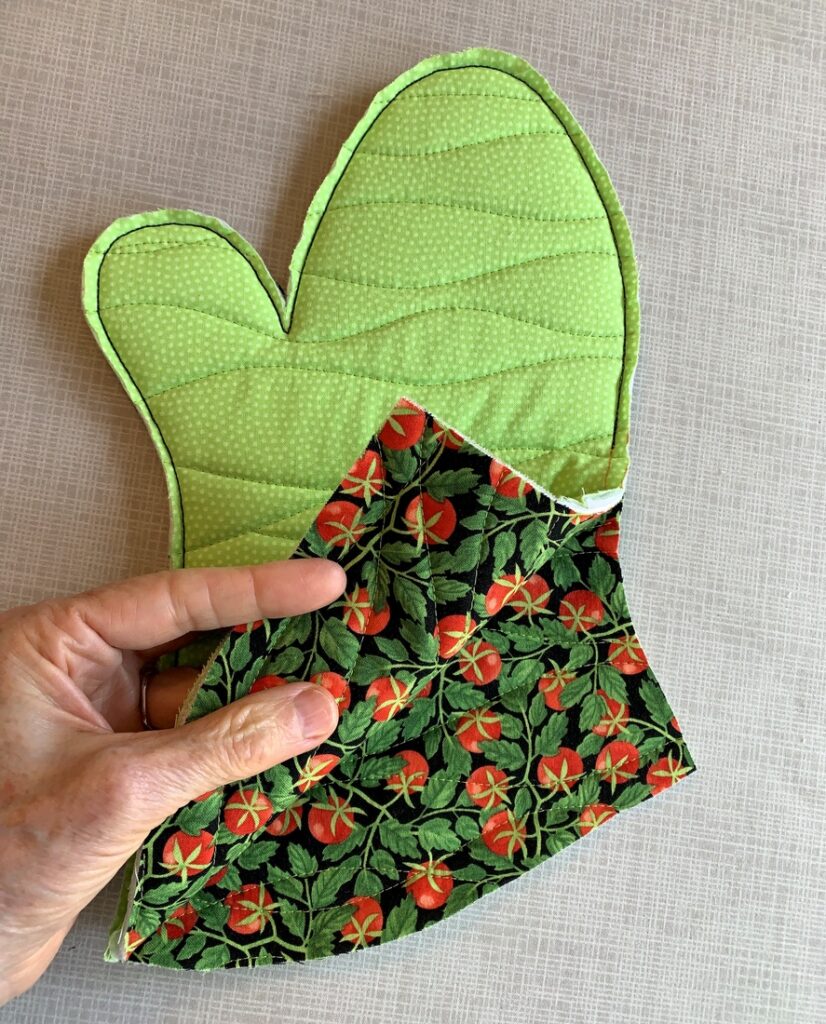
Check first to see if you need to baste the layers together at the bottom edge. I find that when I quilt my sandwich with overlapping wavy lines, I often need to take this extra step. Here you can see I basted a quarter-inch from the edge:
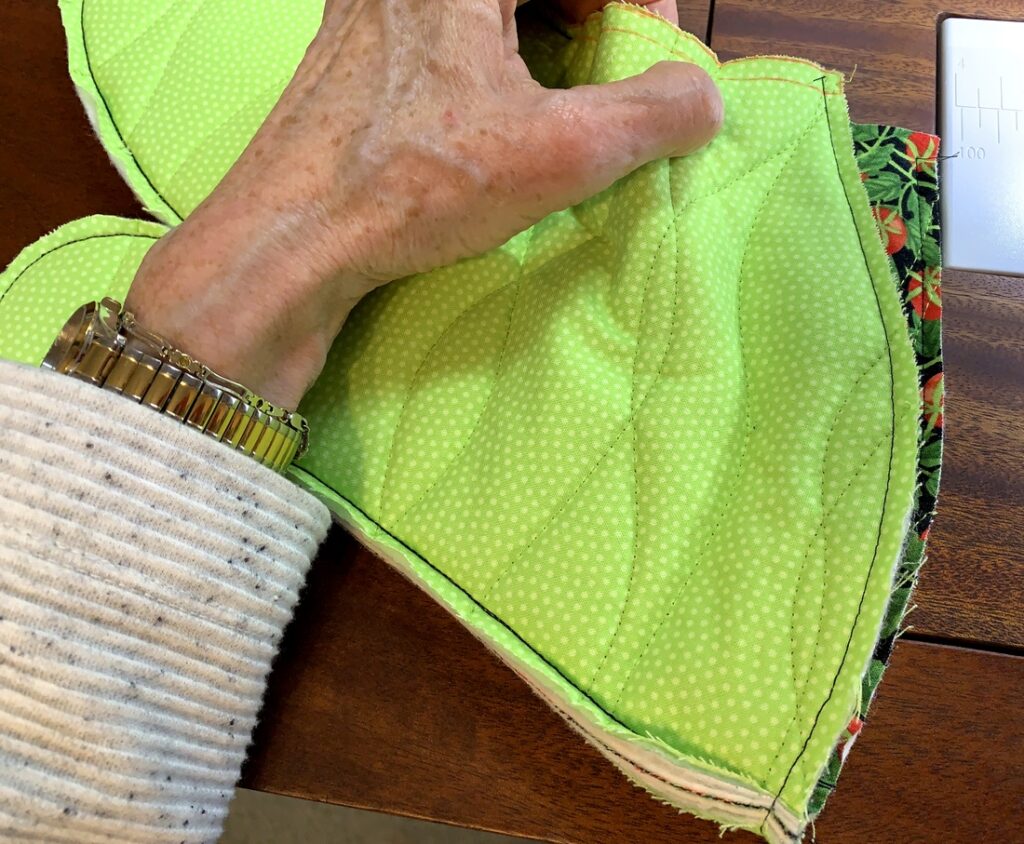

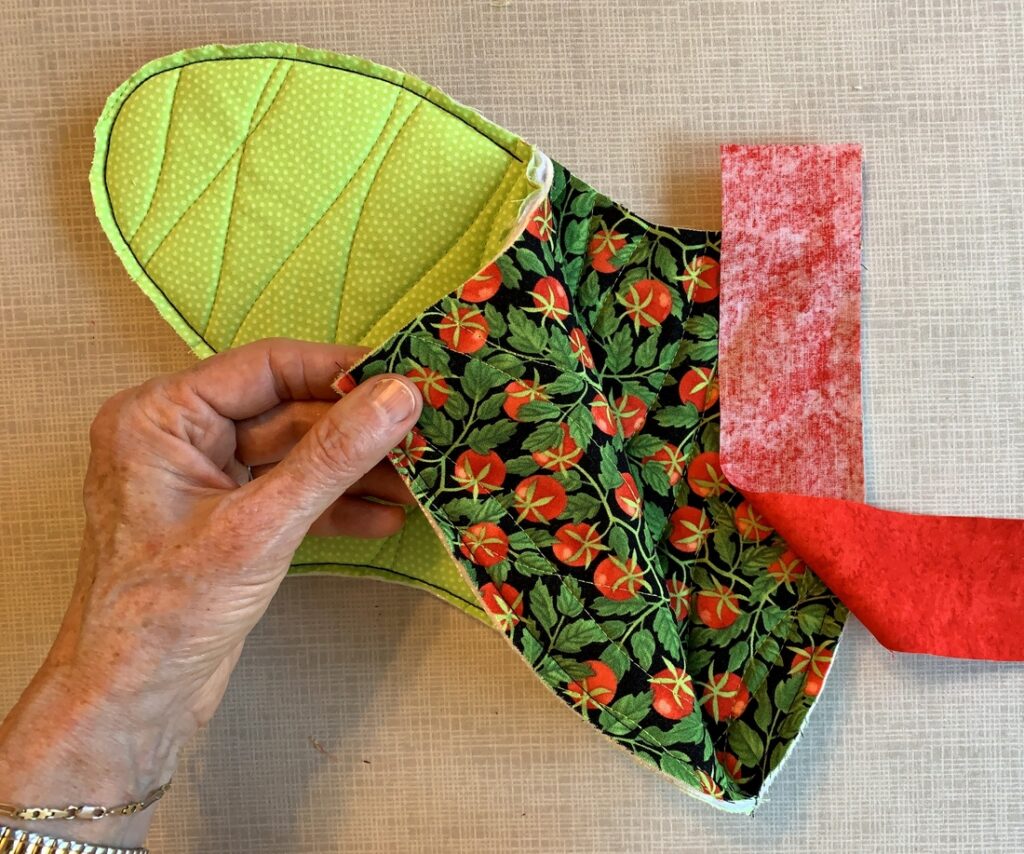
From the 2″ x WOF binding strip, cut an 18″ strip. (Save the remainder of the strip for a second mitt.) With the mitt opened up, align the strip along the lower edge, right sides together. Extend the top of the strip one inch beyond the side edge of the mitt:

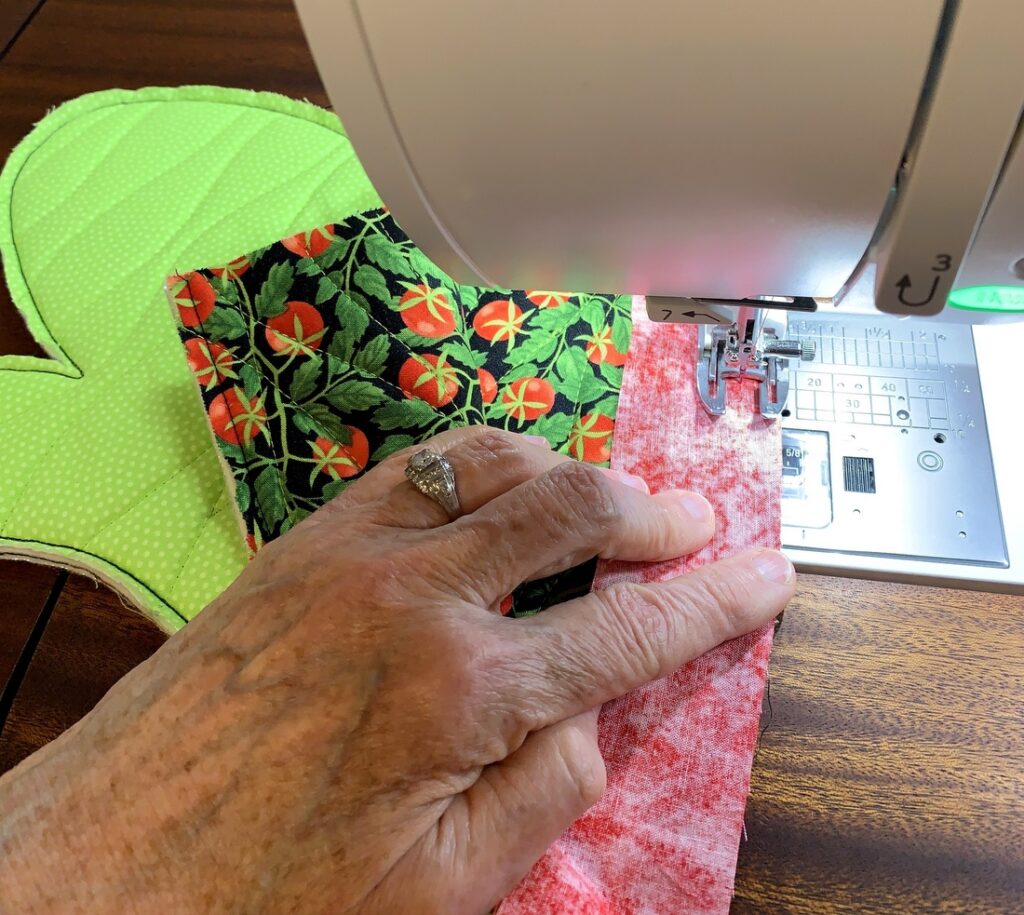
Starting at the top of the binding strip, sew around the bottom edge with a 3/8” seam. It is not necessary to pin the strip to the mitt first. Stop stitching when necessary to make sure the edges are aligned and remember that both sides of the mitt are gently curved along the cuff edge. You’ll need to stop every few stitches to adjust the fabrics as you approach the side seam but you should find it fairly easy to manipulate the fabric under the needle while keeping the edges aligned properly.

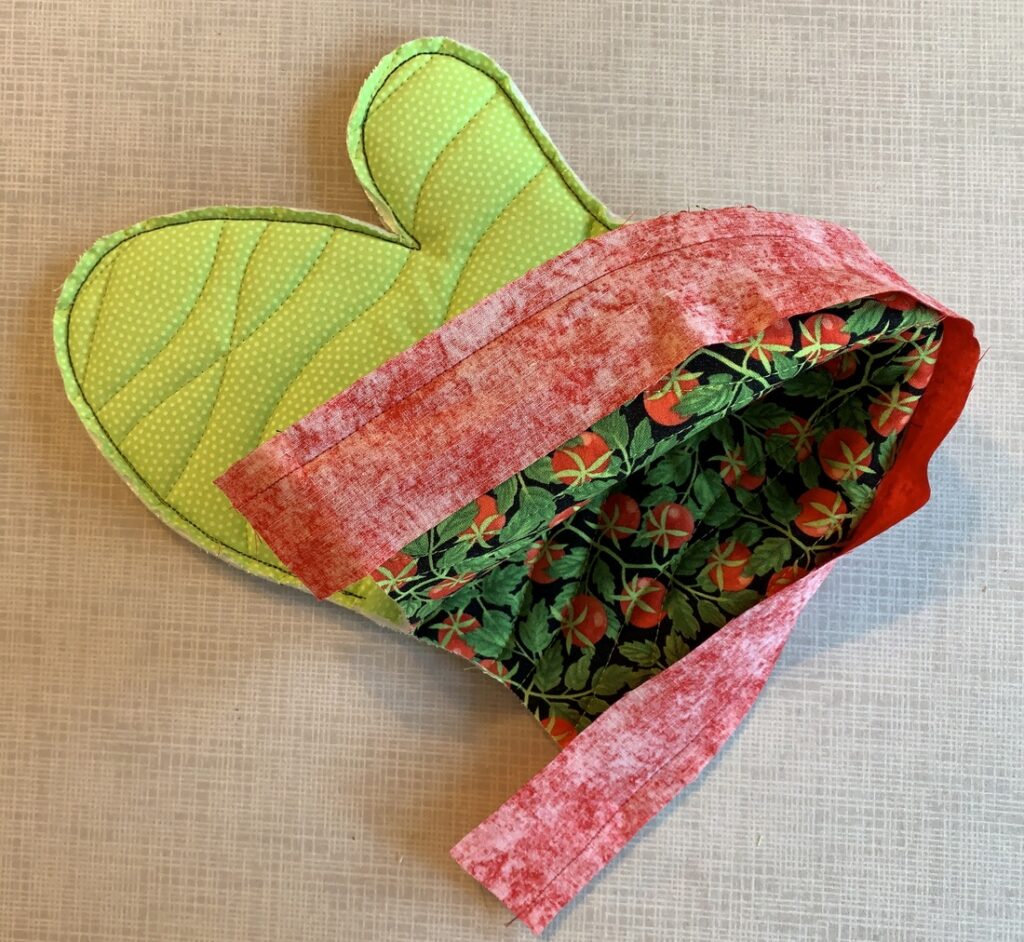
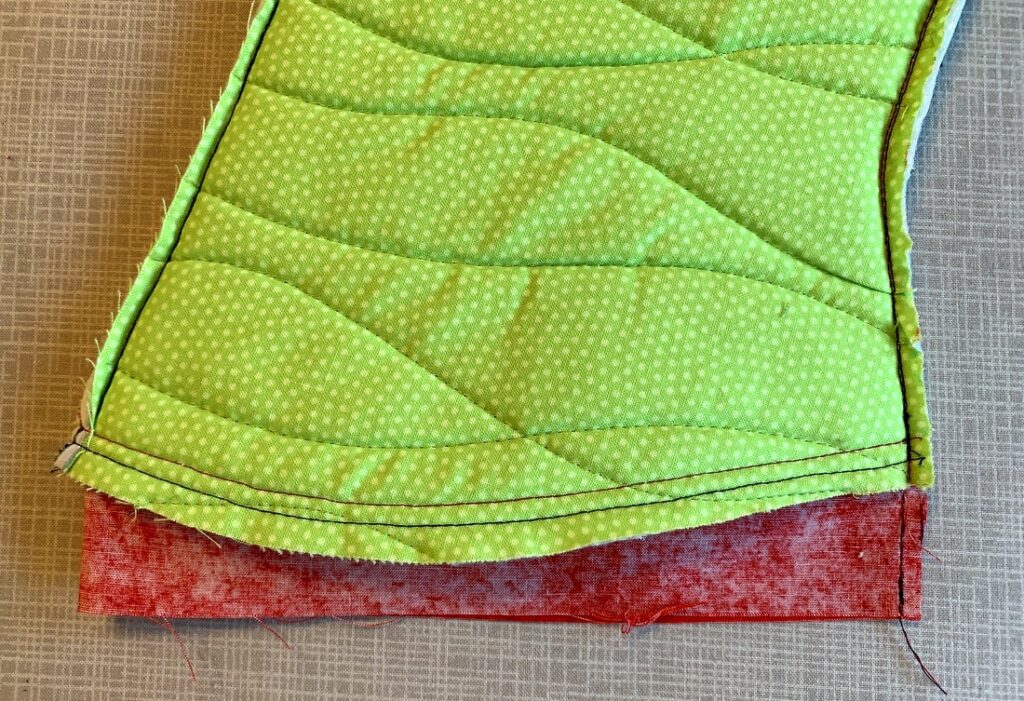
When you get to the end of the strip sew right off the edge of the fabric. Here’s what the mitt looks like now:
To finish sewing the seam, clip the edges together, making sure the edges of the binding strip are aligned at the top and bottom edges:
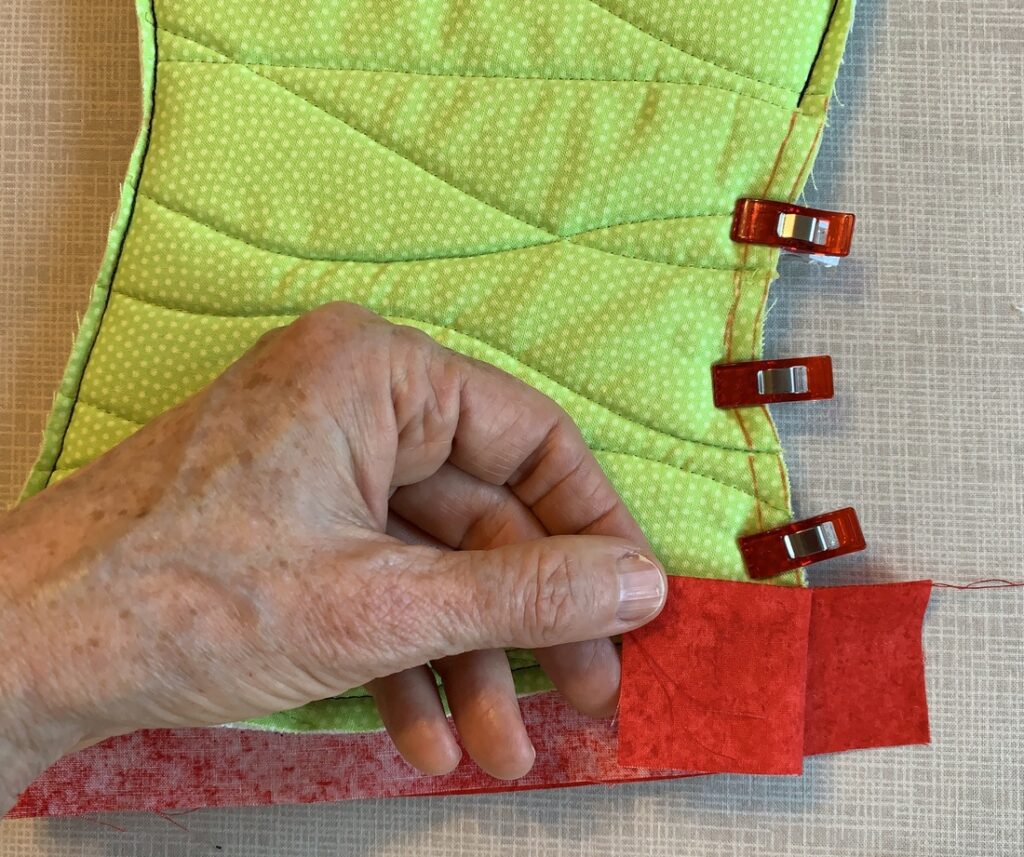
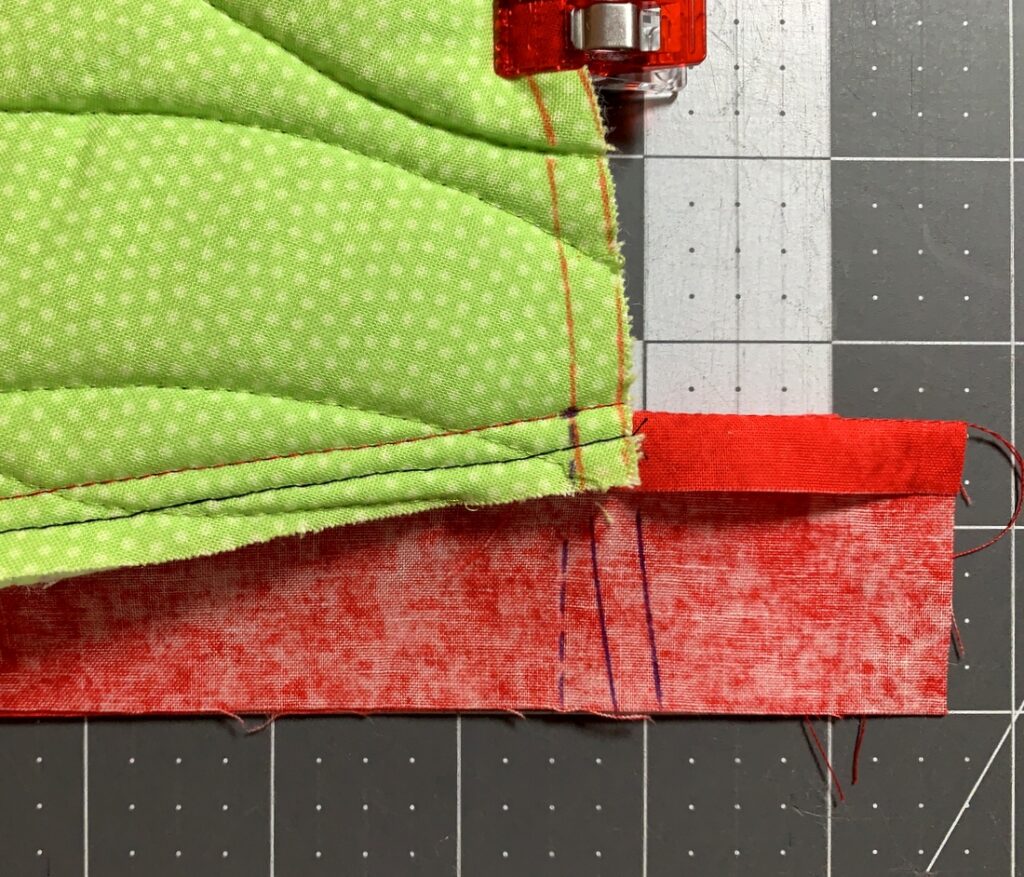
Note that the seam allowances at the top of the binding strip are folded down (see next photo too).

Look very carefully at the next photo. You will see that I have drawn two solid lines visually extending the cutting and stitching lines drawn earlier on the mitt. But I don’t want to sew on that stitching line in the binding strip portion because the binding strip will be too loose; in other words, it won’t fit snugly around the open edge of the mitt when the strip is folded in place. The dotted line to the left of the solid lines is the actual stitching line:
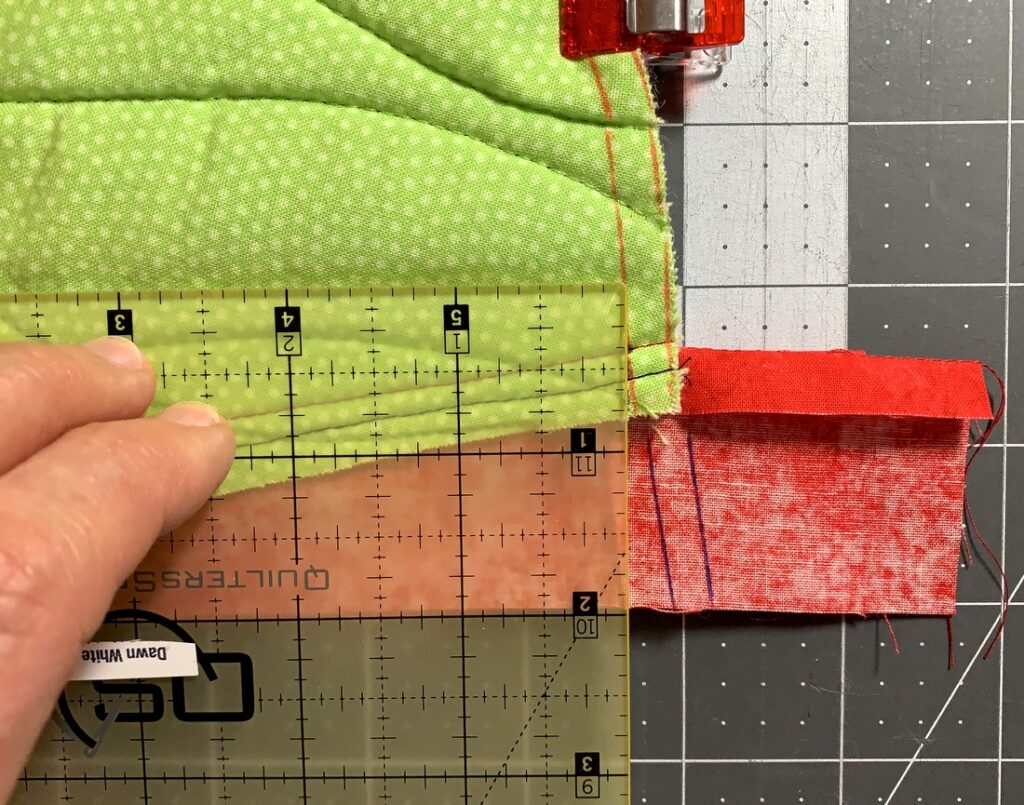
To mark the stitching line place a ruler with a horizontal marking (in this example the 2″ line) aligned with the bottom edges of the binding strip. Draw a dotted line from the dot on the seamline (where the mitt and binding strip were joined) to the bottom of the binding strip. Note that the dotted line is at a 90˚ angle to the horizontal line on your ruler:
Now you can finish stitching the seam, backstitching at the beginning and end. Trim the seam allowance to a generous 1/8″ just as you did around the rest of the mitt:
At this point I know you are eager to turn the mitt inside out but you will find it so much easier to tack down the binding if you do it before turning. So . . .

Start at the seam. Finger press the seam to one side and turn the top edge of the binding strip down about a half-inch:
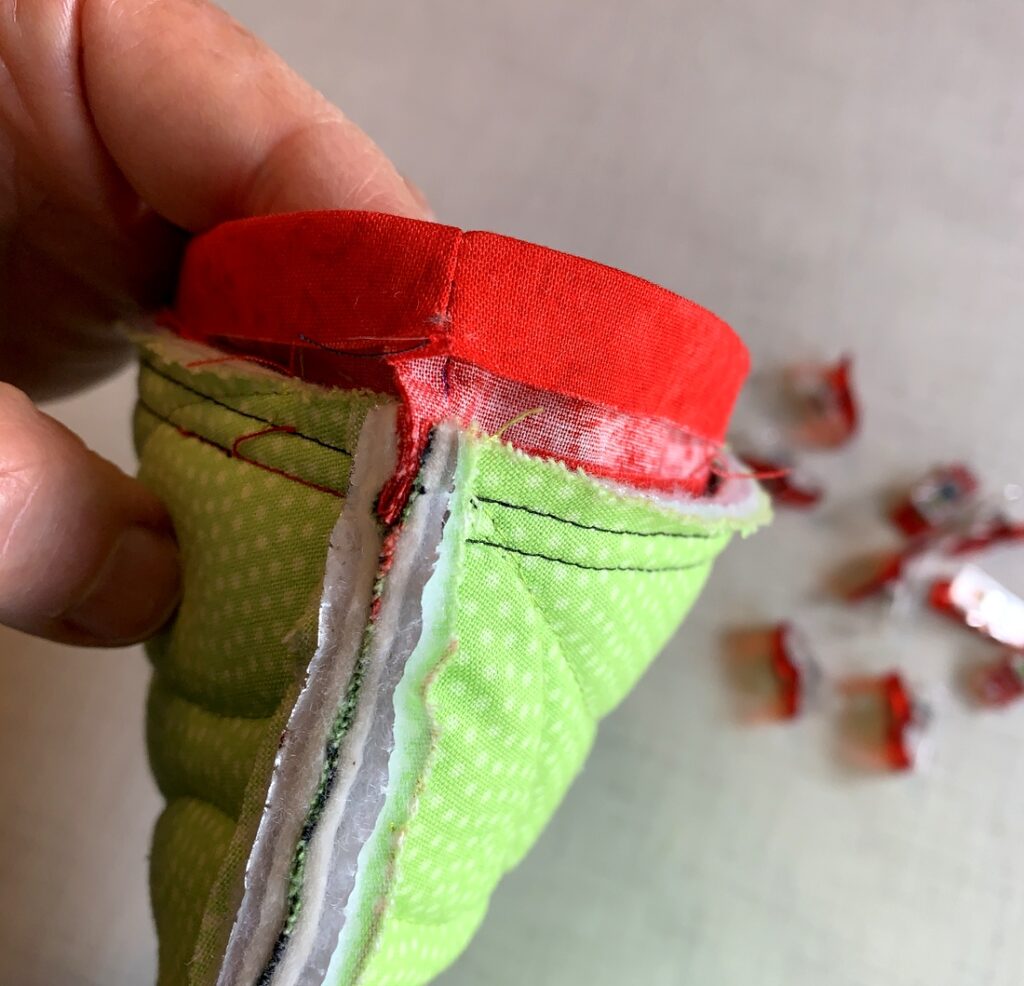
Turn it own one more time, pulling it snugly over the seamline and making sure the folded edge covers the line of stitching. Hold in place with a clip:
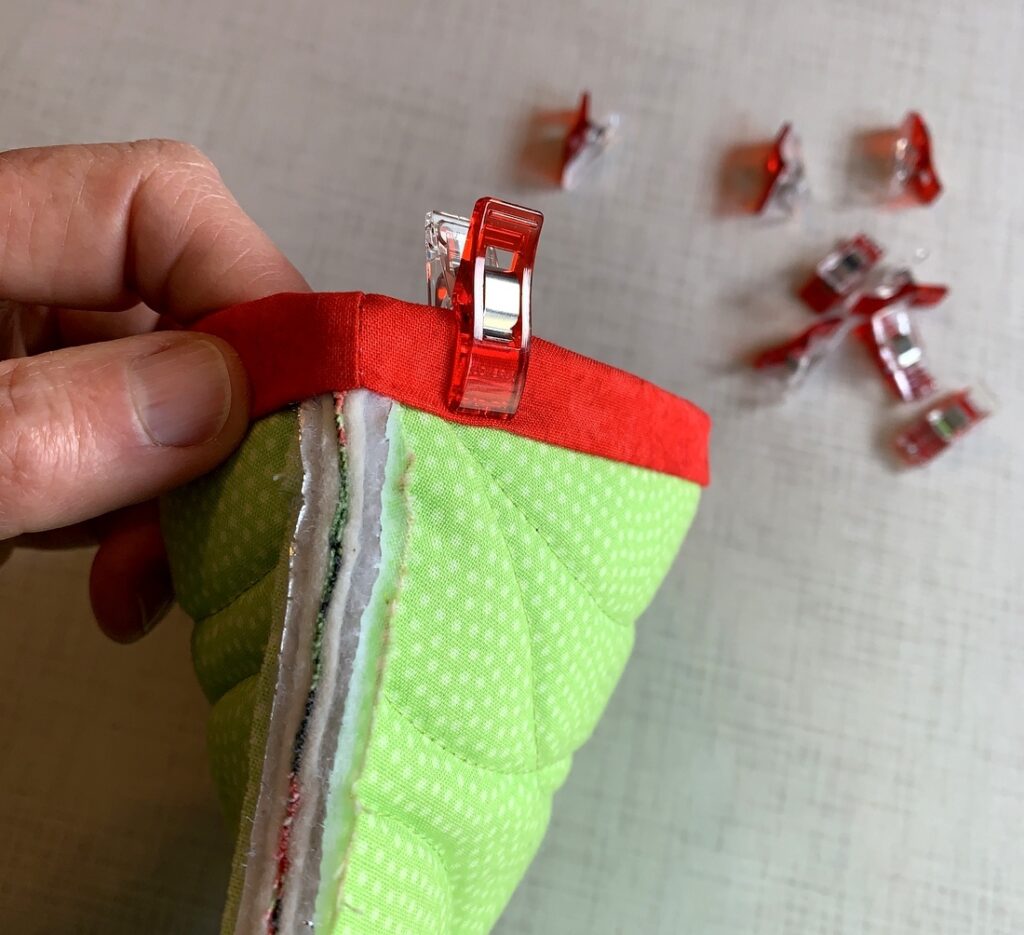

Place a clip on the other side of the seam (where my thumb is) and work your way around the cuff edge, placing a clip every couple of inches:
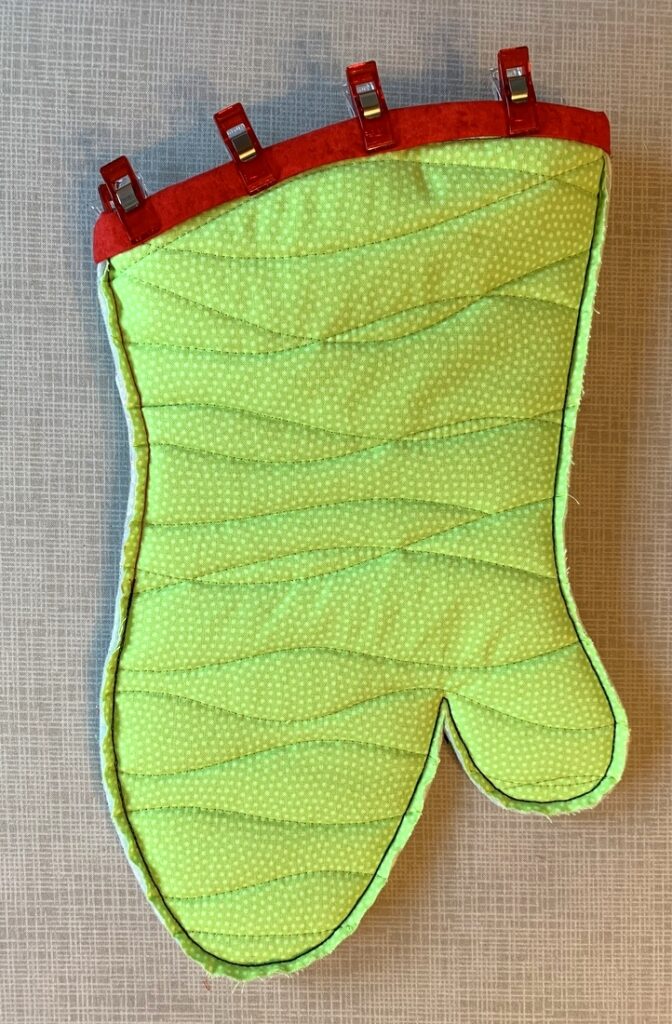

Using thread to match the binding fabric, tack the folded edge of the binding in place:
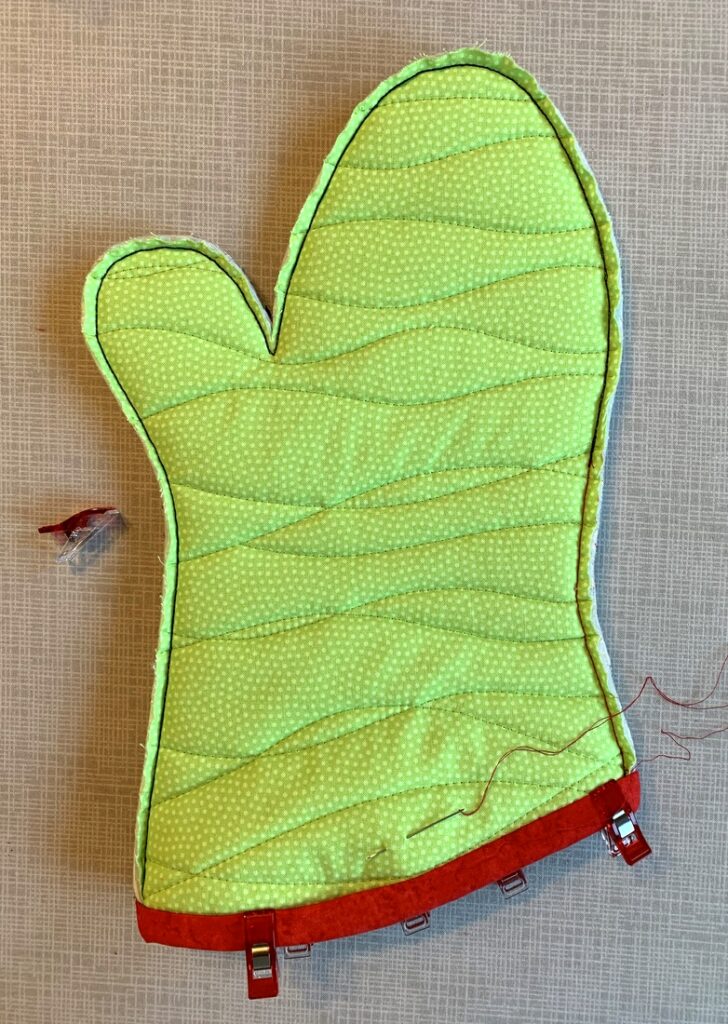
Now you are ready to turn the mitt!

You’ll find that the finger portion turns quite easily but it may take some time to work the thumb through. Be patient with this step and do not give in to the temptation to use some object to push the thumb out from the inside. Use your fingers and thumb only until the mitt is fully turned.

Voila! You have a beautiful functional oven mitt. . .
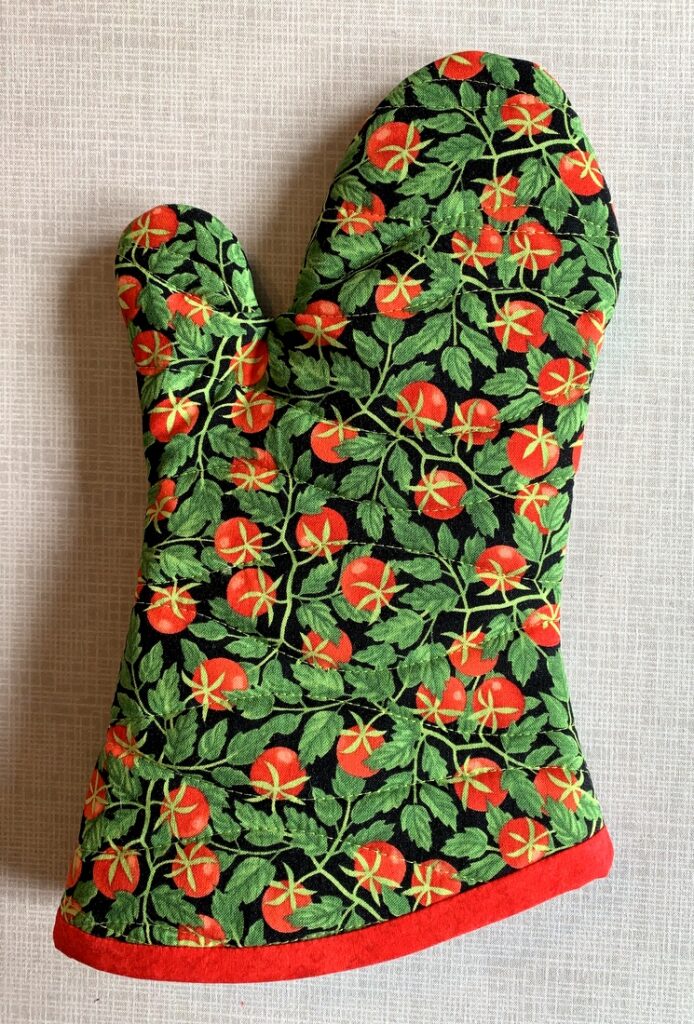
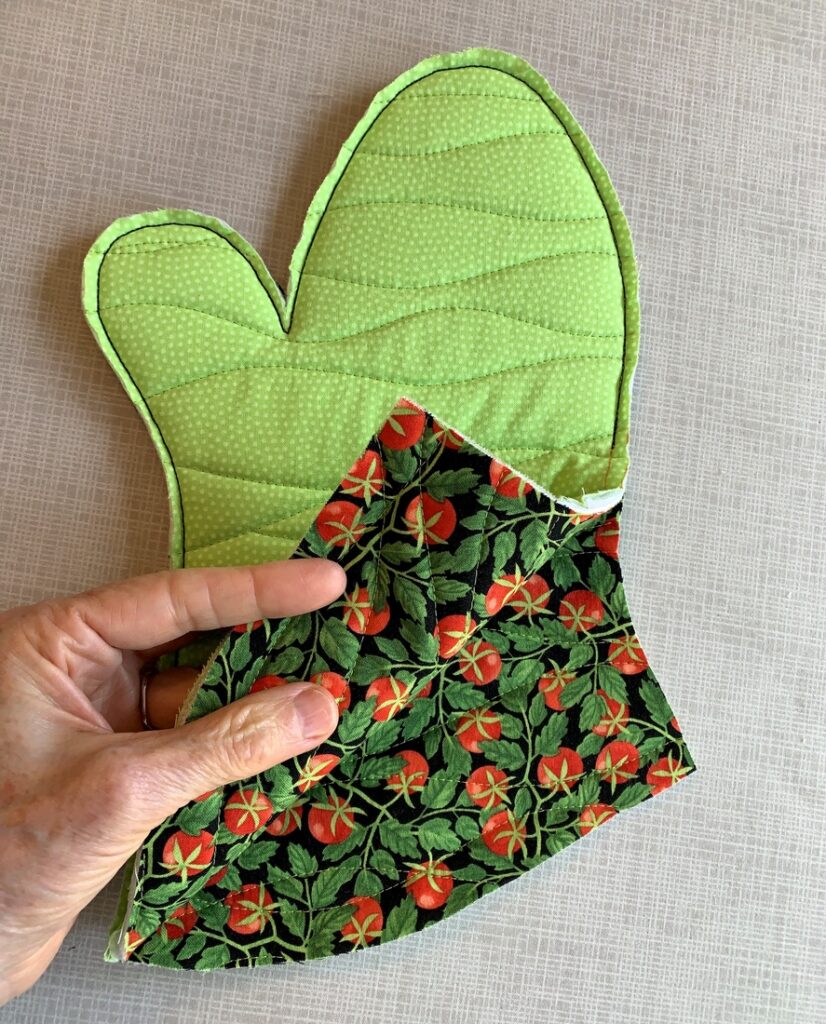
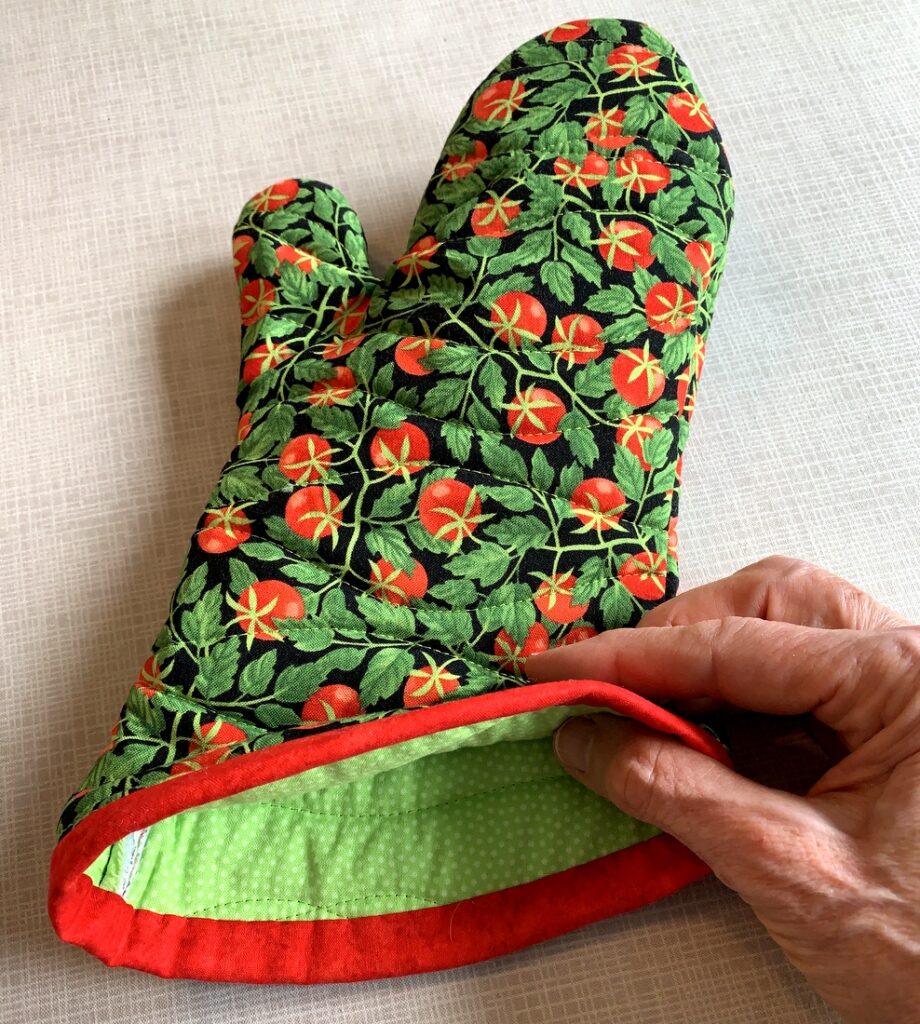
. . . with a pretty interior . . .
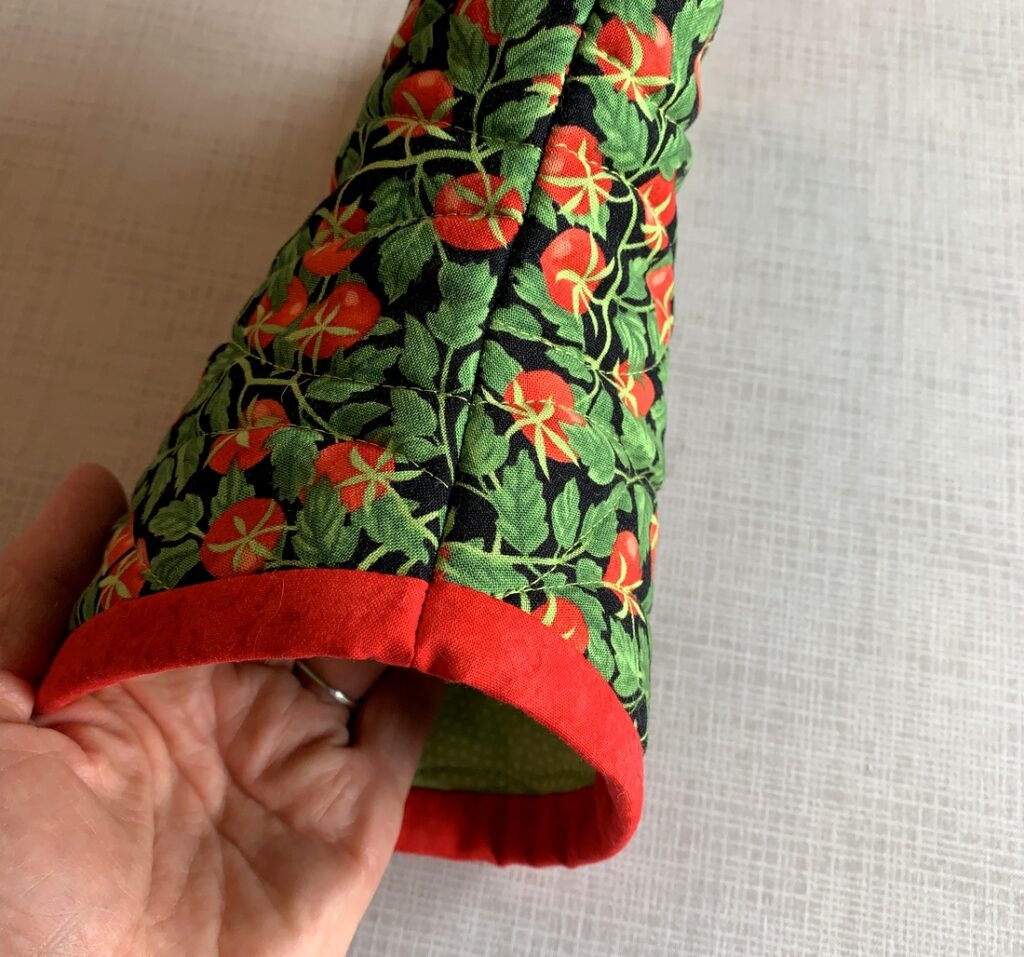
. . . and a beautifully finished accent strip around the opening:
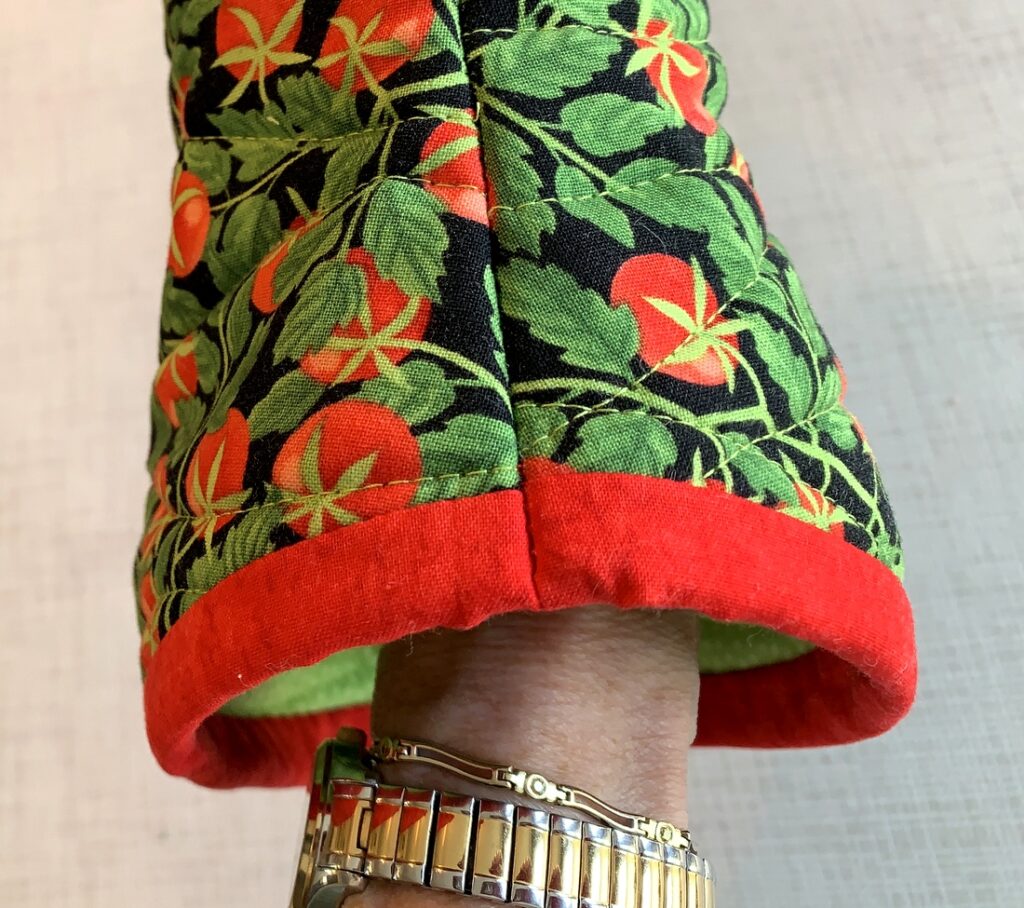
Now all it needs is a mate!

This mitt is heat-resistant (mainly because of the Insul-bright batting) but not heat-proof, so use care when wearing it just as you would with a commercial oven mitt made of cotton fabric.

Oven mitts made with this tutorial and using the fabrics specified can be thrown in the washer and dryer. Wash them in warm or cold water and dry them on medium heat.

Please let me know if you have any questions or concerns after reading this tutorial. I’ll be happy to respond!



Posted in home dec, oven mitts, tutorial, update | 3 Comments

Oven Mitt Tutorial from First Light Designs: Part 1 of 2

I’m delighted to bring you Part 1 of my Oven Mitt Tutorial. (Part 2 will be fast on its heels!) I think you will find my method of making a top-quality oven mitt to be fast and efficient, eliminating extra steps in tutorials I found when searching online for a pattern and instructions. My directions include a nifty way to add a contrasting band at the cuff edge.

You’ll also find this a really fun project to work on. So pick out a fabulous 100% cotton print and get ready to dress up your kitchen!

Part 1 covers fabric requirements, instructions for downloading and printing the pattern, assembling the layers, and quilting the resulting “quilt sandwich.”

Part 2 covers the sewing of the mitt and contrasting band around the cuff edge as well as the final step of tacking the band down before turning the mitt right side out.

Fabric and notions for two mitts
½ yard (or two fat quarters) 100% cotton for outer fabric
½ yard (or two fat quarters) 100% cotton for the lining
⅛ yard 100% cotton for the contrast binding at cuff edge
½ yard insulated heat-resistant batting (Insul-bright)
100% cotton batting (enough to cut two 14″ x 19″ rectangles)
100% cotton thread

For the outer fabric choose fabrics that are medium to dark in value; light-colored fabrics are not practical for oven mitts (but they work very well for the lining).

For the insulated batting I prefer Insul-bright, made of polyester fibers needled through a reflective metalized polyester film. According to the Warm Company, maker of Insul-bright, the fibers “resist conduction while the reflective metalized polyester film reflects radiant energy, hot and cold, back to its source.” Insul-bright doesn’t have a right or wrong side.

Supplies
Sewing machine with open-toed walking foot
New needle in your sewing machine (90/14 Jeans or Sharp recommended)
Standard sewing supplies (scissors, pins, measuring tape, seam ripper, etc.)
Rotary cutting equipment (mat, rotary cutter, rulers)
Wonder Clips
One piece of white freezer paper about 10″ x 14″

Part 1. Download and print the free pattern. Click on the links below:
Oven Mitt Pattern, page 1 of 2
Oven Mitt Pattern, page 2 of 2

Check the 1” registration line to make sure the pattern printed at 100%.

Trace the pattern directly onto the flat (not shiny) side of the freezer paper, matching the top and bottom pieces on the dotted lines. Lay your own hand on the pattern to see if it fits. Make any changes you feel necessary. For tips on making adjustments to the pattern, see my post Oven Mitts that Fit: the Prequel.

Cut around the outside edges of the pattern. Do not add a seam allowance. Set aside the pattern for now.

Part 2. Cut the fabrics
For each mitt:
Cut (1) piece 19” x 14” from outer fabric*
Cut (1) piece 19” x 14” from lining fabric*
Cut (1) piece 19″ x 14″ of Insul-bright
Cut (1) piece 19” x 14” of medium-weight cotton batting
Cut (1) strip 2” x WOF from binding trim fabric. (It’s important to cut across the width of fabric rather than the length because you want the strip to have a bit of give. One 2″ strip x WOF will provide binding strips for two mitts.)

*If using directional fabric, keep the direction of the design in mind (as well as the quilting motif if it is directional too). In the photo below, both the design and quilting motif are going across the width of the mitt, not the length:

Part 3. Prepare the quilt sandwich
On a flat surface make a quilt sandwich of your four layers in this order: lining fabric right side down, Insul-bright, cotton batting, outer fabric right side up.

The thread color you use on the outer fabric can blend or contrast; that’s a personal choice. Match the bobbin thread to the lining fabric if you want it to blend. Use your preferred method to baste the layers together and quilt as desired.

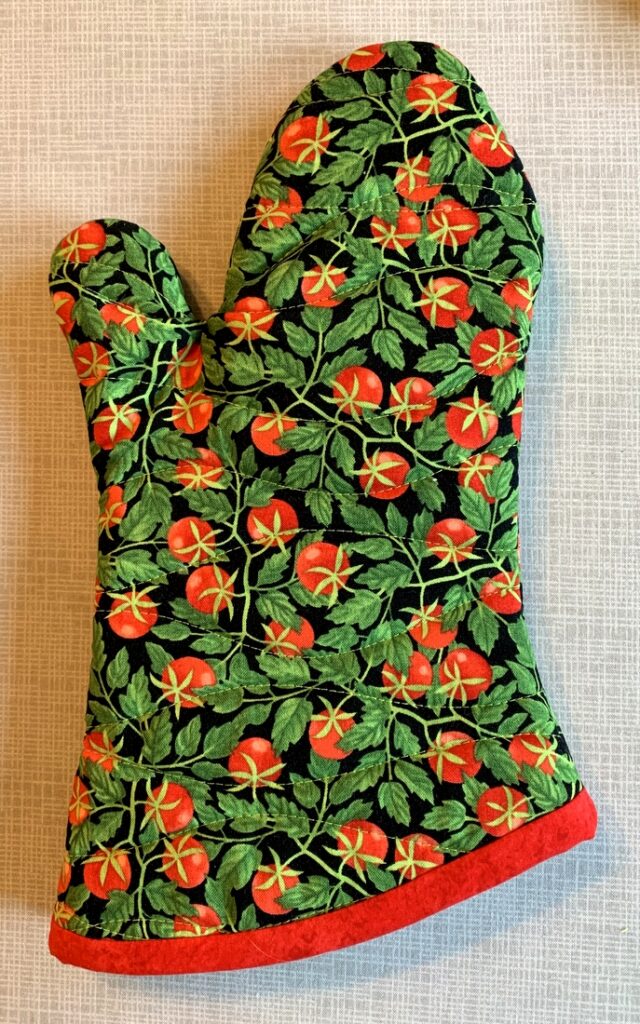
Sometimes I quilt a 1” grid as I did on these mitts . . .

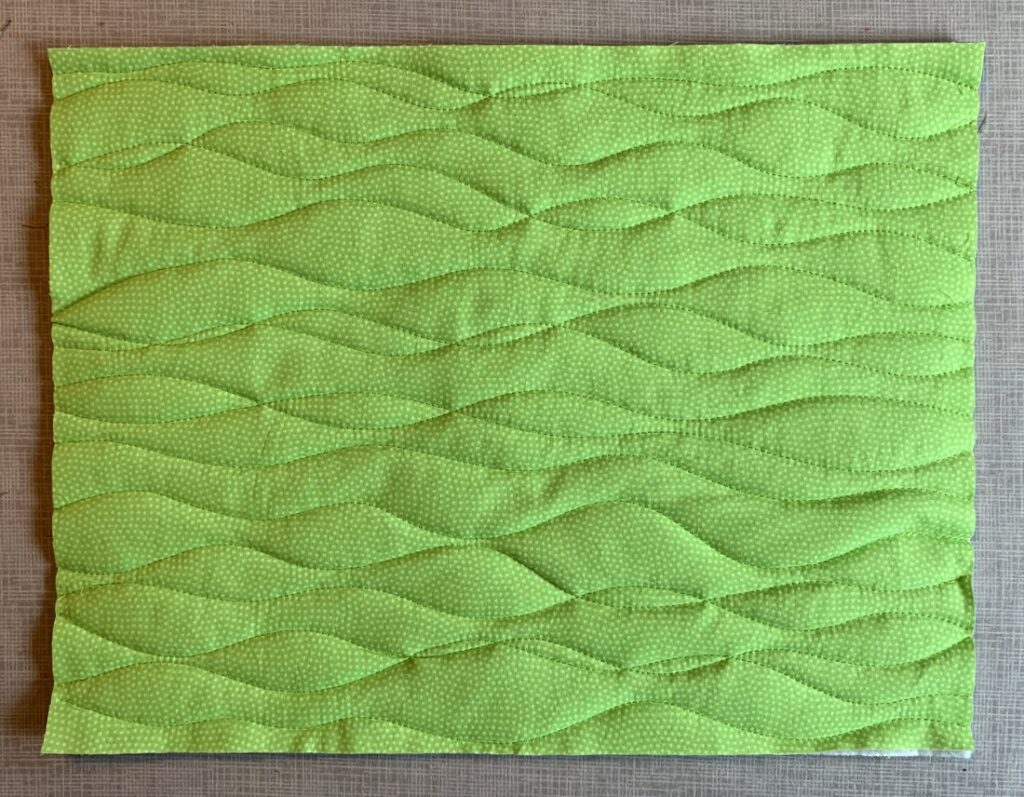
. . . but most often I quilt random wavy lines, some of which cross each other, because it’s fast and easy and I don’t have to mark a grid:

The wavy quilting motif is easier to see on the lining side:

Trim the sandwich to 18″ x 13″:

Fold the quilt sandwich in half, right sides together, with the fold on the left. Lay the freezer paper pattern on the fabric, shiny side down, making sure you have at least a half-inch clearance all around. Use a hot dry iron to press the pattern in place:

The sandwich is now ready to be transformed into an oven mitt.

Proceed to Part 2.


Posted in home dec, oven mitts, tutorial, update | 4 Comments

Oven Mitts that Fit: the Prequel

The prequel to the tutorial, that is.

My oven mitt tutorial is almost ready to go. Before I hit “publish” on the post, I want to give you a bit of background (by way of explaining my obsession with making a beautifully finished oven mitt) and a couple of hints on making a pattern for a mitt that fits your own hand.

For the last three or four years I was on the lookout for new oven mitts but was never able to find suitable replacements. The ones in stores were either too big or poorly made, sometimes both. My twin sister Diane was in the same boat. We actually bought our mitts at the same time years ago and they had definitely seen better days. We were bemoaning the lack of good store-bought oven mitts around Thanksgiving last year. At that point I decided to make my own — and make a pair for Diane to boot.

In preparation I went online and checked out several printed tutorials. Boy, was I surprised! Some of the tutorials were way too much work. Some had you cutting out left and right hand patterns. Why on earth . . . ? The mitts are the same shape on both sides, for heaven’s sake.

Others had you make two mitts – one from the main fabric and one from the lining fabric; you inserted the lining mitt into the main mitt and sewed the two together, meaning you were doing twice as much cutting and sewing – and not even getting a mitt that was quilted all the way through. Not one tutorial gave what I considered good instructions for a nicely finished cuff edge made with a contrasting fabric.

There had to be a great method out there somewhere, I thought, and if I couldn’t find one – well, I would just have to figure one out for myself. But I needed a pattern to get started. I downloaded a couple of free templates. When they were printed I could tell they were too big. What to do? Why, make my own pattern.

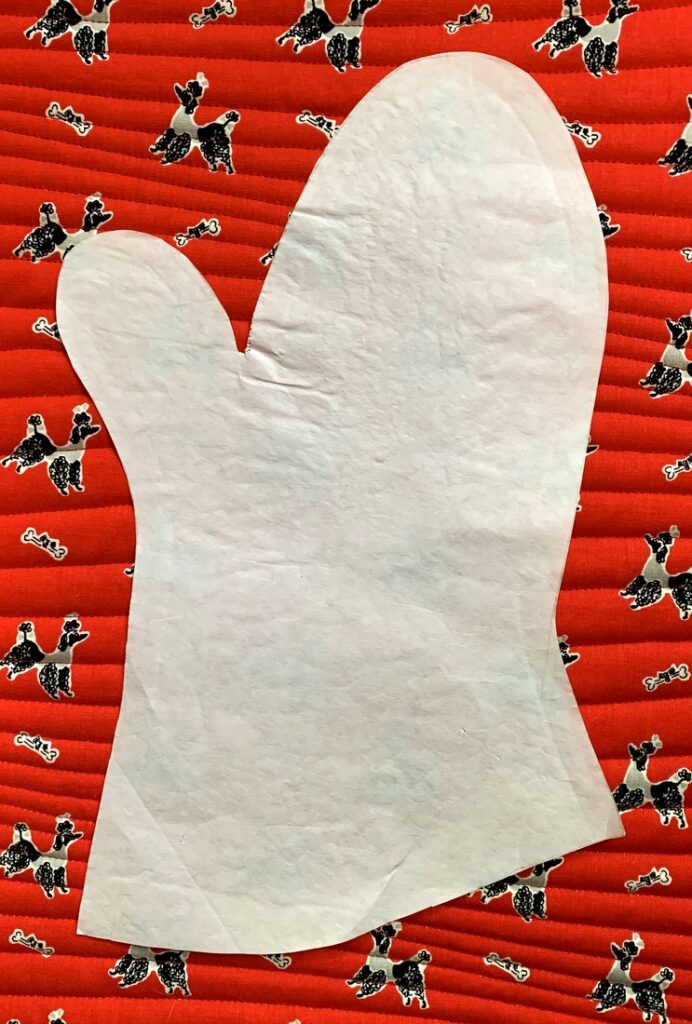
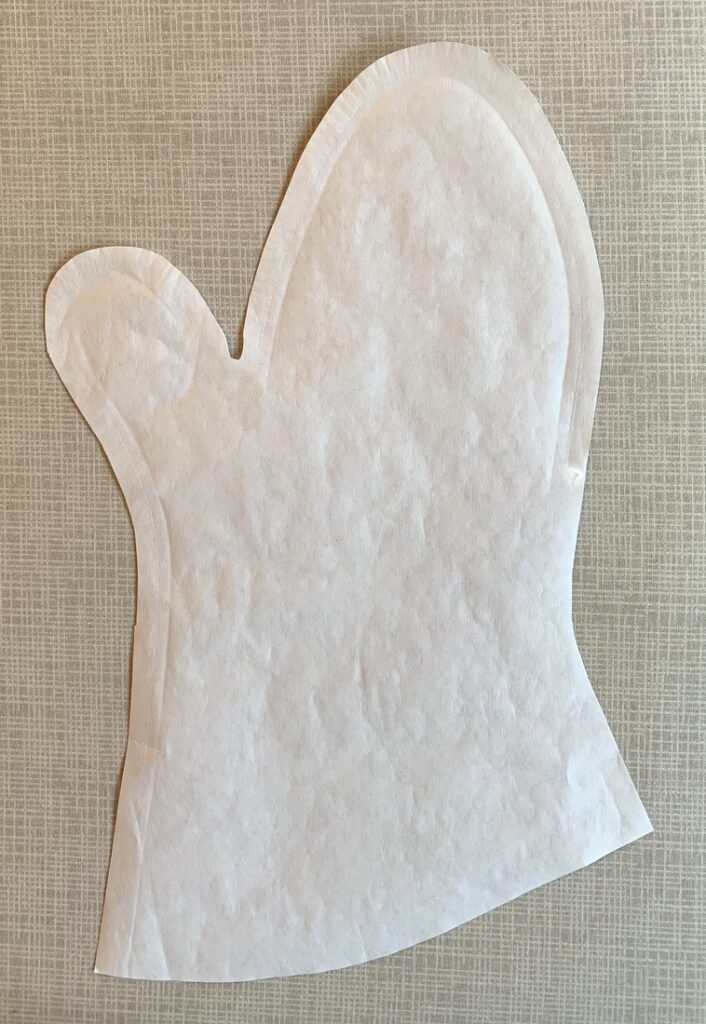
I simply traced around my favorite old mitt on a piece of freezer paper:

Did you notice that the pattern is flared at the bottom? That makes the mitt easier to slip on if you are wearing a garment with long sleeves.

For those of you unfamiliar with freezer paper, it has a shiny coating on one side that allows it to be ironed temporarily onto fabric. No need to use pins. The freezer paper can be peeled off easily, leaving no residue — and it can be used over and over again. The best place to get your freezer paper? The grocery store! The only brand I’ve ever seen is by Reynolds Kitchens. Crafters and quilters love it.

Combining what seemed to be the best elements of some online tutorials, I made a test mitt. That was the easy part. The hard part was applying the binding strip around the cuff edge. The opening of the mitt is relatively small, presenting a challenge first in moving it under the needle of the sewing machine and then in joining the raw edges neatly. Most tutorials are maddeningly vague about this step or produce results that leave something to be desired.

I experimented with different widths of binding strips and various techniques for joining the ends, making several sets of mitts in the process, including this early pair for Diane:

The results were satisfactory . . . but I was looking for something more. The best solution came to me last month in a “what if?” moment. It seems so obvious now.

Want to know my secret? A partial seam!

That’s right. By leaving one side seam only partially sewn, there was more room around the cuff edge to manipulate the fabric while applying the binding strip. And then I could finish sewing the side seam, which now includes the binding strip, giving me a beautifully finished mitt when the strip was turned down and tacked to the inside:

Are you intrigued? Want to make your own? I hope so!

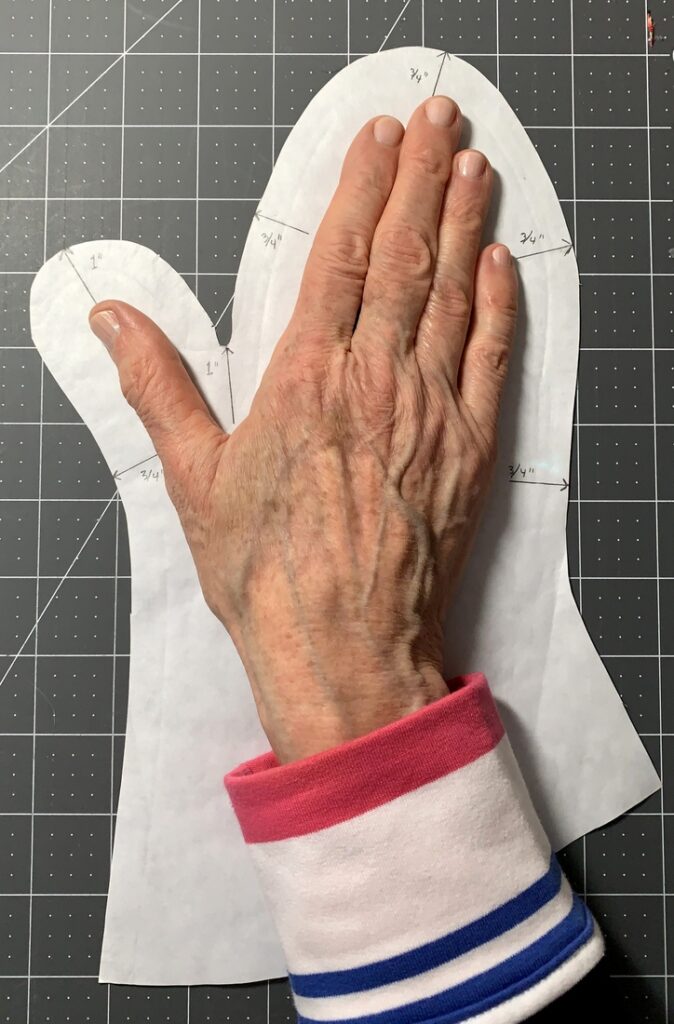
My tutorial will come with a link to a printable template so you can make your own freezer paper pattern. Or you can do what I did and draw around a mitt you already have. If you use my pattern you can modify it to fit your own hand. If you make your own pattern by tracing around an existing mitt, you can place your hand on it to test the fit as I do in the photo below.

The edges of the pattern should be at least ¾” wider than your hand around the thumb and finger portions. There should also be at least 1” from the notch between your thumb and fingers to the notch of the pattern and from the tip of your thumb to the end of the thumb on the pattern. Note the arrows:

It may look like my hand would be swimming in a mitt that size but you need room to turn the mitt inside out and still have room for the seam allowance.

My tutorial is so detailed and picture-laden that it is coming to you in two parts. Part 1 covers fabric requirements, instructions for downloading and printing the pattern, assembling the layers, and quilting the resulting “quilt sandwich.”

Part 2 covers the sewing of the mitt and band around the cuff edge as well as the final step of tacking the band down.


Posted in family, home dec, oven mitts, tutorial, update | 10 Comments

Oven Mitt Breakthrough

For those of you wondering whatever happened to that oven mitt tutorial I promised a couple of months ago, I have an update for you. I actually started working on a tutorial back in January but got hung up working on instructions for applying the binding.

Each set of oven mitts I’ve made since making my own pattern in December has been nicely finished but applying the binding has been a process best described as “fiddly.” My goal has been to figure out a way to apply the binding for a neat finish that can be effectively illustrated in a picture-heavy tutorial and be easy enough for a confident beginner to follow.

To that end I’ve been experimenting with different widths and different ways of joining the ends. I’ve tinkered with single-fold and double-fold binding. The results have been acceptable. But ease of construction? Not so much. “There has to be a better way,” I kept thinking.

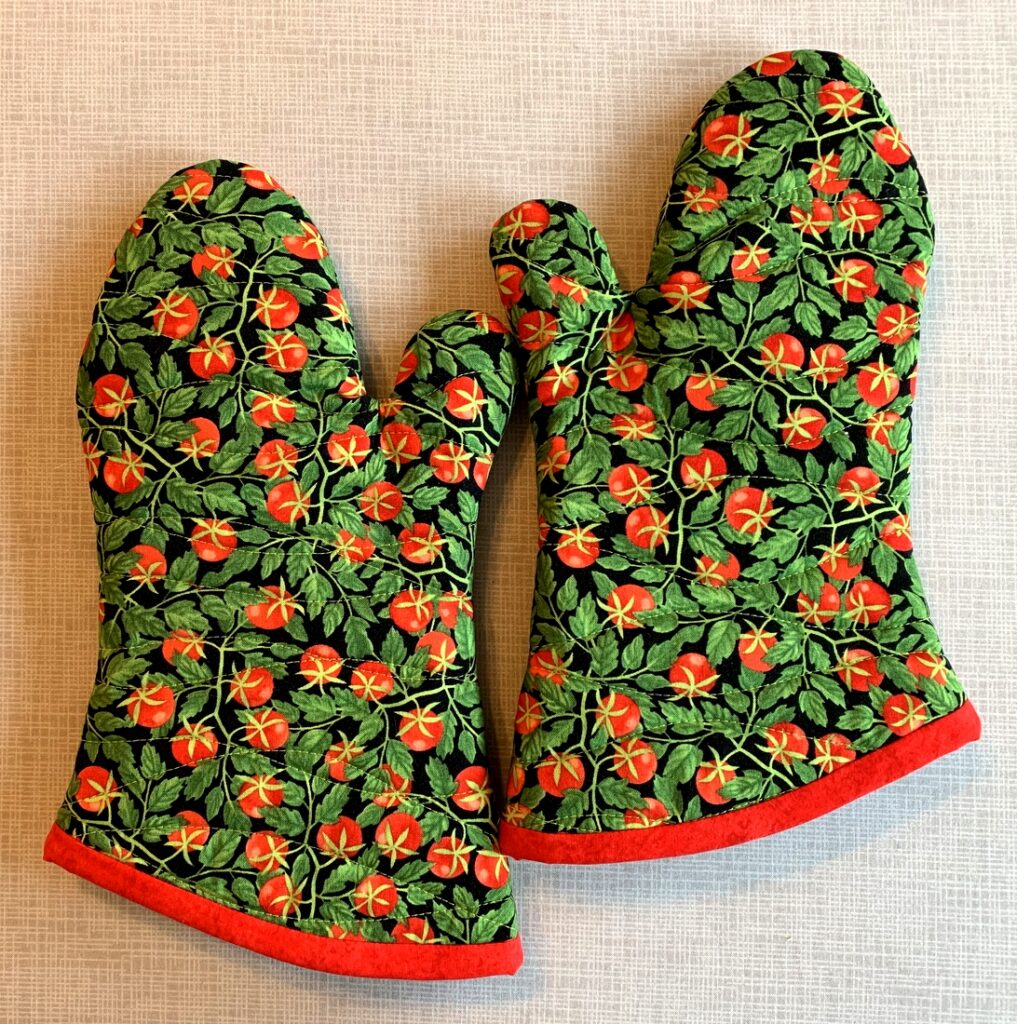
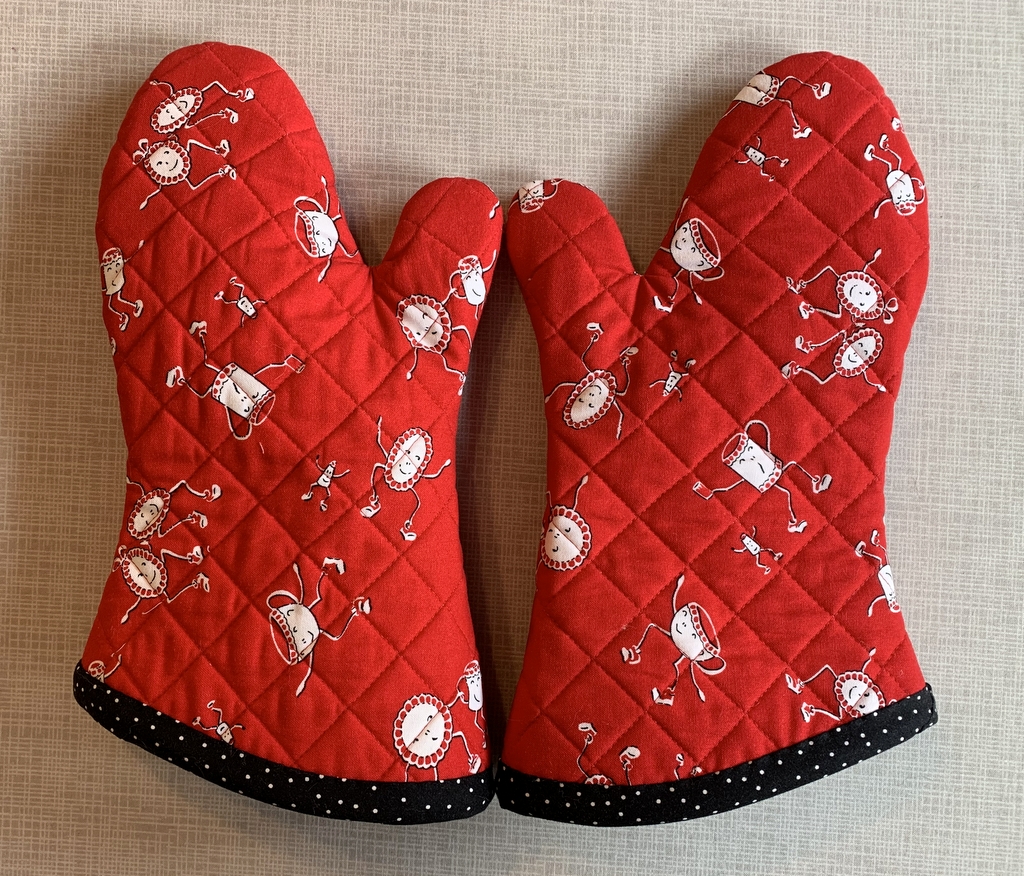
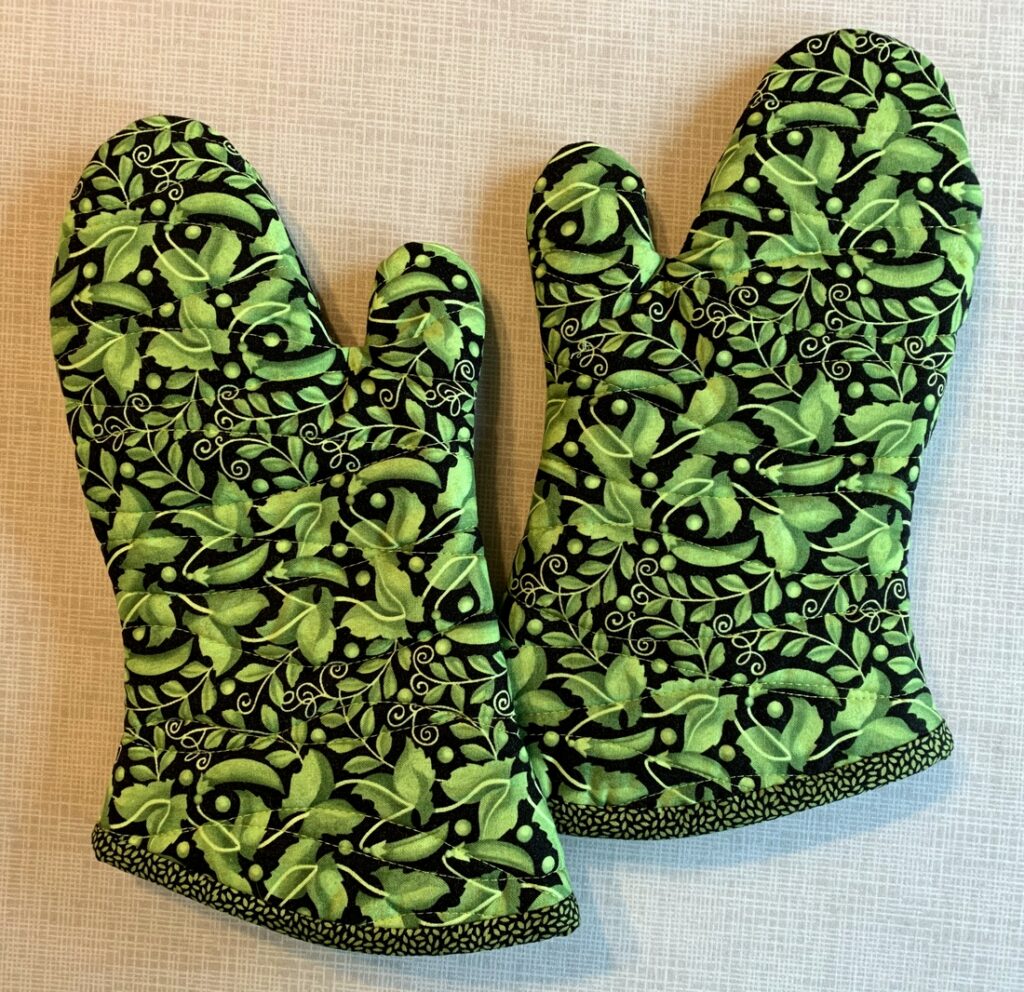
The other day I had a “what if?” moment. Yesterday I tried out my idea. I was on the right track but took one wrong turn. I tried again today — and it worked! The result is the set of oven mitts you see above.

Isn’t that fabric cute? It reminds me of a Valentine card I received as a kid that had peas on the outside. Inside was the message “Peas be my pod-ner.”

I have the perfect person in mind for these oven mitts. She’s Irish and loves the color green as much as I do. She reads my blog so I’m betting she’ll figure out these are for her. I’m planning to visit her next month but don’t want to wait that long to give them to her. If I get them in the mail tomorrow, she might get them by St. Patrick’s Day.


Posted in family, oven mitts, single-fold binding, tutorial, update | 7 Comments

JBB Accessories

A year ago at this time I had just finished teaching a class at Montavilla Sewing Center on the one and only Junior Billie Bag, which I like to call “the quintessential quilter’s tote.” I wanted to test my idea for a new Junior Billie Bag Accessories class and had offered my students a bonus class on making four accessories to go along with their newly finished totes.

My idea was to have the students do advance work on all four projects and then finish them up in the space of a four-hour class. Good thing the class was a freebie, as it turned out I had vastly underestimated the time it would take to complete each project. Fortunately, by the time class ended the students were well on their way and would be able to complete their projects at home.

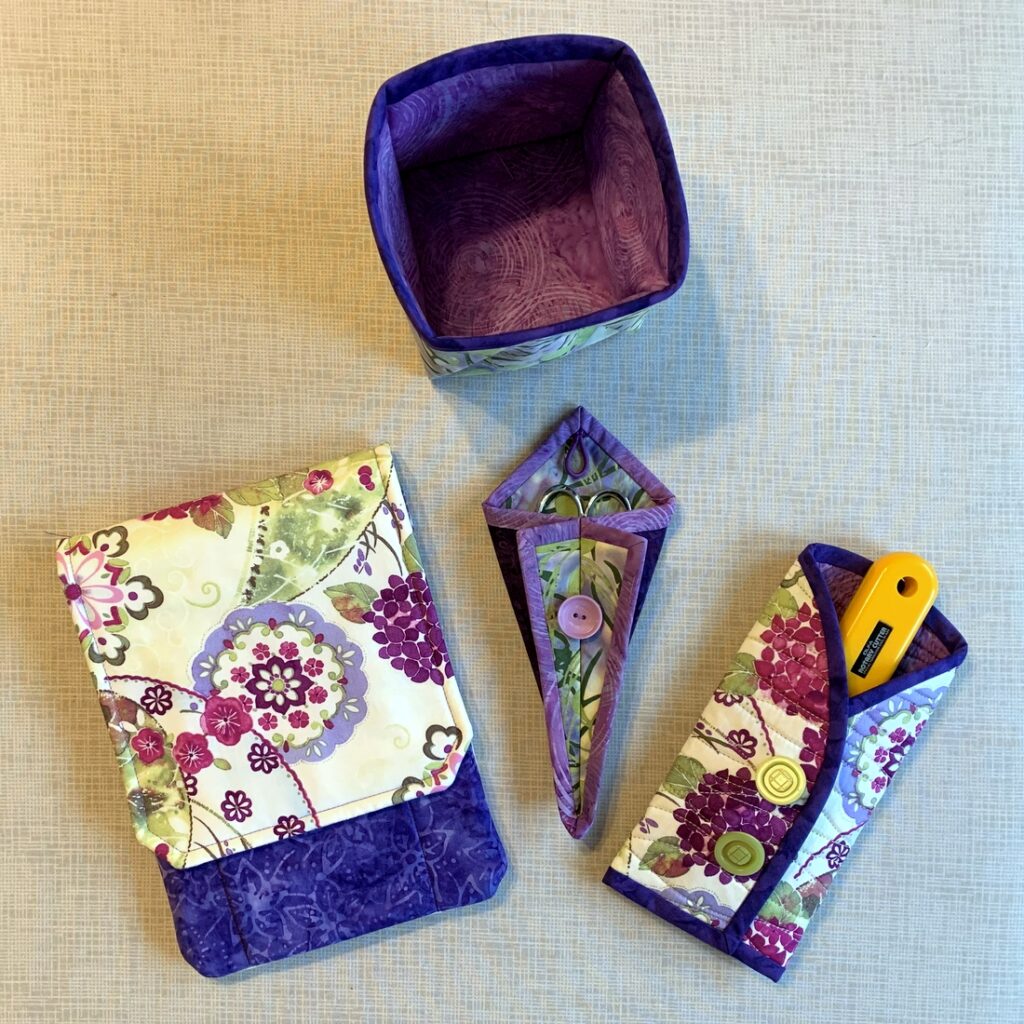
I was making accessories along with my students in order to demonstrate some of my tips and techniques so I too went home with unfinished projects. One year later, my accessories are finally finished:

At the top is a 4″ x 4″ x 4″ fabric box, which makes a wonderful threadcatcher. On the bottom left is a tool caddy based on the Travel Case pattern by Pearl Pereira of P3 Designs. In the middle is a little scissors case, and on the right is a rotary cutter coat.

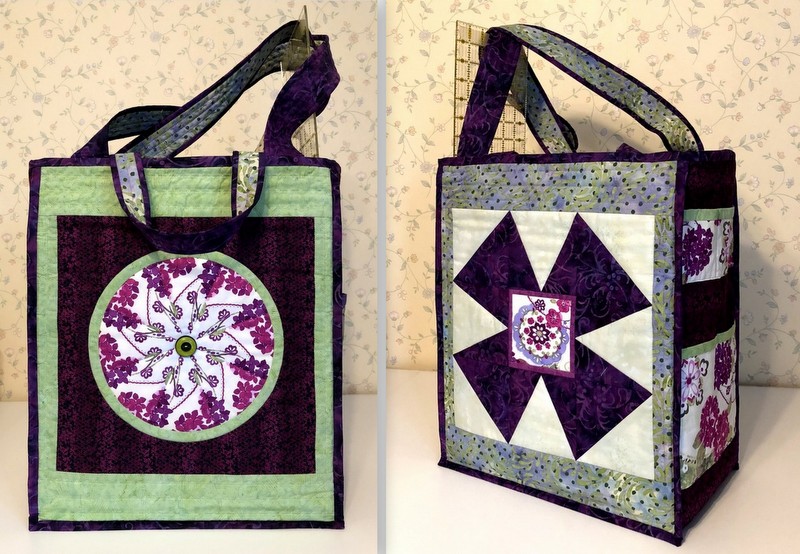
I selected the fabrics you see above because they go so well with a Junior Billie Bag I made a couple of years ago for my dear friend Vickie R.:


Naturally these latest accessories were made with Vickie in mind, and I am happy to say they are now in her possession.

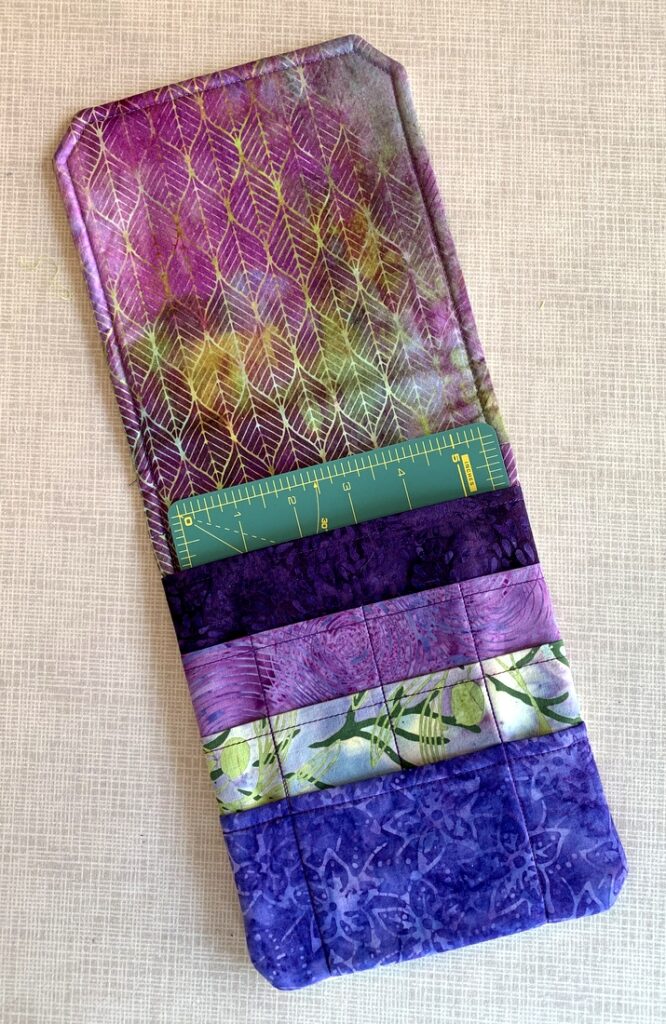
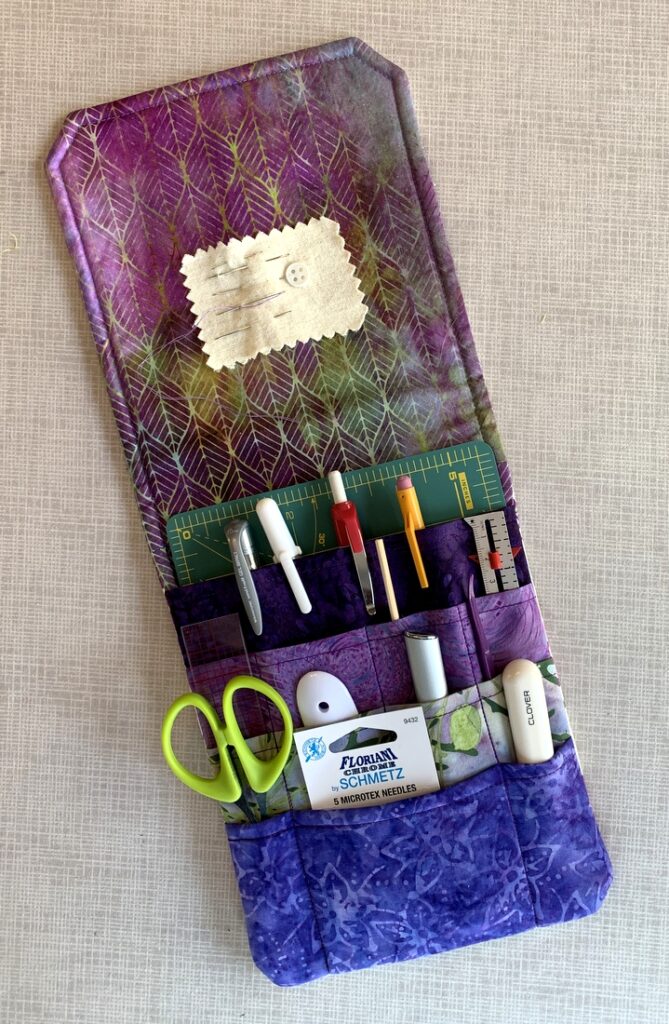
Here’s a look at the inside of Vickie’s tool caddy:


I made some modifications to the original pattern, adding a fourth pocket and making the case a little less wide (I’ll explain why in just a bit). The 6″ x 8″ mini cutting mat made by Olfa fits perfectly inside the case. Vickie will choose which of her tools she wants to put in her case; I put some of my own in just for this photo shoot:

As you can see, it holds a lot! Mine is loaded with even more.

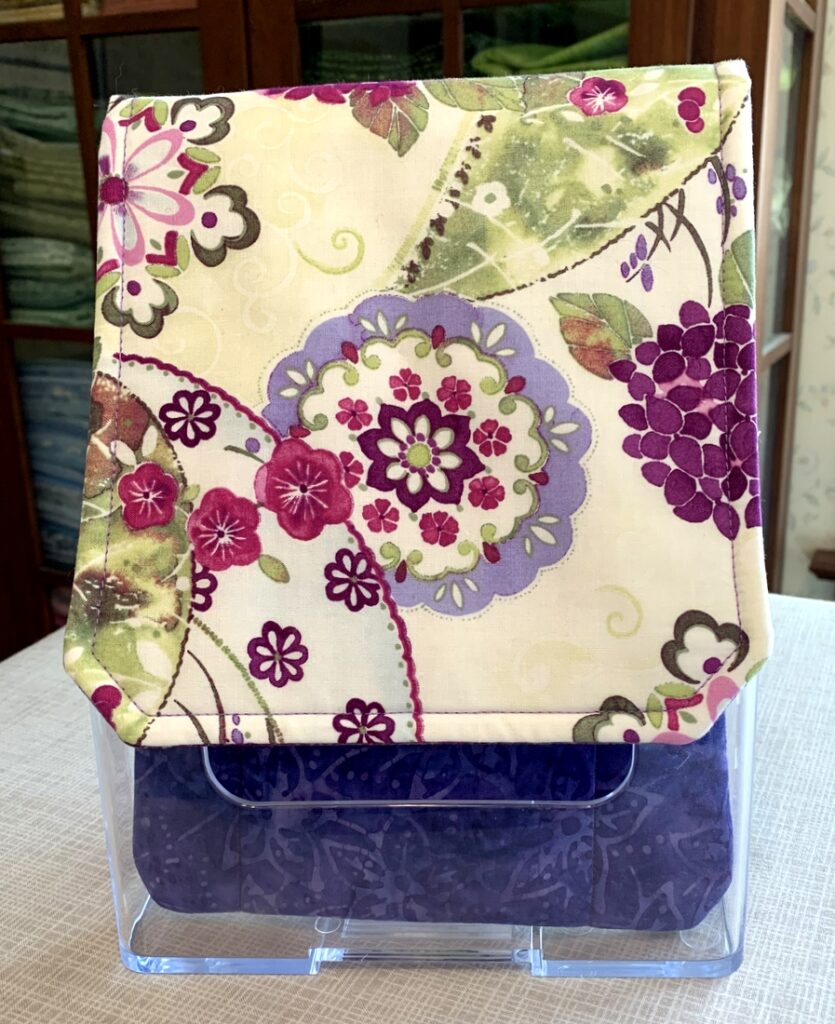
The reason I made the travel caddy a bit narrower than the pattern calls for is to make it fit better in this hard plastic brochure holder:

With the flap turned back, all of Vickie’s favorite tools will be right at her fingertips and easy to see. (A huge “thank you” to my guildmate Becky B. for introducing me to the brochure holder.)

That class in February 2020 was one of the last ones I taught before the coronavirus pandemic brought a screeching halt to in-person classes. I miss teaching so much and will savor the day when classes resume. There’s a list of quilters who want to make their own Junior Billie Bag, and I trust some of them will want their own suite of accessories to go with it. If so, I will be ready for them!


Posted in Billie Bag, Junior Billie Bag, rotary cutter case, tote bags, tutorial, update | 8 Comments

A New Project!

I know, I know. Why on earth am I starting something new when I have a sewing room full of UFOs? Well, I have my friend Char to blame — er, thank — for this one. Char, who blogs at The Quilted “Q,” wrote a post recently about a video tutorial she found online to create a quick but dramatic quilt made from 2½” strips of fabric. Fabric manufacturers have found a ready market for packages of these pre-cut strips that feature an entire line of fabric. The packages are popularly known as Jelly Rolls, although that name is trademarked by Moda Fabrics.

Intrigued, I clicked on the link Char provided. After watching the video I decided on the spot to make a quilt using a Jelly Roll that’s been in my stash for a few years. The quilt pattern, Tea Time, was designed by Larene Smith of the Quilted Button. The tutorial is by Donna Jordan of Jordan Fabrics and includes a pdf handout:

(Clicking here will take you to the video and the pdf handout.)

In doing a little research I found that Larene Smith’s design first appeared in 2009 as a free pattern called Tea Time in Bali and was offered to promote Bali Pops, the name Hoffman Fabrics gave to its packages of 2½” batik strips. You can see Larene Smith’s striking version here.

The fabrics in my version are very different. I’m using the one and only Jelly Roll in my stash, “High Street” by Lily Ashbury for Moda:

It was an impulse purchase. I really don’t use pre-cuts much (mainly because I like to wash and iron my fabrics before using them) but for some reason this one spoke to me. I do remember buying this while on a quilt shop hop with good friends; no doubt they influenced my decision to purchase it!

The pattern calls for 40 strips, from which you make eight strip sets of five fabrics. This Jelly Roll has five main colors — pink, orange, yellow, green, and grey . . .

. . . and with one exception each color is represented with eight strips. All I had to do was lay out the strips on my ironing board and combine them into eight piles of five strips each:

I tried not to think too much about choosing the piles, just making sure I had one of each color and looking for contrast in value and scale in the strips that will be next to each other. Because of the unique way the strip sets are cut and arranged, each fabric is going to wind up in different places in the blocks for a very scrappy look.

You see only seven piles above because I had already sewn one strip set together. Actually, you sew the strips into a tube and then cut the tube into triangles which open up to reveal blocks measuring 7″ square. Each tube yields seven blocks. Here are the blocks from my first strip set:

They went together really fast, and I’m eager to move on to the next set. Truth be told, I’m in a bit of a winter funk (and darn it, Punxsutawney Phil saw his shadow yesterday on Groundhog Day so we’re looking at six more weeks of winter). Being able to finish a quilt top quickly is sure to be a mood-lifter, and I will certainly enjoy working with these colorful and cheerful fabrics.


Posted in tutorial, update | 12 Comments

Oven Mitt Giveaway!

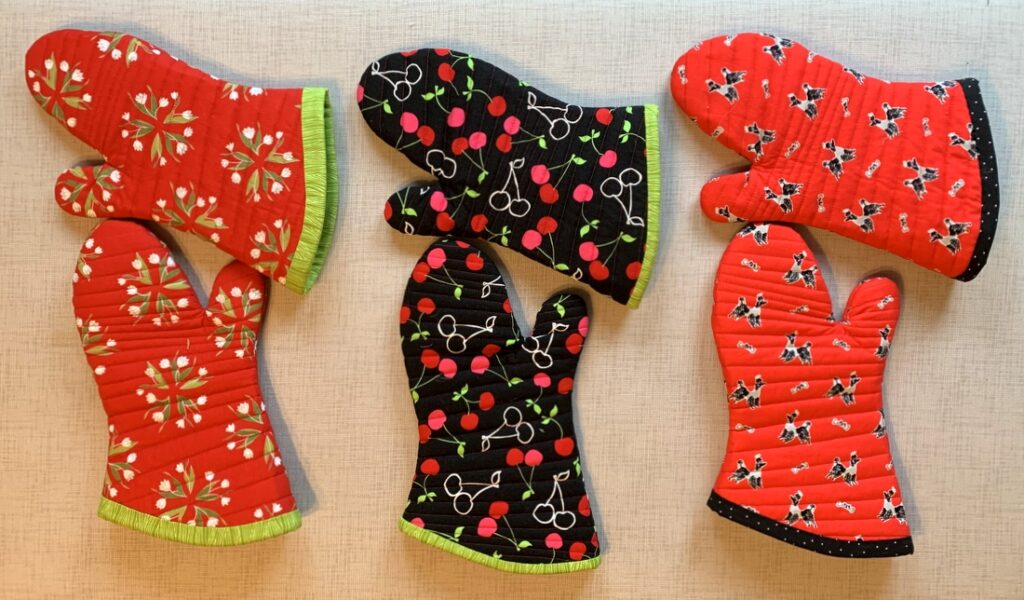
That’s right, friends. I’m giving away a set of oven mitts to three lucky winners. Will you be one of them?

I made these oven mitts in preparation for writing a tutorial. The shape of the mitts is the same on all of them — it’s the binding I’ve been tinkering with. I’ve been trying different widths and finishing techniques. Now that I’m finally satisfied, I can get to the tutorial — but now I have to make one more set of mitts to photograph for the tutorial!

The mitts you see above were made of four layers:
⦁ the outer fabric is 100% cotton
⦁ the second layer is 100% cotton batting
⦁ the third layer is Insul-bright, an insulated lining material specifically made for hot pads and oven mitts
⦁ the fourth layer (the inside of the mitt) is cotton with an aluminized coating, commonly used to cover ironing boards. This fabric is not essential but I had some on hand and decided to use it because one of my old oven mitts happened to be lined with it.

To be entered in the giveaway, all you have to do is write a comment at the bottom of this post responding to the question, “What is your favorite kind of food?” If you wish, name a dish you especially like in your favored cuisine. How simple is that? No need for you to subscribe to my blog or follow me on Instagram (though I would be delighted if you chose to do either).

One entry per person. I will mail anywhere in the world so international readers are welcome to enter.

Family members are invited to leave comments but are not eligible to win. (Don’t feel too sorry for them; all they have to do is let me know they want a set and they’ll get one!)

The giveaway will remain open through Friday, January 29. On Saturday, January 30, I’ll use a random number generator to pick three winners. Winner #1 gets the red mitts on the left with the flowers; winner #2 gets the set in the middle with the cherries; and winner #3 gets the set on the right with the poodles.

But wait — there’s more! It it happens that you are a winner and the mitts are totally the wrong color for your kitchen, you can let me know when I contact you and I’ll make you a custom set in the color of your choice. If that happens, I’ll draw a fourth winner for the set that didn’t work for you.

Good luck, everyone!


Posted in family, Giveaway, home dec, oven mitts, tutorial, update | 46 Comments