Category Archives: home dec

Kitchen Remodel: Before and After

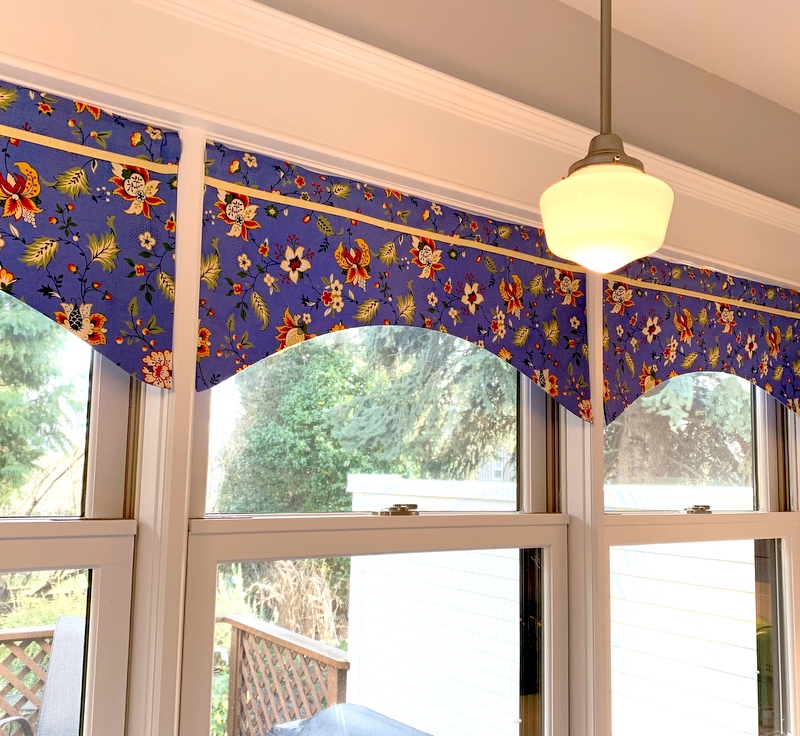
After posting pictures in January of the valances I made for our kitchen windows, I declared last year’s kitchen remodel “officially complete” and blithely added I would post before and after pictures “one of these days.” Well, friends, it’s been nine months coming but “one of these days” has finally arrived.

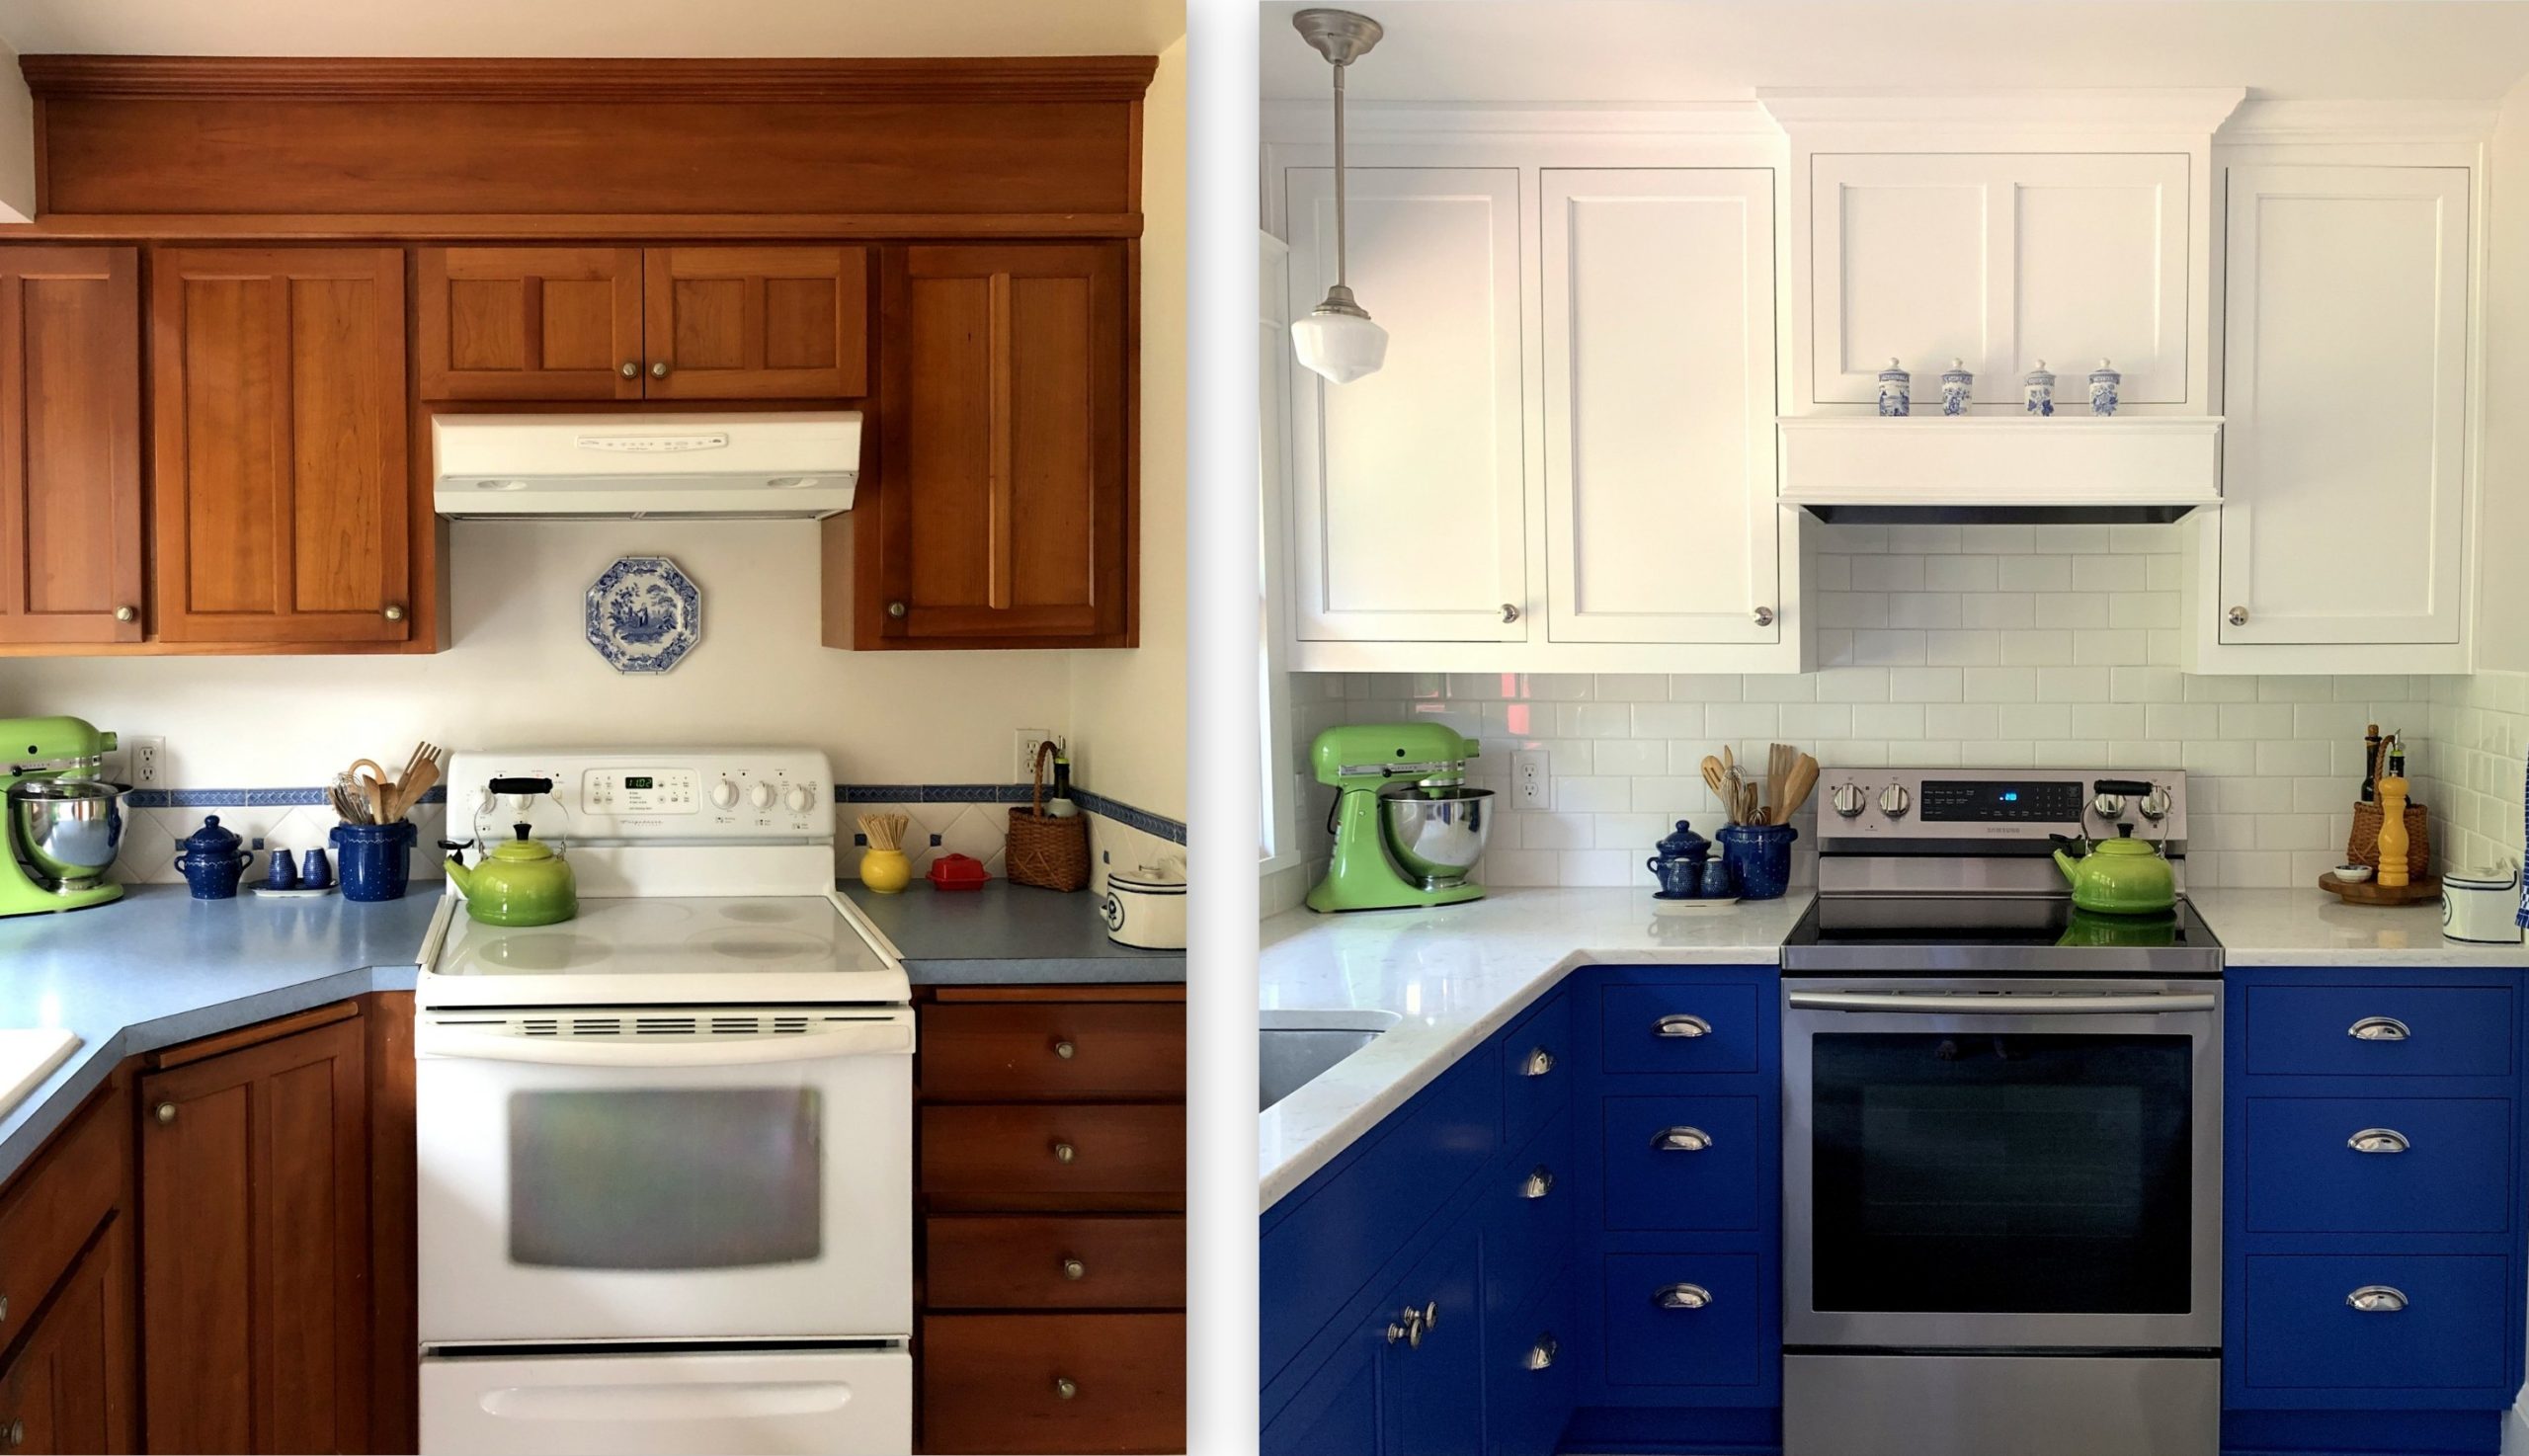
Our kitchen was fully functional before the remodel. Indeed, it had been updated only 20 years earlier. But there were several things about the kitchen I had grown dissatisfied with and I knew that making changes now would achieve three ends. First, the Dear Husband and I would enjoy cooking in the kitchen more. Second, it would give us the opportunity to correct some design flaws from previous remodels. Third — and much more important — the updates would make our home more attractive to buyers, a consideration down the line when it’s time to think about selling.

Let’s start with the east wall, moving around the corner to part of the south wall:

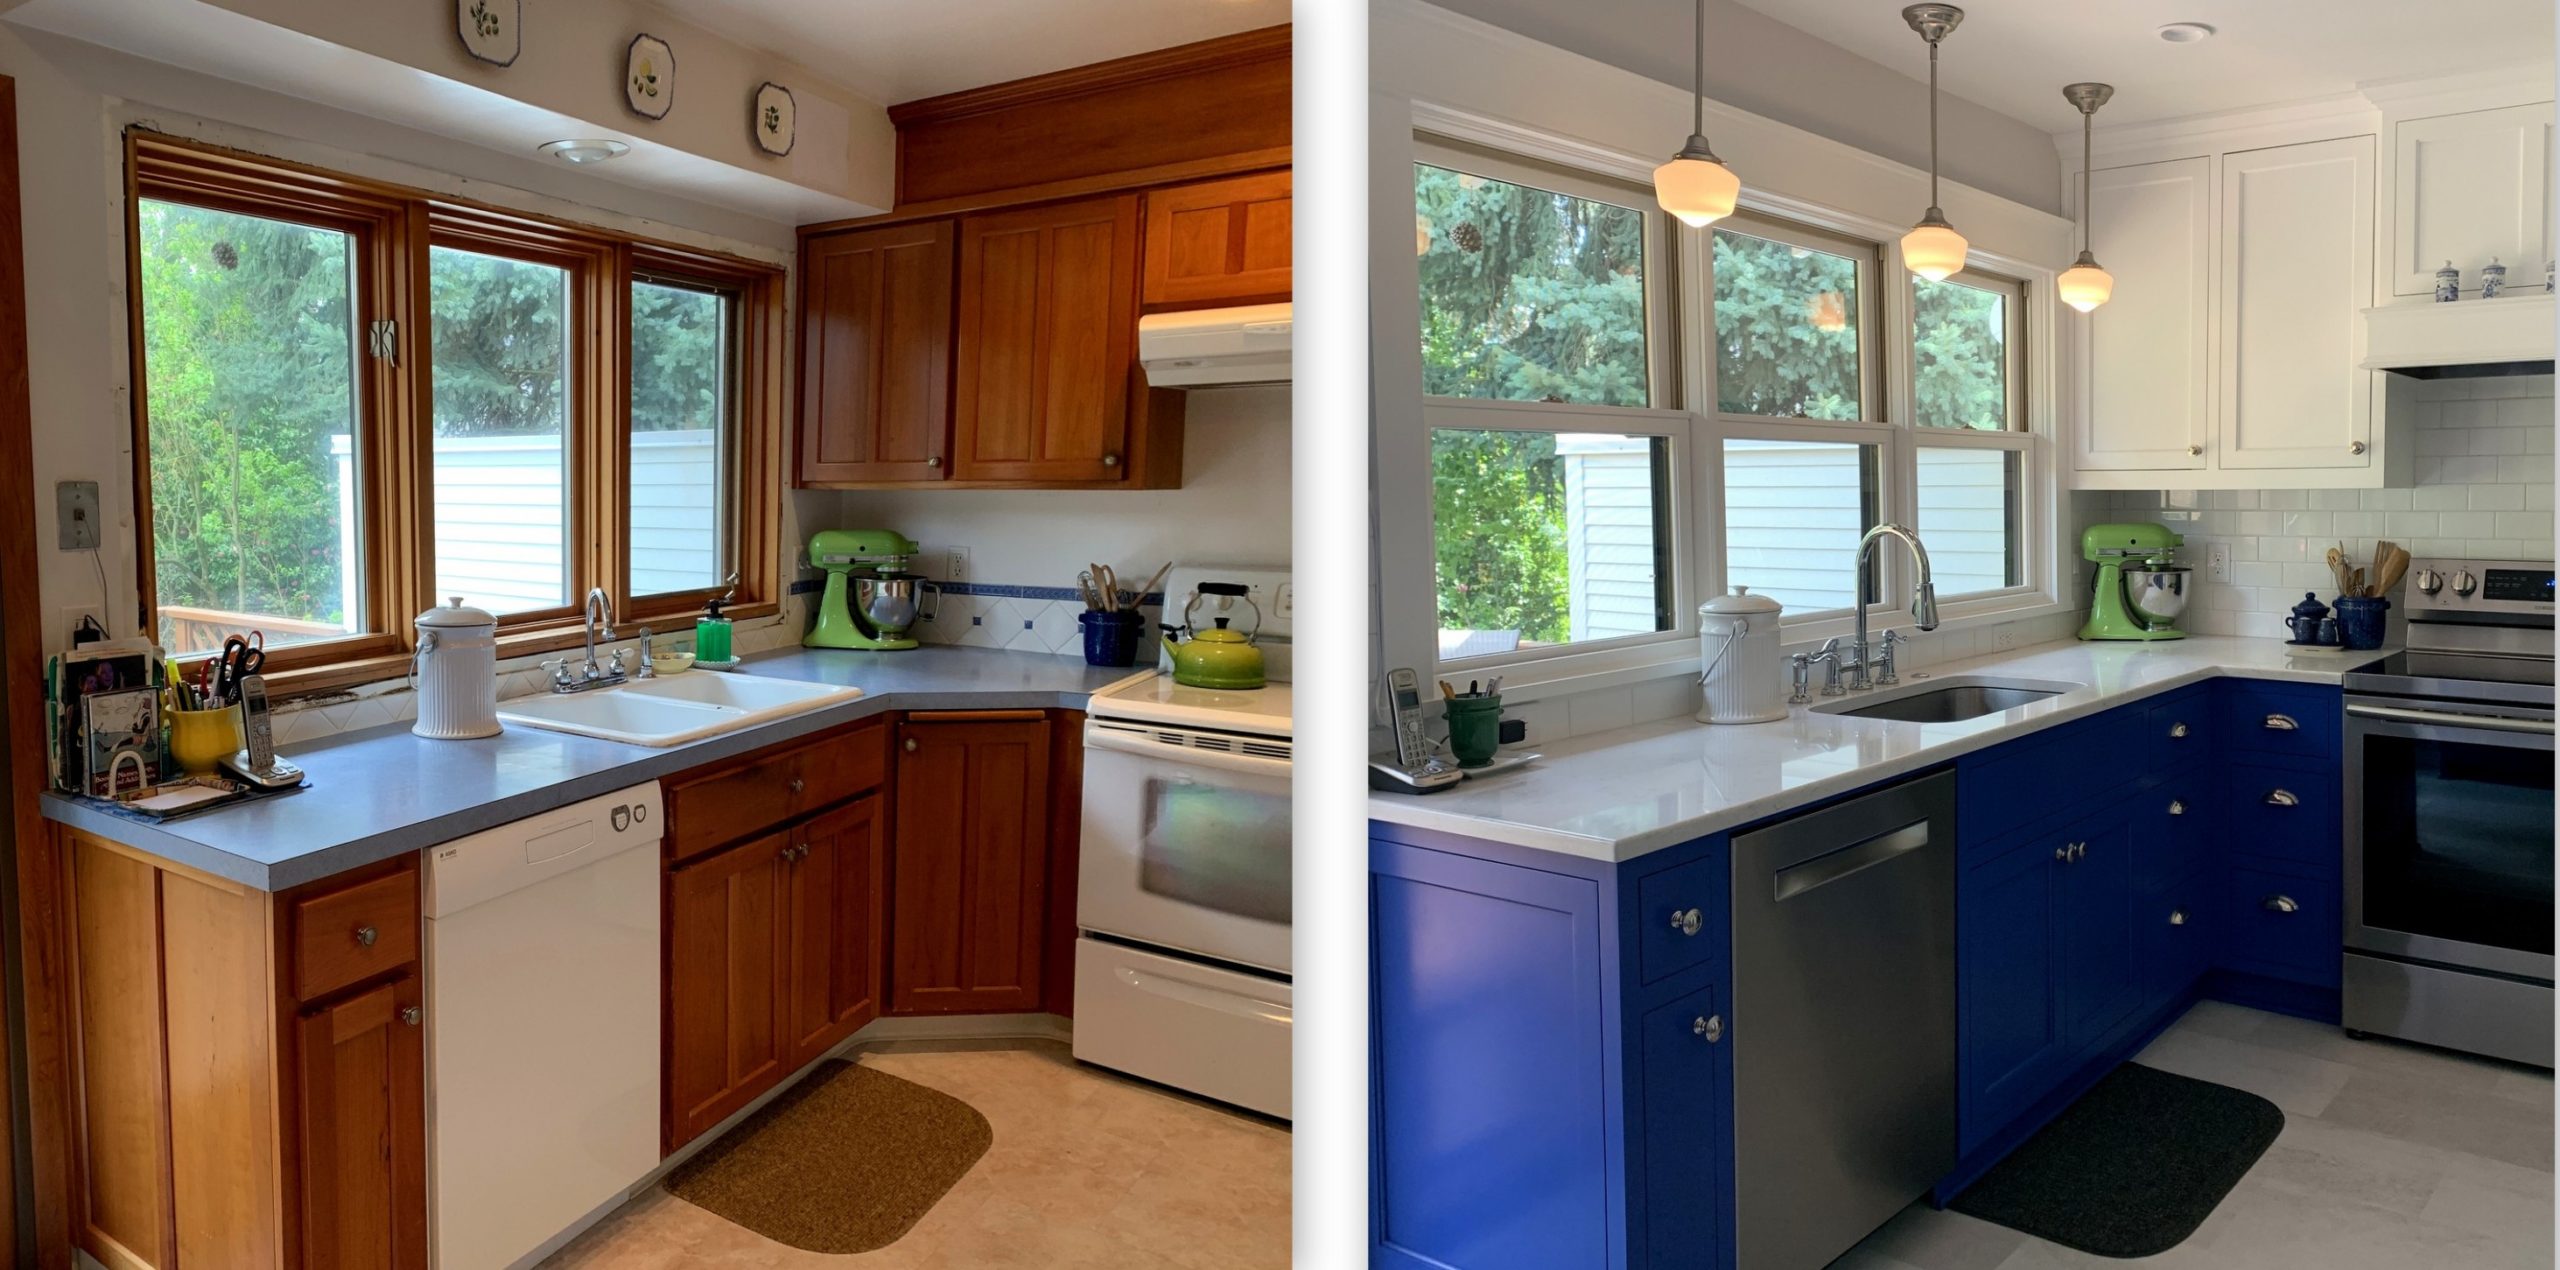
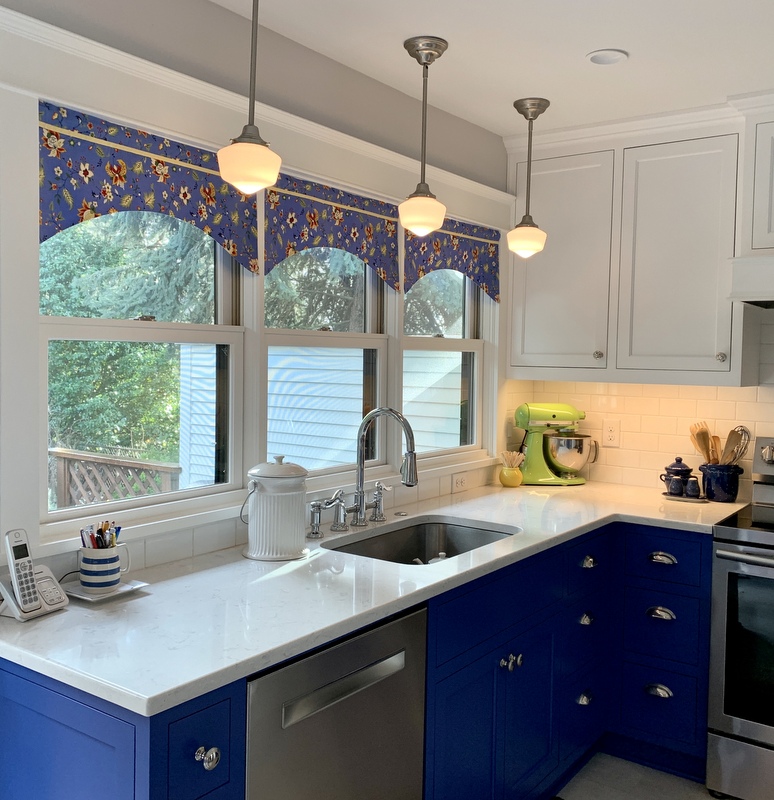
The soffit over the sink is gone, allowing the new cabinets on the south wall to go all the way to the ceiling. The old casement windows were failing, which is what started the remodeling ball rolling. We replaced them with double-hung windows in keeping with the windows in the rest of our 1913 house. Not shown in the photos above is the sliding glass door that takes up the rest of the east wall.

Here’s the east wall with the valances in place:

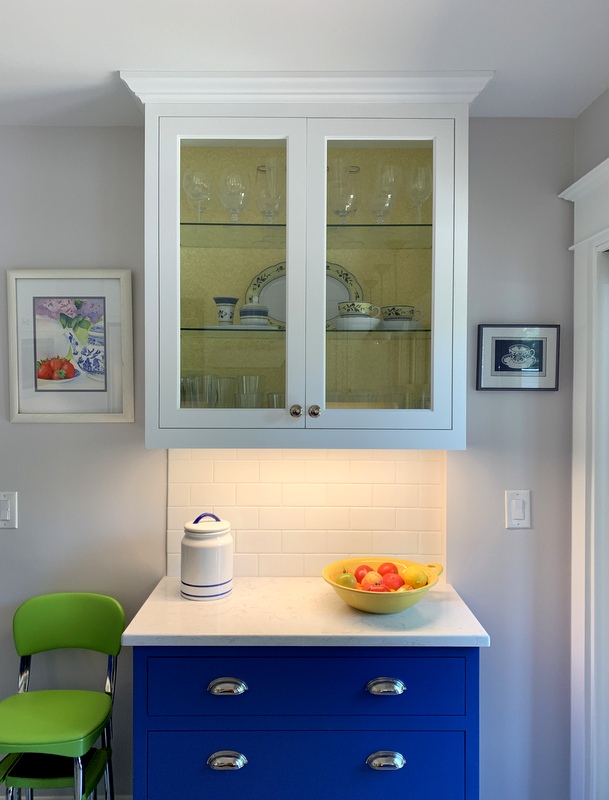
Looking directly at the south wall:

The upper cupboard space gained with the elimination of the east wall soffit was offset by cupboard space lost by having a custom range hood cover installed. We also lost a great deal of lower storage space by giving up the angled corner cupboard to the left of the stove containing a very large two-tiered lazy Susan that held most of my pots and pans. This forced me to pay attention to the items I actually use in my kitchen and resulted in paring down contents not just there but throughout the kitchen.

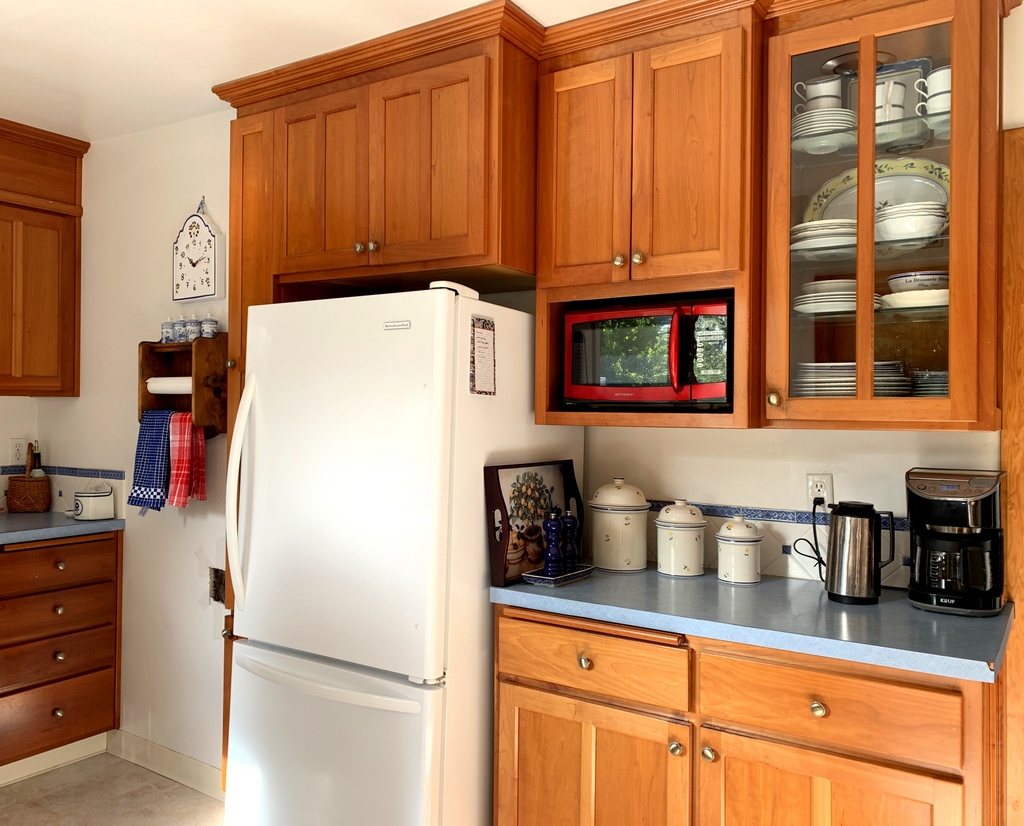
Here’s a “before” shot of the west wall:

Apparently I didn’t get a shot of the entire west wall after the remodel so I can’t show you a side-by-side comparison. Here are two “after” shots of the west wall:

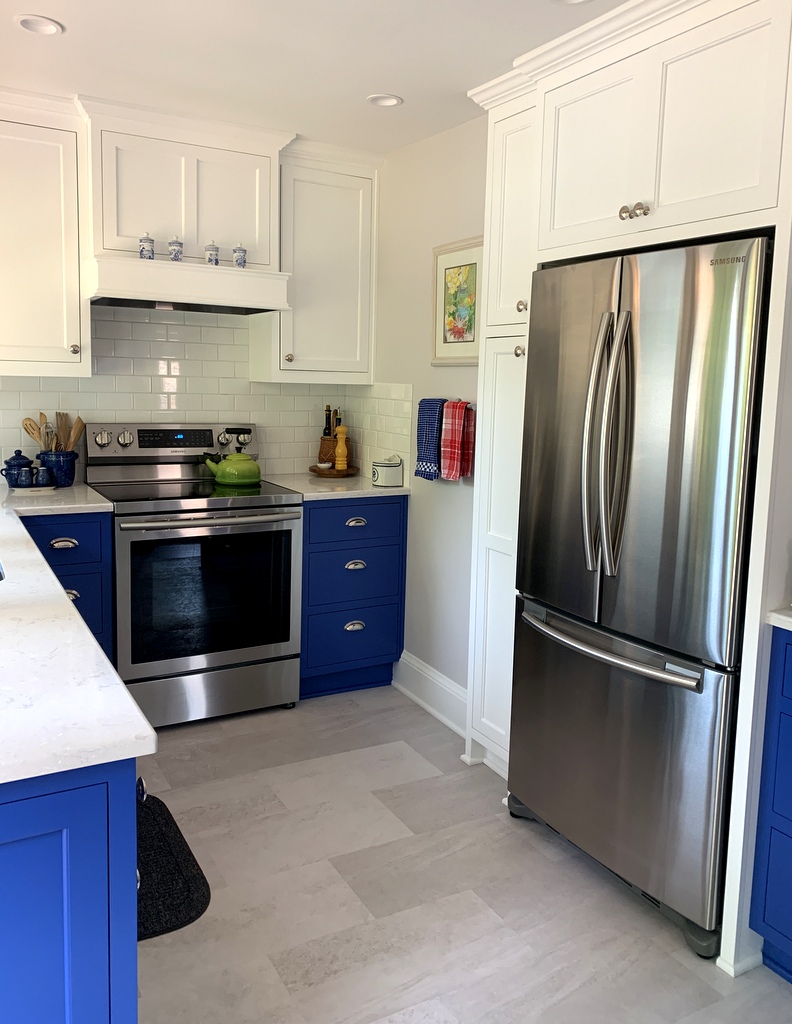
The counter-depth refrigerator makes the kitchen feel roomier. It’s wider than the old fridge but doesn’t hold nearly as much. No matter: the old one is now downstairs in the pantry. Having a second fridge is one of the biggest bonuses of this remodel.

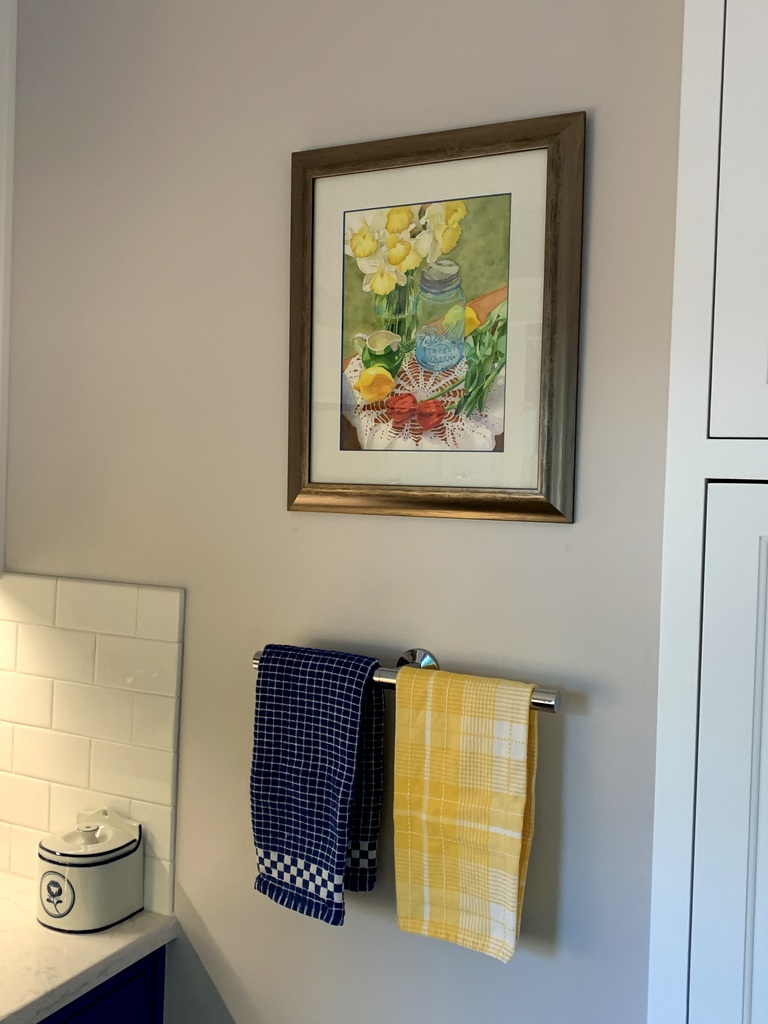
By the way, after taking the “after” shots last fall I had the lovely watercolor (by my talented daughter-in-law, Jeanne Ann White) reframed. Not until I got it home and hung it on the wall did I notice that the wood frame is the same color as the stainless steel appliances:

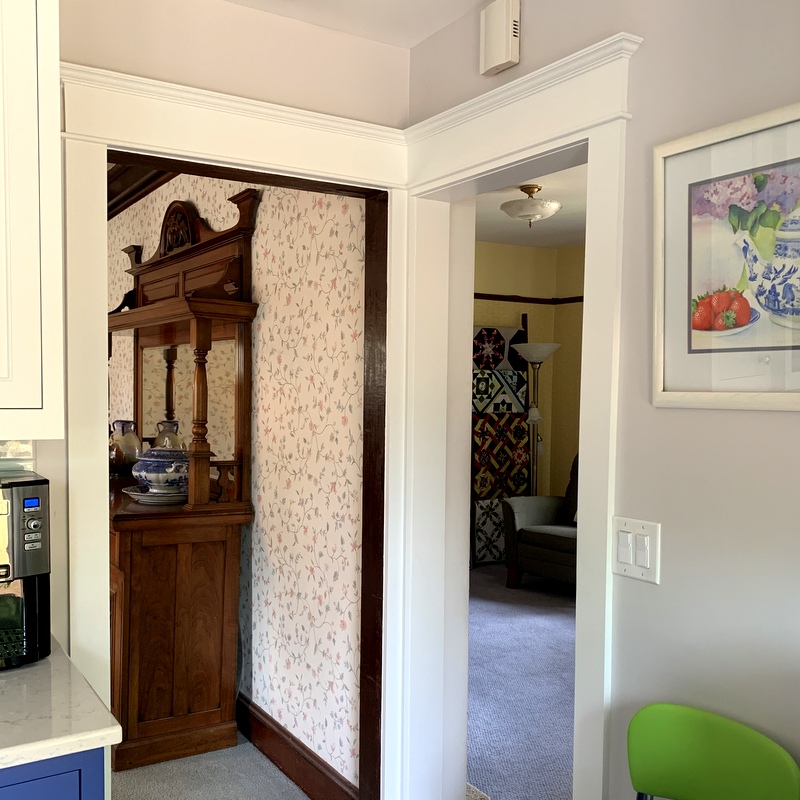
In the northwest corner of the kitchen, the doorways to the dining room and TV room were transformed by millwork matching the rest of the house:

It didn’t occur to me to take a “before” picture of this corner because there was literally nothing there but sheetrock.

Finally we come to the north wall:

Jeanne Ann’s work is featured on this wall as well. The wood trim you see on the far right side of the photos is the frame of the sliding glass door.

And there you have it.

I’m going to do one more post, focusing on some of the decorative accents I’ve added to the kitchen.

If you’re new to my blog and want to review the kitchen remodel from the outset, feel free to follow these links:

March 27, 2019:  All Quiet on the Sewing Front
April 14, 2019:  Prepping for the Kitchen Remodel
April 22, 2019:  Kitchen Remodel: Week 1
April 28, 2019:  Kitchen Remodel: Week 2
April 30, 2019:  Kitchen Remodel: My Color Inspiration
May 5, 2019:  Kitchen Remodel: Week 3
May 11, 2019:  Kitchen Remodel: Week 4
May 15, 2019:  Kitchen Remodel: Week 5
May 26, 2019:  Kitchen Remodel: Week 6
June 3, 2019:  Kitchen Remodel: Week 7 — Part 1
June 9, 2019:  Kitchen Remodel: Week 7 — Part 2
June 13, 2019:  Kitchen Remodel: Week 8
June 16, 2019:  Kitchen Remodel: Week 9
August 14, 2019:  Kitchen Remodel: An Update
August 24, 2019:  Kitchen Remodel: the Glass-Fronted Cabinet
January 5, 2020: First Finish of 2020: Kitchen Valances

Let me end this long post by saying I am beyond grateful to have a kitchen. As wildfires raged through Oregon last week leaving destruction and devastation in their wake, some of my family members and friends were forced to evacuate their homes. I am relieved to report their homes are still standing but it will be some time before they can go home because the fires are still burning and the air is thick with dangerous smoke. The fires came within a few miles of Portland but the city was blanketed by smoke. Portland has had the worst air quality in the entire United States for the last few days. Rain is forecast for tomorrow so we are hoping for some relief.

I have watched in anguish the images on TV of entire neighborhoods reduced to rubble not just in my state but also in California and Washington. Wildfires are burning in a dozen western states but the west coast has been hit especially hard. Against that backdrop I feel lucky to have a beautifully remodeled kitchen.


Posted in family, home dec, kitchen remodel, update | 7 Comments

Here, There, and Everywhere

Do you ever buy a piece of fabric that you have no idea what to do with but you just know you have to have it? A couple years ago I was in a quilt shop in Bend, Oregon and spotted a succulent print in greens from the “Canyon” line designed by Kate Spain for Moda. I had to have some!

It sat on a shelf in my sewing room cabinet until a few weeks ago when I pulled it out to make this test block from a new pattern by Margot Languedoc called Pretty Little Baskets:

The pattern is definitely on my “to do” list but I only made one block with that fabric.

Then very recently Sew Kind of Wonderful released a new pattern called Curvy Bow Tie using the new Wonder Curve Ruler and I used a bit more of the fabric to make this test block:

Such a cute block but I wondered if the fabric would look better as the background of the block rather than the focal point. I made another block to see:

Oh yes, I like that better. But I’m not ready to make an entire quilt out of it just yet. (I love the Curvy Bow Tie pattern, though, and do plan to make a quilt when I’ve decided on a color scheme.)

What I really wanted to do with that fabric was make a pair of pillowcases for the Portland White House (using my own tutorial). So I did:

And I used some scraps to try out a new mask tutorial:

Now I can’t stop thinking of ways to use this fabric. Wouldn’t it make a great camp shirt?


Posted in bias tape, bowties, face masks, home dec, roll-it-up pillowcases, tutorial, update, Wonder Curve Ruler | 12 Comments

March Madness

Hooray — March is here! Spring is on its way! In celebration of my favorite season of the year, I’m working on a new project featuring the quintessential color of spring: green, of course. My favorite color.

You’re probably wondering why on earth I’ve started something new when I have so many Works-in-Progress and Unfinished Objects (aka WIPs and UFOs) on hand. All I can say in my defense is that a) I like working on multiple projects at once, and b) there’s a method to my madness.

Before I explain, let me show you the new project:

I’m building a wonky neighborhood using the pattern Dresden Neighborhood by Kim Lapacek of Persimon Dreams. The wedges are made with a Dresden plate ruler, hence the name of the pattern. Isn’t my little neighborhood cute? The houses will have wonky doors and windows, and the raw edges in the center will be covered by an appliquéd circle.

Here’s Kim’s version as shown on her pattern cover:

I came across the pattern last year and bought it right away. After looking at some clever and charming versions recently on Instagram and Pinterest, I decided to jump in and create my own version. I’m also working on a couple of large quilts so the idea of a small (24″ square finished) project has great appeal. That’s one reason.

The houses in this little neighborhood are meant to be embellished with decorative machine stitches, especially around the roofs. Late last year I upgraded my Janome sewing machine to the Horizon Memory Craft 9450 QCP model. I am absolutely loving some of the new features but haven’t yet played around with the decorative stitches. This project is the perfect jumping off point. That’s the second reason.

And the third reason? I’m going to be teaching a “Wonky Dresden Neighborhood” class in June. (I teach at Montavilla Sewing Center’s Lake Oswego store.) This is going to be my store sample so I have some extra motivation to finish it up as soon as possible and get it on display. Hardly a burden. I can’t wait to get back to it!


Posted in appliqué, home dec, machine applique, update | 8 Comments

Throwback Thursday: Square Dance (2014)

Throwback Thursday already?? It seems impossible but we are in the final week of January, Week 5 (and Year 5) of my 10-year-lookback at quilts. I started with 2010 at the beginning of the month and now I’m up to 2014.

In Square Dance you see my interpretation of the classic Twist block. Every Twist quilt I’ve ever seen features a solid fabric in the center of each block and two fabrics for the lattice. My version incorporates a lovely folk art floral in the center of each block and 12 fabrics in the lattice — four each of rose, green, and purple:

Square Dance, 55½” x 64½” (2014)

It was quite a challenge getting the balance of fabrics just right but I was very pleased with the outcome.

The beautiful quilting by Melissa Hoffman of Fiddlestitches is hard to see so here’s a close-up:

I remember Melissa telling me she had to wear a headlamp to stitch the free-motion filigree design in the interior of the quilt. Black thread on solid black fabric: what a challenge that must have been!

Square Dance is one of my quilts in rotation on the back of the couch in our living room. In fact, it’s there right now, and I managed to get a shot just now while the sun was briefly shining:


Posted in free motion quilting, home dec, snowball blocks, Throwback Thursday, update | 4 Comments

First Finish of 2020: Kitchen Valances

This project falls squarely in the “why on earth did it take me so long to get it done?” category. After all, last year’s major kitchen remodel — faithfully documented on the pages of this blog — was essentially completed by the end of August. (You can see one of my last posts about the kitchen here.)

The only thing left to complete the remodel was making valances for the three new windows. I already had the fabric, a vibrant Jacobean floral that had been in my stash for a few years. The fabric (from the “Breath of Avignon” line designed by Sandy Klop for Moda) inspired my choice of paint color for the lower cabinets:


I also had a picture in my mind’s eye of what the valances would look like. No simple ruffled valances like I’ve made before. I liked them well enough but this time I wanted a more tailored look. I envisioned valances that curved upward from the sides with an inverted pleat in the middle made with contrasting fabric.

Since I had covered the back wall of the glass-fronted cabinet with yellow fabric . . .

. . . I decided to use fabric in the same shade of yellow for the pleat. And for extra pizzazz, I decided to insert a navy blue flange between the pleated part of the valance and the top band.

After taking very careful measurements, I drew up a pattern on freezer paper . . .

. . . and proceeded to fashion the first valance.

Alas, it was not a success:

First of all, I measured incorrectly; the valance wasn’t wide enough. You’re not supposed to see the end of the spring tension rod at the top of the window. Second, when the valance was placed at the top of the window, you could see the bottom of the pleat. That was not the look I was going for. Third, instead of folding the ends of the upper band in to make a rod pocket, I sewed the ends shut. (What on earth was I thinking?) In order to audition the valance on the window, I had to add a sleeve on the back.

The valance isn’t a keeper but it was very useful as a prototype. With some valuable input from my sister Diane, I nixed the pleat and changed the flange from navy blue to yellow. Here’s a close-up of the updated flange:

Can you see the pattern of tiny little flowers? It’s very subtle.

I’m much happier with the look of the yellow flanges:

I fussycut the second and third valances to match the design on the first, simply because I thought it would look better than having each valance cut at random from the focus fabric.

The lining of the valances is a blue print pulled from my stash:

Before the valances went up, the globes of the pendant lights blended into the white woodwork. I really like the way they stand out now. Here’s what the kitchen looks like at night:

I can now declare the kitchen remodel officially complete. One of these days I’ll do that “before and after” post I promised last year.


Posted in family, home dec, kitchen remodel, update, valance | 10 Comments

Throwback Thursday: Dianthus (2010)

First things first:  Happy New Year!! Can you believe it’s 2020?

I’m taking a look back at some of the quilts I’ve made over the last 10 years, starting in 2010. (I got the idea from Thelma at Cupcakes’n’Daisies who posted on Instagram yesterday with photos of 10 gorgeous quilts she made between 2010 and 2019. Check out her beauties at instagram.com/thelmacupcake.

For 2010 I chose this quilt, Dianthus:

Dianthus, 57″ x 67″ (2010)

The pattern is 4-Patch Stacked Posies by HD Designs. I had recently discovered the four-patch kaleidoscope block and was having great fun investigating the possibilities with other fabrics and other settings. Here you see a large strip of the focus fabric as well as the blocks that didn’t make the cut for the front of the quilt:

I quilted this one myself and I don’t mind telling you I was a bundle of nerves during the process. Here are a couple of close-ups:

I used a variegated thread of green and lavender. The color variation is very subtle, which is just what I wanted.

Why the name Dianthus? The fabric is a gorgeous melange of blossoms including tulips, hydrangeas, and carnations. Dianthus is the Latin word for carnation. The quilt wound up at the home of my twin sister, Diane. ‘Nuff said.

When Diane’s grandson Edward was a baby, the quilt was used in his bedroom at her home:


Edward is now 10 years old. (How did that happen?) He’s still a frequent overnight visitor but as you might imagine his room looks very different today. The crib has been replaced with a trundle bed, for one thing.

And the quilt? Nowadays it’s folded at the bottom of the bed in the first floor guest room and is often pulled into service for a lap quilt while watching TV. The 57″ x 67″ size makes it a good candidate for that.

Thanks for stopping by on this second day of the New Year. Do come back for next week’s Throwback Thursday to see a quilt I made in 2011.


Posted in 4-Patch Wonder, baby quilt, family, faux-kaleido quilts, free motion quilting, home dec, kaleidoscope quilts, Throwback Thursday, update | 4 Comments

Christmas Pillowcases All Year ‘Round

Now that Christmas is over, I can show you the pillowcases I made for my twin sister Diane and her husband Ed:


The cases are made for a king size bed so they measure a generous 20″ x 33″. I am so in love with that floral fabric; it’s from a 2010 line for Henry Glass Fabrics called “At Home for Christmas” designed by Heather Mulder Peterson of Anka’s Treasures. It’s been in my stash for years. Knowing I would be using most of it, I scoured the Internet looking for more and even contacted Heather to see if she still had some in her shop; alas, it is gone.

I confess it was really hard to cut into that fabric but I knew that pillowcases made from it would look wonderful in Diane and Ed’s master bedroom:

The colors are Christmas-y but the prints are not, making the pillowcases appropriate for use all year round.

I had one other thing in mind when I chose the fabric. In the picture below you can just get a glimpse of a quilt on the wall:


It’s Midnight in the Garden, one of my very favorite quilts, made from my pattern 4-Patch Wonder:

I gave the quilt to Diane for her 60th birthday a few years ago and I get to see it whenever I travel to Georgia to visit her. I figured the pillowcases would complement her quilt very nicely. And they do, don’t they?!


Posted in 4-Patch Wonder, family, faux-kaleido quilts, home dec, kaleidoscope quilts, roll-it-up pillowcases, tutorial, update, wall hanging | 10 Comments

More Simple Sewing

It’s been almost two weeks since the Dear Husband and I returned from our annual Thanksgiving trip to Georgia. I’m afraid I don’t have much to show for it in terms of sewing. Quite ironic, as the few things I have worked on fall squarely in the “simple sewing” camp.

I converted a one-pocket long-sleeved shirt for the DH into a two-pocket short-sleeved shirt. The pockets were made from the bottom part of the sleeves:

I hope you can see the pocket! I matched the plaid pretty carefully.

New napkins for the Portland White House (we don’t use paper napkins):

Pillowcases for the Portland White House featuring the same toile fabric I used in the pillowcases made when I was in Georgia (which I wrote about here):

These are ready to go in my linen closet. Judging by the look on Coco’s face, I may not get them away from her:

That simple paisley table topper I made for sister Diane over Thanksgiving is getting a re-do. It was just two pieces of fabric sewn right sides together, turned, and topstitched around the edges. Trouble was, the two layers of fabric didn’t lie completely flat. I convinced Diane I had to take the table topper home and remake it, this time stitching the layers together and adding a simple binding.

Here’s the paisley fabric with two choices for binding pulled from my stash:

We’re going with the one on the bottom left. Diane and I both like the way the linear squares play off the paisley, and it’s a better color match. I think the binding will look even better cut on the bias.

Once I’m done with that, I absolutely must make the DH a new bathrobe. The one I made him several years ago is practically in tatters. I picked up a cotton print a few months ago with his bathrobe in mind. I’ll trim it with a navy blue blender from Maywood:

It’s been a while since I made a garment. I’ll be pulling my serger out of the sewing room closet and refreshing my memory on how it works. Wish me luck!


Posted in family, garment sewing, home dec, mitered corners, roll-it-up pillowcases, table napkins, table topper, update | 4 Comments

Simple Sewing

My sister Diane has a new table topper and four generously sized napkins made from the same paisley fabric I used last year to update the window treatment in her dining room:

(I wrote about the window treatments in this post from a year ago.)

Simple sewing. Even so, I found it necessary to revisit my own tutorial on mitering the corners of the napkins.

Diane just happened to have some enameled napkin rings shaped like umbrellas that go perfectly with the napkins:

Aren’t those fun? They add just the right amount of whimsy, don’t you think?


Posted in family, home dec, mitered corners, table napkins, table topper, update | 6 Comments

Giving Thanks

Greetings from Norcross, Georgia, the Atlanta suburb where my twin sister Diane and her husband Ed live. My husband and I are here for our annual Thanksgiving visit spanning two weeks. We’ve already been here a week. The time is going by way too fast!

Before we left Portland, Diane asked if I would bring fabric to make a pair of what she calls “Dawn pillowcases” as a thank you gift for a friend of hers. These are pillowcases made in such a way that all seams are enclosed. You may know them as burrito or roll-it-up pillowcases (see my tutorial here.) I love to have a sewing project to work on while I am here so of course I said yes.

Diane figured I would have something appropriate in my stash. (How well she knows me!) I texted her photos of possible fabrics and she quickly zeroed in on this lovely sage and cream toile from Timeless Treasures that I’ve had for a few years:

I brought several other fabrics as candidates for contrast strips, flanges, and bottom bands. Diane chose a narrow stripe for the flange and a small leaf print for the band, deciding against a third fabric for a contrast strip between the flange and the body of the pillowcase. This is the result:

The pillowcases are pictured on the bed in the main floor guest room, whose bedspread and quilt (the latter made by moi several years ago) match the cases perfectly.

As it happened, I didn’t have quite enough of the leaf fabric to make two bands without having to piece them. I used strips of the toile to do that. Take a peek inside a pillowcase:

Here’s a close-up of the inside:

I stitched the seam allowances down so they will stay flat when the pillowcases are washed.

Diane arranged the cases in a lovely gift box:

They’ll be in the mail tomorrow.

I had five yards of that toile; perhaps I was thinking of it as a potential quilt backing. There’s enough left to make two more sets of pillowcases — one for Diane’s guest room (since we know how well the pillowcases go with the furnishings) and one for the Portland White House. I’m thankful for that!


Posted in family, home dec, roll-it-up pillowcases, tutorial, update | 7 Comments